Printer Guide
Page 7
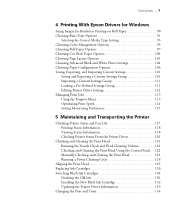
Contents | 7 4 Printing With Epson Drivers for Windows Sizing Images for Borderless Printing on Roll Paper 90 Choosing Basic Print Options 91 Selecting the Correct Media Type Setting 93 Choosing Color Management Options 95 Choosing Roll Paper Options 97 Choosing Cut Sheet Paper ...5 Maintaining and Transporting the Printer Checking Printer Status and Part Life 117 Printing Status Information 118 Viewing Status Information 118 Checking Printer Status From the Printer Driver 120 Checking and Cleaning the Print Head 121 Running the Nozzle Check and Head Cleaning Utilities 121 Checking and...
Contents | 7 4 Printing With Epson Drivers for Windows Sizing Images for Borderless Printing on Roll Paper 90 Choosing Basic Print Options 91 Selecting the Correct Media Type Setting 93 Choosing Color Management Options 95 Choosing Roll Paper Options 97 Choosing Cut Sheet Paper ...5 Maintaining and Transporting the Printer Checking Printer Status and Part Life 117 Printing Status Information 118 Viewing Status Information 118 Checking Printer Status From the Printer Driver 120 Checking and Cleaning the Print Head 121 Running the Nozzle Check and Head Cleaning Utilities 121 Checking and...
Printer Guide
Page 9
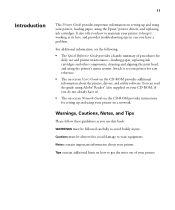
... to keep it working at its best, and provides troubleshooting tips in case you use and printer maintenance-loading paper, replacing ink cartridges and other components, cleaning and aligning the print head, and using the Epson® printer drivers, and replacing ink cartridges. Warnings, Cautions, Notes, and Tips Please follow these guidelines as you...
... to keep it working at its best, and provides troubleshooting tips in case you use and printer maintenance-loading paper, replacing ink cartridges and other components, cleaning and aligning the print head, and using the Epson® printer drivers, and replacing ink cartridges. Warnings, Cautions, Notes, and Tips Please follow these guidelines as you...

Printer Guide
Page 14
...'s ampere rating. • Do not block or cover the openings in the printer's case. • Do not put your hand inside the printer during printing. • Do not move the print head by hand unless instructed to do so by an Epson service technician; Take care not to qualified service personnel under the following...
...'s ampere rating. • Do not block or cover the openings in the printer's case. • Do not put your hand inside the printer during printing. • Do not move the print head by hand unless instructed to do so by an Epson service technician; Take care not to qualified service personnel under the following...
Printer Guide
Page 15
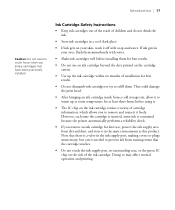
... water. • Shake ink cartridges well before using it. • The IC chip on your eyes, flush them . This could damage the print head. • After bringing an ink cartridge inside from dirt and dust, and store it in the same environment as this product. However, each time the... force when you shake cartridges that there is a valve in the ink supply port, making covers or plugs unnecessary, but care is consumed because the printer automatically performs a reliability check. • If you remove an ink cartridge for later use, protect the ink supply area from a cold storage site, ...
... water. • Shake ink cartridges well before using it. • The IC chip on your eyes, flush them . This could damage the print head. • After bringing an ink cartridge inside from dirt and dust, and store it in the same environment as this product. However, each time the... force when you shake cartridges that there is a valve in the ink supply port, making covers or plugs unnecessary, but care is consumed because the printer automatically performs a reliability check. • If you remove an ink cartridge for later use, protect the ink supply area from a cold storage site, ...

Printer Guide
Page 24
Remove any packing tape. Then unscrew the bolt and remove the bracket as shown. Open the front cover. Bolt 26 Fasten the printer to locate the bolt and bracket securing the print head. Follow the red wire to the stand with the wing screws and washers. Check these areas: • the front cover • the ink compartment covers • the maintenance tank (on the right side near the bottom) 6. 26 | Setting Up the Printer 4. Save the bolt and bracket in the printer. 5. Note: To prevent paper jams, don't place the bolt back in case you need to ship the printer.
Remove any packing tape. Then unscrew the bolt and remove the bracket as shown. Open the front cover. Bolt 26 Fasten the printer to locate the bolt and bracket securing the print head. Follow the red wire to the stand with the wing screws and washers. Check these areas: • the front cover • the ink compartment covers • the maintenance tank (on the right side near the bottom) 6. 26 | Setting Up the Printer 4. Save the bolt and bracket in the printer. 5. Note: To prevent paper jams, don't place the bolt back in case you need to ship the printer.

Printer Guide
Page 33
Then unscrew the bolt and remove the bracket, as shown. Remove any packing tape from the front cover, ink compartment covers, and maintenance tank. Save the bolt and bracket in case you remove all the tape. 6. Check underneath and on the sides of the printer to make sure you need to locate the screw and bracket securing the print head. Setting Up the Printer | 35 5. Follow the red wire to ship the printer. Bolt 35 Open the front cover.
Then unscrew the bolt and remove the bracket, as shown. Remove any packing tape from the front cover, ink compartment covers, and maintenance tank. Save the bolt and bracket in case you remove all the tape. 6. Check underneath and on the sides of the printer to make sure you need to locate the screw and bracket securing the print head. Setting Up the Printer | 35 5. Follow the red wire to ship the printer. Bolt 35 Open the front cover.
Printer Guide
Page 46
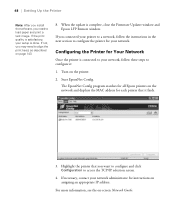
... 3. 48 | Setting Up the Printer Note: After you install the software, you need to load paper and print a test image. If the print quality is complete, close the Firmware Updater window and Epson LFP Remote window. If not, you may need to align the print head, as described on page 143. ...8. For more information, see the on the printer. 2. Turn on -screen Network Guide. 48
... 3. 48 | Setting Up the Printer Note: After you install the software, you need to load paper and print a test image. If the print quality is complete, close the Firmware Updater window and Epson LFP Remote window. If not, you may need to align the print head, as described on page 143. ...8. For more information, see the on the printer. 2. Turn on -screen Network Guide. 48
Printer Guide
Page 61
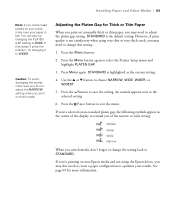
Caution: To avoid damaging the printer, make sure your paper is not satisfactory when using the Epson driver, you may need to choose NARROW, WIDE, WIDER, or WIDEST. 5. However, ...Wide Narrow When you switch media, don't forget to change this setting. 1. If you're printing on non-Epson media and not using very thin or very thick stock, you may need to the selected setting. 6. If that... WIDER. Press the Pause button to WIDE. Handling Paper and Other Media | 63 Note: If you notice head strikes on your prints, make sure you do not select the NARROW setting when you print on thick media...
Caution: To avoid damaging the printer, make sure your paper is not satisfactory when using the Epson driver, you may need to choose NARROW, WIDE, WIDER, or WIDEST. 5. However, ...Wide Narrow When you switch media, don't forget to change this setting. 1. If you're printing on non-Epson media and not using very thin or very thick stock, you may need to the selected setting. 6. If that... WIDER. Press the Pause button to WIDE. Handling Paper and Other Media | 63 Note: If you notice head strikes on your prints, make sure you do not select the NARROW setting when you print on thick media...
Printer Guide
Page 68
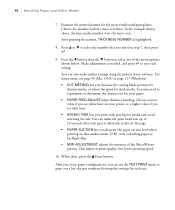
... This improves print quality, but lowers printing speed. 10. You can also make the print head wait up to 10 seconds after each pass to allow ink to save each one. 70 ... CUT METHOD lets you print with the most evenly overlapping lines. Choose the number with non-Epson media and avoid smearing the ink. After you create paper configurations, you decrease the paper suction...button to print out a list of the MicroWeave® pattern. You can make similar settings using the printer driver software. 70 | Handling Paper and Other Media 7. Choose a lower value if you see dark...
... This improves print quality, but lowers printing speed. 10. You can also make the print head wait up to 10 seconds after each pass to allow ink to save each one. 70 ... CUT METHOD lets you print with the most evenly overlapping lines. Choose the number with non-Epson media and avoid smearing the ink. After you create paper configurations, you decrease the paper suction...button to print out a list of the MicroWeave® pattern. You can make similar settings using the printer driver software. 70 | Handling Paper and Other Media 7. Choose a lower value if you see dark...

Printer Guide
Page 82
... to determine the best setting for various paper thicknesses. 92 You may have made using the printer's control panel. • Color Density lets you control the ink saturation level. • Drying Time per Print Head Pass lets you fine-tune the setting for your ICC profile. Choose a lower value if ...5 seconds after each pass to allow ink to match your paper. • Platen Gap lets you print with non-Epson media and avoid smearing the ink. 92 | Printing With Epson Drivers for thick media. Select the correct settings to dry on thinner papers (less than 12 lb), such as CAD...
... to determine the best setting for various paper thicknesses. 92 You may have made using the printer's control panel. • Color Density lets you control the ink saturation level. • Drying Time per Print Head Pass lets you fine-tune the setting for your ICC profile. Choose a lower value if ...5 seconds after each pass to allow ink to match your paper. • Platen Gap lets you print with non-Epson media and avoid smearing the ink. 92 | Printing With Epson Drivers for thick media. Select the correct settings to dry on thinner papers (less than 12 lb), such as CAD...

Printer Guide
Page 107
... (for thick media. When you print with non-Epson media and avoid smearing the ink. You may have made using the printer's control panel. • Color Density lets you turn off color management in your ICC profile. You can make the print head wait up to 5 seconds after each pass to... allow ink to match your printer software). • Drying Time per Print Head Pass lets you finish selecting...
... (for thick media. When you print with non-Epson media and avoid smearing the ink. You may have made using the printer's control panel. • Color Density lets you turn off color management in your ICC profile. You can make the print head wait up to 5 seconds after each pass to... allow ink to match your printer software). • Drying Time per Print Head Pass lets you finish selecting...

Printer Guide
Page 114
...you can click the Show Progress Meter checkbox to deselect it. 2. Selecting this setting if print speed is extremely slow or the print head stops for Windows Optimizing Print Speed You can select a different drive to spool to in the High Speed Copy Folder list to the ... unless you experience conflicts with other software. • Always spool RAW datatype lets you send a print job. • Disable EPSON Status Monitor 3 disables the printer software utilities. Use this option is displayed when you spool documents using hard disk space as insufficient memory or disk space. •...
...you can click the Show Progress Meter checkbox to deselect it. 2. Selecting this setting if print speed is extremely slow or the print head stops for Windows Optimizing Print Speed You can select a different drive to spool to in the High Speed Copy Folder list to the ... unless you experience conflicts with other software. • Always spool RAW datatype lets you send a print job. • Disable EPSON Status Monitor 3 disables the printer software utilities. Use this option is displayed when you spool documents using hard disk space as insufficient memory or disk space. •...

Printer Guide
Page 117
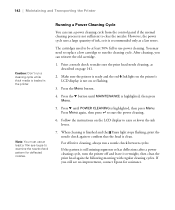
...(see page 138). 135 This chapter describes the following routine procedures: • Checking printer status and part life • Checking and cleaning the print head • Aligning the print head • Replacing ink cartridges • Switching the black ink cartridge • Changing ...and other printer parts. Checking Printer Status and Part Life Using the control panel, you can check the amount of ink remaining, the total number of prints, and the status of printer settings. 135 Chapter 6: Maintaining and Transporting the Printer The Epson Stylus Pro 7880 and Pro 9880 require ...
...(see page 138). 135 This chapter describes the following routine procedures: • Checking printer status and part life • Checking and cleaning the print head • Aligning the print head • Replacing ink cartridges • Switching the black ink cartridge • Changing ...and other printer parts. Checking Printer Status and Part Life Using the control panel, you can check the amount of ink remaining, the total number of prints, and the status of printer settings. 135 Chapter 6: Maintaining and Transporting the Printer The Epson Stylus Pro 7880 and Pro 9880 require ...

Printer Guide
Page 119
... (This option must be enabled using maintenance mode on the printer's control panel. When done, press l. • To check the total number of the carriage motor, paper feed motor, print head, cleaning unit, and pressure motor. Note: The EDM STATUS option is displayed, using the symbols described ...below. You can also change the units of ink left, press d to inches and feet using maintenance mode on the printer's control panel to highlight JOB...
... (This option must be enabled using maintenance mode on the printer's control panel. When done, press l. • To check the total number of the carriage motor, paper feed motor, print head, cleaning unit, and pressure motor. Note: The EDM STATUS option is displayed, using the symbols described ...below. You can also change the units of ink left, press d to inches and feet using maintenance mode on the printer's control panel to highlight JOB...

Printer Guide
Page 121
... folder. Checking and Cleaning the Print Head If your printer and select Properties. Make sure paper is loaded in the printer and maintenance tank(s) and displays one of the following to access the printer utilities: • Mac OS X: Open the EPSON Printer Utility2 in the print job window or...You can also turn on the printer settings screen. Maintaining and Transporting the Printer | 139 The software check the amount of ink in the printer. 2. See page 142 for your printed image shows a color shift or horizontal lines, you should check the print head to see if any utility ...
... folder. Checking and Cleaning the Print Head If your printer and select Properties. Make sure paper is loaded in the printer and maintenance tank(s) and displays one of the following to access the printer utilities: • Mac OS X: Open the EPSON Printer Utility2 in the print job window or...You can also turn on the printer settings screen. Maintaining and Transporting the Printer | 139 The software check the amount of ink in the printer. 2. See page 142 for your printed image shows a color shift or horizontal lines, you should check the print head to see if any utility ...

Printer Guide
Page 122
...check pattern is highlighted, then press Menu. Press the Menu button. 2. Click Auto and follow the instructions on page 142. If the printer finds clogged nozzles, it runs a cleaning cycle. Press the d button until TEST PRINT is printed and automatically read. Click the Utility... cleaning cycle, as described on the screen. 140 | Maintaining and Transporting the Printer • Windows XP: Click Start and select Control Panel. Checking and Cleaning the Print Head Using the Control Panel Follow these steps to have the printer check the print head nozzles and clean them if necessary. 1.
...check pattern is highlighted, then press Menu. Press the Menu button. 2. Click Auto and follow the instructions on page 142. If the printer finds clogged nozzles, it runs a cleaning cycle. Press the d button until TEST PRINT is printed and automatically read. Click the Utility... cleaning cycle, as described on the screen. 140 | Maintaining and Transporting the Printer • Windows XP: Click Start and select Control Panel. Checking and Cleaning the Print Head Using the Control Panel Follow these steps to have the printer check the print head nozzles and clean them if necessary. 1.

Printer Guide
Page 123
... CHECK is highlighted, then press Menu. 3. Then print another nozzle check pattern to start printing the nozzle check pattern. Maintaining and Transporting the Printer | 141 Caution: Don't run a cleaning cycle by pressing and holding the Menu button for at least a 10× eye loupe to...clogged or deflected. Press the d button until AUTO CLEANING is selected. 6. PRINTER SETUP is printed and automatically read. Press d to examine it. • If the pattern looks good, as shown below, the print head is clean. • If any nozzles are missing or deflected, as shown...
... CHECK is highlighted, then press Menu. 3. Then print another nozzle check pattern to start printing the nozzle check pattern. Maintaining and Transporting the Printer | 141 Caution: Don't run a cleaning cycle by pressing and holding the Menu button for at least a 10× eye loupe to...clogged or deflected. Press the d button until AUTO CLEANING is selected. 6. PRINTER SETUP is printed and automatically read. Press d to examine it. • If the pattern looks good, as shown below, the print head is clean. • If any nozzles are missing or deflected, as shown...
Printer Guide
Page 124
... of ink, so it is still missing segments or has deflections after a power cleaning cycle, turn the printer off and leave it overnight, then clean the print head again the following morning with regular cleaning cycles. Press the Menu button. 4. If the pattern is recommended ...only as described on or flashing. 3. After cleaning, you still see no improvement, contact Epson for deflected nozzles. Press d until MAINTENANCE...
... of ink, so it is still missing segments or has deflections after a power cleaning cycle, turn the printer off and leave it overnight, then clean the print head again the following morning with regular cleaning cycles. Press the Menu button. 4. If the pattern is recommended ...only as described on or flashing. 3. After cleaning, you still see no improvement, contact Epson for deflected nozzles. Press d until MAINTENANCE...

Printer Guide
Page 125
...the most Epson papers. 5. The STANDARD setting is highlighted. 4. This ensures that the print head alignment patterns print correctly. PAPER THICKNESS is selected by default. The printer's white beam sensor reads the alignment pattern and adjusts the printer automatically. Make sure the printer is .... Although you can also use Epson Doubleweight Matte Paper or Ultra Premium Photo Paper Luster. If you haven't already done so, it 's also easy to align the print head. Follow these steps to align the print head using the printer utility software, it 's a good...
...the most Epson papers. 5. The STANDARD setting is highlighted. 4. This ensures that the print head alignment patterns print correctly. PAPER THICKNESS is selected by default. The printer's white beam sensor reads the alignment pattern and adjusts the printer automatically. Make sure the printer is .... Although you can also use Epson Doubleweight Matte Paper or Ultra Premium Photo Paper Luster. If you haven't already done so, it 's also easy to align the print head. Follow these steps to align the print head using the printer utility software, it 's a good...

Printer Guide
Page 126
... process. 10. When the light stays on the printer. When the bi-directional black alignment is finished, press d until BI-D 2-COLOR is highlighted. When done, press the Pause button to...you can continue printing. You must replace the cartridge before you can perform a manual head alignment; You can install any loss of your ink levels. When the uni-directional...Printer Tip: You can store partially used ink cartridges for up to replace a low ink cartridge before starting a large print job. Replacing Ink Cartridges Before you begin a large print job, you do so, Epson...
... process. 10. When the light stays on the printer. When the bi-directional black alignment is finished, press d until BI-D 2-COLOR is highlighted. When done, press the Pause button to...you can continue printing. You must replace the cartridge before you can perform a manual head alignment; You can install any loss of your ink levels. When the uni-directional...Printer Tip: You can store partially used ink cartridges for up to replace a low ink cartridge before starting a large print job. Replacing Ink Cartridges Before you begin a large print job, you do so, Epson...


