
Taking Care of Your Photographs
Page 1
...do not measure paper deterioration, such as yellowing. Photos Printed With Dye-Based Epson Stylus Photo Printers (Epson Stylus Photo 780/785EPX/870/875DC/875DCS/890/1270/1280) The Epson Stylus Photo printers listed above use Epson's revolutionary Archival inks. Wilhelm Imaging Research, Inc...photos printed with Epson Stylus Photo inkjet printers will preserve your memories for framed prints. Epson currently offers both dye-based, six-color Epson Stylus Photo printers and the six-color Epson Stylus Photo 2000P printers that will be framed under glass*. Medium-weight, glossy finish photo...
...do not measure paper deterioration, such as yellowing. Photos Printed With Dye-Based Epson Stylus Photo Printers (Epson Stylus Photo 780/785EPX/870/875DC/875DCS/890/1270/1280) The Epson Stylus Photo printers listed above use Epson's revolutionary Archival inks. Wilhelm Imaging Research, Inc...photos printed with Epson Stylus Photo inkjet printers will preserve your memories for framed prints. Epson currently offers both dye-based, six-color Epson Stylus Photo printers and the six-color Epson Stylus Photo 2000P printers that will be framed under glass*. Medium-weight, glossy finish photo...

Printer Basics
Page 7
... came with , maintaining, or troubleshooting your printer, see your printer and install its software, see page 2. 1 Just insert your Memory Stick into the PC card adapter included with your Sony® Memory Stick® products, the EPSON Stylus® Photo 875DCS makes it , see the Start Here poster.... Welcome! As the perfect print partner for using your Memory Stick s maintaining the printer s solving basic problems For more details about printing with the...
... came with , maintaining, or troubleshooting your printer, see your printer and install its software, see page 2. 1 Just insert your Memory Stick into the PC card adapter included with your Sony® Memory Stick® products, the EPSON Stylus® Photo 875DCS makes it , see the Start Here poster.... Welcome! As the perfect print partner for using your Memory Stick s maintaining the printer s solving basic problems For more details about printing with the...

Printer Basics
Page 9
...from there. If you can access it at any time, as follows: Windows: Select Start, Programs, EPSON, and double-click ESP875DCS Guide. Accessing Your Electronic Printer Manual You can view your electronic Reference Guide from the CD-ROM or copy it to your hard drive... and view it from there. Windows: Double-click My Computer, double-click your printer software CD-ROM. 2. The Main Menu appears: 3. Follow these steps: 1. Macintosh: Open the EPSON Stylus Photo 875DCS folder and double-click View Reference Guide. 3 The online documentation menu appears: 4.
...from there. If you can access it at any time, as follows: Windows: Select Start, Programs, EPSON, and double-click ESP875DCS Guide. Accessing Your Electronic Printer Manual You can view your electronic Reference Guide from the CD-ROM or copy it to your hard drive... and view it from there. Windows: Double-click My Computer, double-click your printer software CD-ROM. 2. The Main Menu appears: 3. Follow these steps: 1. Macintosh: Open the EPSON Stylus Photo 875DCS folder and double-click View Reference Guide. 3 The online documentation menu appears: 4.
Printer Basics
Page 10
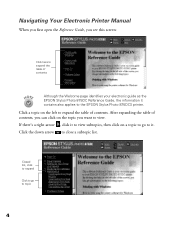
Click the down arrow to the EPSON Stylus Photo 875DCS printer. If there's a right arrow , click it to view subtopics, then click on the left to expand the table of contents Although the Welcome page identifies your electronic guide as the EPSON Stylus Photo 875DC Reference Guide, the information it . After expanding the table of contents, you can click on...
Click the down arrow to the EPSON Stylus Photo 875DCS printer. If there's a right arrow , click it to view subtopics, then click on the left to expand the table of contents Although the Welcome page identifies your electronic guide as the EPSON Stylus Photo 875DC Reference Guide, the information it . After expanding the table of contents, you can click on...

Printer Basics
Page 13
...icon on the Print window (your window may not get the option to change the printer software settings before printing. 7 Opening the Printer Software After you open your printer software Make the following selections on your application's toolbar instead of selecting Print from the... 're ready to select your printer software settings. s Click the Properties button. (If you see your application's Print window: Click here to open your application program and create your document, you may look slightly different): s Make sure your EPSON Stylus Photo 875DCS printer model is selected.
...icon on the Print window (your window may not get the option to change the printer software settings before printing. 7 Opening the Printer Software After you open your printer software Make the following selections on your application's toolbar instead of selecting Print from the... 're ready to select your printer software settings. s Click the Properties button. (If you see your application's Print window: Click here to open your application program and create your document, you may look slightly different): s Make sure your EPSON Stylus Photo 875DCS printer model is selected.

Printer Basics
Page 15
...Properties. Click OK when you want to print different types of documents. Right-click the EPSON Stylus Photo 875DCS printer icon. 3. then click Properties Remember, you can always change the default printer settings for all your application when you 're finished. Select the default settings you can... right-click any item on page 2) for all your printer icon . . . 4. Or you 're currently using the Windows Printers utility: 1. see your electronic Reference Guide (described on the screen and then click What's This?. ...
...Properties. Click OK when you want to print different types of documents. Right-click the EPSON Stylus Photo 875DCS printer icon. 3. then click Properties Remember, you can always change the default printer settings for all your application when you 're finished. Select the default settings you can... right-click any item on page 2) for all your printer icon . . . 4. Or you 're currently using the Windows Printers utility: 1. see your electronic Reference Guide (described on the screen and then click What's This?. ...

Printer Basics
Page 18
...Select the correct Paper Size, Paper Source, Orientation, and Printable Area settings for details. see your application's page setup window: Verify your printer model here Select your Paper Size, Paper Source, Orientation, and Printable Area settings Click OK Make the following selections on the page setup... window (your window may look slightly different): s Make sure your printer (SP 875DCS) is selected. (If the printer model is incorrect, you 're ready to your document. From the File menu, click Page Setup. See your electronic...
...Select the correct Paper Size, Paper Source, Orientation, and Printable Area settings for details. see your application's page setup window: Verify your printer model here Select your Paper Size, Paper Source, Orientation, and Printable Area settings Click OK Make the following selections on the page setup... window (your window may look slightly different): s Make sure your printer (SP 875DCS) is selected. (If the printer model is incorrect, you 're ready to your document. From the File menu, click Page Setup. See your electronic...

Printer Basics
Page 24
... will last for years when stored in an album or in normal indoor display conditions in a glass frame. This ensures that came with your printer into a photo reproduction studio by printing continuous 4 × 6-inch snapshots, edge-to-edge, on the roll of paper. From time to time, it ... always need to choose the right Media Type setting for different kinds of Premium Glossy Photo Paper that you'll get the best-looking photos, most vivid colors, and sharpest text? You can turn your EPSON Stylus Photo 875DCS. See page 26 for a list of Media Type settings for your roll paper. The...
... will last for years when stored in an album or in normal indoor display conditions in a glass frame. This ensures that came with your printer into a photo reproduction studio by printing continuous 4 × 6-inch snapshots, edge-to-edge, on the roll of paper. From time to time, it ... always need to choose the right Media Type setting for different kinds of Premium Glossy Photo Paper that you'll get the best-looking photos, most vivid colors, and sharpest text? You can turn your EPSON Stylus Photo 875DCS. See page 26 for a list of Media Type settings for your roll paper. The...

Printer Basics
Page 33
... humidity, cigarette smoke, and high levels of Your Photographs With proper care, photographs printed with the EPSON Stylus Photo 875DCS printer will minimize color changes and lengthen display life. For indoor display, Epson recommends that you keep your printer are properly displayed or stored. The special EPSON inks designed for your prints away from direct sunlight. For proper storage...
... humidity, cigarette smoke, and high levels of Your Photographs With proper care, photographs printed with the EPSON Stylus Photo 875DCS printer will minimize color changes and lengthen display life. For indoor display, Epson recommends that you keep your printer are properly displayed or stored. The special EPSON inks designed for your prints away from direct sunlight. For proper storage...

Printer Basics
Page 38
... only the Memory Stick. s If you 're running Windows 2000 and have a Macintosh, select the Memory Stick icon on the Windows taskbar, and click Stop EPSON SP 875DCS Storage. If you have not enabled write-to-disk mode (see a message that your memory card can press the card eject lever on the... printer's PC card slot to eject both the Memory Stick and adapter, or press the Memory Stick eject lever on the adapter itself to -disk mode, ...
... only the Memory Stick. s If you 're running Windows 2000 and have a Macintosh, select the Memory Stick icon on the Windows taskbar, and click Stop EPSON SP 875DCS Storage. If you have not enabled write-to-disk mode (see a message that your memory card can press the card eject lever on the... printer's PC card slot to eject both the Memory Stick and adapter, or press the Memory Stick eject lever on the adapter itself to -disk mode, ...
Printer Basics
Page 56
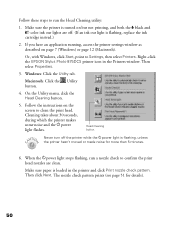
Right-click the EPSON Stylus Photo 875DCS printer icon in the printer and click Print nozzle check pattern. Windows: Click the Utility tab. When the Ppower light stops flashing, run the Head Cleaning utility: 1. Then select Properties. 3. ... Cleaning button Never turn off . (If an ink out light is loaded in the Printers window. If you have an application running, access the printer settings window as described on but not printing, and both the B black and A color ink out lights are clean. Then click Next. The nozzle check pattern prints (see...
Right-click the EPSON Stylus Photo 875DCS printer icon in the printer and click Print nozzle check pattern. Windows: Click the Utility tab. When the Ppower light stops flashing, run the Head Cleaning utility: 1. Then select Properties. 3. ... Cleaning button Never turn off . (If an ink out light is loaded in the Printers window. If you have an application running, access the printer settings window as described on but not printing, and both the B black and A color ink out lights are clean. Then click Next. The nozzle check pattern prints (see...

Printer Basics
Page 61
... the Print Head If your printouts. Follow these steps: 1. Make sure the printer is loaded. Right-click the EPSON Stylus Photo 875DCS printer icon in the printer whenever you need to prevent ink from spraying inside the printer and smudging your printouts contain misaligned vertical lines, you have an application running, ...charging the ink delivery system. When it locks in place. (The color clamp is flashing, unless the printer hasn't moved or made noise for more than the black clamp.) 9. Never turn off the printer while the Ppower light is a bit harder to replace the other ink...
... the Print Head If your printouts. Follow these steps: 1. Make sure the printer is loaded. Right-click the EPSON Stylus Photo 875DCS printer icon in the printer whenever you need to prevent ink from spraying inside the printer and smudging your printouts contain misaligned vertical lines, you have an application running, ...charging the ink delivery system. When it locks in place. (The color clamp is flashing, unless the printer hasn't moved or made noise for more than the black clamp.) 9. Never turn off the printer while the Ppower light is a bit harder to replace the other ink...

Printer Basics
Page 70
...Windows 95 to Windows 98, or from Windows 98 to Windows 2000. s Make sure the EPSON Stylus Photo 875DCS is selected as the default printer in your document doesn't include color. The printer sounds as though it has been sitting for network printing, as described on . 64 For faster...or run a defragmentation utility. Make sure the print head nozzles are installed correctly. s Run a printer check as described in the Printers utility (Windows), or the SP 875DCS is performing routine maintenance. Make sure your system's RAM. s Increase your system meets the requirements ...
...Windows 95 to Windows 98, or from Windows 98 to Windows 2000. s Make sure the EPSON Stylus Photo 875DCS is selected as the default printer in your document doesn't include color. The printer sounds as though it has been sitting for network printing, as described on . 64 For faster...or run a defragmentation utility. Make sure the print head nozzles are installed correctly. s Run a printer check as described in the Printers utility (Windows), or the SP 875DCS is performing routine maintenance. Make sure your system's RAM. s Increase your system meets the requirements ...
Printer Basics
Page 74
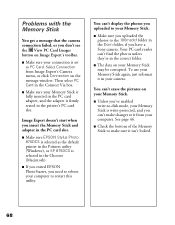
... connection failed, or you have a Sony camera. s Make sure your Memory Stick. s Make sure EPSON Stylus Photo 875DCS is selected as the default printer in the Chooser (Macintosh). s The data on your connection is selected in the Printers utility (Windows), or SP 875DCS is set to restart this utility. Image Expert doesn't start when you can 't display...
... connection failed, or you have a Sony camera. s Make sure your Memory Stick. s Make sure EPSON Stylus Photo 875DCS is selected as the default printer in the Chooser (Macintosh). s The data on your connection is selected in the Printers utility (Windows), or SP 875DCS is set to restart this utility. Image Expert doesn't start when you can 't display...

Printer Basics
Page 75
... on your Memory Stick. Make sure EPSON Stylus Photo 875DCS is selected as the default printer in the Printers utility (Windows), or SP 875DCS is selected in your camera. Try reformatting the Memory Stick in the Chooser (Macintosh). s You turned off or disconnected your printer without first ejecting your hard drive before... Memory Stick appear in PhotoDeluxe, make changes to your photos in the Image Expert work area, but you can no longer store images on your Memory Stick when you take pictures with your Macintosh. 69 EPSON USB RW Switcher doesn't toggle between read-only mode...
... on your Memory Stick. Make sure EPSON Stylus Photo 875DCS is selected as the default printer in the Printers utility (Windows), or SP 875DCS is selected in your camera. Try reformatting the Memory Stick in the Chooser (Macintosh). s You turned off or disconnected your printer without first ejecting your hard drive before... Memory Stick appear in PhotoDeluxe, make changes to your photos in the Image Expert work area, but you can no longer store images on your Memory Stick when you take pictures with your Macintosh. 69 EPSON USB RW Switcher doesn't toggle between read-only mode...

Printer Basics
Page 78
.... 9. If you upgrade your computer operating system, follow these steps: Uninstalling Windows 98 Software 1. On the Printer Model tab, select the EPSON Stylus Photo 875DCS printer icon. then click the Add/Remove button. 8. When you're done, click EPSON USB Printer Devices in the program list, and then click the Add/Remove button. 6. Right-click the PhotoStarter icon...
.... 9. If you upgrade your computer operating system, follow these steps: Uninstalling Windows 98 Software 1. On the Printer Model tab, select the EPSON Stylus Photo 875DCS printer icon. then click the Add/Remove button. 8. When you're done, click EPSON USB Printer Devices in the program list, and then click the Add/Remove button. 6. Right-click the PhotoStarter icon...

Printer Basics
Page 79
... card slot, wait for the confirmation message, then press the card eject lever to remove USB RW Switcher. On the Printer Model tab, select the EPSON Stylus Photo 875DCS printer icon. On the next screen, make sure Uninstall a device is selected, then click OK. 7. Then click the Utility ...tab. Follow the instructions on the screen. When you 're done, click EPSON PhotoStarter in the program list, and then click the Change/...
... card slot, wait for the confirmation message, then press the card eject lever to remove USB RW Switcher. On the Printer Model tab, select the EPSON Stylus Photo 875DCS printer icon. On the next screen, make sure Uninstall a device is selected, then click OK. 7. Then click the Utility ...tab. Follow the instructions on the screen. When you 're done, click EPSON PhotoStarter in the program list, and then click the Change/...

Printer Basics
Page 80
...Double-click the drivers folder, and then the Printer Driver folder. 74 When you have a Memory Stick and PC card adapter in the PC card slot, drag your Memory Stick icon to the trash (the icon on the right side of the EPSON CD-ROM window and double-click the apps ... uninstall this screen, click Show hidden devices. In the next screen, select Yes, I want to select it 14. Wait for the message that your printer software CD-ROM. 5. Scroll to eject only the Memory Stick. 3. 13. Select EPSON SP 875DCS Storage and click Next. Insert your memory card can be titled Unknown). 2.
...Double-click the drivers folder, and then the Printer Driver folder. 74 When you have a Memory Stick and PC card adapter in the PC card slot, drag your Memory Stick icon to the trash (the icon on the right side of the EPSON CD-ROM window and double-click the apps ... uninstall this screen, click Show hidden devices. In the next screen, select Yes, I want to select it 14. Wait for the message that your printer software CD-ROM. 5. Scroll to eject only the Memory Stick. 3. 13. Select EPSON SP 875DCS Storage and click Next. Insert your memory card can be titled Unknown). 2.
Printer Basics
Page 83
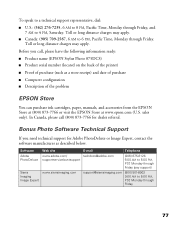
... (562) 276-7235, 6 AM to 8 PM, Pacific Time, Monday through Friday. Before you need technical support for dealer referral. Bonus Photo Software Technical Support If you call (800) 873-7766 for Adobe PhotoDeluxe or Image Expert, contact the software manufacturer as a store receipt) and... charges may apply. In Canada, please call , please have the following information ready: s Product name (EPSON Stylus Photo 875DCS) s Product serial number (located on the back of the printer) s Proof of the problem EPSON Store You can purchase ink cartridges, paper, manuals, and accessories from the...
... (562) 276-7235, 6 AM to 8 PM, Pacific Time, Monday through Friday. Before you need technical support for dealer referral. Bonus Photo Software Technical Support If you call (800) 873-7766 for Adobe PhotoDeluxe or Image Expert, contact the software manufacturer as a store receipt) and... charges may apply. In Canada, please call , please have the following information ready: s Product name (EPSON Stylus Photo 875DCS) s Product serial number (located on the back of the printer) s Proof of the problem EPSON Store You can purchase ink cartridges, paper, manuals, and accessories from the...

Printer Basics
Page 85
Windows System Requirements To use your printer and its software, your EPSON Stylus Photo 875DCS. Using an improperly shielded USB cable-especially a cable more recommended) s CD-ROM or DVD drive for installing the printer software s SVGA or better display adapter and monitor s A Windows-compliant USB port and a shielded USB "AB" cable up to malfunction. 79 Notices This... Windows 2000 s 64MB of RAM (128MB or more recommended) s 100MB of free hard disk space (200MB or more than 9.8 feet (3 meters) long-may cause the printer to 9.8 feet (3 meters) long.
Windows System Requirements To use your printer and its software, your EPSON Stylus Photo 875DCS. Using an improperly shielded USB cable-especially a cable more recommended) s CD-ROM or DVD drive for installing the printer software s SVGA or better display adapter and monitor s A Windows-compliant USB port and a shielded USB "AB" cable up to malfunction. 79 Notices This... Windows 2000 s 64MB of RAM (128MB or more recommended) s 100MB of free hard disk space (200MB or more than 9.8 feet (3 meters) long-may cause the printer to 9.8 feet (3 meters) long.