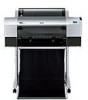
Printer Guide
Page 5
... Windows System Requirements 12 Important Safety Instructions 13 Ink Cartridge Safety Instructions 15 1 Setting Up the Printer Unpacking and Assembling the Epson Stylus Pro 7800 17 Unpacking and Assembling the Stand 18 Unpacking the Printer 20 Mounting the Printer on the Stand 22 Attaching the Paper Basket 25 Unpacking and Assembling the Epson Stylus Pro 9800 27 Unpacking and Assembling the Stand...
... Windows System Requirements 12 Important Safety Instructions 13 Ink Cartridge Safety Instructions 15 1 Setting Up the Printer Unpacking and Assembling the Epson Stylus Pro 7800 17 Unpacking and Assembling the Stand 18 Unpacking the Printer 20 Mounting the Printer on the Stand 22 Attaching the Paper Basket 25 Unpacking and Assembling the Epson Stylus Pro 9800 27 Unpacking and Assembling the Stand...

Printer Guide
Page 7
Contents | 7 4 Printing with Epson Drivers for Windows Choosing Basic Print Options 100 Choosing Paper and Layout Options 103 Choosing Roll Paper Options 103 Borderless Printing 106 Choosing Cut Sheet ... and Cleaning the Print Head 124 Running a Power Cleaning Cycle 125 Aligning the Print Head 126 Replacing Ink Cartridges 127 Switching Black Ink Cartridges 132 Draining the Old Ink 132 Installing the New Black Ink Cartridge 134 Updating the Printer Driver Information 135 Changing the Date and Time 136 Using Maintenance Mode 136 Replacing the Paper Cutter Blade...
Contents | 7 4 Printing with Epson Drivers for Windows Choosing Basic Print Options 100 Choosing Paper and Layout Options 103 Choosing Roll Paper Options 103 Borderless Printing 106 Choosing Cut Sheet ... and Cleaning the Print Head 124 Running a Power Cleaning Cycle 125 Aligning the Print Head 126 Replacing Ink Cartridges 127 Switching Black Ink Cartridges 132 Draining the Old Ink 132 Installing the New Black Ink Cartridge 134 Updating the Printer Driver Information 135 Changing the Date and Time 136 Using Maintenance Mode 136 Replacing the Paper Cutter Blade...

Printer Guide
Page 8
... Shipment 144 Removing the Optional Print Server Card 146 Moving the Printer on the Stand 147 Setting Up the Printer After Transportation 148 6 Solving Problems Diagnosing Problems 149 Checking Error Messages and Lights 150 Improving Print Quality 154 ... 161 Clearing Paper Jams 162 Uninstalling and Reinstalling the Printer Driver 164 Macintosh 164 Windows 164 A Specifications Environmental 165 Electrical 165 Dimensions and Weight 166 Printer Interfaces 166 Safety Approvals 166 Media 166 Roll Paper 166 Cut Sheets 167 Printable Area 168 Ink Cartridges 168 Index 169 -8
... Shipment 144 Removing the Optional Print Server Card 146 Moving the Printer on the Stand 147 Setting Up the Printer After Transportation 148 6 Solving Problems Diagnosing Problems 149 Checking Error Messages and Lights 150 Improving Print Quality 154 ... 161 Clearing Paper Jams 162 Uninstalling and Reinstalling the Printer Driver 164 Macintosh 164 Windows 164 A Specifications Environmental 165 Electrical 165 Dimensions and Weight 166 Printer Interfaces 166 Safety Approvals 166 Media 166 Roll Paper 166 Cut Sheets 167 Printable Area 168 Ink Cartridges 168 Index 169 -8
Printer Guide
Page 9
... working at its best, and provides troubleshooting tips in case you have a problem. You can read the guide using the Epson® printer drivers, and replacing ink cartridges. Notes contain important information about the printer, drivers, and utility software. Warnings, Cautions, Notes, and Tips Please follow these guidelines as SafariT,M Mozilla FireFox, or Netscape®...
... working at its best, and provides troubleshooting tips in case you have a problem. You can read the guide using the Epson® printer drivers, and replacing ink cartridges. Notes contain important information about the printer, drivers, and utility software. Warnings, Cautions, Notes, and Tips Please follow these guidelines as SafariT,M Mozilla FireFox, or Netscape®...
Printer Guide
Page 10
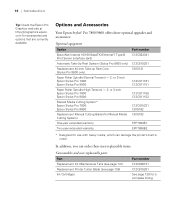
... Your Epson Stylus® Pro 7800/9800 offers these user-replaceable items: Consumables and user-replaceable parts Part Replacement Ink Maintenance Tank (see page 141) Replacement Printer Cutter Blade (see page 138) Ink Cartridges Part number C12C890191 C12C815291 See page 128 for a complete listing. 10 10 | Introduction Tip: Check the Epson Pro Graphics web site at http://prographics.epson. or 3-inch Epson Stylus Pro 7800: Epson Stylus Pro...
... Your Epson Stylus® Pro 7800/9800 offers these user-replaceable items: Consumables and user-replaceable parts Part Replacement Ink Maintenance Tank (see page 141) Replacement Printer Cutter Blade (see page 138) Ink Cartridges Part number C12C890191 C12C815291 See page 128 for a complete listing. 10 10 | Introduction Tip: Check the Epson Pro Graphics web site at http://prographics.epson. or 3-inch Epson Stylus Pro 7800: Epson Stylus Pro...
Printer Guide
Page 15
... surrounding area, or the green IC chip on the side of the ink cartridge. Ink Cartridge Safety Instructions • Keep ink cartridges out of the reach of children and do not drink the ink. • Store ink cartridges in your skin, wash it off with water. • Shake ink cartridges well before installing them for best results. • Do not use...
... surrounding area, or the green IC chip on the side of the ink cartridge. Ink Cartridge Safety Instructions • Keep ink cartridges out of the reach of children and do not drink the ink. • Store ink cartridges in your skin, wash it off with water. • Shake ink cartridges well before installing them for best results. • Do not use...
Printer Guide
Page 21
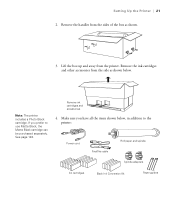
... cord FireWire cable Roll paper and spindle Spindle adapters Ink cartridges Black Ink Conversion Kit Paper guides 1-21 Remove the handles from the printer. If you have all the items shown below . Note: The printer includes a Photo Black cartridge. Setting Up the Printer | 21 2. Lift the box up and away from the sides of the box as...
... cord FireWire cable Roll paper and spindle Spindle adapters Ink cartridges Black Ink Conversion Kit Paper guides 1-21 Remove the handles from the printer. If you have all the items shown below . Note: The printer includes a Photo Black cartridge. Setting Up the Printer | 21 2. Lift the box up and away from the sides of the box as...
Printer Guide
Page 30
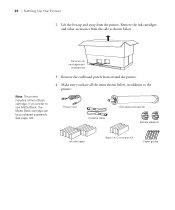
... the items shown below . See page 128. 3. Make sure you prefer to the printer: Power cord FireWire cable Roll paper and spindle Spindle adapters Ink cartridges Black Ink Conversion Kit Paper guides 1-30 Remove the ink cartridges and other accessories from the printer. Lift the box up and away from the side as shown below , in addition...
... the items shown below . See page 128. 3. Make sure you prefer to the printer: Power cord FireWire cable Roll paper and spindle Spindle adapters Ink cartridges Black Ink Conversion Kit Paper guides 1-30 Remove the ink cartridges and other accessories from the printer. Lift the box up and away from the side as shown below , in addition...
Printer Guide
Page 38
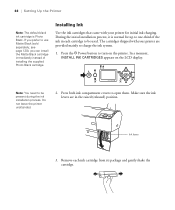
.... In a moment, INSTALL INK CARTRIDGES appears on the printer. 38 | Setting Up the Printer Note: The default black ink cartridge is normal for initial ink charging. Remove each cartridge to be present during the ink installation process. The cartridges shipped with your printer are in each ink cartridge from its package and gently shake the cartridge. 1-38 Installing Ink Use the ink cartridges that came with your...
.... In a moment, INSTALL INK CARTRIDGES appears on the printer. 38 | Setting Up the Printer Note: The default black ink cartridge is normal for initial ink charging. Remove each cartridge to be present during the ink installation process. The cartridges shipped with your printer are in each ink cartridge from its package and gently shake the cartridge. 1-38 Installing Ink Use the ink cartridges that came with your...
Printer Guide
Page 39
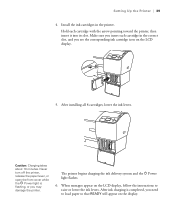
... messages appear on the LCD display. 5. Install the ink cartridges in the correct slot, and you see the corresponding ink cartridge icon on the LCD display, follow the instructions to load paper so that READY will appear on the display. 1-39 Hold each cartridge in the printer. After ink charging is flashing, or you need to raise...
... messages appear on the LCD display. 5. Install the ink cartridges in the correct slot, and you see the corresponding ink cartridge icon on the LCD display, follow the instructions to load paper so that READY will appear on the display. 1-39 Hold each cartridge in the printer. After ink charging is flashing, or you need to raise...
Printer Guide
Page 94
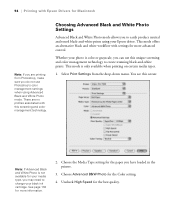
This mode offers an alternative black and white workflow with this screening and color management technology. Whether your black ink cartridge. See page 132 for more advanced control. Choose Advanced B&W Photo for the best quality. 3-94 Select Print Settings from ...Epson driver. There are printing from the drop-down menu. 94 | Printing with Epson Drivers for Macintosh Note: If you are no profiles associated with settings for more information. 2. Choosing Advanced Black and White Photo Settings Advanced Black and White Photo mode allows you have loaded in the printer...
This mode offers an alternative black and white workflow with this screening and color management technology. Whether your black ink cartridge. See page 132 for more advanced control. Choose Advanced B&W Photo for the best quality. 3-94 Select Print Settings from ...Epson driver. There are printing from the drop-down menu. 94 | Printing with Epson Drivers for Macintosh Note: If you are no profiles associated with settings for more information. 2. Choosing Advanced Black and White Photo Settings Advanced Black and White Photo mode allows you have loaded in the printer...

Printer Guide
Page 113
... also choose other popular presets such as the Color setting. 3. See page 132 for your media type, you may need to easily change your black ink cartridge. The default is the default setting, you may see this screen: 4. Note that the presets will provide you with Epson Drivers for Windows | 113 Note: If Advanced...
... also choose other popular presets such as the Color setting. 3. See page 132 for your media type, you may need to easily change your black ink cartridge. The default is the default setting, you may see this screen: 4. Note that the presets will provide you with Epson Drivers for Windows | 113 Note: If Advanced...
Printer Guide
Page 119
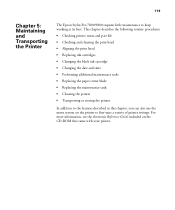
... printer to fine-tune a variety of printer settings. 119 Chapter 5: Maintaining and Transporting the Printer The Epson Stylus Pro 7800/9800 requires little maintenance to the features described in this chapter, you can also use the menu system on the CD-ROM that came with your printer.... 119 This chapter describes the following routine procedures: • Checking printer status and part life • Checking and cleaning the print head • Aligning the print head • Replacing ink cartridges • Changing the black ink cartridge • Changing the ...
... printer to fine-tune a variety of printer settings. 119 Chapter 5: Maintaining and Transporting the Printer The Epson Stylus Pro 7800/9800 requires little maintenance to the features described in this chapter, you can also use the menu system on the CD-ROM that came with your printer.... 119 This chapter describes the following routine procedures: • Checking printer status and part life • Checking and cleaning the print head • Aligning the print head • Replacing ink cartridges • Changing the black ink cartridge • Changing the ...
Printer Guide
Page 120
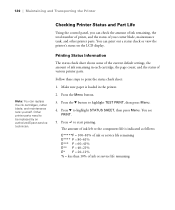
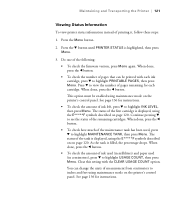
Printing Status Information The status check sheet shows some of the current default settings, the amount of various printer parts. You can replace the ink cartridges, cutter blade, and maintenance tank yourself. Press the d button to highlight STATUS SHEET, then press Menu. Press d to ... maintenance tank, and other printer parts. Press to print the status check sheet: 1. Other printer parts need to be replaced by an authorized Epson service technician. Checking Printer Status and Part Life Using the control panel, you can check the amount of ink remaining, the total number ...
Printing Status Information The status check sheet shows some of the current default settings, the amount of various printer parts. You can replace the ink cartridges, cutter blade, and maintenance tank yourself. Press the d button to highlight STATUS SHEET, then press Menu. Press d to ... maintenance tank, and other printer parts. Press to print the status check sheet: 1. Other printer parts need to be replaced by an authorized Epson service technician. Checking Printer Status and Part Life Using the control panel, you can check the amount of ink remaining, the total number ...
Printer Guide
Page 121
...each ink cartridge, press d to highlight PRINTABLE PAGES, then press Menu. As the tank is highlighted, then press Menu. 3. Clear this setting with each cartridge. Press d to view the number of the first cartridge is displayed, using the E*****F symbols described on the printer's ... the percentage drops. Do one of the remaining cartridges. You can be enabled using maintenance mode on page 120. Maintaining and Transporting the Printer | 121 Viewing Status Information To view printer status information instead of ink used (in milliliters) and paper used , press...
...each ink cartridge, press d to highlight PRINTABLE PAGES, then press Menu. As the tank is highlighted, then press Menu. 3. Clear this setting with each cartridge. Press d to view the number of the first cartridge is displayed, using the E*****F symbols described on the printer's ... the percentage drops. Do one of the remaining cartridges. You can be enabled using maintenance mode on page 120. Maintaining and Transporting the Printer | 121 Viewing Status Information To view printer status information instead of ink used (in milliliters) and paper used , press...
Printer Guide
Page 127
... to the 8 ink cartridge slots on the printer. Each head alignment takes about 7 minutes. When the bi-directional black alignment is finished, press the d button until BI-D 2-COLOR is the type of your ink levels. If you can wait until the ink runs out, replace the cartridge, and then continue... done, press the Pause button to start with tape. 7. Or you do so, Epson recommends covering the openings with . 8. However, it before starting a large print job. The numbers below the ink icons on the LCD display correspond to start the bi-directional black alignment process. 10...
... to the 8 ink cartridge slots on the printer. Each head alignment takes about 7 minutes. When the bi-directional black alignment is finished, press the d button until BI-D 2-COLOR is the type of your ink levels. If you can wait until the ink runs out, replace the cartridge, and then continue... done, press the Pause button to start with tape. 7. Or you do so, Epson recommends covering the openings with . 8. However, it before starting a large print job. The numbers below the ink icons on the LCD display correspond to start the bi-directional black alignment process. 10...

Printer Guide
Page 128
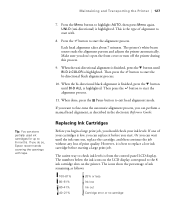
... are ready to replace it. Note the color of the cartridge that is the cartridge you need to replace an ink cartridge: 1. Other products may cause damage not covered by Epson's warranty. Caution: Leave the empty cartridge in the printer until you can continue printing. Make sure you start, make sure the printer is powered on. When the light...
... are ready to replace it. Note the color of the cartridge that is the cartridge you need to replace an ink cartridge: 1. Other products may cause damage not covered by Epson's warranty. Caution: Leave the empty cartridge in the printer until you can continue printing. Make sure you start, make sure the printer is powered on. When the light...
Printer Guide
Page 129
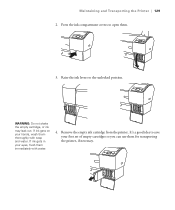
Maintaining and Transporting the Printer | 129 2. Remove the empty ink cartridge from the printer. Press the ink compartment covers to open them immediately with soap and water. WARNING: Do not shake the empty cartridge, or ink may leak out. If ink gets in your eyes, flush them . 3. If ink gets on your first set of empty cartridges so you can use them thoroughly with water. 4. It's a good idea to the unlocked position. Raise the ink levers to save your hands, wash them for transporting the printer, if necessary. 5-129
Maintaining and Transporting the Printer | 129 2. Remove the empty ink cartridge from the printer. Press the ink compartment covers to open them immediately with soap and water. WARNING: Do not shake the empty cartridge, or ink may leak out. If ink gets in your eyes, flush them . 3. If ink gets on your first set of empty cartridges so you can use them thoroughly with water. 4. It's a good idea to the unlocked position. Raise the ink levers to save your hands, wash them for transporting the printer, if necessary. 5-129

Printer Guide
Page 132
... to use the Black Ink Conversion Kit (included with your printer) and the new black ink cartridge (either Matte or Photo) that you change black ink cartridges. See page 141 for traditional photographic and ink jet-coated papers, such as Epson Premium Luster Photo Paper,... Photo Semigloss Paper, Premium Semimatte Photo Paper, and so on. • The Matte Black cartridge is highlighted, then press Menu. 4. Changing the black ink cartridge also consumes color ink...
... to use the Black Ink Conversion Kit (included with your printer) and the new black ink cartridge (either Matte or Photo) that you change black ink cartridges. See page 141 for traditional photographic and ink jet-coated papers, such as Epson Premium Luster Photo Paper,... Photo Semigloss Paper, Premium Semimatte Photo Paper, and so on. • The Matte Black cartridge is highlighted, then press Menu. 4. Changing the black ink cartridge also consumes color ink...
Printer Guide
Page 133
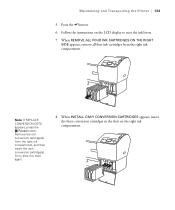
... button. 6. Follow the instructions on the right ink compartment. 5-133 Maintaining and Transporting the Printer | 133 5. Remove the old conversion cartridge(s) from the right ink compartment. When REMOVE ALL FOUR INK CARTRIDGES ON THE RIGHT SIDE appears, remove all four ink cartridges from the right ink compartment, and then insert the new conversion cartridge(s). Go to step 4 to raise the...
... button. 6. Follow the instructions on the right ink compartment. 5-133 Maintaining and Transporting the Printer | 133 5. Remove the old conversion cartridge(s) from the right ink compartment. When REMOVE ALL FOUR INK CARTRIDGES ON THE RIGHT SIDE appears, remove all four ink cartridges from the right ink compartment, and then insert the new conversion cartridge(s). Go to step 4 to raise the...


