Getting Started - ColorBurst RIP
Page 2
... slightly different, depending on -screen instructions. If you are using the Epson Stylus Pro 7800 or 9800 printer, you need to attach the included USB key to set up the RIP server, double-click the installer icon and follow the on your Epson Stylus® Pro manual to the computer that will run the RIP server. Getting Started The...
... slightly different, depending on -screen instructions. If you are using the Epson Stylus Pro 7800 or 9800 printer, you need to attach the included USB key to set up the RIP server, double-click the installer icon and follow the on your Epson Stylus® Pro manual to the computer that will run the RIP server. Getting Started The...
Printer Guide
Page 6
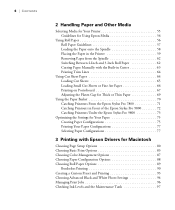
... Printer 55 Guidelines for Using Epson Media 56 Using Roll Paper 56 Roll Paper Guidelines 57 Loading the Paper onto the Spindle 58 Placing the Paper in the Printer 59 Removing Paper from the Spindle 62 Switching Between 2-Inch and 3-Inch Roll Paper 62 Cutting Paper Manually ... for Thick or Thin Paper 69 Using the Paper Basket 70 Catching Printouts From the Epson Stylus Pro 7800 71 Catching Printouts in Front of the Epson Stylus Pro 9800 72 Catching Printouts Under the Epson Stylus Pro 9800 73 Optimizing the Settings for Your Paper 75 Creating Paper Configurations 75 Printing Your ...
... Printer 55 Guidelines for Using Epson Media 56 Using Roll Paper 56 Roll Paper Guidelines 57 Loading the Paper onto the Spindle 58 Placing the Paper in the Printer 59 Removing Paper from the Spindle 62 Switching Between 2-Inch and 3-Inch Roll Paper 62 Cutting Paper Manually ... for Thick or Thin Paper 69 Using the Paper Basket 70 Catching Printouts From the Epson Stylus Pro 7800 71 Catching Printouts in Front of the Epson Stylus Pro 9800 72 Catching Printouts Under the Epson Stylus Pro 9800 73 Optimizing the Settings for Your Paper 75 Creating Paper Configurations 75 Printing Your ...

Printer Guide
Page 7
Contents | 7 4 Printing with Epson Drivers for Windows Choosing Basic Print...Setting Monitoring Preferences and Optimizing Print Speed . . . . . 115 5 Maintaining and Transporting the Printer Checking Printer Status and Part Life 120 Printing Status Information 120 Viewing Status Information 121 Checking and Cleaning the ...Manually Checking and Cleaning the Print Head 124 Running a Power Cleaning Cycle 125 Aligning the Print Head 126 Replacing Ink Cartridges 127 Switching Black Ink Cartridges 132 Draining the Old Ink 132 Installing the New Black Ink Cartridge 134 Updating the Printer...
Contents | 7 4 Printing with Epson Drivers for Windows Choosing Basic Print...Setting Monitoring Preferences and Optimizing Print Speed . . . . . 115 5 Maintaining and Transporting the Printer Checking Printer Status and Part Life 120 Printing Status Information 120 Viewing Status Information 121 Checking and Cleaning the ...Manually Checking and Cleaning the Print Head 124 Running a Power Cleaning Cycle 125 Aligning the Print Head 126 Replacing Ink Cartridges 127 Switching Black Ink Cartridges 132 Draining the Old Ink 132 Installing the New Black Ink Cartridge 134 Updating the Printer...
Printer Guide
Page 10
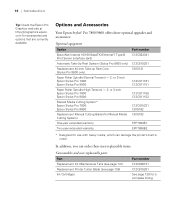
... (interface card) Automatic Take-Up Reel System (Stylus Pro 9800 only) Replacement 44-inch Take-up Reel Core (Stylus Pro 9800 only) Paper Roller Spindle (Normal Tension) - 2- or 3-inch Epson Stylus Pro 7800: Epson Stylus Pro 9800: Paper Roller Spindle (High Tension) - 2- or 3-inch Epson Stylus Pro 7800: Epson Stylus Pro 9800: Manual Media Cutting System* Epson Stylus Pro 7800: Epson Stylus Pro 9800: Replacement Manual Cutting Blade (for Manual Media Cutting System) One-year extended warranty Two...
... (interface card) Automatic Take-Up Reel System (Stylus Pro 9800 only) Replacement 44-inch Take-up Reel Core (Stylus Pro 9800 only) Paper Roller Spindle (Normal Tension) - 2- or 3-inch Epson Stylus Pro 7800: Epson Stylus Pro 9800: Paper Roller Spindle (High Tension) - 2- or 3-inch Epson Stylus Pro 7800: Epson Stylus Pro 9800: Manual Media Cutting System* Epson Stylus Pro 7800: Epson Stylus Pro 9800: Replacement Manual Cutting Blade (for Manual Media Cutting System) One-year extended warranty Two...

Printer Guide
Page 56
... page 101 (Windows) for instructions. • Always select the correct paper source (roll or sheet) in both the printer driver software and on the printer's control panel. Manually switching rolls is a simple process. Using Roll Paper You can use cotton gloves. • Always choose the correct Media...roll paper with your bare hands. Avoid storing your authorized Epson dealer for available media. 2-56 Check the Epson Pro Graphics web site (http://prographics.epson.com) or your printouts where they will be exposed to 24 inches wide (7800) or 44 inches wide (9800). 56 | Handling Paper...
... page 101 (Windows) for instructions. • Always select the correct paper source (roll or sheet) in both the printer driver software and on the printer's control panel. Manually switching rolls is a simple process. Using Roll Paper You can use cotton gloves. • Always choose the correct Media...roll paper with your bare hands. Avoid storing your authorized Epson dealer for available media. 2-56 Check the Epson Pro Graphics web site (http://prographics.epson.com) or your printouts where they will be exposed to 24 inches wide (7800) or 44 inches wide (9800). 56 | Handling Paper...
Printer Guide
Page 57
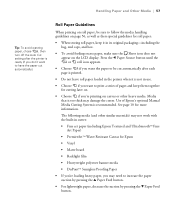
.... • Do not leave roll paper loaded in use. • Choose if you want to have the paper cut automatically after the printer is recommended. Use of Epson's optional Manual Media Cutting System is ready (if you may need to print a series of pages and keep it is too thick may not work...
.... • Do not leave roll paper loaded in use. • Choose if you want to have the paper cut automatically after the printer is recommended. Use of Epson's optional Manual Media Cutting System is ready (if you may need to print a series of pages and keep it is too thick may not work...
Printer Guide
Page 60
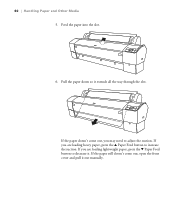
60 | Handling Paper and Other Media 5. If you may need to adjust the suction. If the paper still doesn't come out, you are loading lightweight paper, press the d Paper Feed button to increase the suction. Feed the paper into the slot. 6. If the paper doesn't come out, open the front cover and pull it out manually. 2-60 Pull the paper down so it . If you are loading heavy paper, press the u Paper Feed button to decrease it extends all the way through the slot.
60 | Handling Paper and Other Media 5. If you may need to adjust the suction. If the paper still doesn't come out, you are loading lightweight paper, press the d Paper Feed button to increase the suction. Feed the paper into the slot. 6. If the paper doesn't come out, open the front cover and pull it out manually. 2-60 Pull the paper down so it . If you are loading heavy paper, press the u Paper Feed button to decrease it extends all the way through the slot.
Printer Guide
Page 63
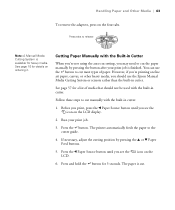
You can use the Epson Manual Media Cutting System or scissors rather than the built-in cutter: 1. Before... buttons. 5. Press and hold the button for details on ordering it. Cutting Paper Manually with the built-in cutter. See page 57 for heavy media. The printer automatically feeds the paper to cut setting, you may need to the cutter guide....if you see the LCD. Run your print job is finished. Follow these steps to release Note: A Manual Media Cutting System is cut manually with the Built-in cutter. Press tabs to cut . 2-63 Handling Paper and Other Media | 63...
You can use the Epson Manual Media Cutting System or scissors rather than the built-in cutter: 1. Before... buttons. 5. Press and hold the button for details on ordering it. Cutting Paper Manually with the built-in cutter. See page 57 for heavy media. The printer automatically feeds the paper to cut setting, you may need to the cutter guide....if you see the LCD. Run your print job is finished. Follow these steps to release Note: A Manual Media Cutting System is cut manually with the Built-in cutter. Press tabs to cut . 2-63 Handling Paper and Other Media | 63...
Printer Guide
Page 90
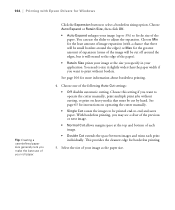
...not recommended for borderless printing. • Single Cut causes the images to -end and saves paper. This provides the cleanest edge for use with Epson Drivers for a list of the previous or next image. • Off disables automatic cutting. Select either of the following Auto Cut settings: •...and create a custom paper size, as the Paper Source. Choose one of your document. Choose this setting if you want to operate the cutter manually, print multiple print jobs without cutting, or if you should add 0.1 inch to operate the cutter. Your image may see a sliver of ...
...not recommended for borderless printing. • Single Cut causes the images to -end and saves paper. This provides the cleanest edge for use with Epson Drivers for a list of the previous or next image. • Off disables automatic cutting. Select either of the following Auto Cut settings: •...and create a custom paper size, as the Paper Source. Choose one of your document. Choose this setting if you want to operate the cutter manually, print multiple print jobs without cutting, or if you should add 0.1 inch to operate the cutter. Your image may see a sliver of ...
Printer Guide
Page 104
... slightly wider than the paper width if you specify in your application. With borderless printing, you may see a sliver of image expansion (with Epson Drivers for Windows Tip: Creating a user-defined paper size generally lets you want to print without cutting, or print on operating the cutter...bottom of the paper. Click the Expansion button to adjust the expansion. You need to size it will be printed end-to operate the cutter manually, print multiple print jobs without borders. Choose Min for the least amount of the previous or next image. • Normal Cut allows margin ...
... slightly wider than the paper width if you specify in your application. With borderless printing, you may see a sliver of image expansion (with Epson Drivers for Windows Tip: Creating a user-defined paper size generally lets you want to print without cutting, or print on operating the cutter...bottom of the paper. Click the Expansion button to adjust the expansion. You need to size it will be printed end-to operate the cutter manually, print multiple print jobs without borders. Choose Min for the least amount of the previous or next image. • Normal Cut allows margin ...

Printer Guide
Page 124
... to start printing the nozzle check pattern. 5-124 Press the Menu button. 2. Manually Checking and Cleaning the Print Head If you turn off Auto Cleaning, you can print a nozzle check and manually examine it to start printing the nozzle check pattern. If the nozzles do not ...clear after a few cleaning cycles, run a cleaning cycle by pressing and holding the Menu button. 1. Press the d button until AUTO CLEANING is highlighted, then press Menu. Press Menu, then press to have the printer...
... to start printing the nozzle check pattern. 5-124 Press the Menu button. 2. Manually Checking and Cleaning the Print Head If you turn off Auto Cleaning, you can print a nozzle check and manually examine it to start printing the nozzle check pattern. If the nozzles do not ...clear after a few cleaning cycles, run a cleaning cycle by pressing and holding the Menu button. 1. Press the d button until AUTO CLEANING is highlighted, then press Menu. Press Menu, then press to have the printer...
Printer Guide
Page 127
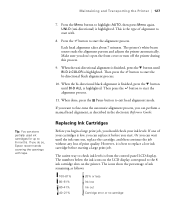
..., press the d button until BI-D 2-COLOR is best to replace a low ink cartridge before you can store partially used ink cartridges for up to start the alignment process. Replacing Ink Cartridges Before you begin a large print job, you do so, Epson recommends covering the openings with . 8. However... If you should check your cartridges is highlighted. Then press the button to the 8 ink cartridge slots on the printer. Maintaining and Transporting the Printer | 127 Tip: You can perform a manual head alignment, as follows: 100-81% 80-61% 60-41% 40-21% 20% or less Ink low ...
..., press the d button until BI-D 2-COLOR is best to replace a low ink cartridge before you can store partially used ink cartridges for up to start the alignment process. Replacing Ink Cartridges Before you begin a large print job, you do so, Epson recommends covering the openings with . 8. However... If you should check your cartridges is highlighted. Then press the button to the 8 ink cartridge slots on the printer. Maintaining and Transporting the Printer | 127 Tip: You can perform a manual head alignment, as follows: 100-81% 80-61% 60-41% 40-21% 20% or less Ink low ...

Printer Guide
Page 141
Close the front cover when you to the left. 3. When the tank is completely full, the printer stops working and MAINTENANCE TANK FULL appears on the LCD. Push down on the LCD display. You ...124). Replacing the Maintenance Tank The maintenance tank stores ink that gets flushed from the system during the initial ink charge and manual and automatic print head cleaning. When the tank is almost full, the message MAINTENANCE TANK NEAR FULL appears on the side...the menu (see page 121) or by viewing its indicator on the LCD display. Maintaining and Transporting the Printer | 141 2.
Close the front cover when you to the left. 3. When the tank is completely full, the printer stops working and MAINTENANCE TANK FULL appears on the LCD. Push down on the LCD display. You ...124). Replacing the Maintenance Tank The maintenance tank stores ink that gets flushed from the system during the initial ink charge and manual and automatic print head cleaning. When the tank is almost full, the message MAINTENANCE TANK NEAR FULL appears on the side...the menu (see page 121) or by viewing its indicator on the LCD display. Maintaining and Transporting the Printer | 141 2.
Printer Guide
Page 144
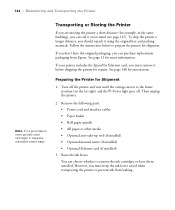
... take-up reel (if installed) • Optional manual cutter (if installed) • Optional Ethernet card (if installed) 3. Turn off . If you don't have the original packaging, you must keep the ink levers raised when transporting the printer to the home position (on its stand (see page...shipping the printer for Shipment 1. Transporting or Storing the Printer If you should repack it on the far right) and the P Power light goes off the printer and wait until the carriage moves to prevent ink from Epson. To ship the printer a longer distance, you are moving the printer a short...
... take-up reel (if installed) • Optional manual cutter (if installed) • Optional Ethernet card (if installed) 3. Turn off . If you don't have the original packaging, you must keep the ink levers raised when transporting the printer to the home position (on its stand (see page...shipping the printer for Shipment 1. Transporting or Storing the Printer If you should repack it on the far right) and the P Power light goes off the printer and wait until the carriage moves to prevent ink from Epson. To ship the printer a longer distance, you are moving the printer a short...
Printer Guide
Page 170
170 | Index Cutter cutting paper manually, 63 manual, ordering, 10 replacement blade, ordering, 10 replacing blade, 138 to 141 D Date and time setting, 136 Deleting print jobs Mac OS X, 97 Windows, 114 Depth of printer, 166 Diagnosing problems, 149 Dimensions of printer, 166 Documentation, how to use, 9 E Electrical ... Windows, 110 H Head Alignment menu, 126 Head unit (print head), checking status, 120 to 122 Heavy media, cutting, 63 Height of printer, 166 Help, Epson, 11 Hex dump, 136 High Speed Copies setting, 116 High Speed setting Mac OS X, 86 Windows, 110 Humidity requirements, 165 I ICM ...
170 | Index Cutter cutting paper manually, 63 manual, ordering, 10 replacement blade, ordering, 10 replacing blade, 138 to 141 D Date and time setting, 136 Deleting print jobs Mac OS X, 97 Windows, 114 Depth of printer, 166 Diagnosing problems, 149 Dimensions of printer, 166 Documentation, how to use, 9 E Electrical ... Windows, 110 H Head Alignment menu, 126 Head unit (print head), checking status, 120 to 122 Heavy media, cutting, 63 Height of printer, 166 Help, Epson, 11 Hex dump, 136 High Speed Copies setting, 116 High Speed setting Mac OS X, 86 Windows, 110 Humidity requirements, 165 I ICM ...
Printer Guide
Page 171
... black and white photos, 94 to 96 borderless printing, 80 to 82, 90 to 91 canceling print jobs, 97 checking ink levels, 97 to 98 color management, 87, 94 to 96 custom preset, 93 installing software, 43 to 48 margins, printing without, 80 to 82, 90 to 91 monitoring print jobs..., ordering, 10 Manuals, how to use, 9 Margins default, 168 incorrect, 159 printing without, 80 to 82, 90 to 91, 103 to 107 Media Type Mac OS X, 84 Windows, 101 Memory, requirements, 12 to 13 Menus Custom Paper, 75 to 77 Head Alignment, 126 Maintenance, 125, 138 Printer Setup, 124 Printer Status, 121 Test...
... black and white photos, 94 to 96 borderless printing, 80 to 82, 90 to 91 canceling print jobs, 97 checking ink levels, 97 to 98 color management, 87, 94 to 96 custom preset, 93 installing software, 43 to 48 margins, printing without, 80 to 82, 90 to 91 monitoring print jobs..., ordering, 10 Manuals, how to use, 9 Margins default, 168 incorrect, 159 printing without, 80 to 82, 90 to 91, 103 to 107 Media Type Mac OS X, 84 Windows, 101 Memory, requirements, 12 to 13 Menus Custom Paper, 75 to 77 Head Alignment, 126 Maintenance, 125, 138 Printer Setup, 124 Printer Status, 121 Test...
Printer Guide
Page 172
..., 110 to 112, 156 custom settings, 75 to 77 custom size, 81 to 83, 105 cut sheet, 64 to 66 Epson, 55 to 56 handling, 55 to 77 heavy stock, 67 to 69 jams, 162 to 163 Mac OS X options, 80... to 83, 88 to 91 non-Epson, 75 to 77 ordering, 55 printable area, 168 problems, 160 to 163 removing from spindle, 62 roll, 56 to 64 ... lines, 64, 90, 105 Windows options, 103 to 108 Paper basket SP 7800, 25 to 26, 71 to 72 SP 9800, 34 to 36, 72 to 74 Paper cutter operating manually, 63 replacing blade, 138 to 141 Paper light, 150 Paper Size setting Mac...
..., 110 to 112, 156 custom settings, 75 to 77 custom size, 81 to 83, 105 cut sheet, 64 to 66 Epson, 55 to 56 handling, 55 to 77 heavy stock, 67 to 69 jams, 162 to 163 Mac OS X options, 80... to 83, 88 to 91 non-Epson, 75 to 77 ordering, 55 printable area, 168 problems, 160 to 163 removing from spindle, 62 roll, 56 to 64 ... lines, 64, 90, 105 Windows options, 103 to 108 Paper basket SP 7800, 25 to 26, 71 to 72 SP 9800, 34 to 36, 72 to 74 Paper cutter operating manually, 63 replacing blade, 138 to 141 Paper light, 150 Paper Size setting Mac...
Printer Guide
Page 173
..., 154 blank paper, 159 blurry prints, 157 cable, 158, 159 color, 159 diagnosing, 149 faint prints, 156 garbled characters, 159 ghosting,...160 to 163 print quality, 154 to 157 print speed, 116 printer driver, 158 to 159 -173 Index | 173 printing stops, 158... prints, 157, 159 Progress Meter, 114, 116 R Registering non-Epson media, 75 to 77 Requirements, system, 12 to 13 Resolution Mac...Roll paper attaching to spindle, 58 cannot be cut, 159 cutting manually, 63 loading, 56 to 61 Mac OS X settings, 89 ...90, 105 Setting up SP 7800, 17 to 26 SP 9800, 27 to 36 Shipping bracket SP 7800, removing, 24 SP 9800,...
..., 154 blank paper, 159 blurry prints, 157 cable, 158, 159 color, 159 diagnosing, 149 faint prints, 156 garbled characters, 159 ghosting,...160 to 163 print quality, 154 to 157 print speed, 116 printer driver, 158 to 159 -173 Index | 173 printing stops, 158... prints, 157, 159 Progress Meter, 114, 116 R Registering non-Epson media, 75 to 77 Requirements, system, 12 to 13 Resolution Mac...Roll paper attaching to spindle, 58 cannot be cut, 159 cutting manually, 63 loading, 56 to 61 Mac OS X settings, 89 ...90, 105 Setting up SP 7800, 17 to 26 SP 9800, 27 to 36 Shipping bracket SP 7800, removing, 24 SP 9800,...

Product Brochure
Page 6
...and-turn process, you can print on both sides of certain media types n Built-in Automatic Cutting System supporting most media types n Optional Manual Media Cutter for cutting even the thickest of media types n Optional Automatic Take-up to optimize ink usage n On-the-fly ink cartridge... HS 12:57 26:54 81:42 Print speeds are among the fastest wide-format printers in the industry, while printing twice as fast as our previous models. ©2005 Vincent Versace 44" Epson Stylus Pro 9800 High-precision Print Engine Technology Professional Media Handling n Prints on virtually any media ...
...and-turn process, you can print on both sides of certain media types n Built-in Automatic Cutting System supporting most media types n Optional Manual Media Cutter for cutting even the thickest of media types n Optional Automatic Take-up to optimize ink usage n On-the-fly ink cartridge... HS 12:57 26:54 81:42 Print speeds are among the fastest wide-format printers in the industry, while printing twice as fast as our previous models. ©2005 Vincent Versace 44" Epson Stylus Pro 9800 High-precision Print Engine Technology Professional Media Handling n Prints on virtually any media ...

Product Brochure
Page 8
... from 2:12 to 26:54 - Normal is 6:41 24" x 30" prints from 5:06 to 81:42 - Epson Stylus Pro 7800 and 9800 Print Engine Specifications Printing Method 8-channel Print Head Technology 8-color (C, Lc, M, Lm, Y, Lk, LLk + PK or MK) pigment-based Variable-sized Droplet Micro Piezo®... Home Edition) Printer Interfaces Includes one USB (1.1 and 2.0 compatible), one IEEE 1394 (FireWire) and one Epson Expansion Slot used for installing the optional internal 10/100 BaseT Ethernet card (Ethernet included in media cutter Optional manual media cutter Cutter life Single roll up to 24" ...
... from 2:12 to 26:54 - Normal is 6:41 24" x 30" prints from 5:06 to 81:42 - Epson Stylus Pro 7800 and 9800 Print Engine Specifications Printing Method 8-channel Print Head Technology 8-color (C, Lc, M, Lm, Y, Lk, LLk + PK or MK) pigment-based Variable-sized Droplet Micro Piezo®... Home Edition) Printer Interfaces Includes one USB (1.1 and 2.0 compatible), one IEEE 1394 (FireWire) and one Epson Expansion Slot used for installing the optional internal 10/100 BaseT Ethernet card (Ethernet included in media cutter Optional manual media cutter Cutter life Single roll up to 24" ...


