
Printer Basics
Page 71
.... 4. Maintaining Your Printer 65 Check your printer settings (see light or dark horizontal banding, you may need to 9.x 1. The settings should match the Media Types that are compatible with the swapped cartridge as described on page 63. Open the Print Center again and add the Stylus Photo 2200 and its additional features...the Print Center. 3. The settings should match the Media Types that are compatible with the swapped cartridge as listed on the printer. 2. Select SP 2200, then select your printouts contain misaligned vertical lines, or you see page 26). 5. 2.
.... 4. Maintaining Your Printer 65 Check your printer settings (see light or dark horizontal banding, you may need to 9.x 1. The settings should match the Media Types that are compatible with the swapped cartridge as described on page 63. Open the Print Center again and add the Stylus Photo 2200 and its additional features...the Print Center. 3. The settings should match the Media Types that are compatible with the swapped cartridge as listed on the printer. 2. Select SP 2200, then select your printouts contain misaligned vertical lines, or you see page 26). 5. 2.

Printer Basics
Page 72
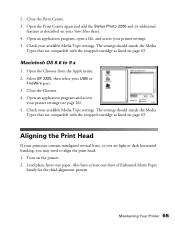
...the Print Head Alignment button. Macintosh OS X: Open the Applications folder and select EPSON Printer Utility. Then click Next. On the test page, select the pattern with ...the lower right corner of 1 white or black between the two rectangles. 2 Note: The bands in the printer list, click OK, and select Print Head Alignment. 4. Follow the instructions on your taskbar (in this... step. 6. Windows: Right-click the printer icon on the next screen to use a magnifying glass or loupe. Select SP 2200 in your screen) and select Print Head Alignment. On the...
...the Print Head Alignment button. Macintosh OS X: Open the Applications folder and select EPSON Printer Utility. Then click Next. On the test page, select the pattern with ...the lower right corner of 1 white or black between the two rectangles. 2 Note: The bands in the printer list, click OK, and select Print Head Alignment. 4. Follow the instructions on your taskbar (in this... step. 6. Windows: Right-click the printer icon on the next screen to use a magnifying glass or loupe. Select SP 2200 in your screen) and select Print Head Alignment. On the...

Printer Basics
Page 73
...and 3. If box 4 is the best in one sheet of the best looking box in the printer and load one or more rows, but you need to realign other rows, clear the checkbox for the rows ...left checked; Maintaining Your Printer 67 On the test page, select the least grainy box in all the rows, click Finish... the test page as shown, with 4 selected and click Realignment. If pattern 4 has the least noticeable band, click Next. Then enter the number of Enhanced Matte Paper. 10. repeat steps 10 through 15 to print the...
...and 3. If box 4 is the best in one sheet of the best looking box in the printer and load one or more rows, but you need to realign other rows, clear the checkbox for the rows ...left checked; Maintaining Your Printer 67 On the test page, select the least grainy box in all the rows, click Finish... the test page as shown, with 4 selected and click Realignment. If pattern 4 has the least noticeable band, click Next. Then enter the number of Enhanced Matte Paper. 10. repeat steps 10 through 15 to print the...

Printer Basics
Page 84
...face up ). ■ Use a support sheet with special paper, or try loading your paper one sheet at a time. ■ Make sure your paper; see banding (light lines). Set it 's usually whiter or shinier. ■ Check the adjust lever. see page 59. ■ Align the print head as described on -screen...; Clean the automatic roll paper cutter (see page 68) and/or the paper rollers (see page 32. ■ Make sure the printable side of genuine EPSON inks. ■ Check the adjust lever. see page 28 (Windows) or page 30 (Macintosh). ■ Select the correct Type (Windows) or Media Type (...
...face up ). ■ Use a support sheet with special paper, or try loading your paper one sheet at a time. ■ Make sure your paper; see banding (light lines). Set it 's usually whiter or shinier. ■ Check the adjust lever. see page 59. ■ Align the print head as described on -screen...; Clean the automatic roll paper cutter (see page 68) and/or the paper rollers (see page 32. ■ Make sure the printable side of genuine EPSON inks. ■ Check the adjust lever. see page 28 (Windows) or page 30 (Macintosh). ■ Select the correct Type (Windows) or Media Type (...

Printer Basics
Page 99
...to 67 Automatic mode, Macintosh, 26 Automatic roll paper cutter, see Cutter B Background printing, 25, 27 Banding, 78 Basic printing Macintosh OS 8.6 to 9.x, 26 to 27 Macintosh OS X, 22 to 25 Windows, 20... to 22 Basket installing, 15 to 16, 32 removing, 40 Best Photo setting, 21, 44 Black Ink Only setting, 11, 79 Blank pages, 81 Blurry images, 78 Borderless ... 25 Windows, 21 Characters, incorrect, 81 Checking printer, 75 Chooser, Macintosh, 76, 81 Cleaning cutter, 68 pad, 69 print head, 57 to 59 printer, 68 to 69 sheets, 69 Color management menu, OS X, 24 settings, 28 to...
...to 67 Automatic mode, Macintosh, 26 Automatic roll paper cutter, see Cutter B Background printing, 25, 27 Banding, 78 Basic printing Macintosh OS 8.6 to 9.x, 26 to 27 Macintosh OS X, 22 to 25 Windows, 20... to 22 Basket installing, 15 to 16, 32 removing, 40 Best Photo setting, 21, 44 Black Ink Only setting, 11, 79 Blank pages, 81 Blurry images, 78 Borderless ... 25 Windows, 21 Characters, incorrect, 81 Checking printer, 75 Chooser, Macintosh, 76, 81 Cleaning cutter, 68 pad, 69 print head, 57 to 59 printer, 68 to 69 sheets, 69 Color management menu, OS X, 24 settings, 28 to...

Service Manual
Page 14
EPSON Stylus PHOTO 2100/2200 Revision B Adjustment Item Market initial setting information Head ID input Head inclination adjustment Head height adjustment Bi-D adjustment USB ID input IEEE1394 ID input Platen gap Pixel Shift Adjustment Printout position adjustment (CR scanning direction) CR Measurement CR motor drive torque dispersion measurement PF Adjustment (Band... standard) G-26 33900 points PRODUCTION DESCRIPTION Basic Specifications 14 Specification Outline Comparison Stylus PHOTO 950 Stylus PHOTO 2100/2200 EEPROM write EEPROM write 19 digits (21 digits on label) 25 digits ...
EPSON Stylus PHOTO 2100/2200 Revision B Adjustment Item Market initial setting information Head ID input Head inclination adjustment Head height adjustment Bi-D adjustment USB ID input IEEE1394 ID input Platen gap Pixel Shift Adjustment Printout position adjustment (CR scanning direction) CR Measurement CR motor drive torque dispersion measurement PF Adjustment (Band... standard) G-26 33900 points PRODUCTION DESCRIPTION Basic Specifications 14 Specification Outline Comparison Stylus PHOTO 950 Stylus PHOTO 2100/2200 EEPROM write EEPROM write 19 digits (21 digits on label) 25 digits ...

Service Manual
Page 128
... Connector Cables and FFCs (narrow FFCs) with the Tie Wrap Bands and Ferrite Cores. EPSON Stylus PHOTO 2100/2200 3. Tie Wrap Bands Convexes Bottom rear side Figure 4-15. Printer rear CN10 Printer front CN11 Figure 4-16. Disconnecting the Connector Cables and FFCs ...4. Refer to Figure 4-15, "Disconnecting the Connector Cables and FFCs". Refer to Figure 4-16, "Connection Destinations of Harnesses and FFCs " When reinstalling the Board Unit, fit the screws in the order shown in colors...
... Connector Cables and FFCs (narrow FFCs) with the Tie Wrap Bands and Ferrite Cores. EPSON Stylus PHOTO 2100/2200 3. Tie Wrap Bands Convexes Bottom rear side Figure 4-15. Printer rear CN10 Printer front CN11 Figure 4-16. Disconnecting the Connector Cables and FFCs ...4. Refer to Figure 4-15, "Disconnecting the Connector Cables and FFCs". Refer to Figure 4-16, "Connection Destinations of Harnesses and FFCs " When reinstalling the Board Unit, fit the screws in the order shown in colors...
Service Manual
Page 189
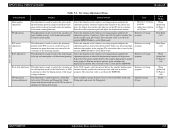
... variations of the mounting position. Select this function in the exclusive servicing program and print the adjustment patterns. Main adjustment items EPSON Stylus PHOTO 2100/2200 Revision B Table 5-1. This adjustment is made to minimize the paper detection error caused by the variations of paper loading accuracy...is made to improve print quality. Print the exclusive pattern again and adjust the displacement amount. Select this function in the band printing mode to correct the mounting position of the PW sensor on the Main board. Check the displacement amount of the ...
... variations of the mounting position. Select this function in the exclusive servicing program and print the adjustment patterns. Main adjustment items EPSON Stylus PHOTO 2100/2200 Revision B Table 5-1. This adjustment is made to minimize the paper detection error caused by the variations of paper loading accuracy...is made to improve print quality. Print the exclusive pattern again and adjust the displacement amount. Select this function in the band printing mode to correct the mounting position of the PW sensor on the Main board. Check the displacement amount of the ...