User Manual (P.I.M Plug-in)
Page 3
...using Windows, but will lose all the PRINT Image Matching color advantages and enhancements. Some of the illustrations below show Macintosh screens. Importing a P.I .M. image into the file and embedding a color space called EPSON RGB 2001. image. Your screens will lose the P.I ... header information intact for Print and click OK. If you overwrite your image (such as a P.I .M. Choose Full Color Management or Full color management - Adobe Photoshop does not retain the PRINT Image Matching or Exif Print information separately in another P.I .M. header information ...
...using Windows, but will lose all the PRINT Image Matching color advantages and enhancements. Some of the illustrations below show Macintosh screens. Importing a P.I .M. image into the file and embedding a color space called EPSON RGB 2001. image. Your screens will lose the P.I ... header information intact for Print and click OK. If you overwrite your image (such as a P.I .M. Choose Full Color Management or Full color management - Adobe Photoshop does not retain the PRINT Image Matching or Exif Print information separately in another P.I .M. header information ...
User Manual (P.I.M Plug-in)
Page 5
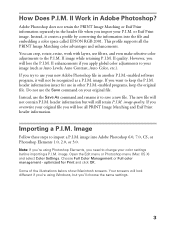
... Matching images are using . quality and enhancements, make sure you 're using Photoshop Elements 3.0.) Then click Show More Options and select Color Management. Do not use the Save As command and rename it to save a new file. header information intact for your file in one ...in other P.I .M. From the File menu, select Print Preview, Print with your printer and paper 5 Follow the steps in Photoshop, use the Save command to save your original file you are converted into the EPSON RGB 2001 color space. Note: To keep the original file. Printing a P.I .M.-enabled programs, ...
... Matching images are using . quality and enhancements, make sure you 're using Photoshop Elements 3.0.) Then click Show More Options and select Color Management. Do not use the Save As command and rename it to save a new file. header information intact for your file in one ...in other P.I .M. From the File menu, select Print Preview, Print with your printer and paper 5 Follow the steps in Photoshop, use the Save command to save your original file you are converted into the EPSON RGB 2001 color space. Note: To keep the original file. Printing a P.I .M.-enabled programs, ...
User Manual (P.I.M Plug-in)
Page 7
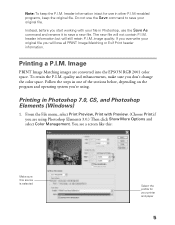
In the Color Management box, select No Color Adjustment and click OK. (If you don't see the Advanced settings: Select ICM, then select No Color Adjustment Select No Color Adjustment 8. Continue clicking OK to print your photo. 7 You see No Color Adjustment, click ICM, then click Off (Not Color Adjustment) or No Color Adjustment.) 9.
In the Color Management box, select No Color Adjustment and click OK. (If you don't see the Advanced settings: Select ICM, then select No Color Adjustment Select No Color Adjustment 8. Continue clicking OK to print your photo. 7 You see No Color Adjustment, click ICM, then click Off (Not Color Adjustment) or No Color Adjustment.) 9.
User Manual (P.I.M Plug-in)
Page 8
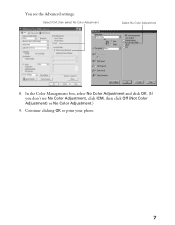
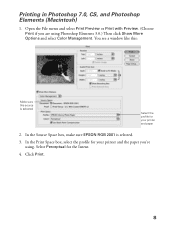
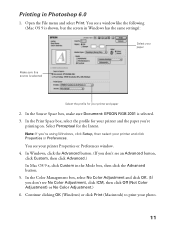
Open the File menu and select Print Preview or Print with Preview. (Choose Print if you 're using Photoshop Elements 3.0.) Then click Show More Options and select Color Management. In the Print Space box, select the profile for your printer and paper 2. You see a window like this: Make sure this source is selected. 3. Click Print. 8 Select Perceptual for your printer and the paper you are using . Printing in Photoshop 7.0, CS, and Photoshop Elements (Macintosh) 1. In the Source Space box, make sure EPSON RGB 2001 is selected Select the profile for the Intent. 4.
Open the File menu and select Print Preview or Print with Preview. (Choose Print if you 're using Photoshop Elements 3.0.) Then click Show More Options and select Color Management. In the Print Space box, select the profile for your printer and paper 2. You see a window like this: Make sure this source is selected. 3. Click Print. 8 Select Perceptual for your printer and the paper you are using . Printing in Photoshop 7.0, CS, and Photoshop Elements (Macintosh) 1. In the Source Space box, make sure EPSON RGB 2001 is selected Select the profile for the Intent. 4.
User Manual (P.I.M Plug-in)
Page 9
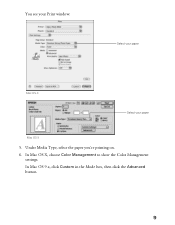
Under Media Type, select the paper you're printing on. 6. In Mac OS 9.x, click Custom in the Mode box, then click the Advanced button. 9 Select your paper Mac OS X Select your Print window: . In Mac OS X, choose Color Management to show the Color Management settings. You see your paper Mac OS 9 5.
Under Media Type, select the paper you're printing on. 6. In Mac OS 9.x, click Custom in the Mode box, then click the Advanced button. 9 Select your paper Mac OS X Select your Print window: . In Mac OS X, choose Color Management to show the Color Management settings. You see your paper Mac OS 9 5.
User Manual (P.I.M Plug-in)
Page 10
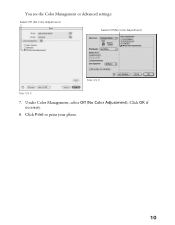
Click OK if necessary. 8. Click Print to print your photo. 10 You see the Color Management or Advanced settings: Select Off (No Color Adjustment) Select Off (No Color Adjustment) Mac OS 9 Mac OS X 7. Under Color Management, select Off (No Color Adjustment).
Click OK if necessary. 8. Click Print to print your photo. 10 You see the Color Management or Advanced settings: Select Off (No Color Adjustment) Select Off (No Color Adjustment) Mac OS 9 Mac OS X 7. Under Color Management, select Off (No Color Adjustment).
User Manual (P.I.M Plug-in)
Page 11
In the Color Management box, select No Color Adjustment and click OK. (If you 're using Windows, click Setup, then select your printer and click Properties or Preferences. Continue clicking OK (Windows) or click Print (Macintosh) to print your printer Properties or Preferences window. 4. Select Perceptual for...same settings): Select your printer and paper 2. You see No Color Adjustment, click ICM, then click Off (Not Color Adjustment) or No Color Adjustment.) 6. In the Print Space box, select the profile for your printer and the paper you don't see your photo. 11 In Windows, click...
In the Color Management box, select No Color Adjustment and click OK. (If you 're using Windows, click Setup, then select your printer and click Properties or Preferences. Continue clicking OK (Windows) or click Print (Macintosh) to print your printer Properties or Preferences window. 4. Select Perceptual for...same settings): Select your printer and paper 2. You see No Color Adjustment, click ICM, then click Off (Not Color Adjustment) or No Color Adjustment.) 6. In the Print Space box, select the profile for your printer and the paper you don't see your photo. 11 In Windows, click...

Printer Basics
Page 30
..., to save your print job as necessary to save your print job, click the Print Center icon when it appears in the printer list. Monitor the progress of your print job or do one of the following: ■ Click the print job, then click...Color Management, to select ColorSync®, adjust the color controls, change the gamma setting, or turn off color adjustments by the printer software ■ Summary, to view a list of your selections ■ Save Custom Setting, to reorder the jobs (not available for future use. 9. Click Print. 10. 8. For OS X 10.2, double-click Stylus Photo 1280...
..., to save your print job as necessary to save your print job, click the Print Center icon when it appears in the printer list. Monitor the progress of your print job or do one of the following: ■ Click the print job, then click...Color Management, to select ColorSync®, adjust the color controls, change the gamma setting, or turn off color adjustments by the printer software ■ Summary, to view a list of your selections ■ Save Custom Setting, to reorder the jobs (not available for future use. 9. Click Print. 10. 8. For OS X 10.2, double-click Stylus Photo 1280...

Printer Basics
Page 32
Set any other advanced settings you want to save settings Set individual color values 4. Note: When you want to use them again, you want to save your settings in the Custom Settings list on the Main ... the Advanced button. For higher quality printing (higher resolution), select Photo - 1440dpi or SuperPhoto - 2880dpi (if available for your custom settings as a group, click Save Settings. Note: Printing is slower at higher resolutions. Select higher print quality (higher resolution) Select color management settings Select various print options Click to use . 6.
Set any other advanced settings you want to save settings Set individual color values 4. Note: When you want to use them again, you want to save your settings in the Custom Settings list on the Main ... the Advanced button. For higher quality printing (higher resolution), select Photo - 1440dpi or SuperPhoto - 2880dpi (if available for your custom settings as a group, click Save Settings. Note: Printing is slower at higher resolutions. Select higher print quality (higher resolution) Select color management settings Select various print options Click to use . 6.

Printer Basics
Page 36
... here Click here to select higher print quality (higher resolution) Select various print options here Macintosh OS 8.5.1 through 9.x To select color management settings, select Color Management from the Print Settings pull-down menu Click here to select higher print quality (higher resolution) Select various print options here Macintosh OS X Note: For ...
... here Click here to select higher print quality (higher resolution) Select various print options here Macintosh OS 8.5.1 through 9.x To select color management settings, select Color Management from the Print Settings pull-down menu Click here to select higher print quality (higher resolution) Select various print options here Macintosh OS X Note: For ...

Printer Basics
Page 45
...bags, photo albums, or glass-covered picture frames. or Exif Print image. optimized for Adobe Photoshop allows you to install the ICC profiles for your printer if you save the image and then try to 9.x, select Color Settings from the Photoshop Elements menu, then select Full color management - Keep...Print, it won't be recognized as Auto Levels, Auto Contrast, Auto Color, etc.) and retain the settings. Store your prints in the file and embeds a color space called EPSON RGB 2001. II Plug-in for use global color adjustments (such as a P.I .M. It works with your changes to its...
...bags, photo albums, or glass-covered picture frames. or Exif Print image. optimized for Adobe Photoshop allows you to install the ICC profiles for your printer if you save the image and then try to 9.x, select Color Settings from the Photoshop Elements menu, then select Full color management - Keep...Print, it won't be recognized as Auto Levels, Auto Contrast, Auto Color, etc.) and retain the settings. Store your prints in the file and embeds a color space called EPSON RGB 2001. II Plug-in for use global color adjustments (such as a P.I .M. It works with your changes to its...

Printer Basics
Page 47
...is selected 2. In the Source Space box, make sure the EPSON RGB 2001 option is selected, then select Color Management from the Output pull-down menu. In the Print Space box, select the Stylus Photo 1280 profile for your printer and paper Make sure this window: Photoshop 7.0/Elements Photoshop 6.0 ... sure the Show More Options checkbox is selected. 3. Windows screens will look different, but the settings are converted into the EPSON RGB 2001 color space. Printing an Image PRINT Image Matching and Exif Print images are the same. 1. To retain their quality and enhancements,...
...is selected 2. In the Source Space box, make sure the EPSON RGB 2001 option is selected, then select Color Management from the Output pull-down menu. In the Print Space box, select the Stylus Photo 1280 profile for your printer and paper Make sure this window: Photoshop 7.0/Elements Photoshop 6.0 ... sure the Show More Options checkbox is selected. 3. Windows screens will look different, but the settings are converted into the EPSON RGB 2001 color space. Printing an Image PRINT Image Matching and Exif Print images are the same. 1. To retain their quality and enhancements,...

Printer Basics
Page 48
...Preferences. Windows: Click Custom, then click the Advanced button that appears. Macintosh OS X: Select Color Management from the Copies & Pages pull-down menu. 7. Windows: Select No Color Adjustment and click OK. Macintosh OS 8.5.1 to print your Media Type. 6. Then select the... Media Type setting. Macintosh OS X: Select No Color Adjustment. 8. Continue clicking OK (Windows) or click Print (Macintosh) to 9.x: Select No Color Adjustment and click OK. 5. Then select your photo...
...Preferences. Windows: Click Custom, then click the Advanced button that appears. Macintosh OS X: Select Color Management from the Copies & Pages pull-down menu. 7. Windows: Select No Color Adjustment and click OK. Macintosh OS 8.5.1 to print your Media Type. 6. Then select the... Media Type setting. Macintosh OS X: Select No Color Adjustment. 8. Continue clicking OK (Windows) or click Print (Macintosh) to 9.x: Select No Color Adjustment and click OK. 5. Then select your photo...
Printer Basics
Page 68
...printer software are set for guidelines. ■ Make sure your monitor profile. Your printout is calibrated correctly. ■ Try changing the Gamma setting on the Advanced dialog box (Windows or Macintosh OS 8.5.1 to 9.x) or the Color Management dialog box (OS X). ■ Your printed colors can use a color management... system-such as ICM (Windows) or ColorSync (Macintosh)-to get as close as possible. See page 32 for color printing. ■ The print head nozzles...
...printer software are set for guidelines. ■ Make sure your monitor profile. Your printout is calibrated correctly. ■ Try changing the Gamma setting on the Advanced dialog box (Windows or Macintosh OS 8.5.1 to 9.x) or the Color Management dialog box (OS X). ■ Your printed colors can use a color management... system-such as ICM (Windows) or ColorSync (Macintosh)-to get as close as possible. See page 32 for color printing. ■ The print head nozzles...

Printer Basics
Page 83
...EPSON accessories, 46, 67 help, 67 Monitor3, 21 papers, 32 PhotoCenter, 3 Store, 46, 67 support site, 53 Error lights, 54, 55 to 6 Elements, Photoshop description, 3 using P.I .M. II Plug-in for, 39 to 42 Aligning print head, 49 to 50 Automatic mode, 17, 20, 23 B Color Management... settings Mac OS 8.5x to 9.x, 29 to 30 Mac OS X, 24 Windows, 26 Color problems, 62 ColorLife Photo Paper, 32 ColorSync, 24, 29 ... White Paper, 32 Browser, 4 Buttons, printer, 54 C Cable, printer, 69 to 70 Cancelling printing, 18, 21, 24 Centering text or image, 27...
...EPSON accessories, 46, 67 help, 67 Monitor3, 21 papers, 32 PhotoCenter, 3 Store, 46, 67 support site, 53 Error lights, 54, 55 to 6 Elements, Photoshop description, 3 using P.I .M. II Plug-in for, 39 to 42 Aligning print head, 49 to 50 Automatic mode, 17, 20, 23 B Color Management... settings Mac OS 8.5x to 9.x, 29 to 30 Mac OS X, 24 Windows, 26 Color problems, 62 ColorLife Photo Paper, 32 ColorSync, 24, 29 ... White Paper, 32 Browser, 4 Buttons, printer, 54 C Cable, printer, 69 to 70 Cancelling printing, 18, 21, 24 Centering text or image, 27...
Printer Basics (For use with printer drivers posted on 10/20/04)
Page 7
Your Epson Stylus® Photo 1280 printer delivers state-of special Epson® photo papers available in a color-managed workflow. ■ Epson PhotoCenterSM is a new driver available, free of the colors in your photos; Note: It's a good idea to check Epson's support web site periodically for your product to see if there is Epson's free photo-sharing web site where you control how your convenience. Visit...
Your Epson Stylus® Photo 1280 printer delivers state-of special Epson® photo papers available in a color-managed workflow. ■ Epson PhotoCenterSM is a new driver available, free of the colors in your photos; Note: It's a good idea to check Epson's support web site periodically for your product to see if there is Epson's free photo-sharing web site where you control how your convenience. Visit...

Printer Basics (For use with printer drivers posted on 10/20/04)
Page 25
... combination of paper. ■ Choose the Media Type for your print job as a PDF file ■ Color Management, to select ColorSync®, adjust the color controls, change the gamma setting, or turn off color adjustments by the printer software ■ Summary, to view a list of all types of quality and speed for instructions on selected... way to preview your selections 10. Optionally, click Preview to get good printing results on all your print job. 11. For the highest print quality (Photo RPM) on selecting...
... combination of paper. ■ Choose the Media Type for your print job as a PDF file ■ Color Management, to select ColorSync®, adjust the color controls, change the gamma setting, or turn off color adjustments by the printer software ■ Summary, to view a list of all types of quality and speed for instructions on selected... way to preview your selections 10. Optionally, click Preview to get good printing results on all your print job. 11. For the highest print quality (Photo RPM) on selecting...

Printer Basics (For use with printer drivers posted on 10/20/04)
Page 28
...highest resolution), select Photo RPM (if available for your Media Type). Then click OK. Note: You must click the Custom button on certain paper types Select Color Management settings Click to save your custom settings as the Epson ICC color profiles that came with your printer to use. 7. ...Set any other advanced settings you want your printer, and don't want to control the...
...highest resolution), select Photo RPM (if available for your Media Type). Then click OK. Note: You must click the Custom button on certain paper types Select Color Management settings Click to save your custom settings as the Epson ICC color profiles that came with your printer to use. 7. ...Set any other advanced settings you want your printer, and don't want to control the...

Printer Basics (For use with printer drivers posted on 10/20/04)
Page 32
3. You see this window: To select color management settings, select Color Management from the Print Settings pull-down menu, and select No Color Adjustment. 5. Click Print. 32 Printing from the Print Settings pull-down menu Click here to select Photo RPM (5760 × 1440 dpi) for your printer to control colors, select Color Management from Start to use. 7. For more information...
3. You see this window: To select color management settings, select Color Management from the Print Settings pull-down menu, and select No Color Adjustment. 5. Click Print. 32 Printing from the Print Settings pull-down menu Click here to select Photo RPM (5760 × 1440 dpi) for your printer to control colors, select Color Management from Start to use. 7. For more information...

Printer Basics (For use with printer drivers posted on 10/20/04)
Page 56
... automatically reference your application and printer software are printing. Reload new paper. Also check if you can never exactly match your monitor is calibrated correctly. ■ Try changing the Gamma setting on the Advanced dialog box (Windows) or the Color Management dialog box (OS X). ■ Your printed colors can use a color management system-such as ICM...
... automatically reference your application and printer software are printing. Reload new paper. Also check if you can never exactly match your monitor is calibrated correctly. ■ Try changing the Gamma setting on the Advanced dialog box (Windows) or the Color Management dialog box (OS X). ■ Your printed colors can use a color management system-such as ICM...


