Product Brochure
Page 5
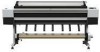
...Media Take-up to ensure consistent printing between multiple Stylus Pro printers of every ink droplet within each printer's performance at the manufacturing stage, producing consistent color output from improved pigment and resin chemistry Color is extremely sharp and accurate placement of large print... runs Optional Retractable Fabric-Based Media Bin, safely captures multiple prints up Reel, for unattended production of ink droplets for class-leading photographic print quality. Eliminating the need for certain Epson ...
...Media Take-up to ensure consistent printing between multiple Stylus Pro printers of every ink droplet within each printer's performance at the manufacturing stage, producing consistent color output from improved pigment and resin chemistry Color is extremely sharp and accurate placement of large print... runs Optional Retractable Fabric-Based Media Bin, safely captures multiple prints up Reel, for unattended production of ink droplets for class-leading photographic print quality. Eliminating the need for certain Epson ...
Product Brochure
Page 7
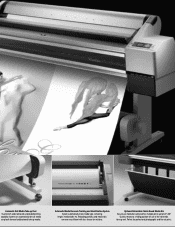
Perfect for mistakes. System can automatically de-curl media using both forward and backward take -up Reel True 64-inch wide roll-to-roll unattended printing capability. Optional Retractable Fabric-Based Media Bin Easy-to-use of the roll media take -up ...to a hiding position for use media bin safely catches multiple prints up modes. Automatic Roll Media Take-up reel. Reloading partially used media rolls are now very efficient with less chance for professional photographic and fine art prints. Automatic Media Bar-code Tracking and...
Perfect for mistakes. System can automatically de-curl media using both forward and backward take -up Reel True 64-inch wide roll-to-roll unattended printing capability. Optional Retractable Fabric-Based Media Bin Easy-to-use of the roll media take -up ...to a hiding position for use media bin safely catches multiple prints up modes. Automatic Roll Media Take-up reel. Reloading partially used media rolls are now very efficient with less chance for professional photographic and fine art prints. Automatic Media Bar-code Tracking and...

Product Brochure
Page 8
...cartridges. Copyright 2007, Epson America, Inc. no condensation) Product/Accessories Epson Stylus Pro 11880 Printer Epson Stylus Pro 11880 ColorBurst Edition Includes ColorBurst® RIP Additional One-year Epson Preferred Plus service Additional Two-year Epson Preferred Plus service ...Color and Monochrome 360 nozzles x 9 Droplet Technology Smallest droplet size 3.5 picoliters Variable Droplet Technology can be automatically cut to any and all prints under glass. For maximum print life, display all rights in media cutter Printer cutter blade life Roll Media Take-up Reel...
...cartridges. Copyright 2007, Epson America, Inc. no condensation) Product/Accessories Epson Stylus Pro 11880 Printer Epson Stylus Pro 11880 ColorBurst Edition Includes ColorBurst® RIP Additional One-year Epson Preferred Plus service Additional Two-year Epson Preferred Plus service ...Color and Monochrome 360 nozzles x 9 Droplet Technology Smallest droplet size 3.5 picoliters Variable Droplet Technology can be automatically cut to any and all prints under glass. For maximum print life, display all rights in media cutter Printer cutter blade life Roll Media Take-up Reel...
Product Information Guide
Page 1
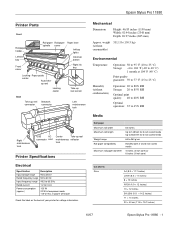
... 20 W in low-power mode 1 W or less in power off mode Check the label on the back of your printer for voltage information. up reel Locking caster Take-up reel sensor Back Take-up reel connector Network connector Left maintenance tank Right maintenance tank USB AC connector inlet Center Take-up... paper Roll paper Paper lever spindle cover Ink bay lights Ink cover button Right ink bay Locking Paper guide caster Auto take- Epson Stylus Pro 11880 Printer Parts - Mechanical Dimensions Height: 46.85 inches (1190 mm) Width: 92.44 inches (2348 mm) Depth: 26.97 inches (685 mm...
... 20 W in low-power mode 1 W or less in power off mode Check the label on the back of your printer for voltage information. up reel Locking caster Take-up reel sensor Back Take-up reel connector Network connector Left maintenance tank Right maintenance tank USB AC connector inlet Center Take-up... paper Roll paper Paper lever spindle cover Ink bay lights Ink cover button Right ink bay Locking Paper guide caster Auto take- Epson Stylus Pro 11880 Printer Parts - Mechanical Dimensions Height: 46.85 inches (1190 mm) Width: 92.44 inches (2348 mm) Depth: 26.97 inches (685 mm...
Product Information Guide
Page 3
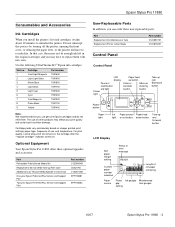
... Paper feed Take-up light or cut button down button reel Forward button LCD Display Roll paper margin setting Custom paper number selected Status or error message Length of use, and temperature. Epson Stylus Pro 11880 Consumables and Accessories Ink Cartridges When you install the printer's first ink cartridges, it takes about 10 minutes to re...
... Paper feed Take-up light or cut button down button reel Forward button LCD Display Roll paper margin setting Custom paper number selected Status or error message Length of use, and temperature. Epson Stylus Pro 11880 Consumables and Accessories Ink Cartridges When you install the printer's first ink cartridges, it takes about 10 minutes to re...

Quick Reference Guide
Page 2
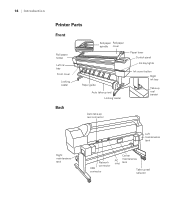
Printer Parts Front Roll paper holder Left ink bay Locking caster Roll paper spindle Roll paper cover Front cover Paper guide Auto take-up reel Locking caster Back Auto take-up reel connector Paper lever Control panel Ink bay lights Ink cover button Right ink bay Take-up reel sensor Right maintenance tank Left maintenance tank AC inlet Network connector USB connector Center maintenance tank Take-up reel reflector 1
Printer Parts Front Roll paper holder Left ink bay Locking caster Roll paper spindle Roll paper cover Front cover Paper guide Auto take-up reel Locking caster Back Auto take-up reel connector Paper lever Control panel Ink bay lights Ink cover button Right ink bay Take-up reel sensor Right maintenance tank Left maintenance tank AC inlet Network connector USB connector Center maintenance tank Take-up reel reflector 1
Quick Reference Guide
Page 4
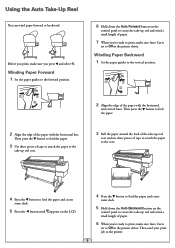
... down the Auto Backward button on the control panel to rotate the take -up reel and wind a small length of paper. 6 When you're ready to print, make sure Auto Cut is set to Off in the printer driver. Then press the button to feed the paper. 3 Use three pieces of tape..., make sure you print, make sure Auto Cut is set to Off in the printer driver. Using the Auto Take-Up Reel You can wind paper forward or backward. Winding Paper Backward 1 Set the paper guides to the printer. 3 Before you press and select . Then send your print job to the vertical position...
... down the Auto Backward button on the control panel to rotate the take -up reel and wind a small length of paper. 6 When you're ready to print, make sure Auto Cut is set to Off in the printer driver. Then press the button to feed the paper. 3 Use three pieces of tape..., make sure you print, make sure Auto Cut is set to Off in the printer driver. Using the Auto Take-Up Reel You can wind paper forward or backward. Winding Paper Backward 1 Set the paper guides to the printer. 3 Before you press and select . Then send your print job to the vertical position...
User's Guide
Page 5
...17 1 Setting Up the Printer Unpacking and Assembling the Printer 19 Unpacking and Assembling the Stand 20 Unpacking the Printer 22 Mounting the Printer on the Stand 23 Unpacking the Auto Take-Up Reel 25 Installing the Auto Take-up Reel 25 Installing the Take-up Reel Core and Paper Guides ...29 Plugging in the Printer 31 Installing Ink 33 Connecting the Printer 35 Configuring the Network Interface 36 Updating Your Printer Firmware 37 Downloading the Firmware ...
...17 1 Setting Up the Printer Unpacking and Assembling the Printer 19 Unpacking and Assembling the Stand 20 Unpacking the Printer 22 Mounting the Printer on the Stand 23 Unpacking the Auto Take-Up Reel 25 Installing the Auto Take-up Reel 25 Installing the Take-up Reel Core and Paper Guides ...29 Plugging in the Printer 31 Installing Ink 33 Connecting the Printer 35 Configuring the Network Interface 36 Updating Your Printer Firmware 37 Downloading the Firmware ...

User's Guide
Page 6
...Loading the Paper onto the Spindle 48 Placing the Paper in the Printer 49 Removing Paper from the Spindle 52 Cutting Paper Manually 54 Printing Trim Lines 55 Using the Auto Take-up Reel 56 Using Cut Sheet Paper 62 Loading Cut Sheets 63 Loading Small... Printing Your Paper Configurations 71 Selecting Paper Configurations 71 3 Printing with Epson Drivers for Macintosh Choosing Page Setup Options 74 Choosing Basic Print Options 77 Selecting the Correct Media Type Setting 80 Choosing Printer Color Management Options 81 Choosing Paper Configuration Options 82 Choosing Roll Paper Options...
...Loading the Paper onto the Spindle 48 Placing the Paper in the Printer 49 Removing Paper from the Spindle 52 Cutting Paper Manually 54 Printing Trim Lines 55 Using the Auto Take-up Reel 56 Using Cut Sheet Paper 62 Loading Cut Sheets 63 Loading Small... Printing Your Paper Configurations 71 Selecting Paper Configurations 71 3 Printing with Epson Drivers for Macintosh Choosing Page Setup Options 74 Choosing Basic Print Options 77 Selecting the Correct Media Type Setting 80 Choosing Printer Color Management Options 81 Choosing Paper Configuration Options 82 Choosing Roll Paper Options...
User's Guide
Page 10
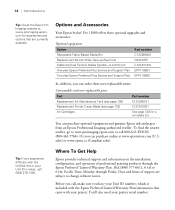
...operation of support are currently available. Options and Accessories Your Epson Stylus® Pro 11880 offers these user-replaceable items: Consumables and user-replaceable parts Part Replacement Ink Maintenance Tank (see page 135) Replacement Printer Cutter Blade (see page 132) Ink Cartridges Part number C12C890191...Retractable Fabric-Based Media Bin Replacement 64-inch Wide Take-up Reel Core Additional Dual Tension Media Spindle-2-inch/3-inch One-year Epson Preferred Plus Service and Support Plan Two-year Epson Preferred Plus Service and Support Plan Part number C12C890401 C64CORE ...
...operation of support are currently available. Options and Accessories Your Epson Stylus® Pro 11880 offers these user-replaceable items: Consumables and user-replaceable parts Part Replacement Ink Maintenance Tank (see page 135) Replacement Printer Cutter Blade (see page 132) Ink Cartridges Part number C12C890191...Retractable Fabric-Based Media Bin Replacement 64-inch Wide Take-up Reel Core Additional Dual Tension Media Spindle-2-inch/3-inch One-year Epson Preferred Plus Service and Support Plan Two-year Epson Preferred Plus Service and Support Plan Part number C12C890401 C64CORE ...

User's Guide
Page 14
... in the upper left ink cartridge compartment. liquid has entered the printer; the printer does not operate normally or exhibits a distinct change in performance. • The interface connectors and the connector for the Auto Take-up Reel are limited power source connectors. • Do not touch the ...front cover sensors highlighted below. • Do not touch the metal plate located in this product contain Perchlorate Material - the printer has been dropped or the cabinet damaged;...
... in the upper left ink cartridge compartment. liquid has entered the printer; the printer does not operate normally or exhibits a distinct change in performance. • The interface connectors and the connector for the Auto Take-up Reel are limited power source connectors. • Do not touch the ...front cover sensors highlighted below. • Do not touch the metal plate located in this product contain Perchlorate Material - the printer has been dropped or the cabinet damaged;...
User's Guide
Page 16
16 | Introduction Printer Parts Front Roll paper holder Left ink bay Front cover Locking caster Roll paper Roll paper spindle cover Paper lever Control panel Ink bay lights Paper guide Auto take-up reel Locking caster Ink cover button Right ink bay Take-up reel sensor Back Auto take-up reel connector Right maintenance tank Left maintenance tank Network connector USB connector Center AC maintenance inlet tank Take-up reel reflector 16
16 | Introduction Printer Parts Front Roll paper holder Left ink bay Front cover Locking caster Roll paper Roll paper spindle cover Paper lever Control panel Ink bay lights Paper guide Auto take-up reel Locking caster Ink cover button Right ink bay Take-up reel sensor Back Auto take-up reel connector Right maintenance tank Left maintenance tank Network connector USB connector Center AC maintenance inlet tank Take-up reel reflector 16

User's Guide
Page 17
Introduction | 17 Control Panel Pause or reset button and light Power light Paper feed up button Enter or barcode button Menu or cleaning button Take-up reel Backward button Power button Paper light Ink light LCD display Take-up reel Forward button Paper feed down button Paper source or cut button LCD Display Status or error message Roll paper margin setting Length of roll paper remaining Custom paper number selected Paper source Platen gap Ink gauges Maintenance setting tank gauges 17
Introduction | 17 Control Panel Pause or reset button and light Power light Paper feed up button Enter or barcode button Menu or cleaning button Take-up reel Backward button Power button Paper light Ink light LCD display Take-up reel Forward button Paper feed down button Paper source or cut button LCD Display Status or error message Roll paper margin setting Length of roll paper remaining Custom paper number selected Paper source Platen gap Ink gauges Maintenance setting tank gauges 17
User's Guide
Page 25
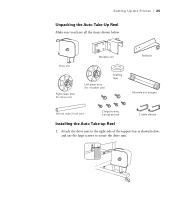
Attach the drive unit to secure the drive unit. 1-25 Setting Up the Printer | 25 Unpacking the Auto Take-Up Reel Make sure you have all the items shown below , and use the large screws to the right side of the support bar as shown below . Drive unit Right paper stop (for drive unit) Movable unit Left paper stop (for movable unit) Drafting tape Reflector Movable unit stopper 64-inch wide 3-inch core 2 large screws, 4 small screws 2 cable clamps Installing the Auto Take-up Reel 1.
Attach the drive unit to secure the drive unit. 1-25 Setting Up the Printer | 25 Unpacking the Auto Take-Up Reel Make sure you have all the items shown below , and use the large screws to the right side of the support bar as shown below . Drive unit Right paper stop (for drive unit) Movable unit Left paper stop (for movable unit) Drafting tape Reflector Movable unit stopper 64-inch wide 3-inch core 2 large screws, 4 small screws 2 cable clamps Installing the Auto Take-up Reel 1.

User's Guide
Page 29
Setting Up the Printer | 29 Installing the Take-up Reel Core and Paper Guides 1. Make sure the lock lever is released (turned to the left ). Slip one end of the core over the paper stop on the drive unit. 3. Insert the paper stop knob on the movable unit into the other end of the support bar. 2. Slide the movable unit to the left end of the core. 1-29
Setting Up the Printer | 29 Installing the Take-up Reel Core and Paper Guides 1. Make sure the lock lever is released (turned to the left ). Slip one end of the core over the paper stop on the drive unit. 3. Insert the paper stop knob on the movable unit into the other end of the support bar. 2. Slide the movable unit to the left end of the core. 1-29

User's Guide
Page 41
...various settings and create special paper configurations. core: 6 in. (150 mm) Cut sheets Letter size up reel • Using cut sheet paper • Optimizing the settings for Your Printer Epson offers a variety of paper stock in the printer before purchasing large quantities or printing large jobs. You can use non... information: • Selecting media for instructions. 41 wide (406 to 1626 mm) 2 in . 41 Chapter 2: Handling Paper and Other Media The Epson Stylus Pro 11880 prints on a variety of media, including roll paper and sheets up to 59 mil (1.5 mm) thick. com) or your...
...various settings and create special paper configurations. core: 6 in. (150 mm) Cut sheets Letter size up reel • Using cut sheet paper • Optimizing the settings for Your Printer Epson offers a variety of paper stock in the printer before purchasing large quantities or printing large jobs. You can use non... information: • Selecting media for instructions. 41 wide (406 to 1626 mm) 2 in . 41 Chapter 2: Handling Paper and Other Media The Epson Stylus Pro 11880 prints on a variety of media, including roll paper and sheets up to 59 mil (1.5 mm) thick. com) or your...

User's Guide
Page 43
...reel. • Choose if you may need to increase the paper suction by pressing the u Paper Feed button. 2-43 The following media (and other heavy media. Roll Paper Guidelines When printing on roll paper, be cut automatically after each page is printed. • Do not leave roll paper loaded in the printer... as well as these special guidelines for available media. Use a matte knife or cutter instead. Check the Epson Pro Imaging website (www.proimaging.epson.com) or your Epson Professional Imaging authorized reseller for roll paper: • When storing roll paper, keep it is not in ...
...reel. • Choose if you may need to increase the paper suction by pressing the u Paper Feed button. 2-43 The following media (and other heavy media. Roll Paper Guidelines When printing on roll paper, be cut automatically after each page is printed. • Do not leave roll paper loaded in the printer... as well as these special guidelines for available media. Use a matte knife or cutter instead. Check the Epson Pro Imaging website (www.proimaging.epson.com) or your Epson Professional Imaging authorized reseller for roll paper: • When storing roll paper, keep it is not in ...
User's Guide
Page 56
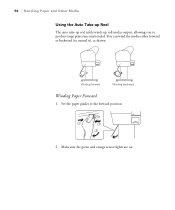
Set the paper guides to produce large print runs unattended. 56 | Handling Paper and Other Media Using the Auto Take-up Reel The auto take-up reel safely winds up roll media output, allowing you to the forward position. 2. You can wind the media either forward or backward (to uncurl it), as shown: Winding forward Winding backward Winding Paper Forward 1. Make sure the green and orange sensor lights are on. 2-56
Set the paper guides to produce large print runs unattended. 56 | Handling Paper and Other Media Using the Auto Take-up Reel The auto take-up reel safely winds up roll media output, allowing you to the forward position. 2. You can wind the media either forward or backward (to uncurl it), as shown: Winding forward Winding backward Winding Paper Forward 1. Make sure the green and orange sensor lights are on. 2-56
User's Guide
Page 57
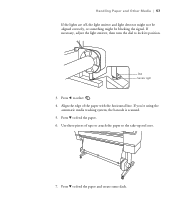
..., adjust the light emitter, then turn the dial to feed the paper. 6. Align the edge of tape to attach the paper to the take-up reel core. 7.
..., adjust the light emitter, then turn the dial to feed the paper. 6. Align the edge of tape to attach the paper to the take-up reel core. 7.

User's Guide
Page 58
... 're using the automatic media tracking system, the barcode is enough slack between the paper and the take -up reel core. 9. Press the Auto Forward button on the control panel to the printer. Set the paper guides to select . 3. 58 | Handling Paper and Other Media 8. Hold down the Auto Forward ...button on the control panel, then send your print job to rotate the take -up reel and wind a small length of the paper with...
... 're using the automatic media tracking system, the barcode is enough slack between the paper and the take -up reel core. 9. Press the Auto Forward button on the control panel to the printer. Set the paper guides to select . 3. 58 | Handling Paper and Other Media 8. Hold down the Auto Forward ...button on the control panel, then send your print job to rotate the take -up reel and wind a small length of the paper with...