Network Guide
Page 5
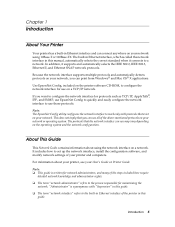
... called the network interface in this guide. Introduction 5 This does not imply that the network interface can use all of the printer in this manual, automatically selects the correct standard when it supports and automatically selects the IEEE 802.2, IEEE 802.3, Ethernet II, and Ethernet SNAP... network protocols. It includes how to use on your printer and computers. For information about using 10Base-T or 100Base-TX. ...
... called the network interface in this guide. Introduction 5 This does not imply that the network interface can use all of the printer in this manual, automatically selects the correct standard when it supports and automatically selects the IEEE 802.2, IEEE 802.3, Ethernet II, and Ethernet SNAP... network protocols. It includes how to use on your printer and computers. For information about using 10Base-T or 100Base-TX. ...
Network Guide
Page 6
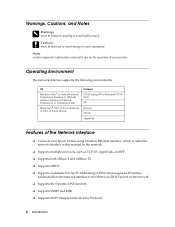
c Cautions must be observed to avoid damage to the network interface even if there is called the network interface in this manual, to the network. ❏ Supports multiple protocols, such as TCP/IP, AppleTalk, and IPP. ❏ Supports both 10Base-T and 100Base-TX. ❏ ... Protocol TCP/IP (using a built-in Ethernet interface, which is no DHCP server on the operation of the Network Interface ❏ Connects your Epson printer using LPR or Standard TCP/IP Port) IPP Bonjour TCP/IP AppleTalk Features of your equipment. Warnings, Cautions, and Notes w Warnings must be ...
c Cautions must be observed to avoid damage to the network interface even if there is called the network interface in this manual, to the network. ❏ Supports multiple protocols, such as TCP/IP, AppleTalk, and IPP. ❏ Supports both 10Base-T and 100Base-TX. ❏ ... Protocol TCP/IP (using a built-in Ethernet interface, which is no DHCP server on the operation of the Network Interface ❏ Connects your Epson printer using LPR or Standard TCP/IP Port) IPP Bonjour TCP/IP AppleTalk Features of your equipment. Warnings, Cautions, and Notes w Warnings must be ...
Network Guide
Page 15
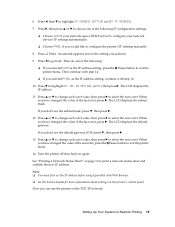
...12. The LCD displays the subnet mask. When you selected AUTO as the IP address setting, continue with step 10. 10. Turn the printer off then back on the printer's control panel. Note: ❏ You must first set the IP address before using EpsonNet with step 14. ❏ If you have .... 11. If you would like to select the next octet. Press u or d to change each octet value, then press r to configure the printer's IP settings manually. 8. Now you have changed the value of the last octet, press the Pause button to print a network status sheet and confirm the new IP...
...12. The LCD displays the subnet mask. When you selected AUTO as the IP address setting, continue with step 10. 10. Turn the printer off then back on the printer's control panel. Note: ❏ You must first set the IP address before using EpsonNet with step 14. ❏ If you have .... 11. If you would like to select the next octet. Press u or d to change each octet value, then press r to configure the printer's IP settings manually. 8. Now you have changed the value of the last octet, press the Pause button to print a network status sheet and confirm the new IP...
Network Guide
Page 18
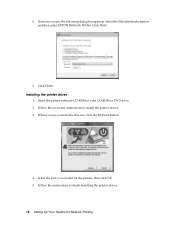
Click Next. 7. Click Finish. Follow the on-screen instructions to finish installing the printer driver. 18 Setting Up Your System for the printer, then click OK. 5. Follow the instructions to install the printer driver. 3. When you created for Network Printing If an error occurs, the following dialog box appears. Select the port you see a screen like this one, click the Manual button. 4. Select the Standard radio button and then select EPSON Network Printer. Installing the printer driver 1. 6. Insert the printer software CD-ROM in your CD-ROM or DVD drive. 2.
Click Next. 7. Click Finish. Follow the on-screen instructions to finish installing the printer driver. 18 Setting Up Your System for the printer, then click OK. 5. Follow the instructions to install the printer driver. 3. When you created for Network Printing If an error occurs, the following dialog box appears. Select the port you see a screen like this one, click the Manual button. 4. Select the Standard radio button and then select EPSON Network Printer. Installing the printer driver 1. 6. Insert the printer software CD-ROM in your CD-ROM or DVD drive. 2.
Network Guide
Page 21
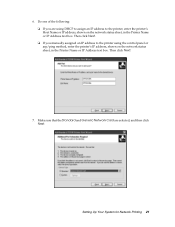
...address, shown on the network status sheet, in the Printer Name or IP Address text box. Do one of the following: ❏ If you manually assigned an IP address to the printer using DHCP to assign an IP address to the printer, enter the printer's Host Name or IP address, shown on the ...network status sheet, in the Printer Name or IP Address text box. Then click Next. &#...
...address, shown on the network status sheet, in the Printer Name or IP Address text box. Do one of the following: ❏ If you manually assigned an IP address to the printer using DHCP to assign an IP address to the printer, enter the printer's Host Name or IP address, shown on the ...network status sheet, in the Printer Name or IP Address text box. Then click Next. &#...
Network Guide
Page 23
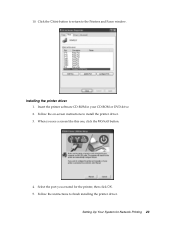
Setting Up Your System for the printer, then click OK. 5. Insert the printer software CD-ROM in your CD-ROM or DVD drive. 2. Follow the instructions to install the printer driver. 3. Installing the printer driver 1. Follow the on-screen instructions to finish installing the printer driver. 10. Select the port you see a screen like this one, click the Manual button. 4. Click the Close button to return to the Printers and Faxes window. When you created for Network Printing 23
Setting Up Your System for the printer, then click OK. 5. Insert the printer software CD-ROM in your CD-ROM or DVD drive. 2. Follow the instructions to install the printer driver. 3. Installing the printer driver 1. Follow the on-screen instructions to finish installing the printer driver. 10. Select the port you see a screen like this one, click the Manual button. 4. Click the Close button to return to the Printers and Faxes window. When you created for Network Printing 23
Network Guide
Page 24
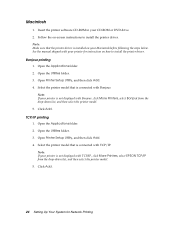
... Utility, and then click Add. 4. Open the Utilities folder. 3. Open the Applications folder. 2. See the manual shipped with TCP/IP, click More Printers, select EPSON TCP/IP from the drop-down list, and then select the printer model. 5. Open Printer Setup Utility, and then click Add. 4. Open the Utilities folder. 3. Click Add. 24 Setting Up...
... Utility, and then click Add. 4. Open the Utilities folder. 3. Open the Applications folder. 2. See the manual shipped with TCP/IP, click More Printers, select EPSON TCP/IP from the drop-down list, and then select the printer model. 5. Open Printer Setup Utility, and then click Add. 4. Open the Utilities folder. 3. Click Add. 24 Setting Up...
Network Guide
Page 28
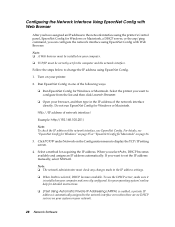
.... ❏ When Auto is selected, DHCP becomes available. To use EpsonNet Config. Do not run EpsonNet Config for Macintosh" on your printer. 2. Click TCP/IP under Network on your computer and correctly configured. Run EpsonNet Config in the IP address of the following ways....screen. 4. Select a method for Windows or Macintosh. Note: ❏ A Web browser must be correctly set the IP address manually, select Manual. Turn on the Configuration menu to change the IP address using EpsonNet Config. 1. Configuring the Network Interface Using EpsonNet Config with Web Browser...
.... ❏ When Auto is selected, DHCP becomes available. To use EpsonNet Config. Do not run EpsonNet Config for Macintosh" on your printer. 2. Click TCP/IP under Network on your computer and correctly configured. Run EpsonNet Config in the IP address of the following ways....screen. 4. Select a method for Windows or Macintosh. Note: ❏ A Web browser must be correctly set the IP address manually, select Manual. Turn on the Configuration menu to change the IP address using EpsonNet Config. 1. Configuring the Network Interface Using EpsonNet Config with Web Browser...
Network Guide
Page 29
Note: If there is not supported, we recommend that you want to specify manually, enter the host name and the domain name in the text boxes. 10. Select Disable when setting an IP address with any unexpected change the printer port setting accordingly. 5. ❏ If the Dynamic DNS function is a ... Enable or Disable for Use Universal Plug and Play. To assign an IP address manually, enter the IP address, the subnet mask, and the default gateway. If you want to use the printer on the printer so that you want to the DNS server, select Enable for Windows systems that ...
Note: If there is not supported, we recommend that you want to specify manually, enter the host name and the domain name in the text boxes. 10. Select Disable when setting an IP address with any unexpected change the printer port setting accordingly. 5. ❏ If the Dynamic DNS function is a ... Enable or Disable for Use Universal Plug and Play. To assign an IP address manually, enter the IP address, the subnet mask, and the default gateway. If you want to use the printer on the printer so that you want to the DNS server, select Enable for Windows systems that ...

Network Guide
Page 32
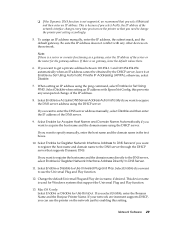
If you are connecting the printer to get a private address between 169.254.1.1 and 169.254.254.254 automatically when an IP address cannot be ..., select Disable. To use the DHCP server, make sure the setting matches the type of hub or switch you are connecting the printer directly to acquire the DNS server address from the DHCP server. Select Enable to a hub or switch, select MDI. Enables or disables...Server Address Descriptions Select a method for Acquire DNS server address automatically, the DNS server address set the IP address manually, select Manual. Set the subnet mask.
If you are connecting the printer to get a private address between 169.254.1.1 and 169.254.254.254 automatically when an IP address cannot be ..., select Disable. To use the DHCP server, make sure the setting matches the type of hub or switch you are connecting the printer directly to acquire the DNS server address from the DHCP server. Select Enable to a hub or switch, select MDI. Enables or disables...Server Address Descriptions Select a method for Acquire DNS server address automatically, the DNS server address set the IP address manually, select Manual. Set the subnet mask.
Network Guide
Page 34
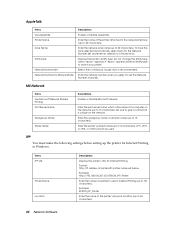
...Format: http://IP address of a computer on the network. Usually Auto is the name of printer:631/printer name set the Network Number manually. Be sure to match your printer. Select Auto or Manual. MS Network Items Use Microsoft Network Shared Printing Print Server Name Workgroup Name Share Name Descriptions Enable..., select Auto for the Network Number Set and enter an asterisk (*) in Windows. Do not change the entity type unless "epson" appears. Enter the network number when you select to set below Example: http://192.168.100.201:631/EPSON_IPP_Printer Enter the name of ...
...Format: http://IP address of a computer on the network. Usually Auto is the name of printer:631/printer name set the Network Number manually. Be sure to match your printer. Select Auto or Manual. MS Network Items Use Microsoft Network Shared Printing Print Server Name Workgroup Name Share Name Descriptions Enable..., select Auto for the Network Number Set and enter an asterisk (*) in Windows. Do not change the entity type unless "epson" appears. Enter the network number when you select to set below Example: http://192.168.100.201:631/EPSON_IPP_Printer Enter the name of ...

Network Guide
Page 36
... Value LPR RAW (Port9100) IPP Descriptions Select this checkbox when you can set the values before a timeout occurs. Manual Settings If the network interface has RTC (Real Time Clock), you set the time manually. Set the length of the time server. Time Items Time Descriptions Displays the time. Enter the time interval...
... Value LPR RAW (Port9100) IPP Descriptions Select this checkbox when you can set the values before a timeout occurs. Manual Settings If the network interface has RTC (Real Time Clock), you set the time manually. Set the length of the time server. Time Items Time Descriptions Displays the time. Enter the time interval...
Network Guide
Page 39
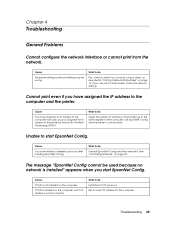
.... Cause You have assigned an IP address to start EpsonNet Config. TCP/IP is installed on page 16. Unable to the computer manually, but its IP address is installed" appears when you start EpsonNet Config. If you can print a status sheet, check the network... settings. What to the printer by Automatic Private IP Addressing (APIPA). Chapter 4 Troubleshooting General Problems Cannot configure the network interface or cannot print from the network. Cannot...
.... Cause You have assigned an IP address to start EpsonNet Config. TCP/IP is installed on page 16. Unable to the computer manually, but its IP address is installed" appears when you start EpsonNet Config. If you can print a status sheet, check the network... settings. What to the printer by Automatic Private IP Addressing (APIPA). Chapter 4 Troubleshooting General Problems Cannot configure the network interface or cannot print from the network. Cannot...

Product Brochure
Page 8
...Epson does not guarantee longevity of use and temperature. Epson, Epson Stylus, MicroPiezo and Epson ESC/P are registered trademarks and Epson Exceed Your Vision, Epson UltraChrome K3, TFP and Microcrystal Encapsulation are trademarks and/or registered trademarks of specified page length Lightfastness RatingsD Epson UltraChrome K3 Ink Color...Epson Stylus Pro 11880 Printer Epson Stylus Pro 11880 ColorBurst Edition Includes ColorBurst® RIP Additional One-year Epson Preferred Plus service Additional Two-year Epson... Automatic and manual cutting ~2,000 cuts (coated media) Auto forward and...
...Epson does not guarantee longevity of use and temperature. Epson, Epson Stylus, MicroPiezo and Epson ESC/P are registered trademarks and Epson Exceed Your Vision, Epson UltraChrome K3, TFP and Microcrystal Encapsulation are trademarks and/or registered trademarks of specified page length Lightfastness RatingsD Epson UltraChrome K3 Ink Color...Epson Stylus Pro 11880 Printer Epson Stylus Pro 11880 ColorBurst Edition Includes ColorBurst® RIP Additional One-year Epson Preferred Plus service Additional Two-year Epson... Automatic and manual cutting ~2,000 cuts (coated media) Auto forward and...

Product Information Guide
Page 5
...below the ink icons on the LCD display correspond to the 9 ink cartridge slots on the printer (as follows: Full Half full 20% or less Ink low (flashing) Letters indicate ink color Ink expended Cartridge error or no cartridge When the red B ink check light (and the ink...the cartridge before you start, make sure the printer is from the printer. Warning: Do not shake the expended cartridge, or ink may leak out. Epson Stylus Pro 11880 Menu HEAD ALIGNMENT NETWORK SETUP Item PAPER THICKNESS SELECT PAPER TYPE SELECT THICKNESS ALIGNMENT AUTO MANUAL NETWORK SETUP IP ADDRESS SETTING IP, SM, ...
...below the ink icons on the LCD display correspond to the 9 ink cartridge slots on the printer (as follows: Full Half full 20% or less Ink low (flashing) Letters indicate ink color Ink expended Cartridge error or no cartridge When the red B ink check light (and the ink...the cartridge before you start, make sure the printer is from the printer. Warning: Do not shake the expended cartridge, or ink may leak out. Epson Stylus Pro 11880 Menu HEAD ALIGNMENT NETWORK SETUP Item PAPER THICKNESS SELECT PAPER TYPE SELECT THICKNESS ALIGNMENT AUTO MANUAL NETWORK SETUP IP ADDRESS SETTING IP, SM, ...
Product Information Guide
Page 7
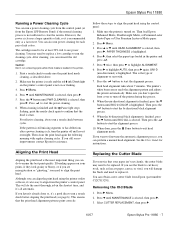
... process is not sufficient to run a nozzle check between cycles. If banding appears on . Press u or d until BI-D 2-COLOR is selected, then press r. Press r to exit head alignment mode. Each head alignment takes about 7 minutes. When the bi-...printer off the printer during this process. 8. Epson Stylus Pro 11880 Running a Power Cleaning Cycle You can run a power cleaning cycle from the control panel (or from Epson (part number C12C815291). However, the power cycle uses a larger quantity of ink, so it 's also easy to start the power cleaning. 6. You can perform a manual...
... process is not sufficient to run a nozzle check between cycles. If banding appears on . Press u or d until BI-D 2-COLOR is selected, then press r. Press r to exit head alignment mode. Each head alignment takes about 7 minutes. When the bi-...printer off the printer during this process. 8. Epson Stylus Pro 11880 Running a Power Cleaning Cycle You can run a power cleaning cycle from the control panel (or from Epson (part number C12C815291). However, the power cycle uses a larger quantity of ink, so it 's also easy to start the power cleaning. 6. You can perform a manual...
Product Information Guide
Page 9
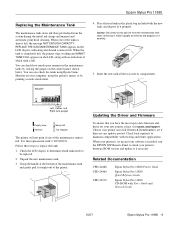
...during the initial ink charge and manual and automatic print head cleaning. Grasp the handle at all the way into its compartment. Choose your printer and click Drivers & Downloads to maintain compatibility with an indication of the printer. Check back regularly to see if.... Check the LCD display to determine which tank is full. Related Documentation CPD-24468 CPD-24469 CPD-24519 Epson Stylus Pro 11880 Printer Guide Epson Stylus Pro 11880 Quick Reference Guide Epson Stylus Pro 11880 CD-ROM with the new tank, and dispose of the maintenance tanks is full. Place the used tank ...
...during the initial ink charge and manual and automatic print head cleaning. Grasp the handle at all the way into its compartment. Choose your printer and click Drivers & Downloads to maintain compatibility with an indication of the printer. Check back regularly to see if.... Check the LCD display to determine which tank is full. Related Documentation CPD-24468 CPD-24469 CPD-24519 Epson Stylus Pro 11880 Printer Guide Epson Stylus Pro 11880 Quick Reference Guide Epson Stylus Pro 11880 CD-ROM with the new tank, and dispose of the maintenance tanks is full. Place the used tank ...

Quick Reference Guide
Page 6
... cleaning cycles from your computer using the Epson Printer Utility 2 (Macintosh) or the Utility tab in your Printer Guide for 3 seconds. This process uses a very small amount of alignment to highlight AUTO, then press Menu again. ALIGNMENT AUTO UNI-D BI-D 2 COLOR BI-D ALL 9 To clean the print head manually, press the Menu button and hold...
... cleaning cycles from your computer using the Epson Printer Utility 2 (Macintosh) or the Utility tab in your Printer Guide for 3 seconds. This process uses a very small amount of alignment to highlight AUTO, then press Menu again. ALIGNMENT AUTO UNI-D BI-D 2 COLOR BI-D ALL 9 To clean the print head manually, press the Menu button and hold...

Quick Reference Guide
Page 11
... ALERT CUSTOM PAPER PAPER TYPE PLATEN GAP THICKNESS PATTERN CUT METHOD PAPER FEED ADJUST DRYING TIME PAPER SUCTION Media type loaded in the printer Setting appears only when no paper is loaded OFF, ON:PRINT EVERY PAGE, ON:AT ROLL EXCHANGE From 15 to 300 ft... WIDEST PRINT STANDARD, THIN PAPER, THICK PAPER FAST, THICK PAPER SLOW -0.70% to 1.5 mm) ALIGNMENT AUTO UNI-D, BI-D 2-COLOR, BI-D ALL, BI-D #1, BI-D #2, BI-D #3, BI-D #4 MANUAL UNI-D, BI-D 2-COLOR, BI-D ALL NETWORK SETUP NETWORK SETUP DISABLE, ENABLE IP ADDRESS SETTING AUTO, PANEL IP, SM, DG SETTING IP address, subnet...
... ALERT CUSTOM PAPER PAPER TYPE PLATEN GAP THICKNESS PATTERN CUT METHOD PAPER FEED ADJUST DRYING TIME PAPER SUCTION Media type loaded in the printer Setting appears only when no paper is loaded OFF, ON:PRINT EVERY PAGE, ON:AT ROLL EXCHANGE From 15 to 300 ft... WIDEST PRINT STANDARD, THIN PAPER, THICK PAPER FAST, THICK PAPER SLOW -0.70% to 1.5 mm) ALIGNMENT AUTO UNI-D, BI-D 2-COLOR, BI-D ALL, BI-D #1, BI-D #2, BI-D #3, BI-D #4 MANUAL UNI-D, BI-D 2-COLOR, BI-D ALL NETWORK SETUP NETWORK SETUP DISABLE, ENABLE IP ADDRESS SETTING AUTO, PANEL IP, SM, DG SETTING IP address, subnet...
User's Guide
Page 2
... to strictly comply with these Epson printers. Trademarks Epson, Epson Stylus, Epson ESC/P, and MicroWeave are service marks of their respective owners. UltraSmooth is not responsible for use of any damages or problems arising from the use with Seiko Epson Corporation's operating and maintenance instructions. and Epson Preferred and Epson Store are registered trademarks and Epson Exceed Your Vision is...
... to strictly comply with these Epson printers. Trademarks Epson, Epson Stylus, Epson ESC/P, and MicroWeave are service marks of their respective owners. UltraSmooth is not responsible for use of any damages or problems arising from the use with Seiko Epson Corporation's operating and maintenance instructions. and Epson Preferred and Epson Store are registered trademarks and Epson Exceed Your Vision is...


