Network Guide
Page 3
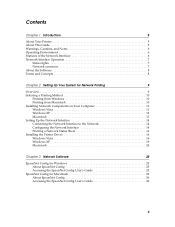
... Network Interface to the Network 14 Configuring the Network Interface 14 Printing a Network Status Sheet 16 Installing the Printer Driver 16 Windows Vista 16 Windows XP 19 Macintosh 24 Chapter 3 Network Software 25 EpsonNet Config for Windows 25 About EpsonNet Config 25 Accessing the EpsonNet Config User's Guide 25 EpsonNet Config for Macintosh 26 About...
... Network Interface to the Network 14 Configuring the Network Interface 14 Printing a Network Status Sheet 16 Installing the Printer Driver 16 Windows Vista 16 Windows XP 19 Macintosh 24 Chapter 3 Network Software 25 EpsonNet Config for Windows 25 About EpsonNet Config 25 Accessing the EpsonNet Config User's Guide 25 EpsonNet Config for Macintosh 26 About...

Network Guide
Page 9
...Operation" on page 14 for details. 5. See "Connecting the Network Interface to set . 4. Configure the network interface and install the printer driver. using EpsonNet Config. Check the network interface operation. Select a printing method. Make sure the necessary components (such as TCP/IP) ...Configure the network interface for Network Printing 9 Connect the network interface to the network. For Macintosh users, see "EpsonNet Config for Windows" on how to the Network" on page 7 for details. 2. Install the necessary components on page 26. Chapter 2 Setting Up...
...Operation" on page 14 for details. 5. See "Connecting the Network Interface to set . 4. Configure the network interface and install the printer driver. using EpsonNet Config. Check the network interface operation. Select a printing method. Make sure the necessary components (such as TCP/IP) ...Configure the network interface for Network Printing 9 Connect the network interface to the network. For Macintosh users, see "EpsonNet Config for Windows" on how to the Network" on page 7 for details. 2. Install the necessary components on page 26. Chapter 2 Setting Up...
Network Guide
Page 16
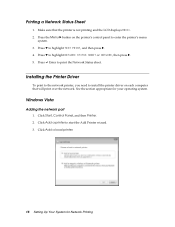
...NETWORK STATUS SHEET or NETWORK, then press r. 5. See the section appropriate for Network Printing Windows Vista Adding the network port 1. Click Add a printer to enter the printer's menu system. 3. Click Add a local printer. 16 Setting Up Your System for your operating system. Printing a Network Status Sheet 1. ...Press the Menu r button on each computer that the printer is not printing and the LCD displays READY. 2. Installing the Printer Driver To print to the network printer, you need to print the Network Status sheet. Make sure that will print...
...NETWORK STATUS SHEET or NETWORK, then press r. 5. See the section appropriate for Network Printing Windows Vista Adding the network port 1. Click Add a printer to enter the printer's menu system. 3. Click Add a local printer. 16 Setting Up Your System for your operating system. Printing a Network Status Sheet 1. ...Press the Menu r button on each computer that the printer is not printing and the LCD displays READY. 2. Installing the Printer Driver To print to the network printer, you need to print the Network Status sheet. Make sure that will print...
Network Guide
Page 23
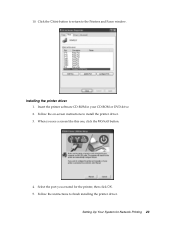
Insert the printer software CD-ROM in your CD-ROM or DVD drive. 2. Follow the instructions to the Printers and Faxes window. Click the Close button to return to finish installing the printer driver. Installing the printer driver 1. Select the port you see a screen like this one, click the Manual button. 4. 10. Setting Up Your System for the printer, then click OK. 5. When you created for Network Printing 23 Follow the on-screen instructions to install the printer driver. 3.
Insert the printer software CD-ROM in your CD-ROM or DVD drive. 2. Follow the instructions to the Printers and Faxes window. Click the Close button to return to finish installing the printer driver. Installing the printer driver 1. Select the port you see a screen like this one, click the Manual button. 4. 10. Setting Up Your System for the printer, then click OK. 5. When you created for Network Printing 23 Follow the on-screen instructions to install the printer driver. 3.

Network Guide
Page 45
... EpsonNet Config with Web Browser password, 37 settings, 30 to 38 using, 27 to 30 I Installing printer driver Macintosh, 24 Windows Vista, 16 to 18 Windows XP, 19 to 23 IP address arp/ping command, 41 to 43 control panel, 14 to 15 EpsonNet Config with Web Browser,... to network, 14 Network software, uninstalling, 43 O Operating environment, 6 P Password, EpsonNet Config with Web Browser, 37 ping, 42 Printer driver installing in Windows Vista, 16 to 18 installing in Windows XP, 19 to 23 installing on Macintosh, 24 Problems, solving, 39 to 40 Protocols, 6 R Resetting network interface, 31, 37 ...
... EpsonNet Config with Web Browser password, 37 settings, 30 to 38 using, 27 to 30 I Installing printer driver Macintosh, 24 Windows Vista, 16 to 18 Windows XP, 19 to 23 IP address arp/ping command, 41 to 43 control panel, 14 to 15 EpsonNet Config with Web Browser,... to network, 14 Network software, uninstalling, 43 O Operating environment, 6 P Password, EpsonNet Config with Web Browser, 37 ping, 42 Printer driver installing in Windows Vista, 16 to 18 installing in Windows XP, 19 to 23 installing on Macintosh, 24 Problems, solving, 39 to 40 Protocols, 6 R Resetting network interface, 31, 37 ...
Product Brochure
Page 6
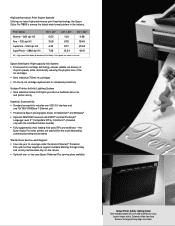
...Monday through Friday and usually next-business-day on-site service Optional one 10/100/1000Base-T Ethernet port Professional Epson photographic drivers for Macintosh® and Windows® Optional PANTONE® licensed and SWOP® certified PostScript® Language Level 3™ Compatible RIP...identify ink status to print engine activity. High-performance Print Engine SpeedsB Utilizing our latest high-performance print head technology, the Epson Stylus Pro 11880 is among the fastest wide-format printers in min:sec. Print Mode 16" x 20" 20" x 30" 40" x 60" Normal - 360 dpi HS...
...Monday through Friday and usually next-business-day on-site service Optional one 10/100/1000Base-T Ethernet port Professional Epson photographic drivers for Macintosh® and Windows® Optional PANTONE® licensed and SWOP® certified PostScript® Language Level 3™ Compatible RIP...identify ink status to print engine activity. High-performance Print Engine SpeedsB Utilizing our latest high-performance print head technology, the Epson Stylus Pro 11880 is among the fastest wide-format printers in min:sec. Print Mode 16" x 20" 20" x 30" 40" x 60" Normal - 360 dpi HS...

Product Brochure
Page 8
... Edition bundle) Supported by application, OS and driver/RIP used for priming the printer. Epson Stylus®Pro11880 Print Engine Specifications Printing Technology Advanced ...Epson engineering. realtime switch; no condensation) Product/Accessories Epson Stylus Pro 11880 Printer Epson Stylus Pro 11880 ColorBurst Edition Includes ColorBurst® RIP Additional One-year Epson Preferred Plus service Additional Two-year Epson... Auto forward and backward; Epson does not guarantee longevity of specified page length Lightfastness RatingsD Epson UltraChrome K3 Ink Color: B&W: Up to 200 years...
... Edition bundle) Supported by application, OS and driver/RIP used for priming the printer. Epson Stylus®Pro11880 Print Engine Specifications Printing Technology Advanced ...Epson engineering. realtime switch; no condensation) Product/Accessories Epson Stylus Pro 11880 Printer Epson Stylus Pro 11880 ColorBurst Edition Includes ColorBurst® RIP Additional One-year Epson Preferred Plus service Additional Two-year Epson... Auto forward and backward; Epson does not guarantee longevity of specified page length Lightfastness RatingsD Epson UltraChrome K3 Ink Color: B&W: Up to 200 years...

Quick Reference Guide
Page 6
...nozzles and cleans them if necessary. You can also run nozzle checks and head cleaning cycles from your computer using the Epson Printer Utility 2 (Macintosh) or the Utility tab in your printer driver (Windows). UNI-D (uni-directional) is turned on. Note: You can specify how often you want this to happen. 1...Paper. 2 Press the Menu button. 3 Press the or button until BI-D 2-COLOR is highlighted. ALIGNMENT AUTO UNI-D BI-D 2 COLOR BI-D ALL 9 To clean the print head manually, press the Menu button and hold it for most Epson® papers), press , then press twice to back up . 10 Press ...
...nozzles and cleans them if necessary. You can also run nozzle checks and head cleaning cycles from your computer using the Epson Printer Utility 2 (Macintosh) or the Utility tab in your printer driver (Windows). UNI-D (uni-directional) is turned on. Note: You can specify how often you want this to happen. 1...Paper. 2 Press the Menu button. 3 Press the or button until BI-D 2-COLOR is highlighted. ALIGNMENT AUTO UNI-D BI-D 2 COLOR BI-D ALL 9 To clean the print head manually, press the Menu button and hold it for most Epson® papers), press , then press twice to back up . 10 Press ...
User's Guide
Page 7
Contents | 7 4 Printing with Epson Drivers for Windows Choosing Basic Print Options 96 Selecting the Correct Media Type Setting 99 Choosing Printer Color Management Options 100 Choosing Roll Paper Options 102 Borderless Printing 104 Choosing Cut Sheet Paper Options 106 Choosing Page Layout Options 107 Choosing Paper Configuration ...
Contents | 7 4 Printing with Epson Drivers for Windows Choosing Basic Print Options 96 Selecting the Correct Media Type Setting 99 Choosing Printer Color Management Options 100 Choosing Roll Paper Options 102 Borderless Printing 104 Choosing Cut Sheet Paper Options 106 Choosing Page Layout Options 107 Choosing Paper Configuration ...
User's Guide
Page 8
... Jams 156 Uninstalling and Reinstalling the Printer Driver 158 Macintosh 158 Windows 158 7 Specifications Environmental 159 Electrical 159 Dimensions and Weight 159 Printer Interfaces 160 Safety Approvals 160 Media... 160 Roll Paper 160 Cut Sheets 160 Printable Area 162 Ink Cartridges 162 Appendix Control Panel Menus 163 Epson Roll Paper Information and ICC Profiles 166 Epson Cut Sheet Paper Information and ICC Profiles 167 Managing Color...
... Jams 156 Uninstalling and Reinstalling the Printer Driver 158 Macintosh 158 Windows 158 7 Specifications Environmental 159 Electrical 159 Dimensions and Weight 159 Printer Interfaces 160 Safety Approvals 160 Media... 160 Roll Paper 160 Cut Sheets 160 Printable Area 162 Ink Cartridges 162 Appendix Control Panel Menus 163 Epson Roll Paper Information and ICC Profiles 166 Epson Cut Sheet Paper Information and ICC Profiles 167 Managing Color...
User's Guide
Page 37
... and functionality up to date, you should check for Macintosh or Windows and follow the instructions on the Epson support site and update your printer, if necessary. You may also need to select the next octet. When you have changed the value of ...printer off then back on again. Visit Epson's U.S. Continue with the instructions in the next section to select the next octet. The LCD displays the default gateway. 13. Downloading the Firmware 1. support website or Canadian support website. 2. Click Drivers and Downloads. 3. When you have changed the value of the Epson...
... and functionality up to date, you should check for Macintosh or Windows and follow the instructions on the Epson support site and update your printer, if necessary. You may also need to select the next octet. When you have changed the value of ...printer off then back on again. Visit Epson's U.S. Continue with the instructions in the next section to select the next octet. The LCD displays the default gateway. 13. Downloading the Firmware 1. support website or Canadian support website. 2. Click Drivers and Downloads. 3. When you have changed the value of the Epson...

User's Guide
Page 42
...Load the media just before you send your job. 42 | Handling Paper and Other Media Guidelines for Using Epson Media Follow these guidelines, as well as those included in your printer driver software before printing. Avoid rapid changes in temperature and humidity. • Always choose the correct Media Type ...a dryer to 60% relative humidity. See page 80 (Mac OS X) or page 99 (Windows) for instructions on selecting the paper source in your bare hands. See page 75 (Mac OS X) or page 106 (Windows) for instructions. • Always select the correct paper source (roll or sheet) in a ...
...Load the media just before you send your job. 42 | Handling Paper and Other Media Guidelines for Using Epson Media Follow these guidelines, as well as those included in your printer driver software before printing. Avoid rapid changes in temperature and humidity. • Always choose the correct Media Type ...a dryer to 60% relative humidity. See page 80 (Mac OS X) or page 99 (Windows) for instructions on selecting the paper source in your bare hands. See page 75 (Mac OS X) or page 106 (Windows) for instructions. • Always select the correct paper source (roll or sheet) in a ...
User's Guide
Page 55
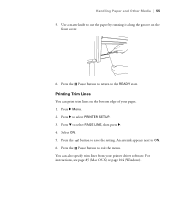
Press r Menu. 2. You can print trim lines on the front cover. 6. For instructions, see page 85 (Mac OS X) or page 104 (Windows). 2-55 Press r to ON. 6. An asterisk appears next to select PRINTER SETUP. 3. Press the Pause button to the READY state. Press the Pause button to return to exit the menu. Press.... 5. Handling Paper and Other Media | 55 5. Use a matte knife to cut the paper by running it along the groove on the bottom edge of your printer driver software.
Press r Menu. 2. You can print trim lines on the front cover. 6. For instructions, see page 85 (Mac OS X) or page 104 (Windows). 2-55 Press r to ON. 6. An asterisk appears next to select PRINTER SETUP. 3. Press the Pause button to the READY state. Press the Pause button to return to exit the menu. Press.... 5. Handling Paper and Other Media | 55 5. Use a matte knife to cut the paper by running it along the groove on the bottom edge of your printer driver software.
User's Guide
Page 70
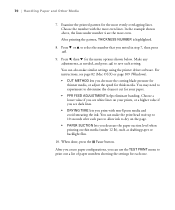
...if you see page 82 (Mac OS X) or page 109 (Windows). • CUT METHOD lets you decrease the cutting blade pressure for thinner media, or adjust the speed for each one. 2-70 You can make similar settings using the printer driver software. You can also make the print head wait up to... 10 seconds after each setting. Press l, then d for the most evenly overlapping lines. Choose the number with non-Epson media and avoid smearing the ink. You may need to...
...if you see page 82 (Mac OS X) or page 109 (Windows). • CUT METHOD lets you decrease the cutting blade pressure for thinner media, or adjust the speed for each one. 2-70 You can make similar settings using the printer driver software. You can also make the print head wait up to... 10 seconds after each setting. Press l, then d for the most evenly overlapping lines. Choose the number with non-Epson media and avoid smearing the ink. You may need to...

User's Guide
Page 91
... at least 3 seconds. 2. When you will lose your settings. 3. Type a name, and click OK. 4. When you're finished, close the print job window, then close the Presets menu without typing a name, or you 're ready to resume printing 3. Printing with Epson Drivers for Macintosh | 91 Caution: Do not open and close your printer window. 3-91
... at least 3 seconds. 2. When you will lose your settings. 3. Type a name, and click OK. 4. When you're finished, close the print job window, then close the Presets menu without typing a name, or you 're ready to resume printing 3. Printing with Epson Drivers for Macintosh | 91 Caution: Do not open and close your printer window. 3-91
User's Guide
Page 92
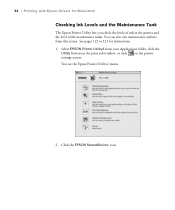
See pages 122 to 123 for Macintosh Checking Ink Levels and the Maintenance Tank The Epson Printer Utility lets you check the levels of ink in the printer and the level of the maintenance tanks. You can also run maintenance utilities from your Applications folder, click the Utility button on the print job window, or click on the printer settings screen. Select EPSON Printer Utility2 from this screen. Click the EPSON StatusMonitor icon. 3-92 You see the Epson Printer Utility2 menu: 2. 92 | Printing with Epson Drivers for instructions. 1.
See pages 122 to 123 for Macintosh Checking Ink Levels and the Maintenance Tank The Epson Printer Utility lets you check the levels of ink in the printer and the level of the maintenance tanks. You can also run maintenance utilities from your Applications folder, click the Utility button on the print job window, or click on the printer settings screen. Select EPSON Printer Utility2 from this screen. Click the EPSON StatusMonitor icon. 3-92 You see the Epson Printer Utility2 menu: 2. 92 | Printing with Epson Drivers for instructions. 1.
User's Guide
Page 93
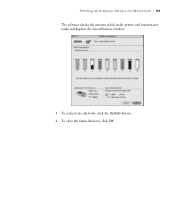
To close the Status Monitor, click OK. 3-93 To recheck the ink levels, click the Update button. 4. Printing with Epson Drivers for Macintosh | 93 The software checks the amount of ink in the printer and maintenance tanks and displays the StatusMonitor window: 3.
To close the Status Monitor, click OK. 3-93 To recheck the ink levels, click the Update button. 4. Printing with Epson Drivers for Macintosh | 93 The software checks the amount of ink in the printer and maintenance tanks and displays the StatusMonitor window: 3.

User's Guide
Page 95
... Type setting • Choosing color management settings • Choosing roll paper options • Choosing cut sheet options • Choosing paper configuration options • Choosing advanced black and white photo settings • Customizing the printer driver • Managing print jobs 95 95 Chapter 4: Printing with Epson Drivers for Windows Your Epson Stylus Pro 11880 comes with drivers and utilities that may become...
... Type setting • Choosing color management settings • Choosing roll paper options • Choosing cut sheet options • Choosing paper configuration options • Choosing advanced black and white photo settings • Customizing the printer driver • Managing print jobs 95 95 Chapter 4: Printing with Epson Drivers for Windows Your Epson Stylus Pro 11880 comes with drivers and utilities that may become...
User's Guide
Page 111
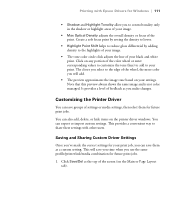
The closer you select to share these settings with Epson Drivers for future print jobs. It provides a level of the wheel, the more color you will save them for Windows | 111 • Shadow and Highlight Tonality allow you use the same profile/printer/ink/media combination for your black and white print.... your image. • Max Optical Density adjusts the overall density or focus of the screen (on the printer driver windows. Note that this preview always shows the same image and is not color managed. You can also add, delete, or hide items on the Main or Page Layout tab). 4-111...
The closer you select to share these settings with Epson Drivers for future print jobs. It provides a level of the wheel, the more color you will save them for Windows | 111 • Shadow and Highlight Tonality allow you use the same profile/printer/ink/media combination for your black and white print.... your image. • Max Optical Density adjusts the overall density or focus of the screen (on the printer driver windows. Note that this preview always shows the same image and is not color managed. You can also add, delete, or hide items on the Main or Page Layout tab). 4-111...

Printer Guide
Page 117
...Epson Drivers for Windows | 117 • Shadow and Highlight Tonality allow you to your print job, you make changes. Printing with other users. It provides a level of settings or media settings, then select them as you can also add, delete, or hide items on the Main or Page Layout tab). 4-117 Customizing the Printer Driver...at the top of the color wheel or enter corresponding values to customize the tone (hue) to add to control tonality only in the shadow or highlight areas of your black and white print. Click on any portion of the screen (on the printer driver windows.
...Epson Drivers for Windows | 117 • Shadow and Highlight Tonality allow you to your print job, you make changes. Printing with other users. It provides a level of settings or media settings, then select them as you can also add, delete, or hide items on the Main or Page Layout tab). 4-117 Customizing the Printer Driver...at the top of the color wheel or enter corresponding values to customize the tone (hue) to add to control tonality only in the shadow or highlight areas of your black and white print. Click on any portion of the screen (on the printer driver windows.

