Quick Install Guide
Page 5
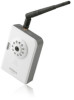
Enter the password for the camera (default: 1234) in the CD-ROM. 4. Note: MacOS utility is launched, all cameras found on the LAN are displayed. The setup wizard will guide you through the setup process. You can also find the file in the login dialogue. 4 To connect to install the utility software. After EdiView Finder is supported within the CD-ROM EdiView Finder Utility. Configuring the EdiView Finder Utility 3. Insert the Edimax CD into your CD-ROM drive and click "Setup Utility" to a specific camera, double-click the camera listing.
Enter the password for the camera (default: 1234) in the CD-ROM. 4. Note: MacOS utility is launched, all cameras found on the LAN are displayed. The setup wizard will guide you through the setup process. You can also find the file in the login dialogue. 4 To connect to install the utility software. After EdiView Finder is supported within the CD-ROM EdiView Finder Utility. Configuring the EdiView Finder Utility 3. Insert the Edimax CD into your CD-ROM drive and click "Setup Utility" to a specific camera, double-click the camera listing.

Quick Install Guide
Page 7
...You may also find MAC address. 6 Enter the Cloud ID, Username and Password to get MAC address. 3. Run the Ediview Finder application to finish the installation. Log onto the camera web configuration page (Default IP:192.168.2.3). Please go to the Apple App store or Google Android ...Go to download "Ediview". Viewing the Camera with a Cloud ID card which contains the camera's Cloud ID (MAC address), username ( default : admin ) and password ( default : 1234 ). Note: Each network camera comes with a Smartphone 8. The sticker on the bottom of the camera says MAC:xxxxxxxxxxxxxx. 2.
...You may also find MAC address. 6 Enter the Cloud ID, Username and Password to get MAC address. 3. Run the Ediview Finder application to finish the installation. Log onto the camera web configuration page (Default IP:192.168.2.3). Please go to the Apple App store or Google Android ...Go to download "Ediview". Viewing the Camera with a Cloud ID card which contains the camera's Cloud ID (MAC address), username ( default : admin ) and password ( default : 1234 ). Note: Each network camera comes with a Smartphone 8. The sticker on the bottom of the camera says MAC:xxxxxxxxxxxxxx. 2.
Manual
Page 24
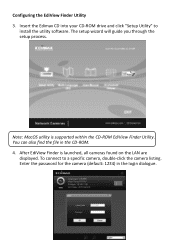
Select 'DHCP' to set the camera to obtain an IP address from DHCP server on local area network automatically, and select 'Manual IP' to save settings. 23 Click 'OK' to input the IP address information manually. Input the password (default: 1234) and click OK to configure the camera's network and security setting: In 'Lan Setting' page, you can configure camera's network settings.
Select 'DHCP' to set the camera to obtain an IP address from DHCP server on local area network automatically, and select 'Manual IP' to save settings. 23 Click 'OK' to input the IP address information manually. Input the password (default: 1234) and click OK to configure the camera's network and security setting: In 'Lan Setting' page, you can configure camera's network settings.

Manual
Page 25
... Make sure the network camera is correctly powered (Power LED is '1234'. Please try to input the user name and password: Default user name is 'admin' and password is on), and then launch Internet Explorer and type the IP address of the network camera in address bar of Internet Explorer...if this is a newly-purchased camera, however, if you get the camera from someone else, the password would be prompted to obtain the correct user name / password, or you 're rejected, maybe the password has been modified previously. This should be changed. Click 'OK' to reset the camera. 24 If...
... Make sure the network camera is correctly powered (Power LED is '1234'. Please try to input the user name and password: Default user name is 'admin' and password is on), and then launch Internet Explorer and type the IP address of the network camera in address bar of Internet Explorer...if this is a newly-purchased camera, however, if you get the camera from someone else, the password would be prompted to obtain the correct user name / password, or you 're rejected, maybe the password has been modified previously. This should be changed. Click 'OK' to reset the camera. 24 If...
Manual
Page 42
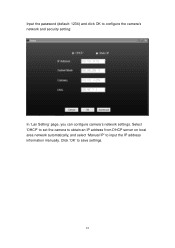
... Description This camera can obtain the IP address from DHCP server automatically (if you have one), or set a fixed IP address. If it . Default value should input here. Specify the gateway address of backup DNS server here. Input the MTU (Maximum Transmission Unit) given by your ISP here....then you don't know what value you 'll have to disable it 's not 80, you should work with a fixed IP address. Input the PPPoE password assigned by your ISP for help. Select 'Enable' to activate PPPoE function of this Network Camera, select 'Disable' to input 'http://10.20.20....
... Description This camera can obtain the IP address from DHCP server automatically (if you have one), or set a fixed IP address. If it . Default value should input here. Specify the gateway address of backup DNS server here. Input the MTU (Maximum Transmission Unit) given by your ISP here....then you don't know what value you 'll have to disable it 's not 80, you should work with a fixed IP address. Input the PPPoE password assigned by your ISP for help. Select 'Enable' to activate PPPoE function of this Network Camera, select 'Disable' to input 'http://10.20.20....
Manual
Page 63
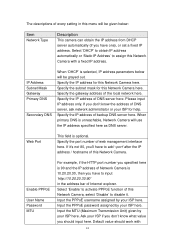
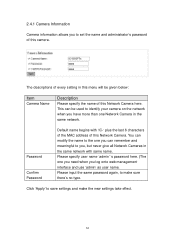
Please input the same password again, to make the new settings take effect. 62 This can remember and meaningful to you, but never give all Network Cameras in the same network with 'IC-' plus the last 6 characters of the MAC address of this Network Camera. You can modify the name...you need when you have more than one you can be given below: Item Camera Name Description Please specify the name of this camera. Password Confirm Password Default name begins with same name. Click 'Apply' to save settings and make sure there's no typo. The descriptions of every setting in ...
Please input the same password again, to make the new settings take effect. 62 This can remember and meaningful to you, but never give all Network Cameras in the same network with 'IC-' plus the last 6 characters of the MAC address of this Network Camera. You can modify the name...you need when you have more than one you can be given below: Item Camera Name Description Please specify the name of this camera. Password Confirm Password Default name begins with same name. Click 'Apply' to save settings and make sure there's no typo. The descriptions of every setting in ...
Manual
Page 85
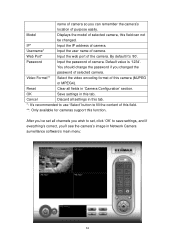
...button to save settings, and if everything's correct, you can not be changed the password of selected camera. IP* Input the IP address of camera. Cancel Discard all fields in 'Camera Configuration' section. Default value is '1234'. name of camera so you 'll see the camera's image... in Network Camera surveillance software's main menu: 84 Reset Clear all settings in this function. By default it's '80'. You should change the password if you changed .
...button to save settings, and if everything's correct, you can not be changed the password of selected camera. IP* Input the IP address of camera. Cancel Discard all fields in 'Camera Configuration' section. Default value is '1234'. name of camera so you 'll see the camera's image... in Network Camera surveillance software's main menu: 84 Reset Clear all settings in this function. By default it's '80'. You should change the password if you changed .
Manual
Page 95
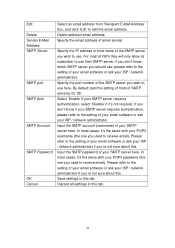
... the SMTP server you wish to use. Input the SMTP account (username) of your SMTP server here. Input the SMTP password of your SMTP server here. Save settings in this . By default (and the setting of most of SMTP servers) it 's not required. If you 're not sure about this tab. ...94 Edit Delete Sender E-Mail Address SMTP Server SMTP port SMTP Auth SMTP Account SMTP Password OK Cancel Select an email address from 'Recipient...
... the SMTP server you wish to use. Input the SMTP account (username) of your SMTP server here. Input the SMTP password of your SMTP server here. Save settings in this . By default (and the setting of most of SMTP servers) it 's not required. If you 're not sure about this tab. ...94 Edit Delete Sender E-Mail Address SMTP Server SMTP port SMTP Auth SMTP Account SMTP Password OK Cancel Select an email address from 'Recipient...
Manual
Page 114
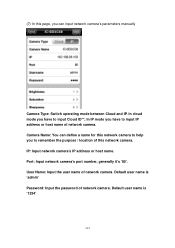
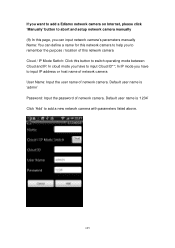
... name of network camera. Camera Name: You can input network camera's parameters manually Camera Type: Switch operating mode between Cloud and IP. Default user name is 'admin' Password: Input the password of network camera. Port: Input network camera's port number, generally it's '80'. (7) In this page, you to remember the purpose / location of... network camera's IP address or host name. In cloud mode you have to input Cloud ID**; User Name: Input the user name of network camera. Default user name is '1234' 113
... name of network camera. Camera Name: You can input network camera's parameters manually Camera Type: Switch operating mode between Cloud and IP. Default user name is 'admin' Password: Input the password of network camera. Port: Input network camera's port number, generally it's '80'. (7) In this page, you to remember the purpose / location of... network camera's IP address or host name. In cloud mode you have to input Cloud ID**; User Name: Input the user name of network camera. Default user name is '1234' 113
Manual
Page 126
... ID**; In cloud mode you have to input IP address or host name of network camera User Name: Input the user name of network camera. Default user name is '1234' Click 'Add' to switch operating mode between Cloud and IP. If you want to add a Ediamx network camera on Internet, please... remember the purpose / location of this network camera Cloud / IP Mode Switch: Click this button to add a new network camera with parameters listed above. 125 Default user name is 'admin' Password: Input the password of network camera.
... ID**; In cloud mode you have to input IP address or host name of network camera User Name: Input the user name of network camera. Default user name is '1234' Click 'Add' to switch operating mode between Cloud and IP. If you want to add a Ediamx network camera on Internet, please... remember the purpose / location of this network camera Cloud / IP Mode Switch: Click this button to add a new network camera with parameters listed above. 125 Default user name is 'admin' Password: Input the password of network camera.
Manual
Page 138
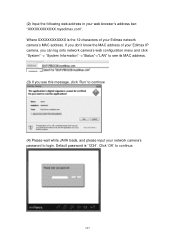
If you don't know the MAC address of your Edimax network camera's MAC address. Default password is the 12 characters of your Edimax IP camera, you can log onto network camera's web configuration menu and click "System" -> "System Information" ->"Status"->"LAN" to see its MAC address. (3) If you ... web browser's address bar: "XXXXXXXXXXXX.myedimax.com". Click 'OK' to continue. 137 Where XXXXXXXXXXXX is '1234'. (2) Input the following web address in your network camera's password to login.
If you don't know the MAC address of your Edimax network camera's MAC address. Default password is the 12 characters of your Edimax IP camera, you can log onto network camera's web configuration menu and click "System" -> "System Information" ->"Status"->"LAN" to see its MAC address. (3) If you ... web browser's address bar: "XXXXXXXXXXXX.myedimax.com". Click 'OK' to continue. 137 Where XXXXXXXXXXXX is '1234'. (2) Input the following web address in your network camera's password to login.