
Quick Install Guide
Page 7
... says MAC:xxxxxxxxxxxxxx. 2. Viewing the Camera with a Cloud ID card which contains the camera's Cloud ID (MAC address), username ( default : admin ) and password ( default : 1234 ). Log onto the camera web configuration page (Default IP:192.168.2.3). Note: Each network camera comes with a Smartphone 8. Enter the Cloud ID, Username and Password to download "Ediview". Go...
... says MAC:xxxxxxxxxxxxxx. 2. Viewing the Camera with a Cloud ID card which contains the camera's Cloud ID (MAC address), username ( default : admin ) and password ( default : 1234 ). Log onto the camera web configuration page (Default IP:192.168.2.3). Note: Each network camera comes with a Smartphone 8. Enter the Cloud ID, Username and Password to download "Ediview". Go...
Manual
Page 10
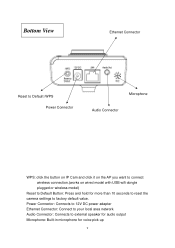
... for more than 10 seconds to reset the camera settings to Default Button: Press and hold for voice pick-up 9 Bottom View Ethernet Connector Reset to Default /WPS Power Connector Microphone Audio Connector WPS: click the button on IP Cam and click it on the AP you want to connect ...wireless connection.(works on wired model with USB wifi dongle plugged or wireless model) Reset to factory default value.
... for more than 10 seconds to reset the camera settings to Default Button: Press and hold for voice pick-up 9 Bottom View Ethernet Connector Reset to Default /WPS Power Connector Microphone Audio Connector WPS: click the button on IP Cam and click it on the AP you want to connect ...wireless connection.(works on wired model with USB wifi dongle plugged or wireless model) Reset to factory default value.
Manual
Page 14
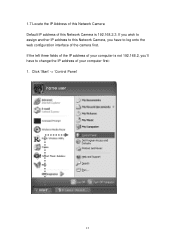
1.7 Locate the IP Address of this Network Camera is not 192.168.2, you have to log onto the web configuration interface of this Network Camera Default IP address of the camera first. Click 'Start' -> 'Control Panel' 13 If you wish to assign another IP address to this Network Camera, you 'll have to change the IP address of your computer first: 1. If the left three fields of the IP address of your computer is 192.168.2.3.
1.7 Locate the IP Address of this Network Camera is not 192.168.2, you have to log onto the web configuration interface of this Network Camera Default IP address of the camera first. Click 'Start' -> 'Control Panel' 13 If you wish to assign another IP address to this Network Camera, you 'll have to change the IP address of your computer first: 1. If the left three fields of the IP address of your computer is 192.168.2.3.
Manual
Page 24
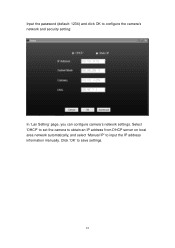
Input the password (default: 1234) and click OK to input the IP address information manually. Select 'DHCP' to set the camera to obtain an IP address from DHCP server on local area network automatically, and select 'Manual IP' to configure the camera's network and security setting: In 'Lan Setting' page, you can configure camera's network settings. Click 'OK' to save settings. 23
Input the password (default: 1234) and click OK to input the IP address information manually. Select 'DHCP' to set the camera to obtain an IP address from DHCP server on local area network automatically, and select 'Manual IP' to configure the camera's network and security setting: In 'Lan Setting' page, you can configure camera's network settings. Click 'OK' to save settings. 23

Manual
Page 25
... be changed. 1.9 Logging in address bar of Internet Explorer. Click 'OK' to reset the camera. 24 Please try to input the user name and password: Default user name is 'admin' and password is '1234'. You should not happen if this is on), and then launch Internet Explorer and type the... IP address of the network camera in the Management Interface Make sure the network camera is correctly powered (Power LED is a newly-purchased camera, however, if ...
... be changed. 1.9 Logging in address bar of Internet Explorer. Click 'OK' to reset the camera. 24 Please try to input the user name and password: Default user name is 'admin' and password is '1234'. You should not happen if this is on), and then launch Internet Explorer and type the... IP address of the network camera in the Management Interface Make sure the network camera is correctly powered (Power LED is a newly-purchased camera, however, if ...
Manual
Page 42
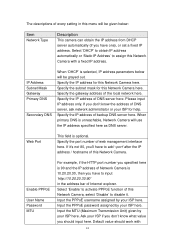
... be grayed out. Input the PPPoE username assigned by your ISP here. Please input IP address only. Select 'Enable' to activate PPPoE function of this Network Camera, select 'Disable' to assign this Network Camera with 41 Default value should input here. The descriptions of every setting in the address bar of Internet...
... be grayed out. Input the PPPoE username assigned by your ISP here. Please input IP address only. Select 'Enable' to activate PPPoE function of this Network Camera, select 'Disable' to assign this Network Camera with 41 Default value should input here. The descriptions of every setting in the address bar of Internet...

Manual
Page 64
...YYYY / MM / DD HH:MM:SS Time is in this camera manually. If your ISP for the IP address or host name, if they have one. 2.4.2 Date / Time Setting This setting allows you to set...of the computer you can use the time of resident from NTP Server automatically. Please input the IP address or host name of residence uses daylight saving, select 63 You can click 'Synchronize to PC... time' to set the time manually, or use network time protocol (NTP) to use default value 'pool.ntp.org', or ask your area of NTP server here. You can set the time automatically....
...YYYY / MM / DD HH:MM:SS Time is in this camera manually. If your ISP for the IP address or host name, if they have one. 2.4.2 Date / Time Setting This setting allows you to set...of the computer you can use the time of resident from NTP Server automatically. Please input the IP address or host name of residence uses daylight saving, select 63 You can click 'Synchronize to PC... time' to set the time manually, or use network time protocol (NTP) to use default value 'pool.ntp.org', or ask your area of NTP server here. You can set the time automatically....
Manual
Page 67
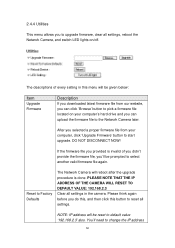
...before you do this, and then click this menu will reboot after the upgrade procedure is invalid of every setting in the camera. Reset to default value '192.168.2.3' also. NOTE: IP address will be reset to Factory Defaults The Network Camera will be prompted to reset all settings. PLEASE NOTE THAT THE... IP ADDRESS OF THE CAMERA WILL RESET TO DEFAULT VALUE: 192.168.2.3 Clear all settings, reboot the Network Camera, and switch LED lights on your computer, click 'Upgrade Firmware' button to the Network ...
...before you do this, and then click this menu will reboot after the upgrade procedure is invalid of every setting in the camera. Reset to default value '192.168.2.3' also. NOTE: IP address will be reset to Factory Defaults The Network Camera will be prompted to reset all settings. PLEASE NOTE THAT THE... IP ADDRESS OF THE CAMERA WILL RESET TO DEFAULT VALUE: 192.168.2.3 Clear all settings, reboot the Network Camera, and switch LED lights on your computer, click 'Upgrade Firmware' button to the Network ...
Manual
Page 85
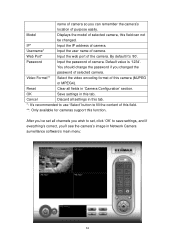
... Port* Input the web port of camera. OK Save settings in 'Camera Configuration' section. Default value is '1234'. name of camera so you can not be changed the password of selected camera. IP* Input the IP address of the camera. You should change the password if you wish to set, click '... to save settings, and if everything's correct, you 've set all fields in this field can remember the camera's location of camera. By default it's '80'. Password Input the password of purpose easily. Model Displays the model of selected camera, this tab.
... Port* Input the web port of camera. OK Save settings in 'Camera Configuration' section. Default value is '1234'. name of camera so you can not be changed the password of selected camera. IP* Input the IP address of the camera. You should change the password if you wish to set, click '... to save settings, and if everything's correct, you 've set all fields in this field can remember the camera's location of camera. By default it's '80'. Password Input the password of purpose easily. Model Displays the model of selected camera, this tab.
Manual
Page 95
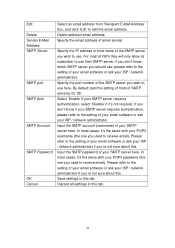
... SMTP server requires authentication, please refer to receive email). In most of the SMTP server you 're not sure about this . Specify the IP address or host name of ISPs they will only allow its subscriber to use their SMTP server, if you don't know if your SMTP server...network administrator if you wish to edit the email address. Save settings in this tab. Input the SMTP password of your ISP / network administrator. By default (and the setting of SMTP servers) it 's not required. Delete selected email address. Specify the email address of your email software or ask your ...
... SMTP server requires authentication, please refer to receive email). In most of the SMTP server you 're not sure about this . Specify the IP address or host name of ISPs they will only allow its subscriber to use their SMTP server, if you don't know if your SMTP server...network administrator if you wish to edit the email address. Save settings in this tab. Input the SMTP password of your ISP / network administrator. By default (and the setting of SMTP servers) it 's not required. Delete selected email address. Specify the email address of your email software or ask your ...
Manual
Page 114
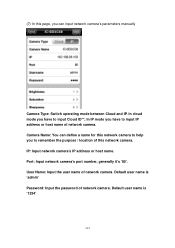
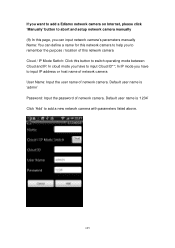
.... Port: Input network camera's port number, generally it's '80'. Default user name is 'admin' Password: Input the password of this page, you can define a name for this network camera to help you to input IP address or host name of network camera. User Name: Input the user... name of network camera. IP: Input network camera's IP address or host name. Camera Name: You can input network camera's parameters manually Camera Type: Switch operating mode between Cloud and IP. In cloud mode you have to input Cloud ID**; (7) In this network camera. Default user name is '1234'...
.... Port: Input network camera's port number, generally it's '80'. Default user name is 'admin' Password: Input the password of this page, you can define a name for this network camera to help you to input IP address or host name of network camera. User Name: Input the user... name of network camera. IP: Input network camera's IP address or host name. Camera Name: You can input network camera's parameters manually Camera Type: Switch operating mode between Cloud and IP. In cloud mode you have to input Cloud ID**; (7) In this network camera. Default user name is '1234'...
Manual
Page 126
...help you to remember the purpose / location of this network camera Cloud / IP Mode Switch: Click this button to input IP address or host name of network camera User Name: Input the user name of network camera. Default user name is 'admin' Password: Input the password of network camera. In... cloud mode you have to switch operating mode between Cloud and IP. Default user name is '1234...
...help you to remember the purpose / location of this network camera Cloud / IP Mode Switch: Click this button to input IP address or host name of network camera User Name: Input the user name of network camera. Default user name is 'admin' Password: Input the password of network camera. In... cloud mode you have to switch operating mode between Cloud and IP. Default user name is '1234...
Manual
Page 138
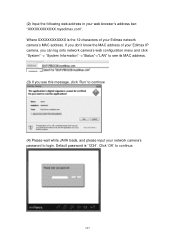
...to continue. 137 (2) Input the following web address in your network camera's password to login. Where XXXXXXXXXXXX is '1234'. Default password is the 12 characters of your Edimax IP camera, you can log onto network camera's web configuration menu and click "System" -> "System Information" ->"Status"->"LAN"... to see its MAC address. (3) If you don't know the MAC address of your Edimax network camera's MAC address. Click ...
...to continue. 137 (2) Input the following web address in your network camera's password to login. Where XXXXXXXXXXXX is '1234'. Default password is the 12 characters of your Edimax IP camera, you can log onto network camera's web configuration menu and click "System" -> "System Information" ->"Status"->"LAN"... to see its MAC address. (3) If you don't know the MAC address of your Edimax network camera's MAC address. Click ...
Manual
Page 145
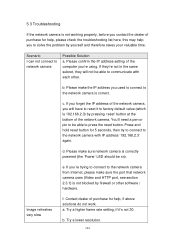
Scenario I can not connect to factory default value (which is 192.168.2.3) by yourself and therefore saves your valuable time. You'll need a pen or pin to be able to communicate with IP address '192.168.2.3' again. Press and hold reset button for 5 seconds, then try to connect to the network... the same subnet, they will have to solve the problem by pressing 'reset' button at the bottom of the network camera. If you forget the IP address of the network camera, you used to connect to press the reset button. e. Image refreshes very slow f. b. d. Please make sure network ...
Scenario I can not connect to factory default value (which is 192.168.2.3) by yourself and therefore saves your valuable time. You'll need a pen or pin to be able to communicate with IP address '192.168.2.3' again. Press and hold reset button for 5 seconds, then try to connect to the network... the same subnet, they will have to solve the problem by pressing 'reset' button at the bottom of the network camera. If you forget the IP address of the network camera, you used to connect to press the reset button. e. Image refreshes very slow f. b. d. Please make sure network ...