Datasheet
Page 2
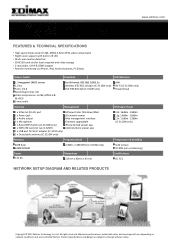
...IEEE 802.3/802.3u Wireless IEEE 802.11b/g/n (IC‐3110W only) PoE IEEE 802.3af (IC‐3110P only) LAN Wi‐Fi (IC‐3110W only) Power/Cloud Interface Management RF Output Power 1...(IC‐3110W only) 1 x SDHC/SD card slot (up to change without notice. Maximum performance, actual data rates, and coverage will vary depending on network conditions and environmental factors. www.edimax....11n: 11dBm ‐ 13dBm (IC‐3110W only) Memory Frequency Band Temperature & Humidity 4MB flash 64MB SDRAM 2.4000 ‐ 2.4835GHz (IC‐3110W only) 0‐40˚ Celsius...
...IEEE 802.3/802.3u Wireless IEEE 802.11b/g/n (IC‐3110W only) PoE IEEE 802.3af (IC‐3110P only) LAN Wi‐Fi (IC‐3110W only) Power/Cloud Interface Management RF Output Power 1...(IC‐3110W only) 1 x SDHC/SD card slot (up to change without notice. Maximum performance, actual data rates, and coverage will vary depending on network conditions and environmental factors. www.edimax....11n: 11dBm ‐ 13dBm (IC‐3110W only) Memory Frequency Band Temperature & Humidity 4MB flash 64MB SDRAM 2.4000 ‐ 2.4835GHz (IC‐3110W only) 0‐40˚ Celsius...
Quick Install Guide
Page 2
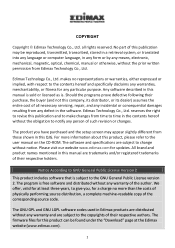
... about this company, its distributor, or its dealer) assumes the entire cost of such revision or changes. Please visit our website www.edimax.com for any warranty of their respective authors. all necessary servicing, repair, and any means, electronic, mechanical, magnetic, optical, chemical,... or by any incidental or consequential damages resulting from Edimax Technology Co., Ltd. The product you , for a charge no representations or warranties, either expressed or implied, with respect to give you have purchased and the setup screen may be found under the "Download" page...
... about this company, its distributor, or its dealer) assumes the entire cost of such revision or changes. Please visit our website www.edimax.com for any warranty of their respective authors. all necessary servicing, repair, and any means, electronic, mechanical, magnetic, optical, chemical,... or by any incidental or consequential damages resulting from Edimax Technology Co., Ltd. The product you , for a charge no representations or warranties, either expressed or implied, with respect to give you have purchased and the setup screen may be found under the "Download" page...
Quick Install Guide
Page 5
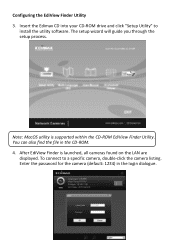
Configuring the EdiView Finder Utility 3. Note: MacOS utility is launched, all cameras found on the LAN are displayed. You can also find the file in the login dialogue. 4 Insert the Edimax CD into your CD-ROM drive and click "Setup Utility" to a specific camera, double-click the camera listing. To connect to install the utility software. Enter the password for the camera (default: 1234) in the CD-ROM. 4. The setup wizard will guide you through the setup process. After EdiView Finder is supported within the CD-ROM EdiView Finder Utility.
Configuring the EdiView Finder Utility 3. Note: MacOS utility is launched, all cameras found on the LAN are displayed. You can also find the file in the login dialogue. 4 Insert the Edimax CD into your CD-ROM drive and click "Setup Utility" to a specific camera, double-click the camera listing. To connect to install the utility software. Enter the password for the camera (default: 1234) in the CD-ROM. 4. The setup wizard will guide you through the setup process. After EdiView Finder is supported within the CD-ROM EdiView Finder Utility.
Manual
Page 2
.... The firmware files for at least three years, to give you have purchased and the setup screen may be found under the "Download" page at the Edimax website (www.edimax.com). 1 Notice According to GNU General Public License Version 2 This product includes software that... is free software and distributed without the obligation to the GNU General Public License version 2. The program is . COPYRIGHT Copyright © Edimax Technology Co., Ltd. All brand and product names mentioned in the contents hereof without any means, electronic, mechanical, magnetic, optical, chemical...
.... The firmware files for at least three years, to give you have purchased and the setup screen may be found under the "Download" page at the Edimax website (www.edimax.com). 1 Notice According to GNU General Public License Version 2 This product includes software that... is free software and distributed without the obligation to the GNU General Public License version 2. The program is . COPYRIGHT Copyright © Edimax Technology Co., Ltd. All brand and product names mentioned in the contents hereof without any means, electronic, mechanical, magnetic, optical, chemical...
Manual
Page 51
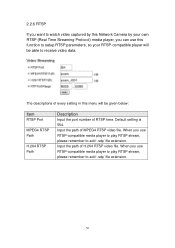
... by this Network Camera by your RTSP-compatible player will be able to receive video data. The descriptions of every setting in this function to setup RTSP parameters, so your own RTSP (Real Time Streaming Protocol) media player, you can use this menu will be given below: Item RTSP Port MPEG4...
... by this Network Camera by your RTSP-compatible player will be able to receive video data. The descriptions of every setting in this function to setup RTSP parameters, so your own RTSP (Real Time Streaming Protocol) media player, you can use this menu will be given below: Item RTSP Port MPEG4...
Manual
Page 53
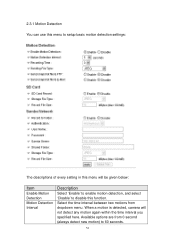
2.3.1 Motion Detection You can use this menu to setup basic motion detection settings: The descriptions of every setting in this menu will not detect any motion again within the time interval you specified here. When a motion is detected, camera will be given below: Item Enable Motion Detection Motion Detection Interval Description Select 'Enable' to enable motion detection, and select 'Disable' to 60 seconds. 52 Select the time interval between two motions from 0 second (always detect new motion) to disable this function. Available options are from dropdown menu.
2.3.1 Motion Detection You can use this menu to setup basic motion detection settings: The descriptions of every setting in this menu will not detect any motion again within the time interval you specified here. When a motion is detected, camera will be given below: Item Enable Motion Detection Motion Detection Interval Description Select 'Enable' to enable motion detection, and select 'Disable' to 60 seconds. 52 Select the time interval between two motions from 0 second (always detect new motion) to disable this function. Available options are from dropdown menu.
Manual
Page 65
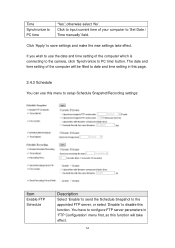
... to 'Set Date / Time manually' field. The date and time setting of the computer will take effect. If you wish to use this menu to setup Schedule Snapshot/Recording settings: Item Enable FTP Schedule Description Select 'Enable' to send the Schedule Snapshot to the appointed FTP server, or select 'Disable' to...
... to 'Set Date / Time manually' field. The date and time setting of the computer will take effect. If you wish to use this menu to setup Schedule Snapshot/Recording settings: Item Enable FTP Schedule Description Select 'Enable' to send the Schedule Snapshot to the appointed FTP server, or select 'Disable' to...
Manual
Page 76
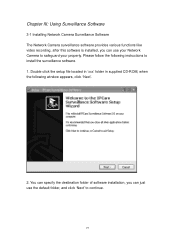
Double click the setup file located in 'xxx' folder in supplied CD-ROM, when the following instructions to install the surveillance software. 1. You can specify the destination folder of ...
Double click the setup file located in 'xxx' folder in supplied CD-ROM, when the following instructions to install the surveillance software. 1. You can specify the destination folder of ...

Manual
Page 86
You can record the video captured by all setting items: Item Channel One Time Schedules New (One Time Schedules) Description Select the channel number you wish to set. Click this schedule will appear: 85 this button and a new window will be executed once only. 3-3-1-2 Schedule Recording In this tab, you can setup scheduled video recording, so you can specify the one-time schedule for selected camera; Here are the descriptions of all cameras you have by a pre-defined schedule.
You can record the video captured by all setting items: Item Channel One Time Schedules New (One Time Schedules) Description Select the channel number you wish to set. Click this schedule will appear: 85 this button and a new window will be executed once only. 3-3-1-2 Schedule Recording In this tab, you can setup scheduled video recording, so you can specify the one-time schedule for selected camera; Here are the descriptions of all cameras you have by a pre-defined schedule.

Manual
Page 94
Click this button and you set. Here are the descriptions of all email addresses you 'll be prompted to input the email address. Here lists all setting items: Item E-Mail Subject Recipient E-Mail Address New Description Specify the subject of sending email. Click 'OK' to get an email that contains the image captured by the camera, please setup your email related parameters here first. 3-3-2-2 'E-Mail Setting' tab If you want to use motion detection function and wish to save changes. 93
Click this button and you set. Here are the descriptions of all email addresses you 'll be prompted to input the email address. Here lists all setting items: Item E-Mail Subject Recipient E-Mail Address New Description Specify the subject of sending email. Click 'OK' to get an email that contains the image captured by the camera, please setup your email related parameters here first. 3-3-2-2 'E-Mail Setting' tab If you want to use motion detection function and wish to save changes. 93
Manual
Page 112
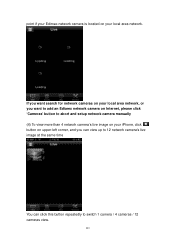
point if your Edimax network camera is located on your iPhone, click button on your local area network. If you want search for network cameras on your local area network, or you want to add an Ediamx network camera on Internet, please click 'Cameras' button to abort and setup network camera manually (4) To view more than 4 network camera's live image at the same time You can view up to 12 network camera's live image on upper-left corner, and you can click this button repeatedly to switch 1 camera / 4 cameras / 12 cameras view. 111
point if your Edimax network camera is located on your iPhone, click button on your local area network. If you want search for network cameras on your local area network, or you want to add an Ediamx network camera on Internet, please click 'Cameras' button to abort and setup network camera manually (4) To view more than 4 network camera's live image at the same time You can view up to 12 network camera's live image on upper-left corner, and you can click this button repeatedly to switch 1 camera / 4 cameras / 12 cameras view. 111
Manual
Page 115
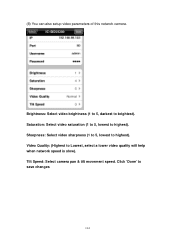
Video Quality: (Highest to save changes 114 Click 'Done' to Lowest, select a lower video quality will help when network speed is slow). Tilt Speed: Select camera pan & tilt movement speed. Saturation: Select video saturation (1 to 5, lowest to highest). Sharpness: Select video sharpness (1 to 5, lowest to highest). (8) You can also setup video parameters of this network camera. Brightness: Select video brightness (1 to 5, darkest to brightest).
Video Quality: (Highest to save changes 114 Click 'Done' to Lowest, select a lower video quality will help when network speed is slow). Tilt Speed: Select camera pan & tilt movement speed. Saturation: Select video saturation (1 to 5, lowest to highest). Sharpness: Select video sharpness (1 to 5, lowest to highest). (8) You can also setup video parameters of this network camera. Brightness: Select video brightness (1 to 5, darkest to brightest).
Manual
Page 126
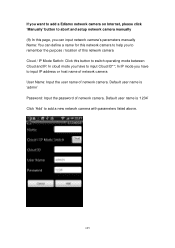
... a new network camera with parameters listed above. 125 If you want to add a Ediamx network camera on Internet, please click 'Manually' button to abort and setup network camera manually (9) In this page, you can input network camera's parameters manually Name: You can define a name for this network camera to help you...
... a new network camera with parameters listed above. 125 If you want to add a Ediamx network camera on Internet, please click 'Manually' button to abort and setup network camera manually (9) In this page, you can input network camera's parameters manually Name: You can define a name for this network camera to help you...