Quick Install Guide
Page 5
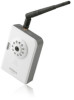
Note: MacOS utility is launched, all cameras found on the LAN are displayed. After EdiView Finder is supported within the CD-ROM EdiView Finder Utility. Insert the Edimax CD into your CD-ROM drive and click "Setup Utility" to a specific camera, double-click the camera listing. The setup wizard will guide you through the setup process. You can also find the file in the login dialogue. 4 To connect to install the utility software. Enter the password for the camera (default: 1234) in the CD-ROM. 4. Configuring the EdiView Finder Utility 3.
Note: MacOS utility is launched, all cameras found on the LAN are displayed. After EdiView Finder is supported within the CD-ROM EdiView Finder Utility. Insert the Edimax CD into your CD-ROM drive and click "Setup Utility" to a specific camera, double-click the camera listing. The setup wizard will guide you through the setup process. You can also find the file in the login dialogue. 4 To connect to install the utility software. Enter the password for the camera (default: 1234) in the CD-ROM. 4. Configuring the EdiView Finder Utility 3.
Quick Install Guide
Page 6
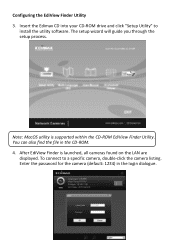
to install ActiveX. You should now be able to see the video images captured by running EdiView), and enter "admin" in the username field, and "1234" in the password field to log in. 6. Configuring the Web-Based Management Interface 5. Once you are logged in the CD. 5 For advanced settings, please refer to the user manual included in , the browser will prompt you to continue. 7. Click "Install ActiveX Control..." Launch IE and type the IP address of the camera (found by your new Edimax network camera.
to install ActiveX. You should now be able to see the video images captured by running EdiView), and enter "admin" in the username field, and "1234" in the password field to log in. 6. Configuring the Web-Based Management Interface 5. Once you are logged in the CD. 5 For advanced settings, please refer to the user manual included in , the browser will prompt you to continue. 7. Click "Install ActiveX Control..." Launch IE and type the IP address of the camera (found by your new Edimax network camera.

Quick Install Guide
Page 7
Note: Each network camera comes with a Smartphone 8. The sticker on the bottom of the camera says MAC:xxxxxxxxxxxxxx. 2. Log onto the camera web configuration page (Default IP:192.168.2.3). Please go to the Apple App store or Google Android market to finish the installation. Go to get MAC address. 3. ...
Note: Each network camera comes with a Smartphone 8. The sticker on the bottom of the camera says MAC:xxxxxxxxxxxxxx. 2. Log onto the camera web configuration page (Default IP:192.168.2.3). Please go to the Apple App store or Google Android market to finish the installation. Go to get MAC address. 3. ...

Quick Install Guide
Page 9
... device is connected. 4. Reorient or relocate the receiving antenna. 2. Federal Communications Commission (FCC) RF Exposure Requirements SAR compliance has been established in the laptop computer(s) configurations with PCMCIA slot on radio equipment and telecommunication terminal equipment and the mutual recognition of this equipment does cause harmful interference to radio or television...
... device is connected. 4. Reorient or relocate the receiving antenna. 2. Federal Communications Commission (FCC) RF Exposure Requirements SAR compliance has been established in the laptop computer(s) configurations with PCMCIA slot on radio equipment and telecommunication terminal equipment and the mutual recognition of this equipment does cause harmful interference to radio or television...
Manual
Page 4
... surveillance software 78 3-3-1 Configure cameras 78 3-3-2 General Settings 85 3-4 Change Display Layout 90 3-5 Full-screen mode 93 3-6 Scan...94 3-7 Zoom-in / Zoom-out 95 3-8 PTZ ...96 3-9 Snapshot...97 3-10 ...
... surveillance software 78 3-3-1 Configure cameras 78 3-3-2 General Settings 85 3-4 Change Display Layout 90 3-5 Full-screen mode 93 3-6 Scan...94 3-7 Zoom-in / Zoom-out 95 3-8 PTZ ...96 3-9 Snapshot...97 3-10 ...
Manual
Page 7
... up to window' only works on Microsoft Internet Explorer. 6 Audio function, suitable for wireless network. Supports UPnP, Windows XP (and above , with a fixed Internet address). Configurable motion detection sensitivity (6 levels from most sensitive to 100Mbps for wired network and 100Mbps for applications like video conference or environment monitor. all major web...
... up to window' only works on Microsoft Internet Explorer. 6 Audio function, suitable for wireless network. Supports UPnP, Windows XP (and above , with a fixed Internet address). Configurable motion detection sensitivity (6 levels from most sensitive to 100Mbps for wired network and 100Mbps for applications like video conference or environment monitor. all major web...
Manual
Page 14
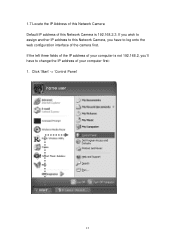
Click 'Start' -> 'Control Panel' 13 If you wish to assign another IP address to this Network Camera is not 192.168.2, you'll have to change the IP address of your computer first: 1. If the left three fields of the IP address of your computer is 192.168.2.3. 1.7 Locate the IP Address of this Network Camera Default IP address of this Network Camera, you have to log onto the web configuration interface of the camera first.
Click 'Start' -> 'Control Panel' 13 If you wish to assign another IP address to this Network Camera is not 192.168.2, you'll have to change the IP address of your computer first: 1. If the left three fields of the IP address of your computer is 192.168.2.3. 1.7 Locate the IP Address of this Network Camera Default IP address of this Network Camera, you have to log onto the web configuration interface of the camera first.
Manual
Page 19
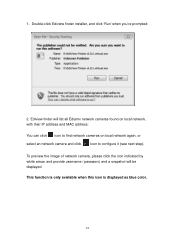
This function is only available when this icon is displayed as blue color. 18 To preview the image of network camera, please click the icon indicated by white arrow, and provide username / password, and a snapshot will list all Ediamx network cameras found on local network, with their IP address and MAC address: You can click icon to find network cameras on local network again, or select an network camera and click Icon to configure it (see next step). Ediview finder will be displayed. Double-click Ediview finder installer, and click 'Run' when you're prompted: 2. 1.
This function is only available when this icon is displayed as blue color. 18 To preview the image of network camera, please click the icon indicated by white arrow, and provide username / password, and a snapshot will list all Ediamx network cameras found on local network, with their IP address and MAC address: You can click icon to find network cameras on local network again, or select an network camera and click Icon to configure it (see next step). Ediview finder will be displayed. Double-click Ediview finder installer, and click 'Run' when you're prompted: 2. 1.
Manual
Page 21
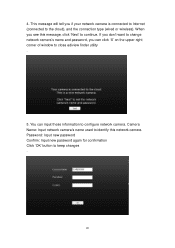
... tell you can input these information to keep changes . 20 Password: Input new password Confirm: Input new password again for confirmation Click 'OK' button to configure network camera. When you see this network camera.
... tell you can input these information to keep changes . 20 Password: Input new password Confirm: Input new password again for confirmation Click 'OK' button to configure network camera. When you see this network camera.
Manual
Page 23
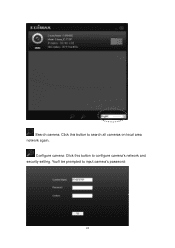
Configure camera: Click this button to configure camera's network and security setting. Search camera: Click this button to search all cameras on local area network again. You'll be prompted to input camera's password: 22
Configure camera: Click this button to configure camera's network and security setting. Search camera: Click this button to search all cameras on local area network again. You'll be prompted to input camera's password: 22
Manual
Page 24
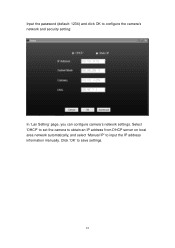
Click 'OK' to input the IP address information manually. Select 'DHCP' to set the camera to obtain an IP address from DHCP server on local area network automatically, and select 'Manual IP' to save settings. 23 Input the password (default: 1234) and click OK to configure the camera's network and security setting: In 'Lan Setting' page, you can configure camera's network settings.
Click 'OK' to input the IP address information manually. Select 'DHCP' to set the camera to obtain an IP address from DHCP server on local area network automatically, and select 'Manual IP' to save settings. 23 Input the password (default: 1234) and click OK to configure the camera's network and security setting: In 'Lan Setting' page, you can configure camera's network settings.
Manual
Page 46
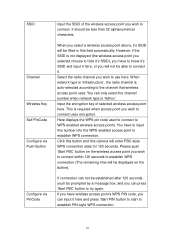
... you wish to use here. Here displays the WPS pin code used to connect to establish WPS connection. SSID Channel Wireless Key Self PinCode Configure via Push Button Configure via PinCode Input the SSID of selected wireless access point here. This is not displayed (the wireless access point you selected choose to...
... you wish to use here. Here displays the WPS pin code used to connect to establish WPS connection. SSID Channel Wireless Key Self PinCode Configure via Push Button Configure via PinCode Input the SSID of selected wireless access point here. This is not displayed (the wireless access point you selected choose to...
Manual
Page 54
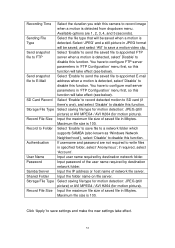
...4, and 5 (seconds). Input password of saved file in Mbytes. Maximum file size is detected. Click 'Apply' to write files in 'FTP Configuration' menu first, so this function. Available options are not required to save settings and make the new settings take effect. 53 Select the file ... to record image when a motion is detected, select' Disable' to disable this function. Select 'JPEG' and a still picture in 'FTP Configuration' menu first, so this function. Input user name required by destination network folder. Select saving file type for motion detection: JPEG (still picture...
...4, and 5 (seconds). Input password of saved file in Mbytes. Maximum file size is detected. Click 'Apply' to write files in 'FTP Configuration' menu first, so this function. Available options are not required to save settings and make the new settings take effect. 53 Select the file ... to record image when a motion is detected, select' Disable' to disable this function. Select 'JPEG' and a still picture in 'FTP Configuration' menu first, so this function. Input user name required by destination network folder. Select saving file type for motion detection: JPEG (still picture...
Manual
Page 59
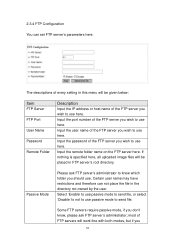
... mode, if you wish to use passive mode to use here. Input the user name of the FTP server you wish to use here. 2.3.4 FTP Configuration You can not place the file in the directory not owned by the user. Select 'Enable' to use passive mode to send file, or select...
... mode, if you wish to use passive mode to use here. Input the user name of the FTP server you wish to use here. 2.3.4 FTP Configuration You can not place the file in the directory not owned by the user. Select 'Enable' to use passive mode to send file, or select...

Manual
Page 61
... filename prefix (the texts which will store the saved image or video clip. Click 'Apply' to make the new settings take effect. 60 2.3.5 SD Card Configuration You can define the filename and destination folder when saving a file in this menu will be added before the file sequence number). Specify the folder...
... filename prefix (the texts which will store the saved image or video clip. Click 'Apply' to make the new settings take effect. 60 2.3.5 SD Card Configuration You can define the filename and destination folder when saving a file in this menu will be added before the file sequence number). Specify the folder...
Manual
Page 65
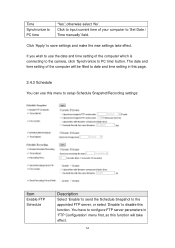
... camera, click 'Synchronize to disable this function will be filled to date and time setting in 'FTP Configuration' menu first, so this function. otherwise select 'No'. Click to input current time of your computer to configure FTP server parameters in this page. 2.4.3 Schedule You can use this menu to setup Schedule Snapshot...
... camera, click 'Synchronize to disable this function will be filled to date and time setting in 'FTP Configuration' menu first, so this function. otherwise select 'No'. Click to input current time of your computer to configure FTP server parameters in this page. 2.4.3 Schedule You can use this menu to setup Schedule Snapshot...
Manual
Page 66
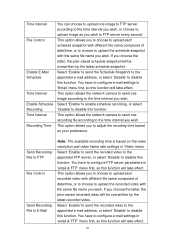
... as you wish to the time interval you wish. If you choose the latter, the prior-saved schedule snapshot will take effect. You have to configure FTP server parameters in 'email & FTP' menu first, so this function will take effect. 65 This option allows you wish. Select 'Enable' to ... with the same file name you to choose to upload each schedule snapshot with different file name composed of date/time, or to choose to configure e-mail settings in 'Video' menu. This option allows you choose the latter, the prior-saved recorded video will be overwritten by the latest ...
... as you wish to the time interval you wish. If you choose the latter, the prior-saved schedule snapshot will take effect. You have to configure FTP server parameters in 'email & FTP' menu first, so this function will take effect. 65 This option allows you wish. Select 'Enable' to ... with the same file name you to choose to upload each schedule snapshot with different file name composed of date/time, or to choose to configure e-mail settings in 'Video' menu. This option allows you choose the latter, the prior-saved recorded video will be overwritten by the latest ...
Manual
Page 74
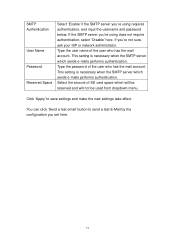
.... You can click 'Send a test email' button to save settings and make the new settings take effect. Click 'Apply' to send a test E-Mail by the configuration you set here. 73 If the SMTP server you're using requires authentication, and input the username and password below; Select the amount of SD...
.... You can click 'Send a test email' button to save settings and make the new settings take effect. Click 'Apply' to send a test E-Mail by the configuration you set here. 73 If the SMTP server you're using requires authentication, and input the username and password below; Select the amount of SD...
Manual
Page 80
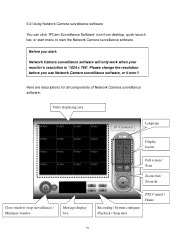
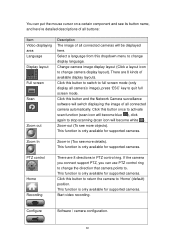
... area Language Display layout Full screen / Scan Zoom Out / Zoom In Close window (stop surveillance) / Minimize window Message display box PTZ Control / Home Recording / System configure Playback / Snap shot 79
... area Language Display layout Full screen / Scan Zoom Out / Zoom In Close window (stop surveillance) / Minimize window Message display box PTZ Control / Home Recording / System configure Playback / Snap shot 79
Manual
Page 81
... Zoom-in PTZ control ring. Click this dropdown menu to 'Home' (default) position. PTZ control Home Recording There are 8 kinds of available display layouts. Configure Software / camera configuration. 80 Select a language from this button to return the camera to change camera display layout). This function is only available for supported cameras. This...
... Zoom-in PTZ control ring. Click this dropdown menu to 'Home' (default) position. PTZ control Home Recording There are 8 kinds of available display layouts. Configure Software / camera configuration. 80 Select a language from this button to return the camera to change camera display layout). This function is only available for supported cameras. This...