Quick Install Guide
Page 3
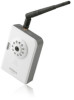
...61548; 1 x Power adapter 1 x Ethernet cable 1 x Quick installation guide 1 x CD (user manual, utility software & multi-language QIG) 1 x Mounting kit 1 x Accessory kit 1 x Antenna (IC-3110W only) 1 x Cloud ID card LED Indicators LED Name Power/Cloud LAN ...Wi-Fi (IC-3110W only) Description The power/cloud LED will flash when the camera is network activity in the local area...
...61548; 1 x Power adapter 1 x Ethernet cable 1 x Quick installation guide 1 x CD (user manual, utility software & multi-language QIG) 1 x Mounting kit 1 x Accessory kit 1 x Antenna (IC-3110W only) 1 x Cloud ID card LED Indicators LED Name Power/Cloud LAN ...Wi-Fi (IC-3110W only) Description The power/cloud LED will flash when the camera is network activity in the local area...
Quick Install Guide
Page 5
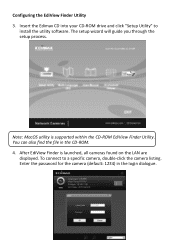
You can also find the file in the login dialogue. 4 Note: MacOS utility is launched, all cameras found on the LAN are displayed. To connect to install the utility software. Configuring the EdiView Finder Utility 3. After EdiView Finder is supported within the CD-ROM EdiView Finder Utility. The setup wizard will guide you through the setup process. Enter the password for the camera (default: 1234) in the CD-ROM. 4. Insert the Edimax CD into your CD-ROM drive and click "Setup Utility" to a specific camera, double-click the camera listing.
You can also find the file in the login dialogue. 4 Note: MacOS utility is launched, all cameras found on the LAN are displayed. To connect to install the utility software. Configuring the EdiView Finder Utility 3. After EdiView Finder is supported within the CD-ROM EdiView Finder Utility. The setup wizard will guide you through the setup process. Enter the password for the camera (default: 1234) in the CD-ROM. 4. Insert the Edimax CD into your CD-ROM drive and click "Setup Utility" to a specific camera, double-click the camera listing.
Quick Install Guide
Page 6
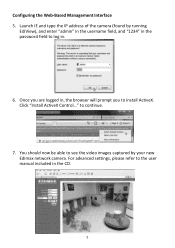
Configuring the Web-Based Management Interface 5. Click "Install ActiveX Control..." You should now be able to see the video images captured by running EdiView), and enter "admin" in the username field, and "1234" in the password field to install ActiveX. Once you to log in. 6. to the user manual included in , the browser will prompt you are logged in the CD. 5 For advanced settings, please refer to continue. 7. Launch IE and type the IP address of the camera (found by your new Edimax network camera.
Configuring the Web-Based Management Interface 5. Click "Install ActiveX Control..." You should now be able to see the video images captured by running EdiView), and enter "admin" in the username field, and "1234" in the password field to install ActiveX. Once you to log in. 6. to the user manual included in , the browser will prompt you are logged in the CD. 5 For advanced settings, please refer to continue. 7. Launch IE and type the IP address of the camera (found by your new Edimax network camera.

Quick Install Guide
Page 7
... : 1234 ). Enter the Cloud ID, Username and Password to download "Ediview". Please go to the Apple App store or Google Android market to finish the installation. The sticker on the bottom of the camera says MAC:xxxxxxxxxxxxxx. 2. Log onto the camera web configuration page (Default IP:192.168.2.3). Note: You may...
... : 1234 ). Enter the Cloud ID, Username and Password to download "Ediview". Please go to the Apple App store or Google Android market to finish the installation. The sticker on the bottom of the camera says MAC:xxxxxxxxxxxxxx. 2. Log onto the camera web configuration page (Default IP:192.168.2.3). Note: You may...
Quick Install Guide
Page 8
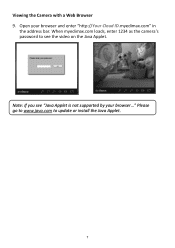
Viewing the Camera with a Web Browser 9. Note: If you see the video on the Java Applet. Open your browser..." When myedimax.com loads, enter 1234 as the camera's password to update or install the Java Applet. 7 Please go to www.java.com to see "Java Applet is not supported by your browser and enter "http://Your Cloud ID.myedimax.com" in the address bar.
Viewing the Camera with a Web Browser 9. Note: If you see the video on the Java Applet. Open your browser..." When myedimax.com loads, enter 1234 as the camera's password to update or install the Java Applet. 7 Please go to www.java.com to see "Java Applet is not supported by your browser and enter "http://Your Cloud ID.myedimax.com" in the address bar.

Quick Install Guide
Page 9
...(FCC) Radiation Exposure Statement This equipment complies with the limits for Use The ETSI version of FCC Rules. Use in a particular installation. R&TTE Compliance Statement This equipment complies with substantially similar physical dimensions, construction, and electrical and RF characteristics. EU Countries Intended for ... by turning the equipment off and on radio equipment and telecommunication terminal equipment and the mutual recognition of those who install and use of this device is connected. 4. All guidelines of the equipment. This transmitter is designed with any ...
...(FCC) Radiation Exposure Statement This equipment complies with the limits for Use The ETSI version of FCC Rules. Use in a particular installation. R&TTE Compliance Statement This equipment complies with substantially similar physical dimensions, construction, and electrical and RF characteristics. EU Countries Intended for ... by turning the equipment off and on radio equipment and telecommunication terminal equipment and the mutual recognition of those who install and use of this device is connected. 4. All guidelines of the equipment. This transmitter is designed with any ...

Quick Install Guide
Page 14
... code. 4. You may modify your copy or copies of the Program or any portion of it contains, plus the scripts used to control compilation and installation of the following: a) Accompany it . However, nothing else grants you do one of the executable. You may not copy, modify, sublicense, or distribute the Program...
... code. 4. You may modify your copy or copies of the Program or any portion of it contains, plus the scripts used to control compilation and installation of the following: a) Accompany it . However, nothing else grants you do one of the executable. You may not copy, modify, sublicense, or distribute the Program...
Manual
Page 3
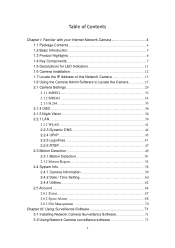
... Internet Network Camera 4 1.1 Package Contents 4 1.2 Basic Introduction 5 1.3 Product Highlights 6 1.4 Key Components 7 1.5 Descriptions for LED Indicators 11 1.6 Camera Installation 12 1.7 Locate the IP Address of this Network Camera 13 1.8 Using the Camera Admin Software to Locate the Camera 17 2.1 Camera Settings 29 2.1.1 MJPEG... 2.4.4 Utilities 62 2.5 Account...64 2.6.1 Status 67 2.6.2 Space Alarm 68 2.6.3 File Management 70 Chapter III: Using Surveillance Software 71 3-1 Installing Network Camera Surveillance Software 71 3-2 Using Network Camera surveillance software 75 2
... Internet Network Camera 4 1.1 Package Contents 4 1.2 Basic Introduction 5 1.3 Product Highlights 6 1.4 Key Components 7 1.5 Descriptions for LED Indicators 11 1.6 Camera Installation 12 1.7 Locate the IP Address of this Network Camera 13 1.8 Using the Camera Admin Software to Locate the Camera 17 2.1 Camera Settings 29 2.1.1 MJPEG... 2.4.4 Utilities 62 2.5 Account...64 2.6.1 Status 67 2.6.2 Space Alarm 68 2.6.3 File Management 70 Chapter III: Using Surveillance Software 71 3-1 Installing Network Camera Surveillance Software 71 3-2 Using Network Camera surveillance software 75 2
Manual
Page 4
... Recording 98 3-11 Video Playback 99 Chapter IV: How to Access the Network Camera Remotely with iPhone & Android Phones 100 4.1 iPhone App Installation 102 4.2 Android App installation 113 4.3 Web browser installation 128 Chapter V: Appendix 134 5.1 Specifications 134 5.2 How to apply for a free DNS account at http://www.no-ip.com .........135 5.3 Troubleshooting 137...
... Recording 98 3-11 Video Playback 99 Chapter IV: How to Access the Network Camera Remotely with iPhone & Android Phones 100 4.1 iPhone App Installation 102 4.2 Android App installation 113 4.3 Web browser installation 128 Chapter V: Appendix 134 5.1 Specifications 134 5.2 How to apply for a free DNS account at http://www.no-ip.com .........135 5.3 Troubleshooting 137...
Manual
Page 5
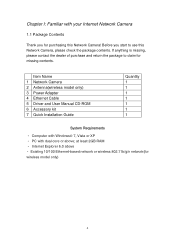
... you for missing contents. Item Name 1 Network Camera 2 Antenna(wireless model only) 3 Power Adapter 4 Ethernet Cable 5 Driver and User Manual CD-ROM 6 Accessory kit 7 Quick Installation Guide Quantity 1 1 1 1 1 1 1 System Requirements • Computer with Windows® 7, Vista or XP • PC with your Internet Network Camera 1.1 Package Contents Thank you start to...
... you for missing contents. Item Name 1 Network Camera 2 Antenna(wireless model only) 3 Power Adapter 4 Ethernet Cable 5 Driver and User Manual CD-ROM 6 Accessory kit 7 Quick Installation Guide Quantity 1 1 1 1 1 1 1 System Requirements • Computer with Windows® 7, Vista or XP • PC with your Internet Network Camera 1.1 Package Contents Thank you start to...
Manual
Page 7
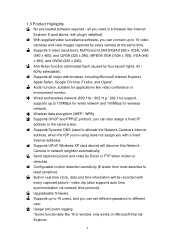
... software required - Supports Dynamic DNS (used to allocate the Network Camera's Internet address, when the ISP you're using does not assign you with plugin installed). all major web browser, including Microsoft Internet Explorer, Apple Safari, Google Chrome, Firefox, and Opera*. Anti-flicker function (eliminates flash caused by every camera at...
... software required - Supports Dynamic DNS (used to allocate the Network Camera's Internet address, when the ISP you're using does not assign you with plugin installed). all major web browser, including Microsoft Internet Explorer, Apple Safari, Google Chrome, Firefox, and Opera*. Anti-flicker function (eliminates flash caused by every camera at...
Manual
Page 13
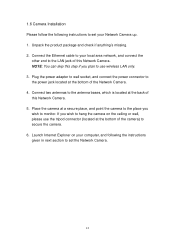
.... 5. Launch Internet Explorer on the ceiling or wall, please use wireless LAN only. 3. NOTE: You can skip this step if you wish to monitor. 1.6 Camera Installation Please follow the following the instructions given in next section to set your local area network, and connect the other end to the LAN jack...
.... 5. Launch Internet Explorer on the ceiling or wall, please use wireless LAN only. 3. NOTE: You can skip this step if you wish to monitor. 1.6 Camera Installation Please follow the following the instructions given in next section to set your local area network, and connect the other end to the LAN jack...
Manual
Page 18
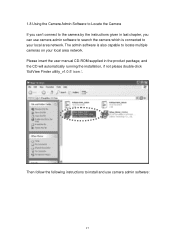
The admin software is connected to the camera by the instructions given in the product package, and the CD will automatically running the installation, if not please double-click 'EdiView Finder utility_v1.0.5' icon :'. 1.8 Using the Camera Admin Software to Locate the Camera If you can use... camera admin software: 17 Then follow the following instructions to install and use camera admin software to search the camera which is also capable to locate multiple cameras on your local area network. Please insert ...
The admin software is connected to the camera by the instructions given in the product package, and the CD will automatically running the installation, if not please double-click 'EdiView Finder utility_v1.0.5' icon :'. 1.8 Using the Camera Admin Software to Locate the Camera If you can use... camera admin software: 17 Then follow the following instructions to install and use camera admin software to search the camera which is also capable to locate multiple cameras on your local area network. Please insert ...
Manual
Page 19
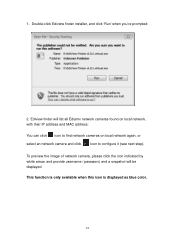
This function is only available when this icon is displayed as blue color. 18 To preview the image of network camera, please click the icon indicated by white arrow, and provide username / password, and a snapshot will list all Ediamx network cameras found on local network, with their IP address and MAC address: You can click icon to find network cameras on local network again, or select an network camera and click Icon to configure it (see next step). Double-click Ediview finder installer, and click 'Run' when you're prompted: 2. Ediview finder will be displayed. 1.
This function is only available when this icon is displayed as blue color. 18 To preview the image of network camera, please click the icon indicated by white arrow, and provide username / password, and a snapshot will list all Ediamx network cameras found on local network, with their IP address and MAC address: You can click icon to find network cameras on local network again, or select an network camera and click Icon to configure it (see next step). Double-click Ediview finder installer, and click 'Run' when you're prompted: 2. Ediview finder will be displayed. 1.
Manual
Page 26
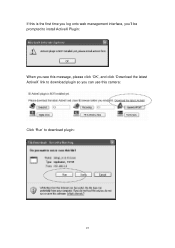
If this is the first time you log onto web management interface, you'll be prompted to install ActiveX Plugin: When you see this message, please click 'OK', and click 'Download the latest ActiveX' link to download plugin so you can use this camera: Click 'Run' to download plugin: 25
If this is the first time you log onto web management interface, you'll be prompted to install ActiveX Plugin: When you see this message, please click 'OK', and click 'Download the latest ActiveX' link to download plugin so you can use this camera: Click 'Run' to download plugin: 25

Manual
Page 27
Click 'Run' to install plugin: Please click 'Next' button to start installation (click 'Next' or 'Install' when you're prompted, until installation is complete). 26
Click 'Run' to install plugin: Please click 'Next' button to start installation (click 'Next' or 'Install' when you're prompted, until installation is complete). 26

Manual
Page 28
Now you can go back to web browser, and you should be able to see the image captured by camera (You may need to press F5 or CTRL-R to complete plugin installation. Click 'Finish' to reload web page). 27
Now you can go back to web browser, and you should be able to see the image captured by camera (You may need to press F5 or CTRL-R to complete plugin installation. Click 'Finish' to reload web page). 27
Manual
Page 29
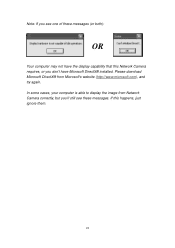
If this Network Camera requires, or you don't have the display capability that this happens, just ignore them. 28 Note: If you see these messages (or both): OR Your computer may not have Microsoft DirectX® installed. In some cases, your computer is able to display the image from Microsoft's website (http://www.microsoft.com), and try again. Please download Microsoft DirectX® from Network Camera correctly, but you'll still see one of these messages.
If this Network Camera requires, or you don't have the display capability that this happens, just ignore them. 28 Note: If you see these messages (or both): OR Your computer may not have Microsoft DirectX® installed. In some cases, your computer is able to display the image from Microsoft's website (http://www.microsoft.com), and try again. Please download Microsoft DirectX® from Network Camera correctly, but you'll still see one of these messages.
Manual
Page 76
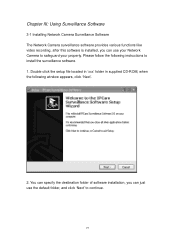
... The Network Camera surveillance software provides various functions like video recording, after this software is installed, you can use the default folder, and click 'Next' to continue. 75 You can specify the destination folder of software installation, you can just use your Network Camera to safeguard your property. Please follow the following...
... The Network Camera surveillance software provides various functions like video recording, after this software is installed, you can use the default folder, and click 'Next' to continue. 75 You can specify the destination folder of software installation, you can just use your Network Camera to safeguard your property. Please follow the following...

Manual
Page 77
If you need installation program to create a desktop icon or a quick launch icon for you, click all items you need here, than click 'Next' to continue. 76 3.
If you need installation program to create a desktop icon or a quick launch icon for you, click all items you need here, than click 'Next' to continue. 76 3.
