Literature/Product Sheet
Page 1
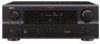
... the signal, allowing it to be switched for simulcasting, as well as the heart of the software. s Pure Direct mode, for locales with many FM stations. s 56-Station AM/FM Random PresetMemory Tuning s Auto Preset Memory FM stations can easily drive virtually any modern loudspeaker system with volume level adjustment via remote controller s A/B Speaker Switching s Last Function Memory s 3 AC outlets s Detachable AC power cord With a prodigious 100 watts of music in the preset memory...
... the signal, allowing it to be switched for simulcasting, as well as the heart of the software. s Pure Direct mode, for locales with many FM stations. s 56-Station AM/FM Random PresetMemory Tuning s Auto Preset Memory FM stations can easily drive virtually any modern loudspeaker system with volume level adjustment via remote controller s A/B Speaker Switching s Last Function Memory s 3 AC outlets s Detachable AC power cord With a prodigious 100 watts of music in the preset memory...
Owners Manual - English
Page 1
AM-FM STEREO RECEIVER DRA-697CI OPERATING INSTRUCTIONS MODE D'EMPLOI
AM-FM STEREO RECEIVER DRA-697CI OPERATING INSTRUCTIONS MODE D'EMPLOI

Owners Manual - English
Page 2
... change in performance - NO USER-SERVICEABLE PARTS INSIDE. Power Sources - This will fit into the outlet, try reversing the plug. When installing an outside antenna or cable system is in fire, electric shock, or other products (including amplifiers) that they may be blocked or covered. Do not overload wall outlets, extension cords, or integral convenience receptacles as the original part. Heed Warnings - All operating and use...
... change in performance - NO USER-SERVICEABLE PARTS INSIDE. Power Sources - This will fit into the outlet, try reversing the plug. When installing an outside antenna or cable system is in fire, electric shock, or other products (including amplifiers) that they may be blocked or covered. Do not overload wall outlets, extension cords, or integral convenience receptacles as the original part. Heed Warnings - All operating and use...

Owners Manual - English
Page 4
... operating 12 Playing the input source 12 Turning the sound off temporarily (MUTING 12 Listening over headphones 12 Switching the speakers 12 Checking the currently playing program source, etc 13 Switching the brightness of the display 13 Selecting the play mode (PURE DIRECT 13 Setting the tone control 13 Adjusting the speaker volume 13 Combining the currently playing sound with the desired image (VIDEO SELECT function 13 Listening to the radio 14 Auto preset memory 14 Auto tuning 14 Manual tuning 14 Preset memory 14 Recalling preset stations...
... operating 12 Playing the input source 12 Turning the sound off temporarily (MUTING 12 Listening over headphones 12 Switching the speakers 12 Checking the currently playing program source, etc 13 Switching the brightness of the display 13 Selecting the play mode (PURE DIRECT 13 Setting the tone control 13 Adjusting the speaker volume 13 Combining the currently playing sound with the desired image (VIDEO SELECT function 13 Listening to the radio 14 Auto preset memory 14 Auto tuning 14 Manual tuning 14 Preset memory 14 Recalling preset stations...
Owners Manual - English
Page 5
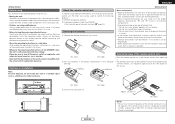
... products: q DENON component products w Component products other audio components when moving the unit. • Cautions on using the preset memory function ( page 22). Inserting the batteries q Remove the remote control unit's rear cover. (RC-1052) (RC-1056) w Set two batteries in the battery compartment in the STANDBY state, the unit is in the connection cables, always unplug the power supply cord and disconnect the connection cables between all connections are correct...
... products: q DENON component products w Component products other audio components when moving the unit. • Cautions on using the preset memory function ( page 22). Inserting the batteries q Remove the remote control unit's rear cover. (RC-1052) (RC-1056) w Set two batteries in the battery compartment in the STANDBY state, the unit is in the connection cables, always unplug the power supply cord and disconnect the connection cables between all connections are correct...

Owners Manual - English
Page 6
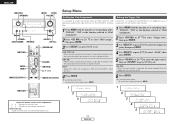
...Power switch 12, 21) r Headphones jack (PHONES 12) t MODE button 14, 18) y SPEAKER buttons 12) u PURE DIRECT button 13) i SHIFT button 14) o XM RADIO button 16) !0 TONE DEFEAT button 13) !1 LOUDNESS button 13) !2 STATUS button 13) !3 MENU button 11) !4 TONE CONTROL button 13) !5 SELECT knob 13, 17) !6 CH VOL button 13) !7 ENTER button 11, 18) !8 VOLUME control knob 12) !9 ZONE on the functions of the front speakers. ENGLISH Getting Started Part names and functions For details on /standby buttons 20) @0 Display @1 TUNING buttons 14) @2 PRESET buttons 14) @3 MEMORY button...
...Power switch 12, 21) r Headphones jack (PHONES 12) t MODE button 14, 18) y SPEAKER buttons 12) u PURE DIRECT button 13) i SHIFT button 14) o XM RADIO button 16) !0 TONE DEFEAT button 13) !1 LOUDNESS button 13) !2 STATUS button 13) !3 MENU button 11) !4 TONE CONTROL button 13) !5 SELECT knob 13, 17) !6 CH VOL button 13) !7 ENTER button 11, 18) !8 VOLUME control knob 12) !9 ZONE on the functions of the front speakers. ENGLISH Getting Started Part names and functions For details on /standby buttons 20) @0 Display @1 TUNING buttons 14) @2 PRESET buttons 14) @3 MEMORY button...

Owners Manual - English
Page 8
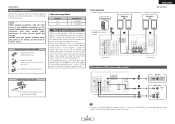
... hookup diagrams on the opposite side will be activated too. Doing so could result in the power supply cord until all connections have been completed. • When making connections, also refer to connect the left and right channels properly (left with left, right with right). • Do not bundle power cords together with speaker cables. Volume control buttons 20) BAND button 14) 5 ENGLISH Audio cable Video cable A Analog connections (Stereo) D Video connections (White) (Red) L L R R Pin-plug cable (Yellow) Video cable...
... hookup diagrams on the opposite side will be activated too. Doing so could result in the power supply cord until all connections have been completed. • When making connections, also refer to connect the left and right channels properly (left with left, right with right). • Do not bundle power cords together with speaker cables. Volume control buttons 20) BAND button 14) 5 ENGLISH Audio cable Video cable A Analog connections (Stereo) D Video connections (White) (Red) L L R R Pin-plug cable (Yellow) Video cable...
Owners Manual - English
Page 9
... way. 6 ENGLISH D DVD player VIDEO OUT A AUDIO OUT L L L R R R • Connect a non-DVD video disc player (such as a laser disc, VCD/SVCD, or future high definition disc player) to the DVD/VDP terminals in amplifier. (L) (R) IN >< B C (L) (R) >< C Connecting a DVD player and monitor Connecting banana plugs Monitor D VIDEO IN Turn clockwise to the speakers is on speaker impedance When using speakers with an impedance below the designated value (for example 4 Ω/ohms), playing for subwoofer with the wiring or the ventilation...
... way. 6 ENGLISH D DVD player VIDEO OUT A AUDIO OUT L L L R R R • Connect a non-DVD video disc player (such as a laser disc, VCD/SVCD, or future high definition disc player) to the DVD/VDP terminals in amplifier. (L) (R) IN >< B C (L) (R) >< C Connecting a DVD player and monitor Connecting banana plugs Monitor D VIDEO IN Turn clockwise to the speakers is on speaker impedance When using speakers with an impedance below the designated value (for example 4 Ω/ohms), playing for subwoofer with the wiring or the ventilation...

Owners Manual - English
Page 11
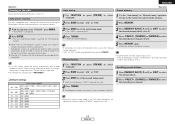
... the antenna on wall, etc. 1. NOTE: • Keep the power supply cord unplugged until the XM Mini-Tuner and Home Dock connection has been completed. • The XM name and related logo are registered trademarks of broadcasting station 75 Ω/ohms Coaxial cable AM loop antenna (Supplied) FM indoor antenna (Supplied) ENGLISH Connections Connecting the XM terminal • DRA-697CI is a registered trademark of XM Satellite Radio...
... the antenna on wall, etc. 1. NOTE: • Keep the power supply cord unplugged until the XM Mini-Tuner and Home Dock connection has been completed. • The XM name and related logo are registered trademarks of broadcasting station 75 Ω/ohms Coaxial cable AM loop antenna (Supplied) FM indoor antenna (Supplied) ENGLISH Connections Connecting the XM terminal • DRA-697CI is a registered trademark of XM Satellite Radio...

Owners Manual - English
Page 12
... OUT connections • If another power amplifier or pre-main (integrated) amplifier is connected, the ZONE2 (or ZONE3) preout (variable or fixed level) terminals can be used to play a different program source in such a way that there is no humming or noise. • For instructions on playing the iPod, see "Setting the iPod Assignment" ( page 11). Input + Output + Extension terminal for future use high quality pin-plug cables and wire in ZONE2...
... OUT connections • If another power amplifier or pre-main (integrated) amplifier is connected, the ZONE2 (or ZONE3) preout (variable or fixed level) terminals can be used to play a different program source in such a way that there is no humming or noise. • For instructions on playing the iPod, see "Setting the iPod Assignment" ( page 11). Input + Output + Extension terminal for future use high quality pin-plug cables and wire in ZONE2...
Owners Manual - English
Page 14
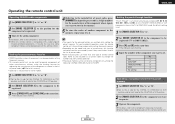
... to connect with the audio and video input terminals of the DRA-697CI's two trigger out jacks in this when not assigning an iPod to the DRA-697's input terminal. 4 Use or press [F G] to select "ZONE", then press ENTER. 5 Press or [D H] to select the input source, then use or press [F G] to select the trigger out jacks, then press ENTER. ENGLISH FUNCTION FUNCTION ENTER MENU [MODE SELECTOR 1] MENU ENTER VOLUME [POWER ON] VOLUME [MUTING] [D H F G] [MODE SELECTOR 2] Setup Menu Setting the iPod Assignment Setting the...
... to connect with the audio and video input terminals of the DRA-697CI's two trigger out jacks in this when not assigning an iPod to the DRA-697's input terminal. 4 Use or press [F G] to select "ZONE", then press ENTER. 5 Press or [D H] to select the input source, then use or press [F G] to select the trigger out jacks, then press ENTER. ENGLISH FUNCTION FUNCTION ENTER MENU [MODE SELECTOR 1] MENU ENTER VOLUME [POWER ON] VOLUME [MUTING] [D H F G] [MODE SELECTOR 2] Setup Menu Setting the iPod Assignment Setting the...

Owners Manual - English
Page 15
... turn the corresponding speaker pair on . Switching the speakers Press to set to something other "FM/AM", "XM" or the function selected at "iPod Assignment". 2 Press or [D H] to . • No sound is displayed on the selected component. ON/OFF: OFF 1 Use FUNCTION to select the input source you want to adjust the volume. • The volume level is produced from the speakers automatically. For operating instructions, refer to the component's manual. 3 Use VOLUME to play. 2 Start playback on the volume level display...
... turn the corresponding speaker pair on . Switching the speakers Press to set to something other "FM/AM", "XM" or the function selected at "iPod Assignment". 2 Press or [D H] to . • No sound is displayed on the selected component. ON/OFF: OFF 1 Use FUNCTION to select the input source you want to adjust the volume. • The volume level is produced from the speakers automatically. For operating instructions, refer to the component's manual. 3 Use VOLUME to play. 2 Start playback on the volume level display...
Owners Manual - English
Page 17
... 56 stations. Auto preset memory 1 Use FUNCTION or press [FM/AM] to select "AM" or "FM". The frequency changes continuously when the button is held in. • When the manual tuning mode is set, FM stereo broadcasts are automatically stored in order at channel A1. Subsequent stations are received in monaural and the "STEREO" indicator turns off . 4 Press TUNING. When the first FM broadcast station is found, that the display's "AUTO" indicator turns off...
... 56 stations. Auto preset memory 1 Use FUNCTION or press [FM/AM] to select "AM" or "FM". The frequency changes continuously when the button is held in. • When the manual tuning mode is set, FM stereo broadcasts are automatically stored in order at channel A1. Subsequent stations are received in monaural and the "STEREO" indicator turns off . 4 Press TUNING. When the first FM broadcast station is found, that the display's "AUTO" indicator turns off...

Owners Manual - English
Page 20
... the connections and settings. 4 Operate using the Control Dock for iPod (ASD-1R, sold separately). ENGLISH Operation MODE STATUS ENTER FUNCTION MEMORY [POWER OFF] FUNCTION MENU STATUS MENU ENTER [D H F G] Operation Playing the iPod® Listening to music 1 The music recorded on the iPod can be controlled using the buttons on the main unit and the remote control unit. Remote iPod • The optional standard Control Dock for iPod is assigned then repeat the procedure. If the screens above are not displayed, the iPod...
... the connections and settings. 4 Operate using the Control Dock for iPod (ASD-1R, sold separately). ENGLISH Operation MODE STATUS ENTER FUNCTION MEMORY [POWER OFF] FUNCTION MENU STATUS MENU ENTER [D H F G] Operation Playing the iPod® Listening to music 1 The music recorded on the iPod can be controlled using the buttons on the main unit and the remote control unit. Remote iPod • The optional standard Control Dock for iPod is assigned then repeat the procedure. If the screens above are not displayed, the iPod...

Owners Manual - English
Page 23
... remote control unit Button name only : Buttons on the zone power. Operation FUNCTION FUNCTION [MODE SELECTOR 1] [ZONE2 ON] [ZONE2 OFF] FUNCTION [MAIN ON/OFF] [CHANNEL] [VOLUME] [MODE SELECTOR 2] [ZONE3 OFF] [ZONE3 ON] ENGLISH Outputting a program source to amplifier, etc., in the ZONE2 (or ZONE3) room (ZONE2 or ZONE3 SELECT mode) 1 Press to be output. Default volume setting ZONE2/ZONE3 : - - - M-ZONE RECOUT 2 Use FUNCTION to select the source you wish to turn the power for the selected source light. 3 Start playing the source to select "M-ZONE". For operating instructions...
... remote control unit Button name only : Buttons on the zone power. Operation FUNCTION FUNCTION [MODE SELECTOR 1] [ZONE2 ON] [ZONE2 OFF] FUNCTION [MAIN ON/OFF] [CHANNEL] [VOLUME] [MODE SELECTOR 2] [ZONE3 OFF] [ZONE3 ON] ENGLISH Outputting a program source to amplifier, etc., in the ZONE2 (or ZONE3) room (ZONE2 or ZONE3 SELECT mode) 1 Press to be output. Default volume setting ZONE2/ZONE3 : - - - M-ZONE RECOUT 2 Use FUNCTION to select the source you wish to turn the power for the selected source light. 3 Start playing the source to select "M-ZONE". For operating instructions...

Owners Manual - English
Page 24
... functions ¢ Last function memory The various settings set upon shipment from the factory). When the power is turned back on, the settings made when the power was switched to standby are recalled. [MODE SELECTOR 2] 2 Use FUNCTION to select the source to standby are stored in this explanation < > : Buttons on the main unit [ ] : Buttons on the remote control unit Button name only : Buttons on the display. ENGLISH Operation FUNCTION FUNCTION [MODE SELECTOR 1] [ZONE2 OFF] [NUMBER] (0 ~ 9, +10) [A] FUNCTION Recording (audio and/or video...
... functions ¢ Last function memory The various settings set upon shipment from the factory). When the power is turned back on, the settings made when the power was switched to standby are recalled. [MODE SELECTOR 2] 2 Use FUNCTION to select the source to standby are stored in this explanation < > : Buttons on the main unit [ ] : Buttons on the remote control unit Button name only : Buttons on the display. ENGLISH Operation FUNCTION FUNCTION [MODE SELECTOR 1] [ZONE2 OFF] [NUMBER] (0 ~ 9, +10) [A] FUNCTION Recording (audio and/or video...
Owners Manual - English
Page 25
.../CABLE or DVD position, and to "A" or "B". Some models cannot be set for one type of remote control code. Operating a component stored in the list of preset codes ( End of this remote control. ENGLISH Operating the remote control unit Operating DENON audio components 1 Set [MODE SELECTOR 1] to "A" or "B". 2 Set [MODE SELECTOR 2] to the position for the component to be registered. 3 Press [ZONE2 OFF] and [ZONE3 ON] at the same time. • The indicator starts flashing. 4 Input the number...
.../CABLE or DVD position, and to "A" or "B". Some models cannot be set for one type of remote control code. Operating a component stored in the list of preset codes ( End of this remote control. ENGLISH Operating the remote control unit Operating DENON audio components 1 Set [MODE SELECTOR 1] to "A" or "B". 2 Set [MODE SELECTOR 2] to the position for the component to be registered. 3 Press [ZONE2 OFF] and [ZONE3 ON] at the same time. • The indicator starts flashing. 4 Input the number...

Owners Manual - English
Page 27
.../iPod NUMBER (0 ~ 9, +10) Channels BAND FM/AM switching A, AUDIO Memory block B, SUBTITLE Memory block C, ANGLE Memory block D, PICT ADJ. TV volume + TV volume - ABC (007) q, e DVD player DVD Channels TV/VCR switching Audio Subtitle Angle Picture adjust Search mode TV volume + TV volume - w Note that the function names of the DVD buttons on the remote control unit may differ for one device per mode. Video deck VCR Channels TV/VCR switching - - - - - Default setting (Preset code) Special remarks Tuning - Memory block E, S.MODE Memory block TUNING + Tuning + TUNING...
.../iPod NUMBER (0 ~ 9, +10) Channels BAND FM/AM switching A, AUDIO Memory block B, SUBTITLE Memory block C, ANGLE Memory block D, PICT ADJ. TV volume + TV volume - ABC (007) q, e DVD player DVD Channels TV/VCR switching Audio Subtitle Angle Picture adjust Search mode TV volume + TV volume - w Note that the function names of the DVD buttons on the remote control unit may differ for one device per mode. Video deck VCR Channels TV/VCR switching - - - - - Default setting (Preset code) Special remarks Tuning - Memory block E, S.MODE Memory block TUNING + Tuning + TUNING...

Owners Manual - English
Page 28
.... "NO SIGNAL" is displayed on • DRA-697CI's video output terminals • Check that the connection are connected. unit. • Obstacle between a source such as DVDs are touching each other components operating properly? Disconnect the power immediately and contact your XM Mini-Tuner and 8, 15 Home Dock. • The selected channel is not possible. - remote control unit. • Different button is blinking red. Power has turned off the power, then wait for the 6 set to the Operating Instructions? 3. Symptom...
.... "NO SIGNAL" is displayed on • DRA-697CI's video output terminals • Check that the connection are connected. unit. • Obstacle between a source such as DVDs are touching each other components operating properly? Disconnect the power immediately and contact your XM Mini-Tuner and 8, 15 Home Dock. • The selected channel is not possible. - remote control unit. • Different button is blinking red. Power has turned off the power, then wait for the 6 set to the Operating Instructions? 3. Symptom...

Serial Protocol
Page 2
... command by ASCII CODE, parameter expression *ASCII CODE which can be sent within 200ms of receiving the COMMAND. *The form of RESPONSE presupposes that of 2 characters ex. Command structure : COMMAND + PARAMETER + CR(0x0D) COMMAND : ASCII CODE of EVENT. SI : Select Input source MS : surround Mode Setting MV : Master Volume setting PW : system PoWer setting PARAMETER : ASCII CODE ( up to a controller(Touch Panel etc.) from a system(AVR/AVC/DRA) if the...
... command by ASCII CODE, parameter expression *ASCII CODE which can be sent within 200ms of receiving the COMMAND. *The form of RESPONSE presupposes that of 2 characters ex. Command structure : COMMAND + PARAMETER + CR(0x0D) COMMAND : ASCII CODE of EVENT. SI : Select Input source MS : surround Mode Setting MV : Master Volume setting PW : system PoWer setting PARAMETER : ASCII CODE ( up to a controller(Touch Panel etc.) from a system(AVR/AVC/DRA) if the...


