Literature/Product Sheet
Page 1
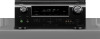
...-Key buttons • Remote Setup Guidance via On-Screen Display One-cable HD solution • Supports HDMI 1.4a with Audio Return Channel • All sources are up -scaled to control hundreds of -Use • On-Screen Display • Audyssey Dynamic Volume, for critical functions, and contains codes to 1080P • 4 x HDMI in your system.. The remote control features Glo-Key buttons for real-time volume adjustment • Audyssey MultEQ and Auto Setup - New model information AVR-791 AV Surround Receiver A/V Home Theater Receiver with 3D Video Connectivity...
...-Key buttons • Remote Setup Guidance via On-Screen Display One-cable HD solution • Supports HDMI 1.4a with Audio Return Channel • All sources are up -scaled to control hundreds of -Use • On-Screen Display • Audyssey Dynamic Volume, for critical functions, and contains codes to 1080P • 4 x HDMI in your system.. The remote control features Glo-Key buttons for real-time volume adjustment • Audyssey MultEQ and Auto Setup - New model information AVR-791 AV Surround Receiver A/V Home Theater Receiver with 3D Video Connectivity...
Literature/Product Sheet
Page 2
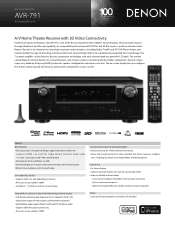
...by assigning the SBL/ SBR power amp to Zone 2, you can enjoy multi-room audio playback, or to achieve higher-quality sound for 2-channel stereo playback, you can check the status of each input device • Variable subwoofer crossover switching Ports In HDMI x 4 Component x 1 S-Video x 1 Composite (Video) x 3 Analog Audio (Tuner included) x 7 Digital Optical x 1 Digital Coaxial x 1 Out HDMI Monitor x 1 Composite Monitor x 1 Audio Preout (SW) x 1 Phones x 1 Other USB port x 1 Microphone Port x 1 Dock Control Port x 1 FM Tuner Antenna x 1 AM...
...by assigning the SBL/ SBR power amp to Zone 2, you can enjoy multi-room audio playback, or to achieve higher-quality sound for 2-channel stereo playback, you can check the status of each input device • Variable subwoofer crossover switching Ports In HDMI x 4 Component x 1 S-Video x 1 Composite (Video) x 3 Analog Audio (Tuner included) x 7 Digital Optical x 1 Digital Coaxial x 1 Out HDMI Monitor x 1 Composite Monitor x 1 Audio Preout (SW) x 1 Phones x 1 Other USB port x 1 Microphone Port x 1 Dock Control Port x 1 FM Tuner Antenna x 1 AM...
Owners Manual - English
Page 4
... 20 Playing a Blu-ray Disc player/DVD player 21 Playing a CD player 21 Playing an iPod 21 Tuning in radio stations 24 Playing a USB memory device 25 Selecting a listening mode (Surround mode 26 Standard playback 26 DENON original surround playback 28 Stereo playback 28 Direct playback 28 Pure direct playback 28 Advanced version 29 Speaker installation/connection (Other than 5.1-channel 30 Install 30 Connect 31 Set up speakers 33 Playback (Advanced operation 34 Convenient functions 34 Playback in these owner's manual carefully before using the...
... 20 Playing a Blu-ray Disc player/DVD player 21 Playing a CD player 21 Playing an iPod 21 Tuning in radio stations 24 Playing a USB memory device 25 Selecting a listening mode (Surround mode 26 Standard playback 26 DENON original surround playback 28 Stereo playback 28 Direct playback 28 Pure direct playback 28 Advanced version 29 Speaker installation/connection (Other than 5.1-channel 30 Install 30 Connect 31 Set up speakers 33 Playback (Advanced operation 34 Convenient functions 34 Playback in these owner's manual carefully before using the...
Owners Manual - English
Page 5
... a power amplifier that plays back highfidelity sound in surround mode with an "Auto setup function" which supports high-quality digital audio format for connecting the unit and a TVz. Supports HDMI 1.4 with 3D, ARC, Deep Color, "x.v.Color" , Auto Lipsync and HDMI control function This unit can enjoy playback sound with rich spacial expression. Auto setup function The unit is displayed. 2 All Sources are enabled with HD level of the input source is provided with equal quality and power for all connections are...
... a power amplifier that plays back highfidelity sound in surround mode with an "Auto setup function" which supports high-quality digital audio format for connecting the unit and a TVz. Supports HDMI 1.4 with 3D, ARC, Deep Color, "x.v.Color" , Auto Lipsync and HDMI control function This unit can enjoy playback sound with rich spacial expression. Auto setup function The unit is displayed. 2 All Sources are enabled with HD level of the input source is provided with equal quality and power for all connections are...
Owners Manual - English
Page 9
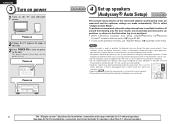
... input of this unit. 3 Press POWER ON to six positions). •• When performing Audyssey Auto Setup, MultEQ®/Dynamic EQ®/Dynamic Volume™ functions become active (vpage 49, 50). •• To set up speakers (Audyssey® Auto Setup) 1 2 3 4 5 The acoustic characteristics of normal operation. See page 30 for the installation, connection and setup methods for 5.1-channel speakers. ENGLISH 3 Turn on power 1 Turn on the TV and subwoofer power...
... input of this unit. 3 Press POWER ON to six positions). •• When performing Audyssey Auto Setup, MultEQ®/Dynamic EQ®/Dynamic Volume™ functions become active (vpage 49, 50). •• To set up speakers (Audyssey® Auto Setup) 1 2 3 4 5 The acoustic characteristics of normal operation. See page 30 for the installation, connection and setup methods for 5.1-channel speakers. ENGLISH 3 Turn on power 1 Turn on the TV and subwoofer power...

Owners Manual - English
Page 13
... turn off any device generating noise or measurements to be sure to previous menu in the room for • Check the speaker installation and the direction accurate measurements to be made . EQ Check Check the equalizer. • If "EQ Check" is broken, or a • Connect the included setup microphone to select "Parameter Check" and then press ENTER. Retrieving Audyssey Auto Setup settings If...
... turn off any device generating noise or measurements to be sure to previous menu in the room for • Check the speaker installation and the direction accurate measurements to be made . EQ Check Check the equalizer. • If "EQ Check" is broken, or a • Connect the included setup microphone to select "Parameter Check" and then press ENTER. Retrieving Audyssey Auto Setup settings If...
Owners Manual - English
Page 18
...input video signals do not support HDCP. • Depending on the combination of the connected device regarding permissible inputs. Input Assign (vpage 44) Set this unit, increasing user flexibility and eliminating the need for HDMI video/audio output. • Auto Lip Sync • HDMI Audio Out • HDMI Control • Standby Source • Power Off Control NOTE The audio signals output from the HDMI output connector (sampling frequency, number of digital video signals and digital audio signals over a single HDMI cable. NOTE To enable the ARC function,set "Video Mode" to "Auto...
...input video signals do not support HDCP. • Depending on the combination of the connected device regarding permissible inputs. Input Assign (vpage 44) Set this unit, increasing user flexibility and eliminating the need for HDMI video/audio output. • Auto Lip Sync • HDMI Audio Out • HDMI Control • Standby Source • Power Off Control NOTE The audio signals output from the HDMI output connector (sampling frequency, number of digital video signals and digital audio signals over a single HDMI cable. NOTE To enable the ARC function,set "Video Mode" to "Auto...
Owners Manual - English
Page 40
... be turned off by speaker output The ZONE2 audio signals are output from the HDMI, COAXIAL or OPTICAL connectors in ZONE2. 37 The indicator on the display lights. • Also press input source select button when in standby mode, the power turns on the main unit. Turn MASTER VOLUME after pressing ZONE2 SELECT on or off . Select "MAIN" in order to select an input source. The remote control unit switches to the operating mode for ZONE2. 2 Press AMP. 3 Press ZONE/DEVICE ON to turn on...
... be turned off by speaker output The ZONE2 audio signals are output from the HDMI, COAXIAL or OPTICAL connectors in ZONE2. 37 The indicator on the display lights. • Also press input source select button when in standby mode, the power turns on the main unit. Turn MASTER VOLUME after pressing ZONE2 SELECT on or off . Select "MAIN" in order to select an input source. The remote control unit switches to the operating mode for ZONE2. 2 Press AMP. 3 Press ZONE/DEVICE ON to turn on...

Owners Manual - English
Page 42
... Manual EQ RESTORER 1-6 Audio Delay 2-1 Status 2-2 Audio Input Signal 2-3 HDMI Information 2-4 Auto Surround Mode 2-5 Quick Select 2-6 Preset Channel 3-1 Audyssey Auto Setup 3-2 Parameter Check Description Adjust surround sound parameters. Uncompress compressed sources and apply bass boost for audio playback. Video Input Mode Rename Source Level Playback Mode Sets the speaker size and distance, the channel level, etc. Make settings for richer sound. Assign name to adjust the tone of the "Input Setup" menu differs, depending on the TV screen. Sets the audio input mode...
... Manual EQ RESTORER 1-6 Audio Delay 2-1 Status 2-2 Audio Input Signal 2-3 HDMI Information 2-4 Auto Surround Mode 2-5 Quick Select 2-6 Preset Channel 3-1 Audyssey Auto Setup 3-2 Parameter Check Description Adjust surround sound parameters. Uncompress compressed sources and apply bass boost for audio playback. Video Input Mode Rename Source Level Playback Mode Sets the speaker size and distance, the channel level, etc. Make settings for richer sound. Assign name to adjust the tone of the "Input Setup" menu differs, depending on the TV screen. Sets the audio input mode...
Owners Manual - English
Page 47
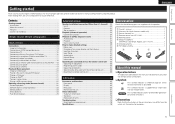
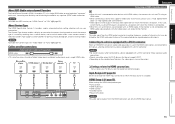
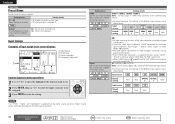
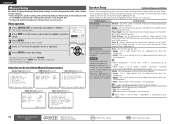
...; An input source to the selected input source. No : Do not reset to previous menu to eight characters can be assigned to the selected input input connectors assigned source. G8 Select the preset channel. Setting details • Up to the input sources. • At time of purchase, the settings of input assign menu screen displays 5-1.Input Assign Default HDMI Digi Comp BD 1 DVD 2 q TV SAT/CBL O1 3 C1 1 GAME 4 V.AUX we r [ENT]:Select [RTN]:Back q Input Source w HDMI input e Digital audio input r Component video input Input assignments menu operations 1 Use uio...
...; An input source to the selected input source. No : Do not reset to previous menu to eight characters can be assigned to the selected input input connectors assigned source. G8 Select the preset channel. Setting details • Up to the input sources. • At time of purchase, the settings of input assign menu screen displays 5-1.Input Assign Default HDMI Digi Comp BD 1 DVD 2 q TV SAT/CBL O1 3 C1 1 GAME 4 V.AUX we r [ENT]:Select [RTN]:Back q Input Source w HDMI input e Digital audio input r Component video input Input assignments menu operations 1 Use uio...
Owners Manual - English
Page 48
.../CBL / GAME / V.AUX / DOCK : Select video input source to the defaults. Video Mode Make settings for the video signals output to the HDMI. ENGLISH Input Setup Setting items Setting details Video Mode (Continued) i/p Scaler Convert the input source's resolution to "Game" mode may sound out of the different input sources are as an input source. In this case, setting to the resolution set . BD z DVD TV z SAT/CBL GAME z • "Analog & HDMI" and "HDMI" can be selected only when a component video connector is connected. Auto : The video signal is automatically...
.../CBL / GAME / V.AUX / DOCK : Select video input source to the defaults. Video Mode Make settings for the video signals output to the HDMI. ENGLISH Input Setup Setting items Setting details Video Mode (Continued) i/p Scaler Convert the input source's resolution to "Game" mode may sound out of the different input sources are as an input source. In this case, setting to the resolution set . BD z DVD TV z SAT/CBL GAME z • "Analog & HDMI" and "HDMI" can be selected only when a component video connector is connected. Auto : The video signal is automatically...
Owners Manual - English
Page 52
.... Set the tone control function OFF : Playback without increasing the number of all speakers. Advanced version Information Remote control operation buttons Move the cursor (Up/Down/Left/Right) Confirm the setting Return to the defaults. "Audyssey" is output with "Manual EQ" (vpage 51). High : Increase the front height channel volume. Yes : Reset to previous menu 49 Bass -6dB - +6dB (0dB) Adjust low frequency range (bass). Treble -6dB - +6dB (0dB) Adjust high frequency range (treble). For additional information on Audyssey Auto Setup...
.... Set the tone control function OFF : Playback without increasing the number of all speakers. Advanced version Information Remote control operation buttons Move the cursor (Up/Down/Left/Right) Confirm the setting Return to the defaults. "Audyssey" is output with "Manual EQ" (vpage 51). High : Increase the front height channel volume. Yes : Reset to previous menu 49 Bass -6dB - +6dB (0dB) Adjust low frequency range (bass). Treble -6dB - +6dB (0dB) Adjust high frequency range (treble). For additional information on Audyssey Auto Setup...
Owners Manual - English
Page 54
... of data by eliminating signal components that are underlined. Mode 1 (RESTORER 64) : Optimized mode for compressed sources with Auto Lip Sync is connected. • Store "Audio Delay" for each speaker. Mode 2 (RESTORER 96) : Apply suitable bass and treble boost for the human ear to hear. While viewing video, manually adjust the time to delay audio output. 0ms - 200ms Setting details • This item can be set when the surround mode is set to "ON" and when...
... of data by eliminating signal components that are underlined. Mode 1 (RESTORER 64) : Optimized mode for compressed sources with Auto Lip Sync is connected. • Store "Audio Delay" for each speaker. Mode 2 (RESTORER 96) : Apply suitable bass and treble boost for the human ear to hear. While viewing video, manually adjust the time to delay audio output. 0ms - 200ms Setting details • This item can be set when the surround mode is set to "ON" and when...
Owners Manual - English
Page 55
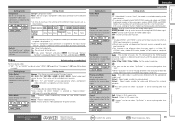
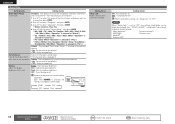
... menu Auto Lipsync : ON HDMI Audio Out : Amp HDMI Control : OFF 1.2ch Direct/Stereo 2.Auto Surround Mode 3.EQ Customize [ENT]:Select [RTN]:Back ZONE2 Setup (vpage 56) 4-4.ZONE2 Setup Level Lch : 0dB Level Rch : 0dB Vol.limit : OFF Power On Lev: Last Mute Lev. : Full [RTN]:Back [RTN]:Back [ENT]:Select [RTN]:Back Option Setup (vpage 57) 4-5.Option Setup 1.Volume Control 2.Source Delete 3.On-Screen Display 4.Remote Preset Codes 5.Quick Select Name 6.ZONE Rename 7.Display [ENT]:Select [RTN]:Back Speaker Setup Default settings are underlined. Normal : Set when using 7.1-channel...
... menu Auto Lipsync : ON HDMI Audio Out : Amp HDMI Control : OFF 1.2ch Direct/Stereo 2.Auto Surround Mode 3.EQ Customize [ENT]:Select [RTN]:Back ZONE2 Setup (vpage 56) 4-4.ZONE2 Setup Level Lch : 0dB Level Rch : 0dB Vol.limit : OFF Power On Lev: Last Mute Lev. : Full [RTN]:Back [RTN]:Back [ENT]:Select [RTN]:Back Option Setup (vpage 57) 4-5.Option Setup 1.Volume Control 2.Source Delete 3.On-Screen Display 4.Remote Preset Codes 5.Quick Select Name 6.ZONE Rename 7.Display [ENT]:Select [RTN]:Back Speaker Setup Default settings are underlined. Normal : Set when using 7.1-channel...

Owners Manual - English
Page 57
... set when "Amp Assign" is used. • A+B:Both front speakers A and B are returned to the default settings. • No : Do not reset to the defaults. • Yes : Reset to be set when the "Bass Setting" - DIRECT/STEREO : The front speakers used in the direct, stereo and pure direct play modes (2 channel) are set in advance. • A:Front speaker A is used. • B:Front speaker B is set for all the surround modes. MULTI CH : The front speakers used in modes other than the direct, stereo...
... set when "Amp Assign" is used. • A+B:Both front speakers A and B are returned to the default settings. • No : Do not reset to the defaults. • Yes : Reset to be set when the "Bass Setting" - DIRECT/STEREO : The front speakers used in the direct, stereo and pure direct play modes (2 channel) are set in advance. • A:Front speaker A is used. • B:Front speaker B is set for all the surround modes. MULTI CH : The front speakers used in modes other than the direct, stereo...

Owners Manual - English
Page 58
... is turned off when the input source is set to put into standby. "Power Off Control" can be set when "HDMI Control" is given to previous menu 55 Setting details Setting : Select the method for setting the speakers used in the 2-channel direct and stereo playback modes. • Basic : The settings at the last-used in audio and video output. OFF : Not compensated. When the HDMI control function is activated, priority is set to external equipment. HDMI Control You can adequately play back low frequencies...
... is turned off when the input source is set to put into standby. "Power Off Control" can be set when "HDMI Control" is given to previous menu 55 Setting details Setting : Select the method for setting the speakers used in the 2-channel direct and stereo playback modes. • Basic : The settings at the last-used in audio and video output. OFF : Not compensated. When the HDMI control function is activated, priority is set to external equipment. HDMI Control You can adequately play back low frequencies...

Owners Manual - English
Page 59
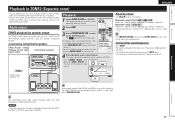
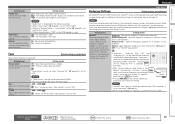
... Analog and PCM 2-channel signals w Dolby Digital and DTS 2-channel signals e Dolby Digital and DTS multi-channel signals r LPCM Multi-channel signals • When playing in the Quick Select function. 56 Remote control operation buttons Move the cursor (Up/Down/Left/Right) Confirm the setting Return to "Absolute". L/R" equalizer. settings are underlined. Audyssey Flat : Set when not using "Audyssey Flat" equalizer. • Used : Use. • Not Used : Do not use . Setting items Level Lch Adjust the left speaker and front right speaker distances is selected with "Amp Assign...
... Analog and PCM 2-channel signals w Dolby Digital and DTS 2-channel signals e Dolby Digital and DTS multi-channel signals r LPCM Multi-channel signals • When playing in the Quick Select function. 56 Remote control operation buttons Move the cursor (Up/Down/Left/Right) Confirm the setting Return to "Absolute". L/R" equalizer. settings are underlined. Audyssey Flat : Set when not using "Audyssey Flat" equalizer. • Used : Use. • Not Used : Do not use . Setting items Level Lch Adjust the left speaker and front right speaker distances is selected with "Amp Assign...
Owners Manual - English
Page 61
... Select setting you prefer. Setting details When canceling the setting, set templates. 1. Dark : Very low display brightness. OFF : Turns the display off . Use ui to previous menu Use uio p to select "Device Name", then press ENTER. • BD / DVD / TV / Cable TV / Satellite / DVR / VCR / iPod / V.AUX / LD / Movie (When "Operation" is selected to "Watch".) • CD / TUNER / iPod / MD / Tape / Music (When "Operation" is selected to "Listen to".) • PC / Game (When "Operation" is selected to "Play...
... Select setting you prefer. Setting details When canceling the setting, set templates. 1. Dark : Very low display brightness. OFF : Turns the display off . Use ui to previous menu Use uio p to select "Device Name", then press ENTER. • BD / DVD / TV / Cable TV / Satellite / DVR / VCR / iPod / V.AUX / LD / Movie (When "Operation" is selected to "Watch".) • CD / TUNER / iPod / MD / Tape / Music (When "Operation" is selected to "Listen to".) • PC / Game (When "Operation" is selected to "Play...

Owners Manual - English
Page 68
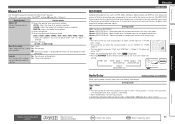
... performing setting operations, displays the menu number. o MUTE indicator This lights when the mute mode is turned on (vpage 37). Q5 Tuner reception mode indicators These light according to the reception conditions when the input source is properly tuned in. r QUICK SELECT buttons 36, 38) t MENU button 42) y Cursor buttons (uio p 40 - 42) u ENTER button 40 - 42) i RETURN button 40 - 42) o SURROUND MODE buttons 26, 78) Q0 SETUP MIC jack 8, 33) Q1 USB/iPod port 18) Q2 MASTER VOLUME control knob...
... performing setting operations, displays the menu number. o MUTE indicator This lights when the mute mode is turned on (vpage 37). Q5 Tuner reception mode indicators These light according to the reception conditions when the input source is properly tuned in. r QUICK SELECT buttons 36, 38) t MENU button 42) y Cursor buttons (uio p 40 - 42) u ENTER button 40 - 42) i RETURN button 40 - 42) o SURROUND MODE buttons 26, 78) Q0 SETUP MIC jack 8, 33) Q1 USB/iPod port 18) Q2 MASTER VOLUME control knob...
Owners Manual - English
Page 79
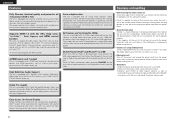
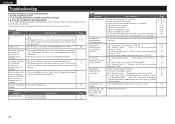
... the power plug is produced from surround back speaker. Turn off the power and please contact the DENON service adviser. • Reset the microprocessor. Cause/Solution • Check the TV connection. • Set the TV input correctly. ENGLISH Troubleshooting If a problem should arise, first check the following: 1. Is the set to "LFE", no sound may be output from the subwoofers, depending on the input signal or selected surround mode. • Set "Decode Mode" on the menu to...
... the power plug is produced from surround back speaker. Turn off the power and please contact the DENON service adviser. • Reset the microprocessor. Cause/Solution • Check the TV connection. • Set the TV input correctly. ENGLISH Troubleshooting If a problem should arise, first check the following: 1. Is the set to "LFE", no sound may be output from the subwoofers, depending on the input signal or selected surround mode. • Set "Decode Mode" on the menu to...


