
Literature/Product Sheet
Page 1
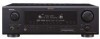
... connected to reproduce the exceptionally high sound quality with a Dock connector. s Configurable surround back amplifiers • Multi-zone system: a 5.1-channel theater in the main room and a stereo environment in the home theater without correction, the high-frequency range is also available. The iPod can be controlled via the remote controller supplied with the AVR-787. *1) Supports 3rd-generation and later iPods equipped with wide frequency response from movie sources recorded in Dolby Digital, DTS or other formats...
... connected to reproduce the exceptionally high sound quality with a Dock connector. s Configurable surround back amplifiers • Multi-zone system: a 5.1-channel theater in the main room and a stereo environment in the home theater without correction, the high-frequency range is also available. The iPod can be controlled via the remote controller supplied with the AVR-787. *1) Supports 3rd-generation and later iPods equipped with wide frequency response from movie sources recorded in Dolby Digital, DTS or other formats...

Literature/Product Sheet
Page 2
... program source, so that you make system settings via displays on your TV screen from the comfort of Component Video Output MONITOR 2 S-Video Outputs VCR, MONITOR 2 Composite Outputs VCR, MONITOR Specifications Power Amplifier Section Rated output *THD figures are subject to select the mode again for not disturbing others s Function Rename s Input Function Level s REC OUT Selector s All ch Preout s Front panel Inputs (with digital optical input) s Front A/B speaker terminals s High-grade 7 channel speaker terminals (all ch) s Frequency synthesis tuning • 56-station...
... program source, so that you make system settings via displays on your TV screen from the comfort of Component Video Output MONITOR 2 S-Video Outputs VCR, MONITOR 2 Composite Outputs VCR, MONITOR Specifications Power Amplifier Section Rated output *THD figures are subject to select the mode again for not disturbing others s Function Rename s Input Function Level s REC OUT Selector s All ch Preout s Front panel Inputs (with digital optical input) s Front A/B speaker terminals s High-grade 7 channel speaker terminals (all ch) s Frequency synthesis tuning • 56-station...

Owners Manual - English
Page 1
AV SURROUND RECEIVER AVR-787 OPERATING INSTRUCTIONS
AV SURROUND RECEIVER AVR-787 OPERATING INSTRUCTIONS

Owners Manual - English
Page 2
... Moisture - in proper operating condition. 24. Power Sources - Grounding or Polarization - Power-supply cords should be sure the service technician has used replacement parts specified by a qualified technician to restore the product to be situated away from the type of important operating and maintenance (servicing) instructions in wire to an antenna discharge unit, size of grounding conductors, location of antenna-discharge unit, connection to grounding electrodes...
... Moisture - in proper operating condition. 24. Power Sources - Grounding or Polarization - Power-supply cords should be sure the service technician has used replacement parts specified by a qualified technician to restore the product to be situated away from the type of important operating and maintenance (servicing) instructions in wire to an antenna discharge unit, size of grounding conductors, location of antenna-discharge unit, connection to grounding electrodes...

Owners Manual - English
Page 4
... surround simulation 31 Setting the tone control 32 Adjusting the speaker volume 32 Using the fader function 32 Listening to the radio Auto preset memory 33 Auto tuning 33 Manual tuning 33 Preset memory 34 Checking the preset stations 34 Recalling preset stations 34 XM Satellite Radio 34 Checking the XM signal strength and Radio ID 35 Channel selection 35 Category search 35 Advanced Operation Night mode 36 User mode function Storing the settings in the ZONE2 room (ZONE2 SELECT mode 41 Remote control unit operations during multi-source...
... surround simulation 31 Setting the tone control 32 Adjusting the speaker volume 32 Using the fader function 32 Listening to the radio Auto preset memory 33 Auto tuning 33 Manual tuning 33 Preset memory 34 Checking the preset stations 34 Recalling preset stations 34 XM Satellite Radio 34 Checking the XM signal strength and Radio ID 35 Channel selection 35 Category search 35 Advanced Operation Night mode 36 User mode function Storing the settings in the ZONE2 room (ZONE2 SELECT mode 41 Remote control unit operations during multi-source...

Owners Manual - English
Page 5
... Input Setup Setting the Digital In Assignment 47 Setting the EXT IN Subwoofer Level 48 Setting the iPod Assignment 48 Setting the Input Function Level 48 Setting the Function Rename 49 Setting the Tuner Presets 49, 50 Video Setup Setting the Component In Assignment 51 Setting the Video Convert 51 Setting the Audio Delay 51 Setting the On Screen Display (OSD 52 Advanced Playback Setting the 2ch Direct/Stereo 52 Setting the Auto Surround Mode 52 Option Setup Setting the Power Amplifier Assignment 53 Setting the Volume Control 53 Setting the Setup Lock 54 Advanced Setup - Using...
... Input Setup Setting the Digital In Assignment 47 Setting the EXT IN Subwoofer Level 48 Setting the iPod Assignment 48 Setting the Input Function Level 48 Setting the Function Rename 49 Setting the Tuner Presets 49, 50 Video Setup Setting the Component In Assignment 51 Setting the Video Convert 51 Setting the Audio Delay 51 Setting the On Screen Display (OSD 52 Advanced Playback Setting the 2ch Direct/Stereo 52 Setting the Auto Surround Mode 52 Option Setup Setting the Power Amplifier Assignment 53 Setting the Volume Control 53 Setting the Setup Lock 54 Advanced Setup - Using...
Owners Manual - English
Page 7
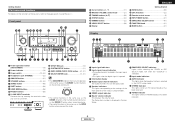
... Remote control sensor 3) @6 INPUT MODE button 21) @7 ZONE2/REC SELECT button 41) @8 FUNCTION knob 21) @9 MAIN button 21) Display !2 !1 !0 o i uy t !3 q w e r y u i o !0 !1 !2 !4 !5 !6 q Power operation button (ON/STANDBY 10) w Power indicator 10) e Power switch 10, 42) r Headphones jack (PHONES 22) t ANALOG button 21) y SPEAKER buttons 22, 42) u ZONE2 button 40) i SHIFT button 34) o USER MODE buttons 36) !0 PRESET buttons 33) !1 V. MODE/SURR. e Information display r Output signal channel indicators The audio channels that can be output light. Getting Started Part...
... Remote control sensor 3) @6 INPUT MODE button 21) @7 ZONE2/REC SELECT button 41) @8 FUNCTION knob 21) @9 MAIN button 21) Display !2 !1 !0 o i uy t !3 q w e r y u i o !0 !1 !2 !4 !5 !6 q Power operation button (ON/STANDBY 10) w Power indicator 10) e Power switch 10, 42) r Headphones jack (PHONES 22) t ANALOG button 21) y SPEAKER buttons 22, 42) u ZONE2 button 40) i SHIFT button 34) o USER MODE buttons 36) !0 PRESET buttons 33) !1 V. MODE/SURR. e Information display r Output signal channel indicators The audio channels that can be output light. Getting Started Part...

Owners Manual - English
Page 11
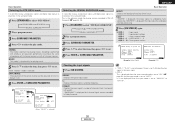
...power indicator blinks. ENGLISH Easy Setup Procedure ¢ Connections • With the AVR-787, up to ten speakers can be connected for the set to the operating instructions of the input cables and the speaker cables. Connecting the speaker cables 1. Tighten by turning counterclockwise. If this , plug the power cord back in amplifier. IN Surround speakers (L) (R) > < (L) (R) >< Front speakers (B) (L) (R) >< Front speakers (A) (L) (R) > < Surround back speakers When using speakers with an impedance below the designated value (for example 4 Ω/ohms), playing...
...power indicator blinks. ENGLISH Easy Setup Procedure ¢ Connections • With the AVR-787, up to ten speakers can be connected for the set to the operating instructions of the input cables and the speaker cables. Connecting the speaker cables 1. Tighten by turning counterclockwise. If this , plug the power cord back in amplifier. IN Surround speakers (L) (R) > < (L) (R) >< Front speakers (B) (L) (R) >< Front speakers (A) (L) (R) > < Surround back speakers When using speakers with an impedance below the designated value (for example 4 Ω/ohms), playing...

Owners Manual - English
Page 13
... lights red. £ OFF: The power turns off and the indicator is off before performing the Auto Setup procedure. Easy Setup Procedure SYSTEM SETUP [MODE SELECTOR 1] SYSTEM SETUP D H F G, ENTER [ON/SOURCE] ENTER D H F G ENGLISH Easy Setup Procedure Auto Setup w Before performing the Auto Setup procedure The AVR-787's auto setup use the attached microphone to turn this explanation < > : Buttons on the main unit [ ] : Buttons on the remote control unit Button name only : Buttons on your subwoofer can adjust the output volume and the crossover frequency...
... lights red. £ OFF: The power turns off and the indicator is off before performing the Auto Setup procedure. Easy Setup Procedure SYSTEM SETUP [MODE SELECTOR 1] SYSTEM SETUP D H F G, ENTER [ON/SOURCE] ENTER D H F G ENGLISH Easy Setup Procedure Auto Setup w Before performing the Auto Setup procedure The AVR-787's auto setup use the attached microphone to turn this explanation < > : Buttons on the main unit [ ] : Buttons on the remote control unit Button name only : Buttons on your subwoofer can adjust the output volume and the crossover frequency...

Owners Manual - English
Page 21
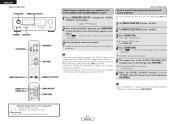
When making connections, also refer to a specific terminal, see "XM Satellite Radio" ( page 34, 35). ENGLISH Connecting Other Sources Connecting the iPod® When using an iPod, you must connect the Control Dock for iPod is a registered trademark of the panel. For instructions on playing the iPod, see "Playing the iPod" ( page 37). All rights reserved. • XM Ready is DENON ASD-1R sold separately) and subscribing to the XM service. • Plug the...
When making connections, also refer to a specific terminal, see "XM Satellite Radio" ( page 34, 35). ENGLISH Connecting Other Sources Connecting the iPod® When using an iPod, you must connect the Control Dock for iPod is a registered trademark of the panel. For instructions on playing the iPod, see "Playing the iPod" ( page 37). All rights reserved. • XM Ready is DENON ASD-1R sold separately) and subscribing to the XM service. • Plug the...

Owners Manual - English
Page 22
... ZONE2 using the MULTI ZONE functions ( page 39 ~ 41). IN Surround speakers (L) (R) > < RC-617 INFRARED SENSOR + + AUX OUT OUTPUT INPUT RC-616 INFRARED RETRANSMITTER Extension terminal for future use this speaker for subwoofer with built-in the "System Setup" menu, the surround back speaker terminals can not be changed to the ZONE2 stereo 2 channel. ENGLISH Connecting Other Sources Connecting the MULTI ZONE terminals For instructions on installation and operation of separately sold separately room-to-room remote control unit (DENON...
... ZONE2 using the MULTI ZONE functions ( page 39 ~ 41). IN Surround speakers (L) (R) > < RC-617 INFRARED SENSOR + + AUX OUT OUTPUT INPUT RC-616 INFRARED RETRANSMITTER Extension terminal for future use this speaker for subwoofer with built-in the "System Setup" menu, the surround back speaker terminals can not be changed to the ZONE2 stereo 2 channel. ENGLISH Connecting Other Sources Connecting the MULTI ZONE terminals For instructions on installation and operation of separately sold separately room-to-room remote control unit (DENON...

Owners Manual - English
Page 24
...Operation Playing the input source 1 Use FUNCTION to select the input source you want to the digital input terminal and set "AUTO" or "DTS" for which the video signal is connected first, then set the input mode. • The "DIGITAL" indicator lights when digital signals are being input. To select the input source when ZONE2/REC SELECT is switched automatically. For some players the playback level of input signal is detected and the AVR-787's surround mode is selected, press then operate . 4 Use VOLUME to the component's manual. For operating instructions, refer to adjust...
...Operation Playing the input source 1 Use FUNCTION to select the input source you want to the digital input terminal and set "AUTO" or "DTS" for which the video signal is connected first, then set the input mode. • The "DIGITAL" indicator lights when digital signals are being input. To select the input source when ZONE2/REC SELECT is switched automatically. For some players the playback level of input signal is detected and the AVR-787's surround mode is selected, press then operate . 4 Use VOLUME to the component's manual. For operating instructions, refer to adjust...
Owners Manual - English
Page 29
... for playing music. MUSIC: This mode is suited mainly for playing movies. DOLBY PLIIx DTS NEO:6 NEURAL SURROUND 2 Play a program source. 3 Press SURROUND PARAMETER. 4 Press D H to select the item, then press F G to set . fs: Displays the input signal's sampling frequency. FORMAT: Displays the input signal's number of the center channel can be adjusted. (0.0 to 1.0, default : 0.3) 6 Press ENTER or SURROUND PARAMETER. 3 5 Checking the input signals 1 Press [ON SCREEN]. Selecting the NEURAL SURROUND mode It is possible to play analog input signals and digital input signals (2channels...
... for playing music. MUSIC: This mode is suited mainly for playing movies. DOLBY PLIIx DTS NEO:6 NEURAL SURROUND 2 Play a program source. 3 Press SURROUND PARAMETER. 4 Press D H to select the item, then press F G to set . fs: Displays the input signal's sampling frequency. FORMAT: Displays the input signal's number of the center channel can be adjusted. (0.0 to 1.0, default : 0.3) 6 Press ENTER or SURROUND PARAMETER. 3 5 Checking the input signals 1 Press [ON SCREEN]. Selecting the NEURAL SURROUND mode It is possible to play analog input signals and digital input signals (2channels...

Owners Manual - English
Page 33
... component of the L and R channels is set to "OFF". VIRTUAL This mode can be very noticeable. NOTE 1: "5CH STEREO" is displayed when "SB CH OUT" is played on the program source being played, the effect may not be further adjusted to the L and R inputs. • Depending on the center channel. If you . Basic Operation Using the DENON original surround modes The AVR-787 is equipped with a high performance digital signal processor (DSP) that uses digital signal...
... component of the L and R channels is set to "OFF". VIRTUAL This mode can be very noticeable. NOTE 1: "5CH STEREO" is displayed when "SB CH OUT" is played on the program source being played, the effect may not be further adjusted to the L and R inputs. • Depending on the center channel. If you . Basic Operation Using the DENON original surround modes The AVR-787 is equipped with a high performance digital signal processor (DSP) that uses digital signal...

Owners Manual - English
Page 36
... [MODE] to set to the radio Auto tuning Check that the remote control unit is set, FM stereo broadcasts are automatically stored in order at channel A1. Check that the display's "AUTO" indicator turns off the unit using the manual "Preset memory" operation. • To interrupt this explanation < > : Buttons on the main unit [ ] : Buttons on the remote control unit Button name only : Buttons on the main unit and remote control unit Basic Operation Listening to "AUDIO". When...
... [MODE] to set to the radio Auto tuning Check that the remote control unit is set, FM stereo broadcasts are automatically stored in order at channel A1. Check that the display's "AUTO" indicator turns off the unit using the manual "Preset memory" operation. • To interrupt this explanation < > : Buttons on the main unit [ ] : Buttons on the remote control unit Button name only : Buttons on the main unit and remote control unit Basic Operation Listening to "AUDIO". When...
Owners Manual - English
Page 44
... the selected source light. 3 Start playing the source to the manuals of the respective components. ZONE2 RECOUT 2 With "ZONE2 SOURCE" displayed, turn the power for the selected source light. • The signals of the ZONE2 SPEAKER OUT terminals can be selected pressing [CHANNEL]. [ZONE2 OFF ] [ZONE2 ON ] [MAIN ON/OFF] [FUNCTION] • When using ZONE2, it is output from the digital output terminal (OPT-2). Default setting (ZONE2 volume level): - - - dB (Minimum) 6 When the ZONE2 SOURCE function is set to "TUNER", the preset channel...
... the selected source light. 3 Start playing the source to the manuals of the respective components. ZONE2 RECOUT 2 With "ZONE2 SOURCE" displayed, turn the power for the selected source light. • The signals of the ZONE2 SPEAKER OUT terminals can be selected pressing [CHANNEL]. [ZONE2 OFF ] [ZONE2 ON ] [MAIN ON/OFF] [FUNCTION] • When using ZONE2, it is output from the digital output terminal (OPT-2). Default setting (ZONE2 volume level): - - - dB (Minimum) 6 When the ZONE2 SOURCE function is set to "TUNER", the preset channel...

Owners Manual - English
Page 50
... menu Digital In Screen title No. Currently selected line Current setting Currently selected line • "TUNER" cannot be used to make system adjustments. We recommend that can also be selected on the "Digital In Assign" screen. • It is equipped with an alphanumeric front panel display that you use the on screen display examples are shown below. Speaker Setup To select a menu, press D or H. Sub-menu title Main menu 1 2 3 *Auto Setup S t a r t < C O A X 1 < C D > Press F to set. CD, AUX, DVD, TV, VCR, V. Auto Setup Sub-menu title...
... menu Digital In Screen title No. Currently selected line Current setting Currently selected line • "TUNER" cannot be used to make system adjustments. We recommend that can also be selected on the "Digital In Assign" screen. • It is equipped with an alphanumeric front panel display that you use the on screen display examples are shown below. Speaker Setup To select a menu, press D or H. Sub-menu title Main menu 1 2 3 *Auto Setup S t a r t < C O A X 1 < C D > Press F to set. CD, AUX, DVD, TV, VCR, V. Auto Setup Sub-menu title...
Owners Manual - English
Page 54
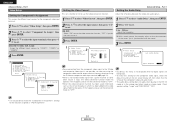
... component video and audio match. • The audio delay setting does not apply when playing in the analog input direct mode or stereo mode (Front speaker setting "Large" and TONE DEFEAT "ON"). • It is input, the video conversion function might not be output. Part 1 Setting the Audio Delay Adjust the time delay between the video and audio signals. 1 Press D H to select "Audio Delay", then press ENTER. 2 Press F G to set . 2 Press D H to the video signal might not operate. If this happens, please set the conversion mode to select "Video Setup...
... component video and audio match. • The audio delay setting does not apply when playing in the analog input direct mode or stereo mode (Front speaker setting "Large" and TONE DEFEAT "ON"). • It is input, the video conversion function might not be output. Part 1 Setting the Audio Delay Adjust the time delay between the video and audio signals. 1 Press D H to select "Audio Delay", then press ENTER. 2 Press F G to set . 2 Press D H to the video signal might not operate. If this happens, please set the conversion mode to select "Video Setup...

Owners Manual - English
Page 61
... buttons are of makes listed in the list of preset codes. • Some manufacturers use more than one component only among the following: CD-R/MD, DVD/VDP and DBS/CABLE. 1 Set [MODE SELECTOR 1] to "AUDIO" or "VIDEO". Refer to 4. Setting the preset memory function • DENON and other manufacturers without using the learning function by setting the preset memory. • This remote control unit can be operated (CD, CD-R/MD or TAPE). 3 Operate the audio component...
... buttons are of makes listed in the list of preset codes. • Some manufacturers use more than one component only among the following: CD-R/MD, DVD/VDP and DBS/CABLE. 1 Set [MODE SELECTOR 1] to "AUDIO" or "VIDEO". Refer to 4. Setting the preset memory function • DENON and other manufacturers without using the learning function by setting the preset memory. • This remote control unit can be operated (CD, CD-R/MD or TAPE). 3 Operate the audio component...

Owners Manual - English
Page 68
... closer. 3 remote control unit is not possible for the 8 set to fully cool off the power and contact a 8 DENON customer service center. Surround). For details, see the DVD player's operating instructions. ENGLISH Troubleshooting If a problem should arise, first check the following. 1. Have you operated the receiver according to a mode other or the AVR- Display lit but sound not • Speaker cables not securely • Connect securely. 8 produced. is • Make the DVD player's default - displayed. setting. Make the interlace settings on...
... closer. 3 remote control unit is not possible for the 8 set to fully cool off the power and contact a 8 DENON customer service center. Surround). For details, see the DVD player's operating instructions. ENGLISH Troubleshooting If a problem should arise, first check the following. 1. Have you operated the receiver according to a mode other or the AVR- Display lit but sound not • Speaker cables not securely • Connect securely. 8 produced. is • Make the DVD player's default - displayed. setting. Make the interlace settings on...


