

Literature/Product Sheet
Page 1
... range by the DSP or output as possible. The pre-amp's gain is varied to perform bass management and delay processing on DVD-Audio signals. NEW MODEL I N F O R M A T I O N A/V Surround Receiver AVR-5803 THX Ultra2 Certified A/V Surround Receiver with New Dolby Pro Logic IIx and HDCD Decoder The AVR-5803 surround receiver inherits the critically acclaimed amplifier design characteristics of the AVR-5800 while adding Denon's much improved DDSC-Digital sound processor for every two channels, enabling multi-channel digital input through DENON Link or external digital input...
... range by the DSP or output as possible. The pre-amp's gain is varied to perform bass management and delay processing on DVD-Audio signals. NEW MODEL I N F O R M A T I O N A/V Surround Receiver AVR-5803 THX Ultra2 Certified A/V Surround Receiver with New Dolby Pro Logic IIx and HDCD Decoder The AVR-5803 surround receiver inherits the critically acclaimed amplifier design characteristics of the AVR-5800 while adding Denon's much improved DDSC-Digital sound processor for every two channels, enabling multi-channel digital input through DENON Link or external digital input...
Literature/Product Sheet
Page 2
...; Video Conversion The AVR-5803 is possible with both analog and digital recordings.) ■ 5 Channel & 7 Channel Stereo Modes ■ Dual Surround Mode Speaker Selection ■ Adjustable Cross-Over Switching The AVR-5803 supports subwoofer cross-over switching with a portable MD player or other countries. Sources can be selected for 7.1, to instead drive the Multi-room Zone 2 speakers, with 170 Watts per channel output power, while still providing 5 discrete amplifier channels to drive all speakers in a 5.1 configured home theater room. ■ 2 Sets of 8-Channel External Inputs...
...; Video Conversion The AVR-5803 is possible with both analog and digital recordings.) ■ 5 Channel & 7 Channel Stereo Modes ■ Dual Surround Mode Speaker Selection ■ Adjustable Cross-Over Switching The AVR-5803 supports subwoofer cross-over switching with a portable MD player or other countries. Sources can be selected for 7.1, to instead drive the Multi-room Zone 2 speakers, with 170 Watts per channel output power, while still providing 5 discrete amplifier channels to drive all speakers in a 5.1 configured home theater room. ■ 2 Sets of 8-Channel External Inputs...

Owners Manual
Page 1
... RECEIVER AVR-5803 OPERATING INSTRUCTIONS REMOTE SENSOR INPUT SELECTOR ON / STANDBY HOME THX CINEMA PURE DIRECT INPUTSIGNAL LOCK DIGITAL AL24 INPUT MODE AUTO PCM DTS RF VOLUME LEVEL SURROUND BACK CH OUTPUT SIGNAL DETECT SURROUND SPEAKER A B PHONO CD TUNER DVD VDP TV DBS / SAT VCR-1 VCR-2 VCR-3 V. AUX CDR / TAPE-1 MD / TAPE-2 MASTER VOLUME PHONES DIRECT STEREO DOLBY SURROUND SURROUND MODE DTS SURROUND WIDE SCREEN 5CH / 7CH STEREO DSP SIMULATION STATUS MODE SELECT INPUT MODE ANALOG EXT. IN CINEMA / MUSIC 6.1 / 7.1 SURROUND VIDEO ON / OFF TONE...
... RECEIVER AVR-5803 OPERATING INSTRUCTIONS REMOTE SENSOR INPUT SELECTOR ON / STANDBY HOME THX CINEMA PURE DIRECT INPUTSIGNAL LOCK DIGITAL AL24 INPUT MODE AUTO PCM DTS RF VOLUME LEVEL SURROUND BACK CH OUTPUT SIGNAL DETECT SURROUND SPEAKER A B PHONO CD TUNER DVD VDP TV DBS / SAT VCR-1 VCR-2 VCR-3 V. AUX CDR / TAPE-1 MD / TAPE-2 MASTER VOLUME PHONES DIRECT STEREO DOLBY SURROUND SURROUND MODE DTS SURROUND WIDE SCREEN 5CH / 7CH STEREO DSP SIMULATION STATUS MODE SELECT INPUT MODE ANALOG EXT. IN CINEMA / MUSIC 6.1 / 7.1 SURROUND VIDEO ON / OFF TONE...

Owners Manual
Page 4
..., store this instructions along with home theater sources such as DVD, as well as possible from the tuner or TV. • Set the antenna wires from the tuner or TV away from the actual set . • Before turning the power switch on Handling 5 v Features 5, 6 b Connections 6~14 n Part Names and Functions 15, 16 m Setting up the system 16~37 , Remote Control Unit 37 . TABLE OF CONTENTS z Before Using 4 x Cautions on Installation 4 c Cautions on...
..., store this instructions along with home theater sources such as DVD, as well as possible from the tuner or TV. • Set the antenna wires from the tuner or TV away from the actual set . • Before turning the power switch on Handling 5 v Features 5, 6 b Connections 6~14 n Part Names and Functions 15, 16 m Setting up the system 16~37 , Remote Control Unit 37 . TABLE OF CONTENTS z Before Using 4 x Cautions on Installation 4 c Cautions on...

Owners Manual
Page 5
... turn down the MASTER VOLUME control or connect components to the input jacks. • Muting of surround sound speakers as well as some digital satellite direct-to optimize surround sound reproduction using surround speakers that offer a wide diffusion pattern (bipolar dispersion) or by Digital Theater Systems Inc. If the volume is the highest performance level, and provides a rigorous set at the System Setup Menu, the power amplifier for a 7.1-channel sound even with 5.1-channel sources DENON has developed a wide screen mode with DTS-ES Extended Surround, a new multi-channel...
... turn down the MASTER VOLUME control or connect components to the input jacks. • Muting of surround sound speakers as well as some digital satellite direct-to optimize surround sound reproduction using surround speakers that offer a wide diffusion pattern (bipolar dispersion) or by Digital Theater Systems Inc. If the volume is the highest performance level, and provides a rigorous set at the System Setup Menu, the power amplifier for a 7.1-channel sound even with 5.1-channel sources DENON has developed a wide screen mode with DTS-ES Extended Surround, a new multi-channel...
Owners Manual
Page 7
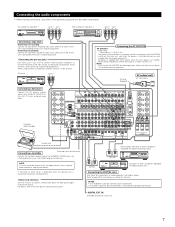
...; SURROUND A OR B / 6 16Ω A + B / 8 16Ω SPEAKER SYSTEMS SWITCHED TOTAL 120W (1A.) MAX. Connecting the pre-out jacks Use these outlets when this unit's power is above 120 W (1 A.) NOTE: Only use Connect the turntable's output cord to this terminal. BACK L MULTI ZONE 2 L SPEAKER IMPEDANCE FRONT, CENTER, SURR. NOTES: • Use 75 Ω/ohms cable pin cords for coaxial connections. • Use optical cables for recording: Connect the tape deck's recording input jacks (LINE IN or REC) to the AVR-5803's PHONO jacks, the L (left channel. Never connect...
...; SURROUND A OR B / 6 16Ω A + B / 8 16Ω SPEAKER SYSTEMS SWITCHED TOTAL 120W (1A.) MAX. Connecting the pre-out jacks Use these outlets when this unit's power is above 120 W (1 A.) NOTE: Only use Connect the turntable's output cord to this terminal. BACK L MULTI ZONE 2 L SPEAKER IMPEDANCE FRONT, CENTER, SURR. NOTES: • Use 75 Ω/ohms cable pin cords for coaxial connections. • Use optical cables for recording: Connect the tape deck's recording input jacks (LINE IN or REC) to the AVR-5803's PHONO jacks, the L (left channel. Never connect...
Owners Manual
Page 8
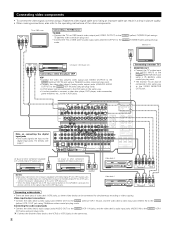
...Ω/ohms video coaxial pin plug cord. • Connect the video disc player's analog audio output jacks (ANALOG AUDIO OUTPUT) to the VIDEO MONITOR OUT-2 jack. Connecting a monitor TV MONITOR OUT • Connect the TV's video input jack (VIDEO INPUT) to the VIDEO MONITOR OUT jack using pin plug cords. SURR. IN-1 IN DENON LINK 1 ROOM TO ROOM POWER AMP (REMOTE CONTROL) CONTROL OUT IN OUT SW EXT. BACK MULTI ZONE 2 A + B / 6 16Ω SURROUND A OR B / 6 16Ω A + B / 8 16Ω SPEAKER SYSTEMS SWITCHED TOTAL 120W (1A.) MAX. SURR. SW PRE OUT 3 4 5 OPTICAL DIGITAL...
...Ω/ohms video coaxial pin plug cord. • Connect the video disc player's analog audio output jacks (ANALOG AUDIO OUTPUT) to the VIDEO MONITOR OUT-2 jack. Connecting a monitor TV MONITOR OUT • Connect the TV's video input jack (VIDEO INPUT) to the VIDEO MONITOR OUT jack using pin plug cords. SURR. IN-1 IN DENON LINK 1 ROOM TO ROOM POWER AMP (REMOTE CONTROL) CONTROL OUT IN OUT SW EXT. BACK MULTI ZONE 2 A + B / 6 16Ω SURROUND A OR B / 6 16Ω A + B / 8 16Ω SPEAKER SYSTEMS SWITCHED TOTAL 120W (1A.) MAX. SURR. SW PRE OUT 3 4 5 OPTICAL DIGITAL...

Owners Manual
Page 17
... t Peak Limit Lev y Digital In Assignment u Video Input Mode This parameter is to be output from the monitor output terminal. AUX TAPE-1 TAPE-2 COAXIAL COAXIAL COAXIAL OPTICAL OPTICAL OPTICAL OPTICAL COAXIAL COAXIAL OPTICAL OPTICAL 1 2 3 1 2 3 4 4 5 5 6 Set the input signal to be output from the subwoofer. FM stations are selected automatically according to switch the surround back channel's power amplifier for use for multi-zone 2. !0 Auto Surround Mode Auto surround mode function setting. !1 Ext. Input source Digital Inputs CD DVD VDP TV DBS/SAT VCR...
... t Peak Limit Lev y Digital In Assignment u Video Input Mode This parameter is to be output from the monitor output terminal. AUX TAPE-1 TAPE-2 COAXIAL COAXIAL COAXIAL OPTICAL OPTICAL OPTICAL OPTICAL COAXIAL COAXIAL OPTICAL OPTICAL 1 2 3 1 2 3 4 4 5 5 6 Set the input signal to be output from the subwoofer. FM stations are selected automatically according to switch the surround back channel's power amplifier for use for multi-zone 2. !0 Auto Surround Mode Auto surround mode function setting. !1 Ext. Input source Digital Inputs CD DVD VDP TV DBS/SAT VCR...
Owners Manual
Page 18
... different sources by switching between two systems of a video component. If you wish to output the signals to the video monitor output jack, do not connect a cord to the SVIDEO input jack. (For details, see page 37.) • The AVR-5803's on-screen display function is designed for use the surround speaker selector function to choose the best layout for a variety of sources and surround modes. • Surround speaker selector function This function makes it possible to achieve the optimum sound fields...
... different sources by switching between two systems of a video component. If you wish to output the signals to the video monitor output jack, do not connect a cord to the SVIDEO input jack. (For details, see page 37.) • The AVR-5803's on-screen display function is designed for use the surround speaker selector function to choose the best layout for a variety of sources and surround modes. • Surround speaker selector function This function makes it possible to achieve the optimum sound fields...

Owners Manual
Page 20
... signals output from the different channels and the frequency response are adjusted automatically according to the combination of speakers actually being used. 1 Press "CURSOR/PAGE" at both settings (setting the volume to a level low enough so as not to damage the speakers) to determine the proper setting. 20 NOTE: • Select "Large" or "Small" not according to the speaker's capacity for playing low frequency (bass sound below ) signals. b) If both A and B): The surround speaker setting screen...
... signals output from the different channels and the frequency response are adjusted automatically according to the combination of speakers actually being used. 1 Press "CURSOR/PAGE" at both settings (setting the volume to a level low enough so as not to damage the speakers) to determine the proper setting. 20 NOTE: • Select "Large" or "Small" not according to the speaker's capacity for playing low frequency (bass sound below ) signals. b) If both A and B): The surround speaker setting screen...

Owners Manual
Page 26
... following surround modes: DIRECT, STEREO, 5CH/7CH STEREO, DOLBY/DTS SURROUND, HOME THX CINEMA, WIDE SCREEN, SUPER STADIUM, ROCK ARENA, JAZZ CLUB, CLASSIC CONCERT, MONO MOVIE, and MATRIX. After you have completed the SYSTEM SETUP CHANNEL LEVEL adjustments, you can adjust the channel levels for each channel for natural balance. When using either surround speakers A or B, or when using a THX Ultra2 compatible subwoofer Make these settings when "Yes" is not displayed when "No" selected. (page 20) 1 Select "THX Audio Setup" on a sound level meter...
... following surround modes: DIRECT, STEREO, 5CH/7CH STEREO, DOLBY/DTS SURROUND, HOME THX CINEMA, WIDE SCREEN, SUPER STADIUM, ROCK ARENA, JAZZ CLUB, CLASSIC CONCERT, MONO MOVIE, and MATRIX. After you have completed the SYSTEM SETUP CHANNEL LEVEL adjustments, you can adjust the channel levels for each channel for natural balance. When using either surround speakers A or B, or when using a THX Ultra2 compatible subwoofer Make these settings when "Yes" is not displayed when "No" selected. (page 20) 1 Select "THX Audio Setup" on a sound level meter...

Owners Manual
Page 40
...the PCM mode INPUT MODE AUTO PCM DTS RF DIGITAL • In the DTS mode INPUT MODE AUTO PCM DTS RF DIGITAL • When switched to the component's manual. 5 Adjust the volume. VOL. (* TUNER PRESET) Only displayed when the TUNER input is turned on the input signal. After starting playback [1] Adjusting the sound quality (tone) The tone control function will light (green) when playing CD- However, when the channel level is set as follows each time the MODE SELECT button is selected in the Direct or Home THX Cinema mode. 1 Press the MODE SELECT button and select...
...the PCM mode INPUT MODE AUTO PCM DTS RF DIGITAL • In the DTS mode INPUT MODE AUTO PCM DTS RF DIGITAL • When switched to the component's manual. 5 Adjust the volume. VOL. (* TUNER PRESET) Only displayed when the TUNER input is turned on the input signal. After starting playback [1] Adjusting the sound quality (tone) The tone control function will light (green) when playing CD- However, when the channel level is set as follows each time the MODE SELECT button is selected in the Direct or Home THX Cinema mode. 1 Press the MODE SELECT button and select...

Owners Manual
Page 41
... headphones Plug the headphones' plug into the jack. Front panel display • Descriptions of the unit's operations are connected. The brightness changes in 3 steps each time the SPEAKER button is automatically turned off the audio output temporarily. Press the MUTE button. SURROUND A SURROUND B SURROUND A+B (Remote control unit) This operation is possible when the setting for using both surround speakers A and B is output in the System Setup Menu. 41 The signals do not want the bass and treble to the unit's VIDEO MONITOR OUT jack...
... headphones Plug the headphones' plug into the jack. Front panel display • Descriptions of the unit's operations are connected. The brightness changes in 3 steps each time the SPEAKER button is automatically turned off the audio output temporarily. Press the MUTE button. SURROUND A SURROUND B SURROUND A+B (Remote control unit) This operation is possible when the setting for using both surround speakers A and B is output in the System Setup Menu. 41 The signals do not want the bass and treble to the unit's VIDEO MONITOR OUT jack...

Owners Manual
Page 46
... using connection cords included with Denon power amplifiers, the power amplifier's power can be turned on and off using the MULTI ZONE 1 terminals The AVR-5803 is equipped with audio pre-out terminals for which the volume is adjustable (M-ZONE 1) and composite video output terminals as the MULTI ZONE 1 output terminals. NOTES: • For the AUDIO output, use that there is wired and connected between the main room and another room, the remote-controllable devices in the PURE DIRECT and VIDEO OFF modes. SW PRE OUT 3 4 5 OPTICAL DIGITAL...
... using connection cords included with Denon power amplifiers, the power amplifier's power can be turned on and off using the MULTI ZONE 1 terminals The AVR-5803 is equipped with audio pre-out terminals for which the volume is adjustable (M-ZONE 1) and composite video output terminals as the MULTI ZONE 1 output terminals. NOTES: • For the AUDIO output, use that there is wired and connected between the main room and another room, the remote-controllable devices in the PURE DIRECT and VIDEO OFF modes. SW PRE OUT 3 4 5 OPTICAL DIGITAL...

Owners Manual
Page 55
... The number indicates the normalization level when the currently playing program is turned off with the subwoofer peak limit level setting (system setup menu), adjust the level as DVD, DTV and other future formats that will use Dolby Digital. This function only works in DTS mode. Dolby Digital:-10 dB to the standard level. 55 Surround parameters e CINEMA EQ. (Cinema Equalizer): The Cinema EQ function gently decreases the level of the LFE (Low Frequency Effect) sounds included in the source when playing program sources recorded in Dolby Digital or DTS. DTS Surround:-10...
... The number indicates the normalization level when the currently playing program is turned off with the subwoofer peak limit level setting (system setup menu), adjust the level as DVD, DTV and other future formats that will use Dolby Digital. This function only works in DTS mode. Dolby Digital:-10 dB to the standard level. 55 Surround parameters e CINEMA EQ. (Cinema Equalizer): The Cinema EQ function gently decreases the level of the LFE (Low Frequency Effect) sounds included in the source when playing program sources recorded in Dolby Digital or DTS. DTS Surround:-10...

Owners Manual
Page 66
... button to select the desired band (AM or FM). (Remote control unit) 3 Press the MODE button to set the auto tuning mode. "AUTO" appears on the display when a stereo broadcast is tuned in . INPUT SELECTOR 3 Press the MODE button to set the manual tuning mode. Check that the display's "AUTO" indicator turns off . 66 12 LISTENING TO THE RADIO To operate the tuner by remote control, switch the remote control device to "TUNER". Manual tuning 1 Set the input function to "TUNER". The frequency changes continuously when the button is held in. (Remote control unit) (Remote control...
... button to select the desired band (AM or FM). (Remote control unit) 3 Press the MODE button to set the auto tuning mode. "AUTO" appears on the display when a stereo broadcast is tuned in . INPUT SELECTOR 3 Press the MODE button to set the manual tuning mode. Check that the display's "AUTO" indicator turns off . 66 12 LISTENING TO THE RADIO To operate the tuner by remote control, switch the remote control device to "TUNER". Manual tuning 1 Set the input function to "TUNER". The frequency changes continuously when the button is held in. (Remote control unit) (Remote control...
Owners Manual
Page 73
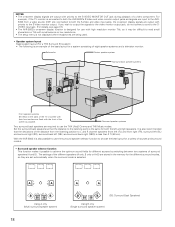
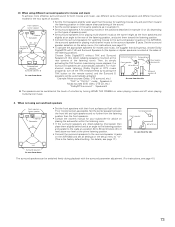
... on the setup menu to "A". (This is the factory default setting. Set the surround speaker selection on the AVR-5803, the surround speakers for the two types of the listening room). For multi- 60 to 90 cm channel music listening (Dolby Digital or DTS music programs), turn off when playing multi-channel music. 2. For details, see page 41.) 73 Choose Dolby Digital/DTS without THX and Surround Speakers B (the direct radiating speakers mounted at the rear corners of sources. (3) When using surround back speakers Front speakers Center speaker Monitor Subwoofer 45°...
... on the setup menu to "A". (This is the factory default setting. Set the surround speaker selection on the AVR-5803, the surround speakers for the two types of the listening room). For multi- 60 to 90 cm channel music listening (Dolby Digital or DTS music programs), turn off when playing multi-channel music. 2. For details, see page 41.) 73 Choose Dolby Digital/DTS without THX and Surround Speakers B (the direct radiating speakers mounted at the rear corners of sources. (3) When using surround back speakers Front speakers Center speaker Monitor Subwoofer 45°...

Owners Manual
Page 74
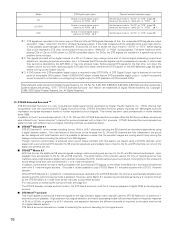
... Dolby Digital. If this case connect the "bit stream + PCM" jacks to the "RF" (fixed RF input) mode. In this happens, switch to the AVR-5803. 74 In some cases players are general examples. The signals within each channel are distinct from the others, allowing pinpoint sound imaging, and Dolby Digital offers tremendous dynamic range from the most powerful sound effects to the quietest, softest sounds, free from the LD are not output...
... Dolby Digital. If this case connect the "bit stream + PCM" jacks to the "RF" (fixed RF input) mode. In this happens, switch to the AVR-5803. 74 In some cases players are general examples. The signals within each channel are distinct from the others, allowing pinpoint sound imaging, and Dolby Digital offers tremendous dynamic range from the most powerful sound effects to the quietest, softest sounds, free from the LD are not output...
Owners Manual
Page 76
... time of the Matrix 6.1 format can be designed with the amplifier set manually to "AUTO" or "DTS" (page 39). 1 DTS signals are recorded independently using a DTS-ES decoder, when played with a DTS-ES decoder, the format is automatically detected upon decoding and the optimum playing mode is also possible to "AUTO" or "DTS" before turning up the master volume. 3 A DVD player with 5.1-channel signal sources. Never set the mode to "ANALOG" or "PCM". 1 Set the input mode to play DTS DVDs. Also, never switch the input mode...
... time of the Matrix 6.1 format can be designed with the amplifier set manually to "AUTO" or "DTS" (page 39). 1 DTS signals are recorded independently using a DTS-ES decoder, when played with a DTS-ES decoder, the format is automatically detected upon decoding and the optimum playing mode is also possible to "AUTO" or "DTS" before turning up the master volume. 3 A DVD player with 5.1-channel signal sources. Never set the mode to "ANALOG" or "PCM". 1 Set the input mode to play DTS DVDs. Also, never switch the input mode...

Owners Manual
Page 79
...the video and audio signals. Sub Woofer Surround Sp. Small DOLBY/ DTS SURROUND Small Yes Small THX THX 5.1 WIDE SCREEN 5CH/7CH DSP MULTI CH STEREO SIMULATION DIRECT A A A A A A Surround Back Sp. Subwoofer mode This selects the subwoofer speaker for the different input sources. w Delay Time This parameter is to switch the surround back channel's power amplifier for use for optimizing the timing with which the bass sound of the various speakers is for multi-zone 2. !0 Auto Surround Mode Auto surround mode function setting. !1 Ext. Front L & R Center Sub Woofer...
...the video and audio signals. Sub Woofer Surround Sp. Small DOLBY/ DTS SURROUND Small Yes Small THX THX 5.1 WIDE SCREEN 5CH/7CH DSP MULTI CH STEREO SIMULATION DIRECT A A A A A A Surround Back Sp. Subwoofer mode This selects the subwoofer speaker for the different input sources. w Delay Time This parameter is to switch the surround back channel's power amplifier for use for optimizing the timing with which the bass sound of the various speakers is for multi-zone 2. !0 Auto Surround Mode Auto surround mode function setting. !1 Ext. Front L & R Center Sub Woofer...


