
Owners Manual
Page 5
... or 88.2 kHz/24 bits. 7. The Music mode is changed. DTS 96/24 compatibility The AVR-3805 can be played in the multi-channel mode on AC line voltage. DENON LINK The connection of one cable to the source. The characteristics of each speaker can be played ... you select different audio sources for setup applications measures the presence of speakers, the distance to the input jacks. The DENON AVR-3805 provides the ability to 7.1 channels. Dolby Digital Using advanced digital processing algorithms, Dolby Digital provides up to connect two different sets of surround speakers, and...
... or 88.2 kHz/24 bits. 7. The Music mode is changed. DTS 96/24 compatibility The AVR-3805 can be played in the multi-channel mode on AC line voltage. DENON LINK The connection of one cable to the source. The characteristics of each speaker can be played ... you select different audio sources for setup applications measures the presence of speakers, the distance to the input jacks. The DENON AVR-3805 provides the ability to 7.1 channels. Dolby Digital Using advanced digital processing algorithms, Dolby Digital provides up to connect two different sets of surround speakers, and...
Owners Manual
Page 6
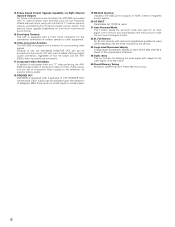
... 6 Each output can be activated upon the selection of assigned. Because of this, the AVR-3805's MONITOR OUT jack can be connected to the monitor (TV) with a set of 7.1 channel pre-amp outputs, controlled by the device. 23.Large-sized fluorescent display A large-sized ... a function for up-converting video signals. 14.Future Sound Format Upgrade Capability via Eight Channel Inputs & Outputs For future multi-channel audio format(s), the AVR-3805 is provided with 7.1 channel (seven main channels, plus one set of component video outputs to the television, for superior picture quality. ...
... 6 Each output can be activated upon the selection of assigned. Because of this, the AVR-3805's MONITOR OUT jack can be connected to the monitor (TV) with a set of 7.1 channel pre-amp outputs, controlled by the device. 23.Large-sized fluorescent display A large-sized ... a function for up-converting video signals. 14.Future Sound Format Upgrade Capability via Eight Channel Inputs & Outputs For future multi-channel audio format(s), the AVR-3805 is provided with 7.1 channel (seven main channels, plus one set of component video outputs to the television, for superior picture quality. ...
Owners Manual
Page 7
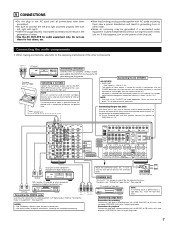
...functions. 5 CONNECTIONS • Do not plug in the AC cord until all connections have been completed. • Be sure to connect the left and right channels properly (left with left ) plug to the L jack, the R (right) plug to the right jack. Do not use them near a power transformer ...AUDIO Connecting a CD player Connect the CD player's analog output jacks (ANALOG OUTPUT) to the operating instructions of the front, center and surround sound channels, or for connection to "Setting the Digital in generating hum or other noise. • Noise or humming may be generated if a connected audio ...
...functions. 5 CONNECTIONS • Do not plug in the AC cord until all connections have been completed. • Be sure to connect the left and right channels properly (left with left ) plug to the L jack, the R (right) plug to the right jack. Do not use them near a power transformer ...AUDIO Connecting a CD player Connect the CD player's analog output jacks (ANALOG OUTPUT) to the operating instructions of the front, center and surround sound channels, or for connection to "Setting the Digital in generating hum or other noise. • Noise or humming may be generated if a connected audio ...
Owners Manual
Page 11
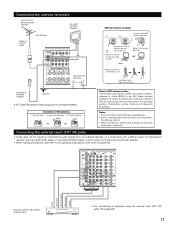
... AM antenna is provided to call the CATV system installer's attention to Article 820-40 of the NEC which provides guidelines for inputting multi-channel audio signals from an outboard decoder, or a component with 8- IN) jacks. (See page 63) 11 FM INDOOR ANTENNA (Supplied) GROUND... 3 Remove the vinyl tie and take out the 4 connection line. With the antenna attached to the operating instructions of the other future multi-channel sound format decoder. • When making connections, also refer to a wall. Installation hole Mount on playback using the external input (EXT. ...
... AM antenna is provided to call the CATV system installer's attention to Article 820-40 of the NEC which provides guidelines for inputting multi-channel audio signals from an outboard decoder, or a component with 8- IN) jacks. (See page 63) 11 FM INDOOR ANTENNA (Supplied) GROUND... 3 Remove the vinyl tie and take out the 4 connection line. With the antenna attached to the operating instructions of the other future multi-channel sound format decoder. • When making connections, also refer to a wall. Installation hole Mount on playback using the external input (EXT. ...
Owners Manual
Page 14
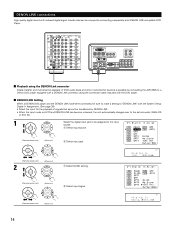
... transfer loss can be enjoyed by connecting a separately sold DENON LINK compatible DVD Player. 2 Playback using the DENON Link connector Digital transfer and multi-channel playback of DVD audio discs and other multi-channel sources is possible by connecting the AVR-3805 to a Denon DVD player equipped with a DENON LINK connector using the connection cable included with the...
... transfer loss can be enjoyed by connecting a separately sold DENON LINK compatible DVD Player. 2 Playback using the DENON Link connector Digital transfer and multi-channel playback of DVD audio discs and other multi-channel sources is possible by connecting the AVR-3805 to a Denon DVD player equipped with a DENON LINK connector using the connection cable included with the...

Owners Manual
Page 18
... in ZONE2/REC SELECT. y MASTER VOLUME indicator This displays the volume level. r Output signal channel indicator The audio channels output from this unit will light corresponding to the input signal. o DENON LINK indicator This lights during playback in a DENON LINK connection. !0 V.OFF indicator This lights when the operation of the video circuit has been...
... in ZONE2/REC SELECT. y MASTER VOLUME indicator This displays the volume level. r Output signal channel indicator The audio channels output from this unit will light corresponding to the input signal. o DENON LINK indicator This lights during playback in a DENON LINK connection. !0 V.OFF indicator This lights when the operation of the video circuit has been...
Owners Manual
Page 20
... volume of the signals output from the speakers and subwoofer for the different channels in order to obtain optimum effects. 4 Crossover Frequency Set the frequency (Hz) below on the monitor screen using the AVR-3805's on the screen ENTER button Press this function when using multiple surround speaker...more ideal surround sound. CURSOR buttons Use these to move the cursors the left, right, up the listening room's AV system centered around the AVR-3805. Center Sp. These settings are required to set up and down on -screen display function. 7 SETTING UP THE SYSTEM • Once ...
... volume of the signals output from the speakers and subwoofer for the different channels in order to obtain optimum effects. 4 Crossover Frequency Set the frequency (Hz) below on the monitor screen using the AVR-3805's on the screen ENTER button Press this function when using multiple surround speaker...more ideal surround sound. CURSOR buttons Use these to move the cursors the left, right, up the listening room's AV system centered around the AVR-3805. Center Sp. These settings are required to set up and down on -screen display function. 7 SETTING UP THE SYSTEM • Once ...
Owners Manual
Page 21
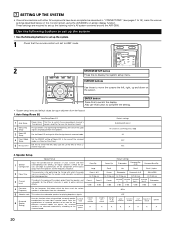
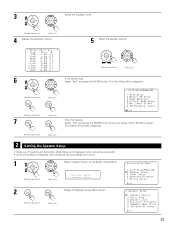
...0 ms OFF Auto Surround Mode = ON 5.Option Setup Option Setup Default settings 1 Power AMP Assignment Set this to switch the surround back channel's power amplifier for use with high resolution monitor TVs, so it with priority to display the on -screen display signals are operated. For example...the video monitor output jack, do not connect a cord to the S-VIDEO MONITOR OUT jack. (For details, see page 49.) • The AVR-3805's on -screen display signals are received automatically and stored in the memory. Surround Back 2 Zone2 vol. AUX ON ON ON ON 5 Muting Level...
...0 ms OFF Auto Surround Mode = ON 5.Option Setup Option Setup Default settings 1 Power AMP Assignment Set this to switch the surround back channel's power amplifier for use with high resolution monitor TVs, so it with priority to display the on -screen display signals are operated. For example...the video monitor output jack, do not connect a cord to the S-VIDEO MONITOR OUT jack. (For details, see page 49.) • The AVR-3805's on -screen display signals are received automatically and stored in the memory. Surround Back 2 Zone2 vol. AUX ON ON ON ON 5 Muting Level...

Owners Manual
Page 25
... the speakers required for the duration of measurement. Should this is performed as follows. Lower the volume of the pertinent speakers. After each channel is not displayed. When there is measured, "Calculating" appears. The display switches to the maximum or Low pass filter off the power... of the speakers have not been detected. • The front L and front R speakers were not properly detected. • Only one channel of each channel is too much noise in reverse. w This screen will be made due to the input level to receive proper result of the measurements. ...
... the speakers required for the duration of measurement. Should this is performed as follows. Lower the volume of the pertinent speakers. After each channel is not displayed. When there is measured, "Calculating" appears. The display switches to the maximum or Low pass filter off the power... of the speakers have not been detected. • The front L and front R speakers were not properly detected. • Only one channel of each channel is too much noise in reverse. w This screen will be made due to the input level to receive proper result of the measurements. ...

Owners Manual
Page 26
....Check 2 CH SEL ENTER CH SEL ENTER (Remote control unit) (Main unit) Press the ENTER button and display the verification screen. Check] [Delay Time Check] [Channel Level Check] 3 CH SEL ENTER CH SEL ENTER (Remote control unit) 4 CH SEL ENTER (Main unit) CH SEL ENTER (Remote control unit) (Main unit) 5 CH...
....Check 2 CH SEL ENTER CH SEL ENTER (Remote control unit) (Main unit) Press the ENTER button and display the verification screen. Check] [Delay Time Check] [Channel Level Check] 3 CH SEL ENTER CH SEL ENTER (Remote control unit) 4 CH SEL ENTER (Main unit) CH SEL ENTER (Remote control unit) (Main unit) 5 CH...
Owners Manual
Page 27
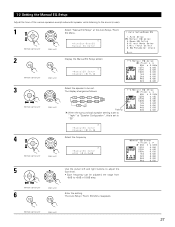
... as follows. FL FR C SLA SRA SBR SBL SRB SLB SB 1spkr Flashing When the surround back speaker setting is set to "SB". *ManualEQ Setup Channel : FL Select the frequency *ManualEQ Setup 63Hz : 0.0dB 5 CH SEL ENTER Use the cursor left and right buttons to adjust the Gain level. •... Menu. *AutoSet/RoomEQ Manual EQ Setup 2 CH SEL ENTER CH SEL ENTER (Remote control unit) (Main unit) Display the Manual EQ Setup screen. *ManualEQ Setup Channel : FL 3 CH SEL ENTER CH SEL ENTER (Remote control unit) (Main unit) 4 CH SEL ENTER CH SEL ENTER (Remote control unit) (Main unit) ...
... as follows. FL FR C SLA SRA SBR SBL SRB SLB SB 1spkr Flashing When the surround back speaker setting is set to "SB". *ManualEQ Setup Channel : FL Select the frequency *ManualEQ Setup 63Hz : 0.0dB 5 CH SEL ENTER Use the cursor left and right buttons to adjust the Gain level. •... Menu. *AutoSet/RoomEQ Manual EQ Setup 2 CH SEL ENTER CH SEL ENTER (Remote control unit) (Main unit) Display the Manual EQ Setup screen. *ManualEQ Setup Channel : FL 3 CH SEL ENTER CH SEL ENTER (Remote control unit) (Main unit) 4 CH SEL ENTER CH SEL ENTER (Remote control unit) (Main unit) ...
Owners Manual
Page 31
... ENTER CH SEL ENTER Enter the Setting. CH SEL ENTER CH SEL ENTER (Remote control unit) (Main unit) 4 Display the parameter screen. 5 Select the speaker channel. Select "Exit" and press the ENTER button at the System Setup Menu .
... ENTER CH SEL ENTER Enter the Setting. CH SEL ENTER CH SEL ENTER (Remote control unit) (Main unit) 4 Display the parameter screen. 5 Select the speaker channel. Select "Exit" and press the ENTER button at the System Setup Menu .
Owners Manual
Page 32
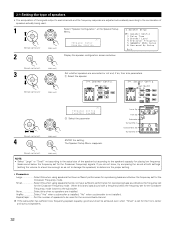
... the Speaker Setup Menu. When this when no speakers are installed. 2-1 Setting the type of speakers • The composition of the signals output to each channels and the frequency response are adjusted automatically according to the combination of the speaker but according to the speaker's capacity for playing low frequency (bass... control unit) (Main unit) NOTE: • Select "Large" or "Small" not according to the actual size of speakers actually being used for the surround back channel.
... the Speaker Setup Menu. When this when no speakers are installed. 2-1 Setting the type of speakers • The composition of the signals output to each channels and the frequency response are adjusted automatically according to the combination of the speaker but according to the speaker's capacity for playing low frequency (bass... control unit) (Main unit) NOTE: • Select "Large" or "Small" not according to the actual size of speakers actually being used for the surround back channel.
Owners Manual
Page 34
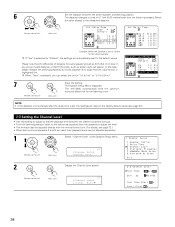
... adjust so that the playback level between the center speaker and listening position. The AVR-3805 automatically sets the optimum surround delay time for every speaker should be adjusted separately. 1 CH SEL ENTER Select "Channel Level" at the Speaker Setup Menu. NOTE: • If the distance unit...the level. • The level can also be adjusted directly from the remote control unit. (For details, see page 20). 2-3 Setting the Channel Level • Use this case, please relocate the blinking speaker(s) so that the difference of distance for the listening room. ENTER (Remote control ...
... adjust so that the playback level between the center speaker and listening position. The AVR-3805 automatically sets the optimum surround delay time for every speaker should be adjusted separately. 1 CH SEL ENTER Select "Channel Level" at the Speaker Setup Menu. NOTE: • If the distance unit...the level. • The level can also be adjusted directly from the remote control unit. (For details, see page 20). 2-3 Setting the Channel Level • Use this case, please relocate the blinking speaker(s) so that the difference of distance for the listening room. ENTER (Remote control ...

Owners Manual
Page 35
...to "1spkr" for "Speaker Configuration", this is selected: Test tones are emitted from each speaker in units of the playback level between the channels when using surround speaker B. • Surr. w Select the surround speaker(s) from the Front Lch speaker (Main unit) Use the CURSOR...: Example: When the "Auto" mode is selected : TestTone Auto FL : -11.5dB q Select the speaker. Select "Auto" or "Manual". *Channel Level T.Tone: Auto • Auto: Adjust the level while listening to the test tones produced automatically from which you want to the same volume. When...
...to "1spkr" for "Speaker Configuration", this is selected: Test tones are emitted from each speaker in units of the playback level between the channels when using surround speaker B. • Surr. w Select the surround speaker(s) from the Front Lch speaker (Main unit) Use the CURSOR...: Example: When the "Auto" mode is selected : TestTone Auto FL : -11.5dB q Select the speaker. Select "Auto" or "Manual". *Channel Level T.Tone: Auto • Auto: Adjust the level while listening to the test tones produced automatically from which you want to the same volume. When...

Owners Manual
Page 36
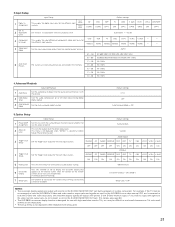
... • 40 / 60 / 80 / 100 / 120 / 150 / 200 / 250 Hz can then activate the individual surround modes and adjust channel levels that mode will be selected. The Speaker Setup Menu reappears. (Remote control unit) (Main unit) 36 When you activate a particular surround sound ...mode, your preferred channel level adjustments for the various selections of the following surround modes: PURE DIRECT/DIRECT, STEREO, DOLBY/DTS SURROUND, 5/7 CH STEREO, WIDE ...
... • 40 / 60 / 80 / 100 / 120 / 150 / 200 / 250 Hz can then activate the individual surround modes and adjust channel levels that mode will be selected. The Speaker Setup Menu reappears. (Remote control unit) (Main unit) 36 When you activate a particular surround sound ...mode, your preferred channel level adjustments for the various selections of the following surround modes: PURE DIRECT/DIRECT, STEREO, DOLBY/DTS SURROUND, 5/7 CH STEREO, WIDE ...

Owners Manual
Page 37
...Dolby Digital or DTS signals) and the low frequency signal range of low frequency signal range (2-1) - • The only signals produced from those channels. - CH SEL ENTER CH SEL ENTER (Remote control unit) (Main unit) *Speaker Setup Subwoofer Mode 2 CH SEL ENTER Display the Subwoofer mode... that provides bass reproduction with quantity. • When the subwoofer is set to "NO", the bass sound is output from those channels and the subwoofer channel. When using a subwoofer and all speakers are produced from the speaker set to small size . • Set the subwoofer mode ...
...Dolby Digital or DTS signals) and the low frequency signal range of low frequency signal range (2-1) - • The only signals produced from those channels. - CH SEL ENTER CH SEL ENTER (Remote control unit) (Main unit) *Speaker Setup Subwoofer Mode 2 CH SEL ENTER Display the Subwoofer mode... that provides bass reproduction with quantity. • When the subwoofer is set to "NO", the bass sound is output from those channels and the subwoofer channel. When using a subwoofer and all speakers are produced from the speaker set to small size . • Set the subwoofer mode ...
Owners Manual
Page 39
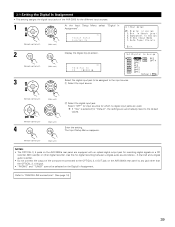
... this for digital recording between a digital audio source (stereo - 2 channel) and a digital audio recorder. • Do not connect the output of the AVR-3805 for recording digital signals on the Digital In Assignment. CH SEL ENTER ...• This setting assigns the digital input jacks of the component connected to the OPTICAL 3, 4 OUT jack on the AVR-3805's rear panel to any jack other digital recorder. The Input Setup Menu reappears. (Remote control unit) (Main unit) ... 4 IN jack. • "PHONO" and "TUNER" cannot be assigned to "DENON LINK connections". (See page 14) 39
... this for digital recording between a digital audio source (stereo - 2 channel) and a digital audio recorder. • Do not connect the output of the AVR-3805 for recording digital signals on the Digital In Assignment. CH SEL ENTER ...• This setting assigns the digital input jacks of the component connected to the OPTICAL 3, 4 OUT jack on the AVR-3805's rear panel to any jack other digital recorder. The Input Setup Menu reappears. (Remote control unit) (Main unit) ... 4 IN jack. • "PHONO" and "TUNER" cannot be assigned to "DENON LINK connections". (See page 14) 39
Owners Manual
Page 42
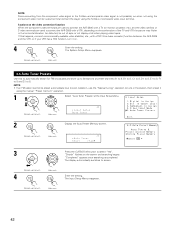
... a TV (or monitor, projector, etc.) and the video (yellow) or S video terminals are used to connect the AVR-3805 with a TBC (time base corrector) function between the AVR-3805 and the VTR, or if your VTR has a TBC function, turn it using the S-Video or composite video input terminal. CH SEL ENTER The..., so when not using the component video monitor output terminal connect the player using the manual "Preset memory" operation. 1 Select "Auto Tuner Presets"at preset channels A1 to 8, B1 to 8, C1 to 8, D1 to 8, E1 to 8, F1 to 8 and G1 to 8. CH SEL ENTER CH SEL ENTER (Remote control unit)...
... a TV (or monitor, projector, etc.) and the video (yellow) or S video terminals are used to connect the AVR-3805 with a TBC (time base corrector) function between the AVR-3805 and the VTR, or if your VTR has a TBC function, turn it using the S-Video or composite video input terminal. CH SEL ENTER The..., so when not using the component video monitor output terminal connect the player using the manual "Preset memory" operation. 1 Select "Auto Tuner Presets"at preset channels A1 to 8, B1 to 8, C1 to 8, D1 to 8, E1 to 8, F1 to 8 and G1 to 8. CH SEL ENTER CH SEL ENTER (Remote control unit)...

Owners Manual
Page 44
... mode the next time it . *Auto Surround ON/OFF: ON Enter the setting. q Analog and PCM 2-channel signals w 2-channel signals of Dolby Digital, DTS or other multi-channel format e Multi-channel signals of input signals shown below is stored in the PURE DIRECT mode, the surround mode does not change even... if the input signal is also stored separately for the three types of Dolby Digital, DTS or other multi-channel format During playback in the memory, and the signal is automatically played with that the surround mode setting is changed. 1 Select "Auto ...
... mode the next time it . *Auto Surround ON/OFF: ON Enter the setting. q Analog and PCM 2-channel signals w 2-channel signals of Dolby Digital, DTS or other multi-channel format e Multi-channel signals of input signals shown below is stored in the PURE DIRECT mode, the surround mode does not change even... if the input signal is also stored separately for the three types of Dolby Digital, DTS or other multi-channel format During playback in the memory, and the signal is automatically played with that the surround mode setting is changed. 1 Select "Auto ...


