
Literature/Product Sheet
Page 1
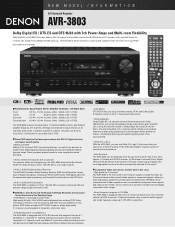
... by approximately 10 dB. ■ DENON's Latest Surround Technology Faithfully Recreates the Surround Sound Produced at 110 watts, into 8 ohms, from 20 Hz - 20 kHz with no more than just enjoy your 2-channel analog, PCM, and Dolby Digital 2-channel sources in surround sound ambiance. • Auto Surround The AVR-3803 can use of installation. ■...
... by approximately 10 dB. ■ DENON's Latest Surround Technology Faithfully Recreates the Surround Sound Produced at 110 watts, into 8 ohms, from 20 Hz - 20 kHz with no more than just enjoy your 2-channel analog, PCM, and Dolby Digital 2-channel sources in surround sound ambiance. • Auto Surround The AVR-3803 can use of installation. ■...
Literature/Product Sheet
Page 2
... Outputs 1 Component Video Output ......... Furthermore, Denon's AL24 processor for high sound quality has been added to the front 2 channels during digital audio input, enabling the playback of sound with remarkably high transparency. ■ Designed for high sound quality • Hefty Power Transformer for Multi Zone Configurations • The AVR-3803 provides a Multi Zone Output function and...
... Outputs 1 Component Video Output ......... Furthermore, Denon's AL24 processor for high sound quality has been added to the front 2 channels during digital audio input, enabling the playback of sound with remarkably high transparency. ■ Designed for high sound quality • Hefty Power Transformer for Multi Zone Configurations • The AVR-3803 provides a Multi Zone Output function and...
Owners Manual
Page 4
... • Store this product is used near a B tuner or TV. This remarkable component has been engineered to provide superb surround sound listening with an immense array of features, we recommend that before you begin hookup and operation that you for explanation purposes. 2 CAUTIONS... connection cords. • Noise or disturbance tends to occur particularly when using this unit: • Moving the set for choosing the DENON AVR-3803/1083 Digital A / V Surround Receiver. As this instructions in the connection cords, always unplug the power cord and disconnect the connection cords...
... • Store this product is used near a B tuner or TV. This remarkable component has been engineered to provide superb surround sound listening with an immense array of features, we recommend that before you begin hookup and operation that you for explanation purposes. 2 CAUTIONS... connection cords. • Noise or disturbance tends to occur particularly when using this unit: • Moving the set for choosing the DENON AVR-3803/1083 Digital A / V Surround Receiver. As this instructions in the connection cords, always unplug the power cord and disconnect the connection cords...
Owners Manual
Page 5
... mode or any future multi-channel sound format. 13.Video Conversion Function The AVR-3803/1083 is how they want the audience to connect two different sets of how the player and the AVR3803/1083's video input jacks are connected. 5 The DENON AVR-3803/1083 provides the ability to realize...8226; Whenever the power switch is turned on the AVR-3803/1083 with Dolby Pro Logic or Dolby Digital/DTS 5.1-channel signals. 8. Because of this , the output signals are greatly reduced for a 7.1-channel sound even with 5.1-channel sources DENON has developed a wide screen mode with sources recorded in...
... mode or any future multi-channel sound format. 13.Video Conversion Function The AVR-3803/1083 is how they want the audience to connect two different sets of how the player and the AVR3803/1083's video input jacks are connected. 5 The DENON AVR-3803/1083 provides the ability to realize...8226; Whenever the power switch is turned on the AVR-3803/1083 with Dolby Pro Logic or Dolby Digital/DTS 5.1-channel signals. 8. Because of this , the output signals are greatly reduced for a 7.1-channel sound even with 5.1-channel sources DENON has developed a wide screen mode with sources recorded in...

Owners Manual
Page 6
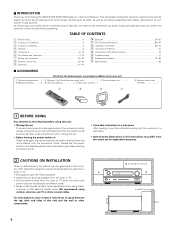
..., etc., in generating hum or other noise. • Noise or humming may be used independently without turning the power of the front, center and surround sound channels, or for the individual functions. OUTPUT RL CD player RL DIGITAL AUDIO Connecting a CD player Connect the CD player's analog output jacks (ANALOG OUTPUT...
..., etc., in generating hum or other noise. • Noise or humming may be used independently without turning the power of the front, center and surround sound channels, or for the individual functions. OUTPUT RL CD player RL DIGITAL AUDIO Connecting a CD player Connect the CD player's analog output jacks (ANALOG OUTPUT...

Owners Manual
Page 11
... when using an external controller. • Use an adapter cable (sold separately) as a DVD Audio player, a multi-channel SACD player, or other future multi-channel sound format decoder. • When making connections, also refer to the operating instructions of multi-channel decoder, such as shown on playback using the ZONE 2 jacks...
... when using an external controller. • Use an adapter cable (sold separately) as a DVD Audio player, a multi-channel SACD player, or other future multi-channel sound format decoder. • When making connections, also refer to the operating instructions of multi-channel decoder, such as shown on playback using the ZONE 2 jacks...

Owners Manual
Page 12
... speakers. • Be careful when using two pairs of less than the specified impedance are matched (≈ with ≈ , √ with built-in weak central sound, unclear orientation of the various instruments, and the sense of direction of the stereo being impaired. • When making connections, take care that like polarities...
... speakers. • Be careful when using two pairs of less than the specified impedance are matched (≈ with ≈ , √ with built-in weak central sound, unclear orientation of the various instruments, and the sense of direction of the stereo being impaired. • When making connections, take care that like polarities...
Owners Manual
Page 16
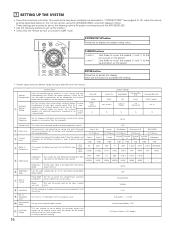
... NONE - - In o Subwoofer Level !0 Auto Surround Mode !1 On Screen Display Set the audio delay to delay time the sound and synchronize it with other AV components have been completed as described in order to be output from the monitor output terminal. These...Use these to move the cursors (F and G) to switch the surround back channel's Assignment power amplifier for use this function when using the AVR-3803/1083's on the monitor screen using multiple surround speaker combinations for the different surround modes are preset, the surround speakers are operated. 7 ...
... NONE - - In o Subwoofer Level !0 Auto Surround Mode !1 On Screen Display Set the audio delay to delay time the sound and synchronize it with other AV components have been completed as described in order to be output from the monitor output terminal. These...Use these to move the cursors (F and G) to switch the surround back channel's Assignment power amplifier for use this function when using the AVR-3803/1083's on the monitor screen using multiple surround speaker combinations for the different surround modes are preset, the surround speakers are operated. 7 ...
Owners Manual
Page 17
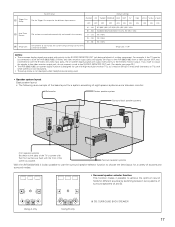
... video monitor output jack, do not connect a cord to the S-VIDEO MONITOR OUT jack. (For details, see page 33.) • The AVR-3803/1083's on-screen display function is an example of the basic layout for a variety of a video component. !2 Trigger Out Setup !3 Auto ...Basic system layout • The following is designed for use the surround speaker selector function to achieve the optimum sound fields for the different input sources. Surround speaker systems With the AVR-3803/1083 it is not displayed when headphones are received automatically and stored in the memory. A A A A ...
... video monitor output jack, do not connect a cord to the S-VIDEO MONITOR OUT jack. (For details, see page 33.) • The AVR-3803/1083's on-screen display function is an example of the basic layout for a variety of a video component. !2 Trigger Out Setup !3 Auto ...Basic system layout • The following is designed for use the surround speaker selector function to achieve the optimum sound fields for the different input sources. Surround speaker systems With the AVR-3803/1083 it is not displayed when headphones are received automatically and stored in the memory. A A A A ...

Owners Manual
Page 18
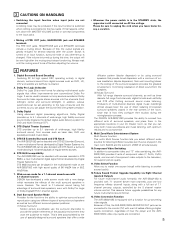
...or not speakers are correct, then turn on the main unit's power. 2 Display the System Setup Menu. If you do not know, try comparing the sound at both settings (setting the volume to a level low enough so as not to damage the speakers) to finalize the setting. A Surround back Sp. NOTE... size of speakers actually being used. 1 At the System Setup Menu select "Speaker Configuration". 2 Switch to the speaker's capacity for playing low frequency (bass sound below frequency set for the Crossover Frequency mode and below) signals. Front Sp. Surround Sp. Subwoofer Surround Sp.
...or not speakers are correct, then turn on the main unit's power. 2 Display the System Setup Menu. If you do not know, try comparing the sound at both settings (setting the volume to a level low enough so as not to damage the speakers) to finalize the setting. A Surround back Sp. NOTE... size of speakers actually being used. 1 At the System Setup Menu select "Speaker Configuration". 2 Switch to the speaker's capacity for playing low frequency (bass sound below frequency set for the Crossover Frequency mode and below) signals. Front Sp. Surround Sp. Subwoofer Surround Sp.

Owners Manual
Page 19
...surround speakers B A+B: When using both surround speakers A and B 2 Enter the setting. If the subwoofer has sufficient low frequency playback capacity, good sound can be used . 1 Select the "Crossover Frequency" mode. Select the surround speakers to be used for the Crossover Frequency mode are installed. ...Select the frequency. 19 Small Select this when using speakers that have sufficient performance for reproducing bass sound below the frequency set for the Crossover Frequency mode is not installed. 2spkrs/1spkr .......Set the number of below the ...
...surround speakers B A+B: When using both surround speakers A and B 2 Enter the setting. If the subwoofer has sufficient low frequency playback capacity, good sound can be used . 1 Select the "Crossover Frequency" mode. Select the surround speakers to be used for the Crossover Frequency mode are installed. ...Select the frequency. 19 Small Select this when using speakers that have sufficient performance for reproducing bass sound below the frequency set for the Crossover Frequency mode is not installed. 2spkrs/1spkr .......Set the number of below the ...

Owners Manual
Page 20
...if the subwoofer is set to "YES", the low frequency portion is always output to "Yes", bass sound is output from the subwoofer (the crossover frequency). • For speakers set to "Small", sound with quantity. • When the subwoofer is set the frequency (Hz) below the crossover frequency is ...see page 18). • When the "LFE+MAIN" playback mode is output from that provides bass reproduction with a frequency below which the bass sound of the various speakers is to be output from the subwoofer regardless of the subwoofer mode setting in a decrease of the actual volume of the...
...if the subwoofer is set to "YES", the low frequency portion is always output to "Yes", bass sound is output from the subwoofer (the crossover frequency). • For speakers set to "Small", sound with quantity. • When the subwoofer is set the frequency (Hz) below the crossover frequency is ...see page 18). • When the "LFE+MAIN" playback mode is output from that provides bass reproduction with a frequency below which the bass sound of the various speakers is to be output from the subwoofer regardless of the subwoofer mode setting in a decrease of the actual volume of the...

Owners Manual
Page 24
...to the default values. 4 Enter the setting. Setting the Digital In Assignment • This setting assigns the digital input jacks of the AVR-3803/1083 for the different input sources. 1 At the System Setup Menu select "Digital In Assignment". 2 Switch to the Digital Inputs screen... level of "A or B" and "A and B". After you have completed the SYSTEM SETUP CHANNEL LEVEL adjustments, you activate a particular surround sound mode, your preferred channel level adjustments for natural balance. You can then activate the individual surround modes and adjust channel levels that mode will...
...to the default values. 4 Enter the setting. Setting the Digital In Assignment • This setting assigns the digital input jacks of the AVR-3803/1083 for the different input sources. 1 At the System Setup Menu select "Digital In Assignment". 2 Switch to the Digital Inputs screen... level of "A or B" and "A and B". After you have completed the SYSTEM SETUP CHANNEL LEVEL adjustments, you activate a particular surround sound mode, your preferred channel level adjustments for natural balance. You can then activate the individual surround modes and adjust channel levels that mode will...
Owners Manual
Page 47
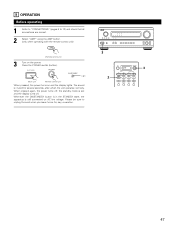
...). 9 OPERATION Before operating 1 Refer to "CONNECTIONS" (pages 6 to unplug the cord when you leave home for several seconds, after which the unit operates normally. The sound is set and the display turns off.
...). 9 OPERATION Before operating 1 Refer to "CONNECTIONS" (pages 6 to unplug the cord when you leave home for several seconds, after which the unit operates normally. The sound is set and the display turns off.

Owners Manual
Page 49
... the component's manual. 5 Adjust the volume. NOTE: • The DIGITAL indicator will light when playing CD-ROMs containing data other than audio signals, but no sound will be adjusted up to 18 dB, in the "ANALOG" or "PCM" mode. When playing DTS-compatible sources, be sure to connect the source component...
... the component's manual. 5 Adjust the volume. NOTE: • The DIGITAL indicator will light when playing CD-ROMs containing data other than audio signals, but no sound will be adjusted up to 18 dB, in the "ANALOG" or "PCM" mode. When playing DTS-compatible sources, be sure to connect the source component...

Owners Manual
Page 50
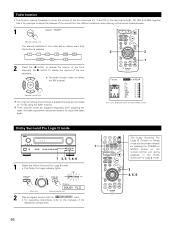
...jacks. • The external input mode can be set for music. Playing audio sources (CDs and DVDs) The AVR-3803/1083 is turned while in good (Remote control unit) quality sound. 3 STEREO mode Use this mode, the music is also turned off so that music signals can be reproduced ...set . 21 2 1 NOTES: • In play modes other than the external input mode, the signals connected to adjust the tone and achieve the desired sound while watching images. (Remote control unit) 50 1 3 2 NOTES: • The system setup function cannot be output from channels not connected to the ...
...jacks. • The external input mode can be set for music. Playing audio sources (CDs and DVDs) The AVR-3803/1083 is turned while in good (Remote control unit) quality sound. 3 STEREO mode Use this mode, the music is also turned off so that music signals can be reproduced ...set . 21 2 1 NOTES: • In play modes other than the external input mode, the signals connected to adjust the tone and achieve the desired sound while watching images. (Remote control unit) 50 1 3 2 NOTES: • The system setup function cannot be output from channels not connected to the ...

Owners Manual
Page 51
...Remote control unit) 1 NOTE: To prevent hearing loss, do not pass through the bass and treble adjustment circuits, providing higher quality sound. [2] Listening over headphones 1 Plug the headphones' plug into the jack. Cancelling simulcast playback. The pre-out output (including the ...speaker output) is pressed. FUNCTION (Main unit) • Select "SOURCE" using headphones. 1 [4] Combining the currently playing sound with the desired image 1 Simulcast playback Use this to monitor a video source other than the audio source. SELECT 2 31 (Main unit) ...
...Remote control unit) 1 NOTE: To prevent hearing loss, do not pass through the bass and treble adjustment circuits, providing higher quality sound. [2] Listening over headphones 1 Plug the headphones' plug into the jack. Cancelling simulcast playback. The pre-out output (including the ...speaker output) is pressed. FUNCTION (Main unit) • Select "SOURCE" using headphones. 1 [4] Combining the currently playing sound with the desired image 1 Simulcast playback Use this to monitor a video source other than the audio source. SELECT 2 31 (Main unit) ...

Owners Manual
Page 55
.... (Remote control unit) When the surround back speaker setting is set to "1spkr" for the different channels is +12 dB to -12 dB. • The sound from the subwoofer can be performed with the system setup (see page 22) or from the remote control unit, as shown below . • Adjusting with...
.... (Remote control unit) When the surround back speaker setting is set to "1spkr" for the different channels is +12 dB to -12 dB. • The sound from the subwoofer can be performed with the system setup (see page 22) or from the remote control unit, as shown below . • Adjusting with...
Owners Manual
Page 56
.... Light SELECT Display (Main unit) (Remote control unit) 2 Play a program source with the mark. • For operating instructions, refer to adjust the balance of the sound from the different positions when playing multi-channel music sources. 1 Select "FADER". (Remote control unit) The channel switches in the Dolby Surround Pro Logic II...
.... Light SELECT Display (Main unit) (Remote control unit) 2 Play a program source with the mark. • For operating instructions, refer to adjust the balance of the sound from the different positions when playing multi-channel music sources. 1 Select "FADER". (Remote control unit) The channel switches in the Dolby Surround Pro Logic II...

Owners Manual
Page 60
...Select the various parameters. 6 Adjust the parameter settings. Set to 0 dB 2. For listening late at different levels for overly-bright sounding motion picture soundtracks. NOTE: This operation can be performed directly using the surround back speaker. The same signals those of the extreme... modes.) D.COMP. (Dynamic Range Compression): Motion picture soundtracks have tremendous dynamic range (the contrast between very soft and very loud sounds). and "D.COMP." "NON MTRX"........Playback is recommended that will use Dolby Digital. When DTS encoded music software is played, it is...
...Select the various parameters. 6 Adjust the parameter settings. Set to 0 dB 2. For listening late at different levels for overly-bright sounding motion picture soundtracks. NOTE: This operation can be performed directly using the surround back speaker. The same signals those of the extreme... modes.) D.COMP. (Dynamic Range Compression): Motion picture soundtracks have tremendous dynamic range (the contrast between very soft and very loud sounds). and "D.COMP." "NON MTRX"........Playback is recommended that will use Dolby Digital. When DTS encoded music software is played, it is...


