Literature/Product Sheet
Page 2
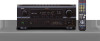
AVR-2106 s Multi-Function Preset Memory Remote Controller with Glo-keys s DENON's Latest Surround Technology Faithfully Recreates the Surround Sound Produced at 100 Hz FM Section Tuning frequency range 87.5 - 107.9 MHz Usable sensitivity 1.0 ...of 8 cross-over switching with home theater ambience. Inputs FRONT L/R, CENTER, SURROUND L/R, SUBWOOFER 6 Digital Inputs OPTICAL x 4 (incl. s Adjustable Cross-Over Switching The AVR-2106 supports subwoofer cross-over frequencies: 40/60/80/100/120/150/200/250Hz. FRONT x 1) COAXIAL x 2 Audio Outputs 1 Analog PRE OUT Terminals 7.1 ch 3 ...
AVR-2106 s Multi-Function Preset Memory Remote Controller with Glo-keys s DENON's Latest Surround Technology Faithfully Recreates the Surround Sound Produced at 100 Hz FM Section Tuning frequency range 87.5 - 107.9 MHz Usable sensitivity 1.0 ...of 8 cross-over switching with home theater ambience. Inputs FRONT L/R, CENTER, SURROUND L/R, SUBWOOFER 6 Digital Inputs OPTICAL x 4 (incl. s Adjustable Cross-Over Switching The AVR-2106 supports subwoofer cross-over frequencies: 40/60/80/100/120/150/200/250Hz. FRONT x 1) COAXIAL x 2 Audio Outputs 1 Analog PRE OUT Terminals 7.1 ch 3 ...
Owners Manual
Page 4
...source 19 Playback using 2 Cautions on installation 2 Cautions on handling 2 Preparing the remote control unit 2 Inserting the batteries 3 Operating range of the remote control unit 3 Part names and functions Front panel 3 Remote control unit 4 Easy Setup and Operation Easy setup flow 4 Speaker system layout 5... surround sound listening with an immense array of features, before you begin hookup and operation that you for choosing the DENON AVR-2106 A/V Surround Receiver. ENGLISH Getting Started Thank you review the contents of this manual Part 2 Speaker Setup Setting the ...
...source 19 Playback using 2 Cautions on installation 2 Cautions on handling 2 Preparing the remote control unit 2 Inserting the batteries 3 Operating range of the remote control unit 3 Part names and functions Front panel 3 Remote control unit 4 Easy Setup and Operation Easy setup flow 4 Speaker system layout 5... surround sound listening with an immense array of features, before you begin hookup and operation that you for choosing the DENON AVR-2106 A/V Surround Receiver. ENGLISH Getting Started Thank you review the contents of this manual Part 2 Speaker Setup Setting the ...
Owners Manual
Page 5
... V. If the volume is turned up is used to operate not only the AVR-2106 but other remote control units, so it can be used near a tuner or TV. Preparing the remote control unit The included remote control unit (RC-1015) can be sure to turn down the MASTER VOLUME ...as well. A clicking noise may be very high after the power switch is still connected to AC line voltage. Please be used to operate non-DENON remote control compatible products. 2 ENGLISH Getting Started Accessories Check that the following parts are included in addition to the main unit: q Operating instructions 1 ...
... V. If the volume is turned up is used to operate not only the AVR-2106 but other remote control units, so it can be used near a tuner or TV. Preparing the remote control unit The included remote control unit (RC-1015) can be sure to turn down the MASTER VOLUME ...as well. A clicking noise may be very high after the power switch is still connected to AC line voltage. Please be used to operate non-DENON remote control compatible products. 2 ENGLISH Getting Started Accessories Check that the following parts are included in addition to the main unit: q Operating instructions 1 ...

Owners Manual
Page 6
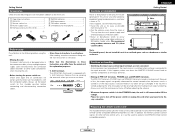
...30° NOTE: • It may result in malfunction, so keep the set does not operate even when the remote control unit is operated nearby the unit. (The included batteries are obstacles in flames. • If the battery fluid ... the "" marks in parentheses ( ). @7 @2 @0 #5 #4 #3 #2 #1 #0 @9 @8 @6 @5 @4 @3 @1 !9 t u o !1 q w e r y i !0 !4 !2 !3 !5 !6 !7 !8 Operating range of the remote control unit • Point the remote control unit at a horizontal angle of approximately 23 feet from such devices as possible. ENGLISH Getting Started Inserting the batteries q Remove the...
...30° NOTE: • It may result in malfunction, so keep the set does not operate even when the remote control unit is operated nearby the unit. (The included batteries are obstacles in flames. • If the battery fluid ... the "" marks in parentheses ( ). @7 @2 @0 #5 #4 #3 #2 #1 #0 @9 @8 @6 @5 @4 @3 @1 !9 t u o !1 q w e r y i !0 !4 !2 !3 !5 !6 !7 !8 Operating range of the remote control unit • Point the remote control unit at a horizontal angle of approximately 23 feet from such devices as possible. ENGLISH Getting Started Inserting the batteries q Remove the...
Owners Manual
Page 7
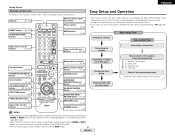
Indicator 34, 36) Remote control signal transmitter 3) ZONE2 buttons····(36, 39) SURROUND MODE buttons 19, 27) Power buttons 8, 34) MAIN buttons 4, 36) ENGLISH Easy Setup and Operation • This section contains the basic steps necessary to configure the AVR-2106 according to the pages given in...8226; The Dolby Surround Pro Logic II(x) Cinema or Music mode can be chosen directly by pressing the CINEMA or MUSIC button on the remote control unit during playback in the Dolby Surround Pro Logic II(x) mode. • The DTS NEO:6 Cinema or Music mode can be ...
Indicator 34, 36) Remote control signal transmitter 3) ZONE2 buttons····(36, 39) SURROUND MODE buttons 19, 27) Power buttons 8, 34) MAIN buttons 4, 36) ENGLISH Easy Setup and Operation • This section contains the basic steps necessary to configure the AVR-2106 according to the pages given in...8226; The Dolby Surround Pro Logic II(x) Cinema or Music mode can be chosen directly by pressing the CINEMA or MUSIC button on the remote control unit during playback in the Dolby Surround Pro Logic II(x) mode. • The DTS NEO:6 Cinema or Music mode can be ...

Owners Manual
Page 11
...a microphone 1 Connect the microphone for Auto Setup at the actual listening position which will be sure to "AUDIO" (only when operating with the remote control unit). 8 ENGLISH Also, be at this should you turn the speakers on the front panel of any obstacles between the microphone and speakers while... Auto Setup is off the power of the unit. NOTE: • A loud test tone is output from the included remote control unit. £ OFF: The power turns off and the indicator is performed. • Do not place any air-conditioner, projector or other...
...a microphone 1 Connect the microphone for Auto Setup at the actual listening position which will be sure to "AUDIO" (only when operating with the remote control unit). 8 ENGLISH Also, be at this should you turn the speakers on the front panel of any obstacles between the microphone and speakers while... Auto Setup is off the power of the unit. NOTE: • A loud test tone is output from the included remote control unit. £ OFF: The power turns off and the indicator is performed. • Do not place any air-conditioner, projector or other...
Owners Manual
Page 20
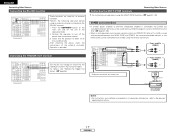
... the product has been set the unit to the operating mode. 2. Connecting the TRIGGER OUT terminal Turn the DC 12V voltage on operations using the remote control unit. A (Fixed) L R Power amplifier (ZONE2) L L IN R R Extension terminals for the individual functions and surround modes. ENGLISH ... 46). After checking the above, check the connections of separately sold separately room-to-room remote control unit (DENON RC-616, 617 or 618) is wired and connected between the MAIN ZONE and ZONE2, the remote-controllable devices in ZONE2 the same time ( page 37, 38). • When a...
... the product has been set the unit to the operating mode. 2. Connecting the TRIGGER OUT terminal Turn the DC 12V voltage on operations using the remote control unit. A (Fixed) L R Power amplifier (ZONE2) L L IN R R Extension terminals for the individual functions and surround modes. ENGLISH ... 46). After checking the above, check the connections of separately sold separately room-to-room remote control unit (DENON RC-616, 617 or 618) is wired and connected between the MAIN ZONE and ZONE2, the remote-controllable devices in ZONE2 the same time ( page 37, 38). • When a...
Owners Manual
Page 21
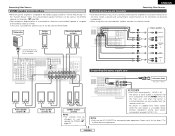
... be changed to use this speaker for when the surround back speaker is assigned to the ZONE2 stereo 2 channel. No power is supplied from the remote control unit. Power amplifier B CENTER A SURROUND L L L R R R A SURROUND BACK L L L R R R B SUB- AC OUTLETS • SWITCHED (total capacity - 120 W (1 A.)) The power to these outlets is turned on and...
... be changed to use this speaker for when the surround back speaker is assigned to the ZONE2 stereo 2 channel. No power is supplied from the remote control unit. Power amplifier B CENTER A SURROUND L L L R R R A SURROUND BACK L L L R R R B SUB- AC OUTLETS • SWITCHED (total capacity - 120 W (1 A.)) The power to these outlets is turned on and...

Owners Manual
Page 22
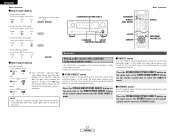
...8226; You can be set for any input source. IN) terminals The signals being input to "ON". Example: STEREO SELECT (Main unit) (Remote control unit) To select the surround mode while adjusting the surround parameters, tone defeat or tone control, press the SURROUND MODE button and then operate.... 3 Start playback on the master volume level display. For operating instructions, refer to the component's manual. 4 Adjust the volume. (Main unit) (Remote control unit) The volume level is connected, then set as described ( page 29), if the volume for any channel is set at +0.5 dB or ...
...8226; You can be set for any input source. IN) terminals The signals being input to "ON". Example: STEREO SELECT (Main unit) (Remote control unit) To select the surround mode while adjusting the surround parameters, tone defeat or tone control, press the SURROUND MODE button and then operate.... 3 Start playback on the master volume level display. For operating instructions, refer to the component's manual. 4 Adjust the volume. (Main unit) (Remote control unit) The volume level is connected, then set as described ( page 29), if the volume for any channel is set at +0.5 dB or ...

Owners Manual
Page 23
...Switch the program source to the component connected to the type of that noise may be checked during playback. Input mode The AVR-2106 has an AUTO signal detection mode that automatically identifies the type of the input selector and the surround parameter settings is selected ...automatically upon playback. Combining the currently playing sound with the SPEAKER button on the remote control unit. 2 Using the dimmer function Press the DIMMER button. Also, the unit's operating status can be changed with the desired...
...Switch the program source to the component connected to the type of that noise may be checked during playback. Input mode The AVR-2106 has an AUTO signal detection mode that automatically identifies the type of the input selector and the surround parameter settings is selected ...automatically upon playback. Combining the currently playing sound with the SPEAKER button on the remote control unit. 2 Using the dimmer function Press the DIMMER button. Also, the unit's operating status can be changed with the desired...
Owners Manual
Page 24
...main unit or the STEREO button on the remote control unit to select the PURE DIRECT mode. 2 DIRECT mode Use this mode to achieve good quality 2-channel sound while watching images. Playing audio sources (CDs and DVDs) 2-channel playback modes • The AVR-2106 is turned on. Press the STEREO/DIRECT/...PURE DIRECT button on the main unit or the DIRECT/PURE DIRECT button on the remote control unit to select the STEREO mode. 21 ENGLISH In this mode, the audio...
...main unit or the STEREO button on the remote control unit to select the PURE DIRECT mode. 2 DIRECT mode Use this mode to achieve good quality 2-channel sound while watching images. Playing audio sources (CDs and DVDs) 2-channel playback modes • The AVR-2106 is turned on. Press the STEREO/DIRECT/...PURE DIRECT button on the main unit or the DIRECT/PURE DIRECT button on the remote control unit to select the STEREO mode. 21 ENGLISH In this mode, the audio...

Owners Manual
Page 27
... be performed directly by pressing the SURROUND BACK button. 24 ENGLISH Dolby Digital: -10 dB to digital (COAXIAL/ OPTICAL) ( page 42). Example: DVD (Main unit) (Remote control unit) 2 Press the INPUT MODE button to set the input mode to "AUTO" or "DTS". 3 Press the STANDARD button to switch Surround Back CH...
... be performed directly by pressing the SURROUND BACK button. 24 ENGLISH Dolby Digital: -10 dB to digital (COAXIAL/ OPTICAL) ( page 42). Example: DVD (Main unit) (Remote control unit) 2 Press the INPUT MODE button to set the input mode to "AUTO" or "DTS". 3 Press the STANDARD button to switch Surround Back CH...

Owners Manual
Page 28
... when discrete processing is displayed for several seconds to the standard level. 2 Checking the input signal The input signal can be checked by pressing the remote control unit's ON SCREEN button. Not displayed if an identification signal has not been recorded. • In addition, screen information is conducted on /off". "MATRIX...
... when discrete processing is displayed for several seconds to the standard level. 2 Checking the input signal The input signal can be checked by pressing the remote control unit's ON SCREEN button. Not displayed if an identification signal has not been recorded. • In addition, screen information is conducted on /off". "MATRIX...

Owners Manual
Page 29
... The audio delay setting does not apply when playing in the listening room to achieve a more realistic, powerful sound. 1 Select the input source. DENON original surround modes This unit is equipped with the sound. 7 Press the ENTER button to complete the setting. One of 7 preset surround modes can...enjoy video game sources. 6 MATRIX Select this mode to achieve the feeling of a live concert in an arena with reflected sounds coming from the remote control unit, as described below. NOTE: When playing sources recorded in the analog input direct, pure direct or stereo mode (TONE DEFEAT "ON...
... The audio delay setting does not apply when playing in the listening room to achieve a more realistic, powerful sound. 1 Select the input source. DENON original surround modes This unit is equipped with the sound. 7 Press the ENTER button to complete the setting. One of 7 preset surround modes can...enjoy video game sources. 6 MATRIX Select this mode to achieve the feeling of a live concert in an arena with reflected sounds coming from the remote control unit, as described below. NOTE: When playing sources recorded in the analog input direct, pure direct or stereo mode (TONE DEFEAT "ON...

Owners Manual
Page 30
... the regular condition several seconds after the last button was pressed and the setting will be set differ for the input channel. (Remote control unit) The surround mode switches in the following order each time the DSP SIMULATION button is pressed for the different surround modes... SURROUND PARAMETER button to select the parameter you want to set it. Basic Operation 2 Operating the surround mode and the surround parameters from the remote control unit 1 Select the surround mode for the different surround modes are displayed. (Refer to "Surround modes and parameters" ( page 62).)...
... the regular condition several seconds after the last button was pressed and the setting will be set differ for the input channel. (Remote control unit) The surround mode switches in the following order each time the DSP SIMULATION button is pressed for the different surround modes... SURROUND PARAMETER button to select the parameter you want to set it. Basic Operation 2 Operating the surround mode and the surround parameters from the remote control unit 1 Select the surround mode for the different surround modes are displayed. (Refer to "Surround modes and parameters" ( page 62).)...

Owners Manual
Page 31
...", "med.s" (medium-small), "medium", "med.l" (medium-large) and "large". EFFECT LEVEL: This sets the strength of 0 to 110 ms only in 15 steps from the remote control unit 1 Press the SURROUND PARAMETER button. • The surround parameter screen appears. 2 Press the CURSOR D or H button to select "Room EQ". 3 Press the CURSOR...
...", "med.s" (medium-small), "medium", "med.l" (medium-large) and "large". EFFECT LEVEL: This sets the strength of 0 to 110 ms only in 15 steps from the remote control unit 1 Press the SURROUND PARAMETER button. • The surround parameter screen appears. 2 Press the CURSOR D or H button to select "Room EQ". 3 Press the CURSOR...

Owners Manual
Page 33
....1 / 90.1 / 90.1 MHz 520 / 600 / 1000 / 1400 / 1500 / 1710 kHz, 90.1 / 90.1 MHz 90.1 MHz 90.1 MHz 90.1 MHz 90.1 MHz 90.1 MHz (Main unit) (Remote control unit) 2 Watching the display, press the BAND button to select the desired band (AM or FM). 3 Press the MODE button to "TUNER". At open...
....1 / 90.1 / 90.1 MHz 520 / 600 / 1000 / 1400 / 1500 / 1710 kHz, 90.1 / 90.1 MHz 90.1 MHz 90.1 MHz 90.1 MHz 90.1 MHz 90.1 MHz (Main unit) (Remote control unit) 2 Watching the display, press the BAND button to select the desired band (AM or FM). 3 Press the MODE button to "TUNER". At open...

Owners Manual
Page 36
...search (forward and reverse) : Stop : Play : Auto search (cue) : Pause : Switch discs (for the component to the position for CD changers only) 2. While this remote control. 6 : Rewind 7 : Fast-forward 2 : Stop 1 : Forward play 0 : Reverse play A/B : Switch between auto and mono MEMORY : Preset memory • TUNER...component. Tuner system buttons 1. For details, refer to "AUDIO". 3. ENGLISH Advanced Operation OFF ON SOURCE NUMBER MODE 1 MODE 2 Remote control unit Operating DENON audio components 1 Set the MODE 1 switch to the component's operating instructions.
...search (forward and reverse) : Stop : Play : Auto search (cue) : Pause : Switch discs (for the component to the position for CD changers only) 2. While this remote control. 6 : Rewind 7 : Fast-forward 2 : Stop 1 : Forward play 0 : Reverse play A/B : Switch between auto and mono MEMORY : Preset memory • TUNER...component. Tuner system buttons 1. For details, refer to "AUDIO". 3. ENGLISH Advanced Operation OFF ON SOURCE NUMBER MODE 1 MODE 2 Remote control unit Operating DENON audio components 1 Set the MODE 1 switch to the component's operating instructions.

Owners Manual
Page 37
...steps 1 to 4. Operating a component stored in the list of preset codes. • Some manufacturers use different names for the DVD remote control buttons, so also refer to the instructions on /standby OFF : DENON DVD power off 6, 7 : Manual search (forward and reverse) 2 : Stop 1 : Play 8, 9 : Auto search (...to the component's operating instructions. ENGLISH Advanced Operation 1. Advanced Operation Preset memory • DENON and other manufacturers without using the learning function by setting the preset memory. • This remote control unit can be set for one type of...
...steps 1 to 4. Operating a component stored in the list of preset codes. • Some manufacturers use different names for the DVD remote control buttons, so also refer to the instructions on /standby OFF : DENON DVD power off 6, 7 : Manual search (forward and reverse) 2 : Stop 1 : Play 8, 9 : Auto search (...to the component's operating instructions. ENGLISH Advanced Operation 1. Advanced Operation Preset memory • DENON and other manufacturers without using the learning function by setting the preset memory. • This remote control unit can be set for one type of...

Owners Manual
Page 40
...speaker out cannot be used for MAIN ZONE. • When a sold separately room-to-room remote control unit (DENON RC-616, 617 or 618) is wired and connected between the MAIN ZONE and ZONE2, the remote-controllable devices in the MAIN ZONE can be operated. 2 When using the SURR.BACK/ZONE2 ...amplifier as the SURROUND BACK • 7.1-channel playback using the remote control unit. • For the AUDIO ...
...speaker out cannot be used for MAIN ZONE. • When a sold separately room-to-room remote control unit (DENON RC-616, 617 or 618) is wired and connected between the MAIN ZONE and ZONE2, the remote-controllable devices in the MAIN ZONE can be operated. 2 When using the SURR.BACK/ZONE2 ...amplifier as the SURROUND BACK • 7.1-channel playback using the remote control unit. • For the AUDIO ...


