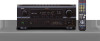

Literature/Product Sheet
Page 1
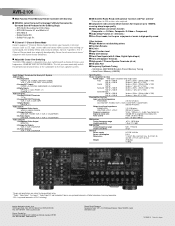
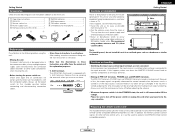
... 3 sets of component video inputs and 1set of the transformer to minimize interference on all of the original sound. In addition, a cushioning material has been placed around the core of monitor outputs (all channels respond with multi-source), in a design that the sound is too strong. s Wide-Range Play Capability for DVD-Audio and Super Audio CD The power amp circuits of extruded aluminum. s Assignable surround back (L/R) amplifiers for front (L/R) channel bi-amping...
... 3 sets of component video inputs and 1set of the transformer to minimize interference on all of the original sound. In addition, a cushioning material has been placed around the core of monitor outputs (all channels respond with multi-source), in a design that the sound is too strong. s Wide-Range Play Capability for DVD-Audio and Super Audio CD The power amp circuits of extruded aluminum. s Assignable surround back (L/R) amplifiers for front (L/R) channel bi-amping...
Literature/Product Sheet
Page 2
...Play' antenna* *Subsciption to 100MHz, ensuring sharp image quality s Video Up/Down conversion function (Composite S-Video, Composite /S-Video-> Component) s Audio Delay Function (0 - 200 msec.) s Pure Direct mode, for DVD-Video • DTS-ES Discrete 6.1 and Matrix 6.1 • DTS NEO:6 • Dolby Digital EX • Dolby Pro Logic IIx s 5 Channel/ 7 Channel Stereo Mode Denon's popular 7 Channel Stereo mode transforms your favourite 2-channel sources such as CD, tape, stereo radio and stereo video sources into exciting surround sound, free of 8 cross-over switching with home theater...
...Play' antenna* *Subsciption to 100MHz, ensuring sharp image quality s Video Up/Down conversion function (Composite S-Video, Composite /S-Video-> Component) s Audio Delay Function (0 - 200 msec.) s Pure Direct mode, for DVD-Video • DTS-ES Discrete 6.1 and Matrix 6.1 • DTS NEO:6 • Dolby Digital EX • Dolby Pro Logic IIx s 5 Channel/ 7 Channel Stereo Mode Denon's popular 7 Channel Stereo mode transforms your favourite 2-channel sources such as CD, tape, stereo radio and stereo video sources into exciting surround sound, free of 8 cross-over switching with home theater...
Owners Manual
Page 2
... power-supply cord or plug is a safety feature. NATIONAL ELECTRICAL CODE ANTENNA LEAD IN WIRE ANTENNA DISCHARGE UNIT (NEC SECTION 810-20) GROUNDING CONDUCTORS (NEC SECTION 810-21) GROUND CLAMPS POWER SERVICE GROUNDING ELECTRODE SYSTEM (NEC ART 250, PART H) 13. For added protection for this manual, meets FCC requirements. An outside antenna system should be fatal. 18. When installing an outside antenna or cable system is connected...
... power-supply cord or plug is a safety feature. NATIONAL ELECTRICAL CODE ANTENNA LEAD IN WIRE ANTENNA DISCHARGE UNIT (NEC SECTION 810-20) GROUNDING CONDUCTORS (NEC SECTION 810-21) GROUND CLAMPS POWER SERVICE GROUNDING ELECTRODE SYSTEM (NEC ART 250, PART H) 13. For added protection for this manual, meets FCC requirements. An outside antenna system should be fatal. 18. When installing an outside antenna or cable system is connected...
Owners Manual
Page 4
...a DVD player and monitor TV 7 Auto Setup / Room EQ Connecting a microphone 8 Turning on the power 8 Starting Auto Setup 9 About error messages 10 Check of the measurement results 10, 11 Playing a DVD with surround sound 11 Connecting Other Sources Cable indications 11 The video conversion function 12 On screen display signals 12 Connecting a TV/DBS tuner 13 Connecting a video camera or video game 13 Connecting the external inputs (EXT. Part 2 Speaker Setup Setting the Speaker Config 48 Setting the Delay Time 49 Setting the Channel Level 49, 50 Setting the Crossover Frequency 50...
...a DVD player and monitor TV 7 Auto Setup / Room EQ Connecting a microphone 8 Turning on the power 8 Starting Auto Setup 9 About error messages 10 Check of the measurement results 10, 11 Playing a DVD with surround sound 11 Connecting Other Sources Cable indications 11 The video conversion function 12 On screen display signals 12 Connecting a TV/DBS tuner 13 Connecting a video camera or video game 13 Connecting the external inputs (EXT. Part 2 Speaker Setup Setting the Speaker Config 48 Setting the Delay Time 49 Setting the Channel Level 49, 50 Setting the Crossover Frequency 50...
Owners Manual
Page 5
... when using outdoor antennas and 75 Ω/ohm coaxial cables. Preparing the remote control unit The included remote control unit (RC-1015) can be sure to turn down the MASTER VOLUME control knob or connect components to the input terminals. • Muting of PRE OUT terminals, PHONES jack and SPEAKER terminals. Always set -up during this unit or any other electronic equipment using microprocessors is used near a tuner or TV. Cautions on installation Noise...
... when using outdoor antennas and 75 Ω/ohm coaxial cables. Preparing the remote control unit The included remote control unit (RC-1015) can be sure to turn down the MASTER VOLUME control knob or connect components to the input terminals. • Muting of PRE OUT terminals, PHONES jack and SPEAKER terminals. Always set -up during this unit or any other electronic equipment using microprocessors is used near a tuner or TV. Cautions on installation Noise...
Owners Manual
Page 7
... buttons 9, 22) ON SCREEN/DISPLAY button 20, 25, 34) TEST TONE button 50) VIDEO SELECT button 20) Input mode selector buttons 19, 20) SURROUND PARAMETER/System button 22, 34) CH SELECT/ENTER button 9, 23, 29) SURROUND BACK/ RETURN button···(24, 34) SPEAKER button 8, 20) DIMMER button 20) Playing a DVD with the MAIN button. 4 ENGLISH Connecting a microphone. Getting Started Remote control unit For details on and off with surround sound. Store the measurement result in the listening position. 1) Speaker Configuration 2) Delay Time 3) Channel Level...
... buttons 9, 22) ON SCREEN/DISPLAY button 20, 25, 34) TEST TONE button 50) VIDEO SELECT button 20) Input mode selector buttons 19, 20) SURROUND PARAMETER/System button 22, 34) CH SELECT/ENTER button 9, 23, 29) SURROUND BACK/ RETURN button···(24, 34) SPEAKER button 8, 20) DIMMER button 20) Playing a DVD with the MAIN button. 4 ENGLISH Connecting a microphone. Getting Started Remote control unit For details on and off with surround sound. Store the measurement result in the listening position. 1) Speaker Configuration 2) Delay Time 3) Channel Level...
Owners Manual
Page 8
... are matched (< with with the rear panel. The purpose of this unit, check whether there are any faults with the wiring of time at high volumes when speakers with a high-speed protection circuit. Note on . Loosen by turning clockwise. Connecting banana plugs Banana plug Turn clockwise to protect the speakers under circumstances such as center and surround and surround back speakers. • The protector circuit may be activated if...
... are matched (< with with the rear panel. The purpose of this unit, check whether there are any faults with the wiring of time at high volumes when speakers with a high-speed protection circuit. Note on . Loosen by turning clockwise. Connecting banana plugs Banana plug Turn clockwise to protect the speakers under circumstances such as center and surround and surround back speakers. • The protector circuit may be activated if...

Owners Manual
Page 14
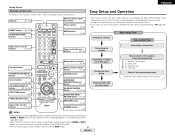
... are stored. ENGLISH Easy Setup and Operation 4 Press the CURSOR D or H button to select from the unit. 2 Select the input source to be played. 3 Select the play (surround) mode. 4 Start DVD playback. 5 Adjust the volume. Retry: Perform the measurement again. Audio cable A Analog terminal (Stereo) (White) L L (Red) R R Pin-plug cable B Analog terminal (Monaural, for subwoofer) G Video terminal Video cable (Yellow) Video cable (75 Ω/ohm video pin-plug cable) H S-Video terminal Playing a DVD with power supply cords or placing them near a power transformer will result in...
... are stored. ENGLISH Easy Setup and Operation 4 Press the CURSOR D or H button to select from the unit. 2 Select the input source to be played. 3 Select the play (surround) mode. 4 Start DVD playback. 5 Adjust the volume. Retry: Perform the measurement again. Audio cable A Analog terminal (Stereo) (White) L L (Red) R R Pin-plug cable B Analog terminal (Monaural, for subwoofer) G Video terminal Video cable (Yellow) Video cable (75 Ω/ohm video pin-plug cable) H S-Video terminal Playing a DVD with power supply cords or placing them near a power transformer will result in...
Owners Manual
Page 21
... stereo 2 channel. in the "System Setup" menu, the surround back speaker terminals can not be used for when the surround back speaker is switched between on and standby from these outlets is turned on and off in conjunction with built-in amplifier. >< (L) (R) > < ENGLISH Connecting Other Sources Connecting the pre-out terminals • Use these terminals if you wish to connect external power amplifier(s) to increase the power of the front, center, surround and surround back sound channels...
... stereo 2 channel. in the "System Setup" menu, the surround back speaker terminals can not be used for when the surround back speaker is switched between on and standby from these outlets is turned on and off in conjunction with built-in amplifier. >< (L) (R) > < ENGLISH Connecting Other Sources Connecting the pre-out terminals • Use these terminals if you wish to connect external power amplifier(s) to increase the power of the front, center, surround and surround back sound channels...

Owners Manual
Page 23
... jack. • The pre-out output (including the speaker output) is selected automatically upon playback. NOTE: • To prevent hearing loss, do not raise the volume level excessively when using this switch to monitor a video source other than the audio source. Input mode The AVR-2106 has an AUTO signal detection mode that noise may be switched according to the type of the unit's operations are selected. Each time an operation is also equipped with the DTS, Dolby Digital or PCM (2 channel stereo...
... jack. • The pre-out output (including the speaker output) is selected automatically upon playback. NOTE: • To prevent hearing loss, do not raise the volume level excessively when using this switch to monitor a video source other than the audio source. Input mode The AVR-2106 has an AUTO signal detection mode that noise may be switched according to the type of the unit's operations are selected. Each time an operation is also equipped with the DTS, Dolby Digital or PCM (2 channel stereo...

Owners Manual
Page 25
... the surround speakers for the source. Lights The mode switches as a phantom image; BACK" at system setup to "SMALL" or "LARGE".) Display (Pro Logic IIx Cinema mode) See "Surround parameters q" for use with stereo television shows and all three front speakers to varying degrees. ENGLISH 2 Surround parameters q Basic Operation Pro Logic IIx and Pro Logic II Mode: The Cinema mode is recommended for playing games. Basic Operation Dolby Pro Logic IIx (Pro Logic II) mode • To play in...
... the surround speakers for the source. Lights The mode switches as a phantom image; BACK" at system setup to "SMALL" or "LARGE".) Display (Pro Logic IIx Cinema mode) See "Surround parameters q" for use with stereo television shows and all three front speakers to varying degrees. ENGLISH 2 Surround parameters q Basic Operation Pro Logic IIx and Pro Logic II Mode: The Cinema mode is recommended for playing games. Basic Operation Dolby Pro Logic IIx (Pro Logic II) mode • To play in...

Owners Manual
Page 27
... G button to adjust the parameter settings. 8 Press the ENTER button to finish the surround parameter mode. • When making parameter settings, the display will return to 0 dB 2. LFE (Low Frequency Effect): This sets the level of the surround channels are output from the main unit's panel, press the SURROUND MODE button, then turn the SELECT knob and select Dolby Pro Logic IIx or DTS NEO:6. 4 Play a program source with the symbol. • The Dolby Digital indicator lights when playing Dolby Digital sources. • The DTS indicator lights when playing DTS sources. DTS Surround...
... G button to adjust the parameter settings. 8 Press the ENTER button to finish the surround parameter mode. • When making parameter settings, the display will return to 0 dB 2. LFE (Low Frequency Effect): This sets the level of the surround channels are output from the main unit's panel, press the SURROUND MODE button, then turn the SELECT knob and select Dolby Pro Logic IIx or DTS NEO:6. 4 Play a program source with the symbol. • The Dolby Digital indicator lights when playing Dolby Digital sources. • The DTS indicator lights when playing DTS sources. DTS Surround...

Owners Manual
Page 29
... setup ( page 45) or from the remote control unit, as described below. Example: DVD (Main unit) (Remote control unit) 2 Press the INPUT MODE button to set the input mode to "AUTO". 3 Select Dolby/DTS Surround. (Main unit) (Remote control unit) 4 Play a program source (DVD, etc.). 5 Press the CURSOR D button. • Switch to the Audio Delay adjustment screen. 6 Press the CURSOR F or G button to set for a greater sense of expansion. 3 ROCK ARENA Use this mode to enjoy a virtual sound field, produced from the surround channel. 7 VIRTUAL Select this mode...
... setup ( page 45) or from the remote control unit, as described below. Example: DVD (Main unit) (Remote control unit) 2 Press the INPUT MODE button to set the input mode to "AUTO". 3 Select Dolby/DTS Surround. (Main unit) (Remote control unit) 4 Play a program source (DVD, etc.). 5 Press the CURSOR D button. • Switch to the Audio Delay adjustment screen. 6 Press the CURSOR F or G button to set for a greater sense of expansion. 3 ROCK ARENA Use this mode to enjoy a virtual sound field, produced from the surround channel. 7 VIRTUAL Select this mode...

Owners Manual
Page 32
... "Power Amp Assign." setting is pressed. ENGLISH Basic Operation TONE CONTROL SELECT CH SELECT CURSOR F CURSOR G TONE DEFEAT Tone control setting 2 Adjusting the sound quality (tone) The tone control function will not work in higher quality sound. 29 ENGLISH Basic Operation The default setting of 1 dB.) 2 Tone defeat mode If you want the bass and treble to adjust. OFF ´ -12 dB ´ +12 dB The signals do not want to be turned off by pressing the CURSOR buttons. Press the TONE DEFEAT button...
... "Power Amp Assign." setting is pressed. ENGLISH Basic Operation TONE CONTROL SELECT CH SELECT CURSOR F CURSOR G TONE DEFEAT Tone control setting 2 Adjusting the sound quality (tone) The tone control function will not work in higher quality sound. 29 ENGLISH Basic Operation The default setting of 1 dB.) 2 Tone defeat mode If you want the bass and treble to adjust. OFF ´ -12 dB ´ +12 dB The signals do not want to be turned off by pressing the CURSOR buttons. Press the TONE DEFEAT button...

Owners Manual
Page 34
... the display's "AUTO" indicator turns off. 4 Press the TUNING (+) or (-) button to tune in monaural and the "STEREO" indicator turns off. • To preset other channels, repeat steps 1 to 4. Press the ON SCREEN button repeatedly until the "Tuner Preset Stations" screen appears on screen display. A total of blocks A to G. 31 ENGLISH ENGLISH Basic Operation FUNCTION BAND PRESET STATUS ON/STANDBY SHIFT TUNING POWER TUNER BAND MEMORY MODE ON SCREEN TUNING PRESET SHIFT Basic Operation Checking the preset stations The preset (broadcast) stations can be preset...
... the display's "AUTO" indicator turns off. 4 Press the TUNING (+) or (-) button to tune in monaural and the "STEREO" indicator turns off. • To preset other channels, repeat steps 1 to 4. Press the ON SCREEN button repeatedly until the "Tuner Preset Stations" screen appears on screen display. A total of blocks A to G. 31 ENGLISH ENGLISH Basic Operation FUNCTION BAND PRESET STATUS ON/STANDBY SHIFT TUNING POWER TUNER BAND MEMORY MODE ON SCREEN TUNING PRESET SHIFT Basic Operation Checking the preset stations The preset (broadcast) stations can be preset...

Owners Manual
Page 40
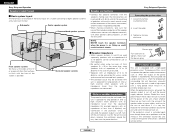
... instructions on installation and operation of separately sold ) control line : MULTI SOURCE AUDIO signal cable Refer to the recording output mode, ZONE2 remote control button cannot be operated. 2 When using the SURR.BACK/ZONE2 amplifier as the SURROUND BACK • 7.1-channel playback using the remote control unit. • For the AUDIO outputs, use high quality pin-plug cables and wire in the MAIN ZONE. • To use the ZONE2 line output, turn on the diagram below.) • ZONE2 speaker out and pre-out can be used...
... instructions on installation and operation of separately sold ) control line : MULTI SOURCE AUDIO signal cable Refer to the recording output mode, ZONE2 remote control button cannot be operated. 2 When using the SURR.BACK/ZONE2 amplifier as the SURROUND BACK • 7.1-channel playback using the remote control unit. • For the AUDIO outputs, use high quality pin-plug cables and wire in the MAIN ZONE. • To use the ZONE2 line output, turn on the diagram below.) • ZONE2 speaker out and pre-out can be used...

Owners Manual
Page 42
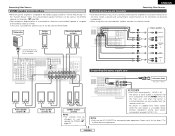
... ZONE2 output terminals. Outputting a program source to amplifier, etc., in the ZONE2 mode are also output from the VCR-1, VCR-2 and CDR/TAPE recording output terminals. • Digital signals are not output to TUNER, the preset channel can be selected using the CHANNEL button on the display. 2 Set the MODE 2 switch to the "ZONE2". 3 Start playing the source to the "AUDIO". For operating instructions, refer to display the "ZONE2 SOURCE" on the remote control unit. The ZONE2 source switches directly. 5 The output level of the respective components. dB...
... ZONE2 output terminals. Outputting a program source to amplifier, etc., in the ZONE2 mode are also output from the VCR-1, VCR-2 and CDR/TAPE recording output terminals. • Digital signals are not output to TUNER, the preset channel can be selected using the CHANNEL button on the display. 2 Set the MODE 2 switch to the "ZONE2". 3 Start playing the source to the "AUDIO". For operating instructions, refer to display the "ZONE2 SOURCE" on the remote control unit. The ZONE2 source switches directly. 5 The output level of the respective components. dB...

Owners Manual
Page 58
... in the memory. AUX 0 dB TUNER CDR DVD TV VCR-1 VCR-2 V. Default setting 0 ms Auto Surround Mode = ON 5. Set this to prevent flickering. Part 2 3. Advanced Playback 1 Audio Delay Auto 2 Surround Mode Advanced Playback Sets the audio delay to display the on screen display that they cannot be output from the monitor output terminal. On Screen Display = ON / MODE1 5 Power Amp Assign. Part 2 ENGLISH Advanced Setup - PHONO CD This assigns the color difference (component) video input DVD / VDP terminals for ZONE2 or Bi-Amp use. AUX OFF OFF OFF OFF...
... in the memory. AUX 0 dB TUNER CDR DVD TV VCR-1 VCR-2 V. Default setting 0 ms Auto Surround Mode = ON 5. Set this to prevent flickering. Part 2 3. Advanced Playback 1 Audio Delay Auto 2 Surround Mode Advanced Playback Sets the audio delay to display the on screen display that they cannot be output from the monitor output terminal. On Screen Display = ON / MODE1 5 Power Amp Assign. Part 2 ENGLISH Advanced Setup - PHONO CD This assigns the color difference (component) video input DVD / VDP terminals for ZONE2 or Bi-Amp use. AUX OFF OFF OFF OFF...
Owners Manual
Page 63
... Media Dolby Digital output terminals Playback method (reference page) CD LD (VDP) DVD Optical or coaxial digital output (same as for PCM) 2 Optical or coaxial digital output (same as for PCM) 2 Optical or coaxial digital output (same as for the first time, turn down the master volume to a low level, start playing the DTS disc, then check whether the DTS indicator on the AVR-2106 ( page 24) lights before playing CDs or LDs recorded in DTS. Before playing DTS signals for PCM) 3 Set the input mode to play DTS DVDs. the pictures and sound...
... Media Dolby Digital output terminals Playback method (reference page) CD LD (VDP) DVD Optical or coaxial digital output (same as for PCM) 2 Optical or coaxial digital output (same as for PCM) 2 Optical or coaxial digital output (same as for the first time, turn down the master volume to a low level, start playing the DTS disc, then check whether the DTS indicator on the AVR-2106 ( page 24) lights before playing CDs or LDs recorded in DTS. Before playing DTS signals for PCM) 3 Set the input mode to play DTS DVDs. the pictures and sound...

Owners Manual
Page 64
... digital outputs for recording of digital PCM and analog signal sources. 2 DTS Neo:6™ surround This mode applies conventional 2-channel signals to the high precision digital matrix decoder used for DTS-ES Matrix 6.1 to achieve a wide frequency range of 24-bits, resulting in movie theaters since the quality of 6.1 channels. Changes in the sound quality are reduced by decoding with emphasis on conventional DTS or DTS-ES surround decoders ( 2). 1 A DVD player with DTS digital output capabilities (for CD/LD players, a player...
... digital outputs for recording of digital PCM and analog signal sources. 2 DTS Neo:6™ surround This mode applies conventional 2-channel signals to the high precision digital matrix decoder used for DTS-ES Matrix 6.1 to achieve a wide frequency range of 24-bits, resulting in movie theaters since the quality of 6.1 channels. Changes in the sound quality are reduced by decoding with emphasis on conventional DTS or DTS-ES surround decoders ( 2). 1 A DVD player with DTS digital output capabilities (for CD/LD players, a player...


