

Literature/Product Sheet
Page 2
... 6.7" (H) x 16.4" (D) Weight 10.9 kg, 24 lbs Front panel with remote control codes from digital sources such as CD. • Front Panel Inputs The AVR-1802's front panel includes 1 set of video, audio and digital (audio) input terminals...AVR-1802 provides 1 digital optical output terminal where you can connect a CD recorder or other digital recording device to make via a dialog format on the fluorescent display on the front panel. s Multi-Function Preset Memory Remote Controller The supplied system remote controller features a large selection of DENON's high-grade A/V amplifiers, the AVR...
... 6.7" (H) x 16.4" (D) Weight 10.9 kg, 24 lbs Front panel with remote control codes from digital sources such as CD. • Front Panel Inputs The AVR-1802's front panel includes 1 set of video, audio and digital (audio) input terminals...AVR-1802 provides 1 digital optical output terminal where you can connect a CD recorder or other digital recording device to make via a dialog format on the fluorescent display on the front panel. s Multi-Function Preset Memory Remote Controller The supplied system remote controller features a large selection of DENON's high-grade A/V amplifiers, the AVR...
Owners Manual
Page 1
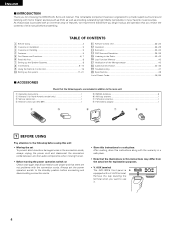
...TITLE 8 3 9 6 SYSTEM 2 7 SURROUND SET UP MENU MASTER CH SELECT VOL SELECT T.TONE STATUS MUTING RETURN DISPLAY CHANNEL TV VOLUME B REMOTE CONTROL UNIT RC-897 FOR ENGLISH READERS PAGE 2 ~ PAGE 48, 94, 95 2 We greatly appreciate your purchase of this unit. 2 To ...future reference should any questions or problems arise. "NO. AV SURROUND RECEIVER AVR-1802/882 OPERATING INSTRUCTIONS MODE D'EMPLOI B PRECISION AUDIO COMPONENT / AV SURROUND RECEIVER AVR-1802 CD PHONO DVD / VDP TUNER VCR-1 TV / DBS REMOTE SENSOR ON / STANDBY AUTO SIGNAL DIGITAL INPUT PCM DTS CDR / TAPE ...
...TITLE 8 3 9 6 SYSTEM 2 7 SURROUND SET UP MENU MASTER CH SELECT VOL SELECT T.TONE STATUS MUTING RETURN DISPLAY CHANNEL TV VOLUME B REMOTE CONTROL UNIT RC-897 FOR ENGLISH READERS PAGE 2 ~ PAGE 48, 94, 95 2 We greatly appreciate your purchase of this unit. 2 To ...future reference should any questions or problems arise. "NO. AV SURROUND RECEIVER AVR-1802/882 OPERATING INSTRUCTIONS MODE D'EMPLOI B PRECISION AUDIO COMPONENT / AV SURROUND RECEIVER AVR-1802 CD PHONO DVD / VDP TUNER VCR-1 TV / DBS REMOTE SENSOR ON / STANDBY AUTO SIGNAL DIGITAL INPUT PCM DTS CDR / TAPE ...
Owners Manual
Page 4
...covering the terminal when you for choosing the DENON A/V Surround receiver. TABLE OF CONTENTS z Before Using 4 x Cautions on Installation 5 c Cautions on Check once again that all connections are not problems with a V. AUX terminal The AVR-1802's front panel is provided with an immense ... that there are proper and that the illustrations in this instructions may differ from the actual set for North America model only 1 e Service station list 1 r Remote control unit (RC-897 1 t R6P/AA batteries 2 y AM loop antenna 1 u FM indoor antenna 1 i FM antenna adaptor 1 r t y u ...
...covering the terminal when you for choosing the DENON A/V Surround receiver. TABLE OF CONTENTS z Before Using 4 x Cautions on Installation 5 c Cautions on Check once again that all connections are not problems with a V. AUX terminal The AVR-1802's front panel is provided with an immense ... that there are proper and that the illustrations in this instructions may differ from the actual set for North America model only 1 e Service station list 1 r Remote control unit (RC-897 1 t R6P/AA batteries 2 y AM loop antenna 1 u FM indoor antenna 1 i FM antenna adaptor 1 r t y u ...

Owners Manual
Page 5
... use with no crosstalk between the top, back and sides of this unit and the wall or other set-up is changed. The remote control command codes for DENON remote controllable AV components as well as laser disc, DVD and specially-encoded music discs. 4. ENGLISH 0.3 ft (10 cm) or more B 0.3 ft (10 cm... for different movie scenes and program sources even with greater precision. 2. Personal Memory Plus function Personal Memory Plus is turned on some AC line voltages. Remote control unit with pre-memory function This unit comes with...
... use with no crosstalk between the top, back and sides of this unit and the wall or other set-up is changed. The remote control command codes for DENON remote controllable AV components as well as laser disc, DVD and specially-encoded music discs. 4. ENGLISH 0.3 ft (10 cm) or more B 0.3 ft (10 cm... for different movie scenes and program sources even with greater precision. 2. Personal Memory Plus function Personal Memory Plus is turned on some AC line voltages. Remote control unit with pre-memory function This unit comes with...

Owners Manual
Page 6
... ( ). #0 @9 @8 @7 @6 @5 @4 @3 @2 @1 @0 !9 !8 !7 !6 B PRECISION AUDIO COMPONENT / AV SURROUND RECEIVER AVR-1802 CD PHONO DVD / VDP TUNER VCR-1 TV / DBS REMOTE SENSOR ON / STANDBY AUTO SIGNAL DIGITAL INPUT PCM DTS CDR / TAPE VCR-2 V. AUX SHIFT DOWN UP PRESET BAND MODE MEMORY DOWN... @3 MEMORY button 40, 42) @4 MODE button 41) @5 BAND button 41) @6 SIGNAL indicators 27) @7 INPUT mode indicators 27) @8 Remote control sensor (REMOTE SENSOR 19) @9 Power operation indicator #0 Input source selector buttons 26, 31, 33) 6 IN button 26, 29) i CINEMA EQ button ...
... ( ). #0 @9 @8 @7 @6 @5 @4 @3 @2 @1 @0 !9 !8 !7 !6 B PRECISION AUDIO COMPONENT / AV SURROUND RECEIVER AVR-1802 CD PHONO DVD / VDP TUNER VCR-1 TV / DBS REMOTE SENSOR ON / STANDBY AUTO SIGNAL DIGITAL INPUT PCM DTS CDR / TAPE VCR-2 V. AUX SHIFT DOWN UP PRESET BAND MODE MEMORY DOWN... @3 MEMORY button 40, 42) @4 MODE button 41) @5 BAND button 41) @6 SIGNAL indicators 27) @7 INPUT mode indicators 27) @8 Remote control sensor (REMOTE SENSOR 19) @9 Power operation indicator #0 Input source selector buttons 26, 31, 33) 6 IN button 26, 29) i CINEMA EQ button ...

Owners Manual
Page 7
...Remote control signal transmitter 16) INPUT MODE button 26, 29) SURROUND MODE button 27, 30, 31, 33, 36) System buttons (TAPE, VCR) buttons 22, 24) VIDEO SELECT button 28) SYSTEM (SYSTEM SET UP) buttons 18) Cursor buttons 17, 32, 36) Test tone button 30) System buttons (TV 24) CD MD/CDR AVR...SKIP+ TITLE 8 3 9 6 SYSTEM 2 7 SURROUND SET UP MENU MASTER CH SELECT VOL SELECT T.TONE STATUS MUTING RETURN DISPLAY CHANNEL TV VOLUME B REMOTE CONTROL UNIT RC-897 Mode selector switch 17, 22, 23) POWER buttons 23, 24, 25) Input source selector buttons 26, 31, 33) Preset ...
...Remote control signal transmitter 16) INPUT MODE button 26, 29) SURROUND MODE button 27, 30, 31, 33, 36) System buttons (TAPE, VCR) buttons 22, 24) VIDEO SELECT button 28) SYSTEM (SYSTEM SET UP) buttons 18) Cursor buttons 17, 32, 36) Test tone button 30) System buttons (TV 24) CD MD/CDR AVR...SKIP+ TITLE 8 3 9 6 SYSTEM 2 7 SURROUND SET UP MENU MASTER CH SELECT VOL SELECT T.TONE STATUS MUTING RETURN DISPLAY CHANNEL TV VOLUME B REMOTE CONTROL UNIT RC-897 Mode selector switch 17, 22, 23) POWER buttons 23, 24, 25) Input source selector buttons 26, 31, 33) Preset ...

Owners Manual
Page 8
Step 2 (page 16) Next, insert the batteries into the remote control unit. Step 3 (page 17 to setup the Speakers and connecting the components. Step 1 (page 8 to 15) Choose the best location to 21) Finally, setting ...
Step 2 (page 16) Next, insert the batteries into the remote control unit. Step 3 (page 17 to setup the Speakers and connecting the components. Step 1 (page 8 to 15) Choose the best location to 21) Finally, setting ...
Owners Manual
Page 9
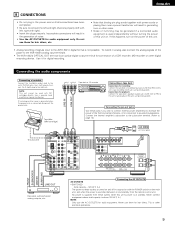
..., also connect the analog signals of the player to powered loudspeakers. Incomplete connections will result in digital format is supplied from the remote control unit. Do not use them for hair driers, etc. • Note that binding pin plug cords together with the POWER... to connect external power amplifier(s) to increase the power of the front and center channels, or for connection to the AVR-1802's analog input terminals. • The AVR-1802's OPTICAL OUT terminal is an optical digital output terminal for connection of a CDR recorder, MD recorder or other electrical appliances...
..., also connect the analog signals of the player to powered loudspeakers. Incomplete connections will result in digital format is supplied from the remote control unit. Do not use them for hair driers, etc. • Note that binding pin plug cords together with the POWER... to connect external power amplifier(s) to increase the power of the front and center channels, or for connection to the AVR-1802's analog input terminals. • The AVR-1802's OPTICAL OUT terminal is an optical digital output terminal for connection of a CDR recorder, MD recorder or other electrical appliances...
Owners Manual
Page 16
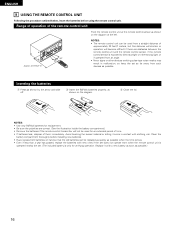
...the illustration inside the battery compartment.) • Remove the batteries if the remote control transmitter will become difficult if there are obstacles between the remote control unit and the remote control sensor, if the remote control sensor is exposed to direct sunlight or other devices emitting pulse-type...or letting it with clothing, etc. e Close the lid. B Approx. 23 feet/7 m 30° 30° B NOTES: • The remote control unit can be used from a straight distance of approximately 23 feet/7 meters, but this distance will shorten or operation will not be replaced as...
...the illustration inside the battery compartment.) • Remove the batteries if the remote control transmitter will become difficult if there are obstacles between the remote control unit and the remote control sensor, if the remote control sensor is exposed to direct sunlight or other devices emitting pulse-type...or letting it with clothing, etc. e Close the lid. B Approx. 23 feet/7 m 30° 30° B NOTES: • The remote control unit can be used from a straight distance of approximately 23 feet/7 meters, but this distance will shorten or operation will not be replaced as...

Owners Manual
Page 18
... all the components are correct, then press the POWER operation switch on the main unit or the POWER button on the remote control unit to turn on the power. (Main unit) (Remote control unit) 2 Press the SYSTEM button to enter the setting. *SYSTEM SET UP NOTE: Please make sure the "AUDIO" position... of the slide switch on the remote control unit. 3 Press the SELECT or (down) button to switch to that point are entered. The changes to the settings made up to the speaker...
... all the components are correct, then press the POWER operation switch on the main unit or the POWER button on the remote control unit to turn on the power. (Main unit) (Remote control unit) 2 Press the SYSTEM button to enter the setting. *SYSTEM SET UP NOTE: Please make sure the "AUDIO" position... of the slide switch on the remote control unit. 3 Press the SELECT or (down) button to switch to that point are entered. The changes to the settings made up to the speaker...
Owners Manual
Page 22
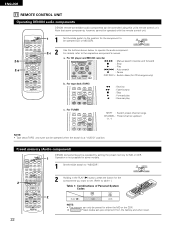
... : Auto search 6 SYSTEM 2 7 SURROUND 3 : Pause DISC SKIP+ : Switch discs (for some components, however, cannot be controlled using this remote control unit. 2-b 2-a CD MD/CDR AVR/AVC ON AUDIO POWER TV VCR VIDEO DVD/VDP PHONO OFF 1 CD DVD/VDP 2 3 V. For TUNER V. AUX VCR-1 VCR-2 TV/DBS ...6 SYSTEM 2 7 SURROUND SET UP MENU MASTER CH SELECT VOL SELECT T.TONE STATUS MUTING RETURN DISPLAY CHANNEL TV VOLUME B REMOTE CONTROL UNIT RC-897 1 2 DENON components can be operated when the switch is at "AUDIO" position. B PLAY (1) MD CDR NOTE: • The ...
... : Auto search 6 SYSTEM 2 7 SURROUND 3 : Pause DISC SKIP+ : Switch discs (for some components, however, cannot be controlled using this remote control unit. 2-b 2-a CD MD/CDR AVR/AVC ON AUDIO POWER TV VCR VIDEO DVD/VDP PHONO OFF 1 CD DVD/VDP 2 3 V. For TUNER V. AUX VCR-1 VCR-2 TV/DBS ...6 SYSTEM 2 7 SURROUND SET UP MENU MASTER CH SELECT VOL SELECT T.TONE STATUS MUTING RETURN DISPLAY CHANNEL TV VOLUME B REMOTE CONTROL UNIT RC-897 1 2 DENON components can be operated when the switch is at "AUDIO" position. B PLAY (1) MD CDR NOTE: • The ...

Owners Manual
Page 23
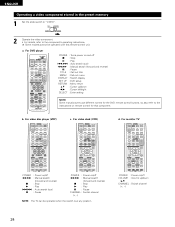
CD MD/CDR AVR/AVC ON AUDIO POWER TV VCR VIDEO DVD/VDP PHONO OFF 1 CD DVD/VDP 2 3 V. AUX VCR-1...B 4 To continue registering other components, repeat steps 2 to set. To avoid accidental operation, cover the remote control unit's transmitting window while setting the preset memory. • Some models and years of manufacture of components...Holding in the SHIFT button. ENGLISH Preset memory (Video component) DENON and other makes of components can be used . • The unit is equipped with several types of remote control codes which depend on pages 94 and 95 for the ...
CD MD/CDR AVR/AVC ON AUDIO POWER TV VCR VIDEO DVD/VDP PHONO OFF 1 CD DVD/VDP 2 3 V. AUX VCR-1...B 4 To continue registering other components, repeat steps 2 to set. To avoid accidental operation, cover the remote control unit's transmitting window while setting the preset memory. • Some models and years of manufacture of components...Holding in the SHIFT button. ENGLISH Preset memory (Video component) DENON and other makes of components can be used . • The unit is equipped with several types of remote control codes which depend on pages 94 and 95 for the ...
Owners Manual
Page 24
...VCR VIDEO DVD/VDP PHONO OFF 1 CD DVD/VDP 2 3 V. For video disc player (VDP) AVR/AVC ON POWER TV VCR DVD/VDP PHONO OFF 1 CD DVD/VDP 2 3 V. For video deck (VCR) AVR/AVC ON POWER TV VCR DVD/VDP OFF PHONO 1 CD DVD/VDP 2 3 V. AUX VCR-1...the instructions on /off 6,7 : Manual search (forward and reverse) 2 : Stop 1 : Play 3 : Pause CHANNEL : Switch channel (+, -) NOTE: The TV can be operated with this remote control unit. a. AUX VCR-1 4 5 VCR-2 TV/DBS 6 7 INPUT MODE CDR / TAPE TUNER 8 9 0 SURROUND MODE TAPE·VCR 6 7 SHIFT 0 3 2 CHANNEL 0...
...VCR VIDEO DVD/VDP PHONO OFF 1 CD DVD/VDP 2 3 V. For video disc player (VDP) AVR/AVC ON POWER TV VCR DVD/VDP PHONO OFF 1 CD DVD/VDP 2 3 V. For video deck (VCR) AVR/AVC ON POWER TV VCR DVD/VDP OFF PHONO 1 CD DVD/VDP 2 3 V. AUX VCR-1...the instructions on /off 6,7 : Manual search (forward and reverse) 2 : Stop 1 : Play 3 : Pause CHANNEL : Switch channel (+, -) NOTE: The TV can be operated with this remote control unit. a. AUX VCR-1 4 5 VCR-2 TV/DBS 6 7 INPUT MODE CDR / TAPE TUNER 8 9 0 SURROUND MODE TAPE·VCR 6 7 SHIFT 0 3 2 CHANNEL 0...

Owners Manual
Page 25
... turns off . 2 Select the front speakers. Press SPEAKER A or B turn on the power (Main unit) (Remote control unit) • ON/STANDBY When the button is pressed, the power turns on the power. 12 OPERATION Before operating B... 1 2 1 CD MD/CDR AVR/AVC ON AUDIO POWER TV VCR VIDEO DVD/VDP OFF PHONO 1 CD DVD/VDP 2 3 V.AUX 4 VCR-1 5 VCR-2...lights after approximately 1 second. Press ON/STANDBY on the main unit or the AVR/AVC on the remote control unit to turn the speaker on and off .
... turns off . 2 Select the front speakers. Press SPEAKER A or B turn on the power (Main unit) (Remote control unit) • ON/STANDBY When the button is pressed, the power turns on the power. 12 OPERATION Before operating B... 1 2 1 CD MD/CDR AVR/AVC ON AUDIO POWER TV VCR VIDEO DVD/VDP OFF PHONO 1 CD DVD/VDP 2 3 V.AUX 4 VCR-1 5 VCR-2...lights after approximately 1 second. Press ON/STANDBY on the main unit or the AVR/AVC on the remote control unit to turn the speaker on and off .

Owners Manual
Page 26
...+ TITLE 8 3 9 6 SYSTEM 2 7 SURROUND SET UP MENU MASTER CH SELECT VOL SELECT T.TONE STATUS MUTING RETURN DISPLAY CHANNEL TV VOLUME B REMOTE CONTROL UNIT RC-897 1 5 Input mode selection function Different input modes can be selected for the different input sources. This mode can be selected for...) • Selecting the AUTO, PCM and DTS modes. IN) mode. (In this mode to play Dolby Digital signals. IN 8 (Remote control unit) 2 3 CD MD/CDR AVR/AVC ON AUDIO POWER TV VCR VIDEO DVD/VDP OFF PHONO 1 CD DVD/VDP 2 3 V. Use this case play the component connected...
...+ TITLE 8 3 9 6 SYSTEM 2 7 SURROUND SET UP MENU MASTER CH SELECT VOL SELECT T.TONE STATUS MUTING RETURN DISPLAY CHANNEL TV VOLUME B REMOTE CONTROL UNIT RC-897 1 5 Input mode selection function Different input modes can be selected for the different input sources. This mode can be selected for...) • Selecting the AUTO, PCM and DTS modes. IN) mode. (In this mode to play Dolby Digital signals. IN 8 (Remote control unit) 2 3 CD MD/CDR AVR/AVC ON AUDIO POWER TV VCR VIDEO DVD/VDP OFF PHONO 1 CD DVD/VDP 2 3 V. Use this case play the component connected...

Owners Manual
Page 27
...adjusted up to 18 dB. (In this case the maximum volume adjustment range is turned on the master volume level display. (Main unit) (Remote control unit) The volume can be decreased to up to "DTS". Input mode display • In the AUTO mode AUTO INPUT PCM DTS ...To select the surround mode while adjusting the surround parameters, channel volume or tone control, press the surround mode button then operate the selector. (Remote control unit) (Main unit) 4 Start playback on the input signal. DIGITAL ANALOG DIGITAL DIGITAL ANALOG Input signal display • DOLBY DIGITAL SIGNAL ...
...adjusted up to 18 dB. (In this case the maximum volume adjustment range is turned on the master volume level display. (Main unit) (Remote control unit) The volume can be decreased to up to "DTS". Input mode display • In the AUTO mode AUTO INPUT PCM DTS ...To select the surround mode while adjusting the surround parameters, channel volume or tone control, press the surround mode button then operate the selector. (Remote control unit) (Main unit) 4 Start playback on the input signal. DIGITAL ANALOG DIGITAL DIGITAL ANALOG Input signal display • DOLBY DIGITAL SIGNAL ...

Owners Manual
Page 28
...B 2 Cautions: • No sound is produced from the headphones when speakers A or B are also displayed on the (Main unit) (Remote control unit) display. The display brightness changes in 3 steps each time the button is pressed, and finally the display turns off. 28 SYSTEM ...source to the component connected to change the brightness of the display. Press MUTING. Press the MUTING button again. STATUS DISPLAY (Main unit) (Remote control unit) 2 Using the dimmer function • Use this to monitor a video source other than the VIDEO SELECT audio source. ENGLISH ...
...B 2 Cautions: • No sound is produced from the headphones when speakers A or B are also displayed on the (Main unit) (Remote control unit) display. The display brightness changes in 3 steps each time the button is pressed, and finally the display turns off. 28 SYSTEM ...source to the component connected to change the brightness of the display. Press MUTING. Press the MUTING button again. STATUS DISPLAY (Main unit) (Remote control unit) 2 Using the dimmer function • Use this to monitor a video source other than the VIDEO SELECT audio source. ENGLISH ...

Owners Manual
Page 29
...IN) setting, press the INPUT MODE (AUTO, PCM, DTS) or ANALOG button to switch to the desired input mode. (See page 26.) 8 (Main unit) (Remote control unit) • When the input mode is connected, then set to the front (left and right), center, surround (left ), and SR (surround right) channels...while listening to sound, select the input source to which the video signal is set this is output to switch the external input. (Main unit) (Remote control unit) Once this mode. Simultaneous recording The signals of the EXT. IN) jacks 1 Set the external input (EXT. In addition, the ...
...IN) setting, press the INPUT MODE (AUTO, PCM, DTS) or ANALOG button to switch to the desired input mode. (See page 26.) 8 (Main unit) (Remote control unit) • When the input mode is connected, then set to the front (left and right), center, surround (left ), and SR (surround right) channels...while listening to sound, select the input source to which the video signal is set this is output to switch the external input. (Main unit) (Remote control unit) Once this mode. Simultaneous recording The signals of the EXT. IN) jacks 1 Set the external input (EXT. In addition, the ...

Owners Manual
Page 30
... the test tones to adjust the playback level from the different speakers. Use the channel volume adjust buttons to adjust. T.TONE RETURN (Remote control unit) • After adjusting using the SELECT (up and down) buttons. 30 2 1 2 VIDEO SELECT CD·MD/...2 7 SURROUND SET UP MENU MASTER CH SELECT VOL SELECT T.TONE STATUS MUTING RETURN DISPLAY CHANNEL TV VOLUME 21 SELECT SURROUND MODE (Main unit) (Remote control unit) 2 Press T. TONE button again. ENGLISH 13 SURROUND Before playing with the surround function • Before playing with the test tones is...
... the test tones to adjust the playback level from the different speakers. Use the channel volume adjust buttons to adjust. T.TONE RETURN (Remote control unit) • After adjusting using the SELECT (up and down) buttons. 30 2 1 2 VIDEO SELECT CD·MD/...2 7 SURROUND SET UP MENU MASTER CH SELECT VOL SELECT T.TONE STATUS MUTING RETURN DISPLAY CHANNEL TV VOLUME 21 SELECT SURROUND MODE (Main unit) (Remote control unit) 2 Press T. TONE button again. ENGLISH 13 SURROUND Before playing with the surround function • Before playing with the test tones is...

Owners Manual
Page 31
... to play is pressed. SURROUND MODE button is connected. SELECT (Main unit) (Remote control unit) MODE PRO LOGIC MODE CINEMA MODE MUSIC SELECT or SELECT or 1 2 4. 6 2, 5, 7 1 2 4, 5, 6, 7 CD MD/CDR AVR/AVC ON AUDIO POWER TV VCR VIDEO DVD/VDP PHONO OFF 1 CD DVD/VDP...8 3 9 2 6 7 SYSTEM SURROUND SET UP MENU MASTER CH SELECT VOL SELECT T.TONE STATUS MUTING RETURN DISPLAY CHANNEL TV VOLUME B REMOTE CONTROL UNIT RC-897 6 Set the surround parameters according to the manuals of the respective components. 4 Select the surround parameter mode. SELECT ...
... to play is pressed. SURROUND MODE button is connected. SELECT (Main unit) (Remote control unit) MODE PRO LOGIC MODE CINEMA MODE MUSIC SELECT or SELECT or 1 2 4. 6 2, 5, 7 1 2 4, 5, 6, 7 CD MD/CDR AVR/AVC ON AUDIO POWER TV VCR VIDEO DVD/VDP PHONO OFF 1 CD DVD/VDP...8 3 9 2 6 7 SYSTEM SURROUND SET UP MENU MASTER CH SELECT VOL SELECT T.TONE STATUS MUTING RETURN DISPLAY CHANNEL TV VOLUME B REMOTE CONTROL UNIT RC-897 6 Set the surround parameters according to the manuals of the respective components. 4 Select the surround parameter mode. SELECT ...


