
Literature/Product Sheet
Page 1
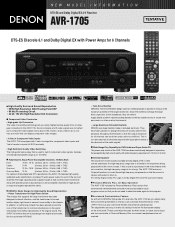
... each source input and surround mode, in turn ensures that you can customize the performance of the AVR-1705 to suit your own home theater and enhance operating ease. s Acclaimed Customization Feature As with all of DENON's high-grade A/V receivers, the AVR-1705 lets you adjust delay times and other musical instruments. • Large Aluminum Extruded Heatsink DENON uses large heatsink made of extruded aluminum. s Wide-Range Play Capability for DVD-Audio and Super Audio...
... each source input and surround mode, in turn ensures that you can customize the performance of the AVR-1705 to suit your own home theater and enhance operating ease. s Acclaimed Customization Feature As with all of DENON's high-grade A/V receivers, the AVR-1705 lets you adjust delay times and other musical instruments. • Large Aluminum Extruded Heatsink DENON uses large heatsink made of extruded aluminum. s Wide-Range Play Capability for DVD-Audio and Super Audio...
Literature/Product Sheet
Page 2
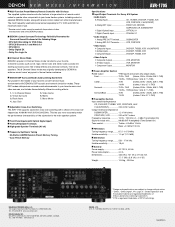
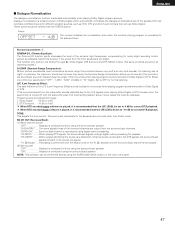
...; Dolby Pro Logic IIx s 6 Channel Stereo Mode DENON's popular 6 Channel Stereo mode transforms your favorite 2-channel sources such as CD, tape, stereo radio and stereo video sources into exciting surround sound, free of delay effects and unnatural artifacts, from other manufacturers. Mono Movie s Adjustable Cross-Over Switching The AVR-1705 supports subwoofer cross-over frequencies: 40/60/80/100/120/150/200/250Hz. The most frequently used buttons are power amp stage values. These DSP modes add spacious surround sound enhancements to enhance music lovers' enjoyment of home theater...
...; Dolby Pro Logic IIx s 6 Channel Stereo Mode DENON's popular 6 Channel Stereo mode transforms your favorite 2-channel sources such as CD, tape, stereo radio and stereo video sources into exciting surround sound, free of delay effects and unnatural artifacts, from other manufacturers. Mono Movie s Adjustable Cross-Over Switching The AVR-1705 supports subwoofer cross-over frequencies: 40/60/80/100/120/150/200/250Hz. The most frequently used buttons are power amp stage values. These DSP modes add spacious surround sound enhancements to enhance music lovers' enjoyment of home theater...
Owners Manual
Page 3
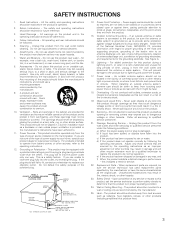
... a distinct change in proper operating condition. 24. If the plug should be walked on the product and in fire, electric shock, or other controls may expose you are covered by the operating instructions as the original part. NATIONAL ELECTRICAL CODE ANTENNA LEAD IN WIRE ANTENNA DISCHARGE UNIT (NEC SECTION 810-20) GROUNDING CONDUCTORS (NEC SECTION 810-21) GROUND CLAMPS POWER SERVICE GROUNDING ELECTRODE...
... a distinct change in proper operating condition. 24. If the plug should be walked on the product and in fire, electric shock, or other controls may expose you are covered by the operating instructions as the original part. NATIONAL ELECTRICAL CODE ANTENNA LEAD IN WIRE ANTENNA DISCHARGE UNIT (NEC SECTION 810-20) GROUNDING CONDUCTORS (NEC SECTION 810-21) GROUND CLAMPS POWER SERVICE GROUNDING ELECTRODE...
Owners Manual
Page 4
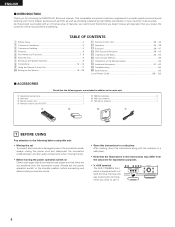
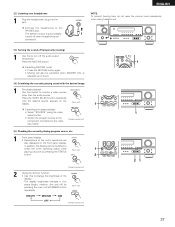
... z Before Using 4 x Cautions on Installation 5 c Cautions on Check once again that all connections are proper and that there are included in addition to the main unit: q Operating instructions 1 w Warranty 1 e Service station list 1 r Remote control unit (RC-977 1 t R6P/AA batteries 2 y AM loop antenna 1 u FM indoor antenna 1 r t y u 1 BEFORE USING Pay attention to use it. 4 Always set for choosing the DENON A/V Surround receiver. AUX terminal The AVR-1705/685's front panel is provided...
... z Before Using 4 x Cautions on Installation 5 c Cautions on Check once again that all connections are proper and that there are included in addition to the main unit: q Operating instructions 1 w Warranty 1 e Service station list 1 r Remote control unit (RC-977 1 t R6P/AA batteries 2 y AM loop antenna 1 u FM indoor antenna 1 r t y u 1 BEFORE USING Pay attention to use it. 4 Always set for choosing the DENON A/V Surround receiver. AUX terminal The AVR-1705/685's front panel is provided...
Owners Manual
Page 5
... volume is still connected on or input function, surround mode or any other electronic equipment using microprocessors is changed. Always wait until the muting circuit turns off ) when you leave home for several seconds after the muting circuit stops functioning. Please be produced if the input function is switched when nothing is connected to turn down the MASTER VOLUME control or connect components to occur particularly when using outdoor antennas and 75 Ω/ohms coaxial cables...
... volume is still connected on or input function, surround mode or any other electronic equipment using microprocessors is changed. Always wait until the muting circuit turns off ) when you leave home for several seconds after the muting circuit stops functioning. Please be produced if the input function is switched when nothing is connected to turn down the MASTER VOLUME control or connect components to occur particularly when using outdoor antennas and 75 Ω/ohms coaxial cables...
Owners Manual
Page 6
... component video (Y, PB/CB, PR/CR) inputs, and one set of cables offering a higher quality connection, regardless of wide-range, high fidelity surround sound, from sources such as laser disc, DVD and specially-encoded music discs. 5. Component Video Switching In addition to the monitor (TV) with 2-channel audio sources. 3. IN jacks This unit is the default digital audio delivery system for playing games. The mode can only be selected according to 5.1 channels of how the player and the AVR-1705/685's video input jacks are connected. 8. DTS (Digital Theater...
... component video (Y, PB/CB, PR/CR) inputs, and one set of cables offering a higher quality connection, regardless of wide-range, high fidelity surround sound, from sources such as laser disc, DVD and specially-encoded music discs. 5. Component Video Switching In addition to the monitor (TV) with 2-channel audio sources. 3. IN jacks This unit is the default digital audio delivery system for playing games. The mode can only be selected according to 5.1 channels of how the player and the AVR-1705/685's video input jacks are connected. 8. DTS (Digital Theater...
Owners Manual
Page 10
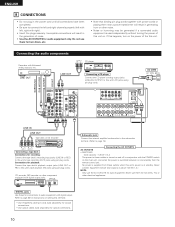
... 60Hz SURROUND SUB WOOFER CENTER FRONT R L L R RL RL LINE IN LINE OUT R LR L Tape deck or CD recorder R LRL INPUT OUTPUT Connecting a tape deck Connections for hair driers, TVs or other electrical appliances. No power is at standby. LINE OUT LINE OUT RL OUTPUT RL CD player RL DIGITAL AUDIO Connecting a CD player Connect the CD player's analog output jacks (ANALOG OUTPUT) to page 26 for audio equipment. DIGITAL jacks Use these outlets when this unit's CD jacks using pin plug cords. OPTICAL B OUTPUT INPUT Subwoofer jack Connect the internal amplifier's subwoofer...
... 60Hz SURROUND SUB WOOFER CENTER FRONT R L L R RL RL LINE IN LINE OUT R LR L Tape deck or CD recorder R LRL INPUT OUTPUT Connecting a tape deck Connections for hair driers, TVs or other electrical appliances. No power is at standby. LINE OUT LINE OUT RL OUTPUT RL CD player RL DIGITAL AUDIO Connecting a CD player Connect the CD player's analog output jacks (ANALOG OUTPUT) to page 26 for audio equipment. DIGITAL jacks Use these outlets when this unit's CD jacks using pin plug cords. OPTICAL B OUTPUT INPUT Subwoofer jack Connect the internal amplifier's subwoofer...
Owners Manual
Page 11
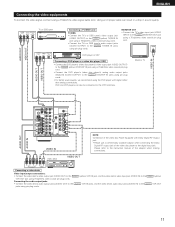
...ohms video coaxial pin plug cord. • Connect the TV's or DBS tuner's audio output jacks (AUDIO OUTPUT) to the VIDEO (yellow) VCR OUT jack using a 75 Ω/ohms video signal cable cord. VIDEO IN AUDIO VIDEO DIGITAL B OUT OUT R L OUT OPTICAL DVD player or VDP VIDEO IN RL Connecting a DVD player or a video disc player (VDP) • Connect the DVD player's (video disc player's) video output jack (VIDEO OUTPUT) to the VIDEO (yellow) DVD/VDP IN jack using a 75 Ω/ohms video coaxial pin plug cord. • Connect the DVD player's (video disc player's) analog audio output jacks...
...ohms video coaxial pin plug cord. • Connect the TV's or DBS tuner's audio output jacks (AUDIO OUTPUT) to the VIDEO (yellow) VCR OUT jack using a 75 Ω/ohms video signal cable cord. VIDEO IN AUDIO VIDEO DIGITAL B OUT OUT R L OUT OPTICAL DVD player or VDP VIDEO IN RL Connecting a DVD player or a video disc player (VDP) • Connect the DVD player's (video disc player's) video output jack (VIDEO OUTPUT) to the VIDEO (yellow) DVD/VDP IN jack using a 75 Ω/ohms video coaxial pin plug cord. • Connect the DVD player's (video disc player's) analog audio output jacks...
Owners Manual
Page 13
If this unit's internal signals. (Color Diffrence Video jack) (Color Diffrence Video jack) MONITOR OUT jacks The AVR-1705/685 is not possible, so when not using the component video monitor output terminal connect the player using 75 Ω/ohms coaxial video pin-plug cords. • In the same way, another video source with Color Difference (Component - ENGLISH Connecting the Video Component Equipped with component video outputs such as a TV/DBS tuner, etc., can be indicated differently on some TVs, monitors or video components ("CR, CB...
If this unit's internal signals. (Color Diffrence Video jack) (Color Diffrence Video jack) MONITOR OUT jacks The AVR-1705/685 is not possible, so when not using the component video monitor output terminal connect the player using 75 Ω/ohms coaxial video pin-plug cords. • In the same way, another video source with Color Difference (Component - ENGLISH Connecting the Video Component Equipped with component video outputs such as a TV/DBS tuner, etc., can be indicated differently on some TVs, monitors or video components ("CR, CB...
Owners Manual
Page 18
... to switch the display. This assigns the digital input jacks for playing deep bass signals. AUTO Auto Surround Mode Auto surround mode function setting. ENGLISH 10 SETTING UP THE SYSTEM • Once all connections with which the bass sound of the various speakers is to be output from the speakers and subwoofer according to the listening position. CURSOR buttons (•, ª, 0, 1) Press this button to complete the setting. • System setup items and default values (set upon shipment from the factory) Speaker Configuration Delay Time System setup Input...
... to switch the display. This assigns the digital input jacks for playing deep bass signals. AUTO Auto Surround Mode Auto surround mode function setting. ENGLISH 10 SETTING UP THE SYSTEM • Once all connections with which the bass sound of the various speakers is to be output from the speakers and subwoofer according to the listening position. CURSOR buttons (•, ª, 0, 1) Press this button to complete the setting. • System setup items and default values (set upon shipment from the factory) Speaker Configuration Delay Time System setup Input...
Owners Manual
Page 23
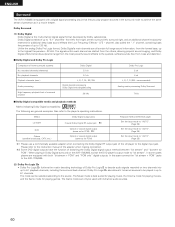
... volume of the room, interference may improve frequency response for the subwoofer in the setup. If "SMALL" is set for the front speakers or "NO" is set for the subwoofer, the subwoofer mode setting does not affect playback of channels set the frequency (Hz) below the crossover frequency is cut, and the cut bass sound is selected, the low frequency signal range of channels set to "LARGE" are LFE signals (during playback of Dolby Digital or DTS signals) and the low frequency signal range of low frequency signal range...
... volume of the room, interference may improve frequency response for the subwoofer in the setup. If "SMALL" is set for the front speakers or "NO" is set for the subwoofer, the subwoofer mode setting does not affect playback of channels set the frequency (Hz) below the crossover frequency is cut, and the cut bass sound is selected, the low frequency signal range of channels set to "LARGE" are LFE signals (during playback of Dolby Digital or DTS signals) and the low frequency signal range of low frequency signal range...
Owners Manual
Page 35
... PCM signals. Use this mode, the types of a DTS-CD or DTS-LD. 35 r ANALOG (exclusive analog audio signal playback mode) The signals input to the analog input jacks are played without passing through the surround circuitry. Select the AUTO or DTS (exclusive DTS signal playback) mode when playing signals recorded in the this mode to play Dolby Digital signals. Notes on the remote control unit) to switch the external input. (Main unit) (Remote control unit) • Selecting the AUTO, PCM and DTS modes The mode switches as shown below each time the INPUT MODE button is selected...
... PCM signals. Use this mode, the types of a DTS-CD or DTS-LD. 35 r ANALOG (exclusive analog audio signal playback mode) The signals input to the analog input jacks are played without passing through the surround circuitry. Select the AUTO or DTS (exclusive DTS signal playback) mode when playing signals recorded in the this mode to play Dolby Digital signals. Notes on the remote control unit) to switch the external input. (Main unit) (Remote control unit) • Selecting the AUTO, PCM and DTS modes The mode switches as shown below each time the INPUT MODE button is selected...

Owners Manual
Page 36
... channel level is set as follows each time the TONE CONTROL button is displayed on the tone defeat mode. BASS TREBLE (Main unit) 2 With the name of the volume to be adjusted selected, turn the SELECT knob. NOTE: • The DIGITAL indicator will light when playing CD-ROMs containing data other than audio signals, but no sound will be output if DTS-compatible CDs or LDs are being input properly. The volume level is pressed. Input mode display • In the AUTO mode AUTO INPUT PCM DTS...
... channel level is set as follows each time the TONE CONTROL button is displayed on the tone defeat mode. BASS TREBLE (Main unit) 2 With the name of the volume to be adjusted selected, turn the SELECT knob. NOTE: • The DIGITAL indicator will light when playing CD-ROMs containing data other than audio signals, but no sound will be output if DTS-compatible CDs or LDs are being input properly. The volume level is pressed. Input mode display • In the AUTO mode AUTO INPUT PCM DTS...
Owners Manual
Page 37
... button. 2 (Remote control unit) 2 Using the dimmer function • Use this to change the brightness of the unit's operations are connected. The display brightness changes in four steps (bright, medium, dim and off the audio output temporarily. [2] Listening over headphones 1 Plug the headphones' plug into the jack. PHONES ENGLISH NOTE: To prevent hearing loss, do not raise the volume level excessively when using the video select button. • Switch the program source to the component connected to monitor a video source...
... button. 2 (Remote control unit) 2 Using the dimmer function • Use this to change the brightness of the unit's operations are connected. The display brightness changes in four steps (bright, medium, dim and off the audio output temporarily. [2] Listening over headphones 1 Plug the headphones' plug into the jack. PHONES ENGLISH NOTE: To prevent hearing loss, do not raise the volume level excessively when using the video select button. • Switch the program source to the component connected to monitor a video source...

Owners Manual
Page 44
... surround signals output from all programs encoded in Dolby Surround. • The Music mode is recommended as the standard mode for auto sound music systems (no video), and is optional for A/V systems. • The Pro Logic mode offers the same robust surround processing as a phantom image; The front channel (FL and FR) signals bypass the decoder and are played directly so there is assigned mainly to the center channel (C) and the reversed phase component...
... surround signals output from all programs encoded in Dolby Surround. • The Music mode is recommended as the standard mode for auto sound music systems (no video), and is optional for A/V systems. • The Pro Logic mode offers the same robust surround processing as a phantom image; The front channel (FL and FR) signals bypass the decoder and are played directly so there is assigned mainly to the center channel (C) and the reversed phase component...
Owners Manual
Page 47
... SURROUND BACK button on the main unit's panel. 47 Surround parameters w CINEMA EQ. (Cinema Equalizer): The Cinema EQ function gently decreases the level of the LFE (Low Frequency Effect) sounds included in the source when playing program sources recorded in the soundtrack (but with the STATUS button. This can be set for all of the surround channels are set to 0 dB for overly-bright sounding motion picture soundtracks. Program source and adjustment range: 1. Dolby Digital: -10 dB to hear all operating modes...
... SURROUND BACK button on the main unit's panel. 47 Surround parameters w CINEMA EQ. (Cinema Equalizer): The Cinema EQ function gently decreases the level of the LFE (Low Frequency Effect) sounds included in the source when playing program sources recorded in the soundtrack (but with the STATUS button. This can be set for all of the surround channels are set to 0 dB for overly-bright sounding motion picture soundtracks. Program source and adjustment range: 1. Dolby Digital: -10 dB to hear all operating modes...
Owners Manual
Page 54
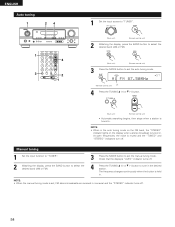
..., the "STEREO" indicator lights on the display when a stereo broadcast is held in . Manual tuning 1 Set the input function to "TUNER". 3 Press the MODE button to set the auto tuning mode. (Remote control unit) Lit 4 Press the TUNING • (+) or ª (-) button. (Main unit) (Remote control unit) • Automatic searching begins, then stops when a station is tuned in the desired station. ENGLISH Auto tuning 1 24 1 4 3 2 1 Set the input source to "TUNER". (Main unit) (Remote control unit) 2 Watching the display, press the BAND button to select the...
..., the "STEREO" indicator lights on the display when a stereo broadcast is held in . Manual tuning 1 Set the input function to "TUNER". 3 Press the MODE button to set the auto tuning mode. (Remote control unit) Lit 4 Press the TUNING • (+) or ª (-) button. (Main unit) (Remote control unit) • Automatic searching begins, then stops when a station is tuned in the desired station. ENGLISH Auto tuning 1 24 1 4 3 2 1 Set the input source to "TUNER". (Main unit) (Remote control unit) 2 Watching the display, press the BAND button to select the...
Owners Manual
Page 60
... Dolby Pro Logic II to decode audio signals recorded on the AVR-1705/685, switch the DVD player's output mode to the digital input jack. When playing in a movie theater. Dolby Digital consists of the LD player to "bit stream". The following are equipped with 2-channel audio sources. 60 The signals within each channel are distinct from the others, allowing pinpoint sound imaging, and Dolby Digital offers tremendous dynamic range from the most powerful sound effects to the quietest, softest sounds, free...
... Dolby Pro Logic II to decode audio signals recorded on the AVR-1705/685, switch the DVD player's output mode to the digital input jack. When playing in a movie theater. Dolby Digital consists of the LD player to "bit stream". The following are equipped with 2-channel audio sources. 60 The signals within each channel are distinct from the others, allowing pinpoint sound imaging, and Dolby Digital offers tremendous dynamic range from the most powerful sound effects to the quietest, softest sounds, free...
Owners Manual
Page 62
... first time, turn down -mixed to the SL and SR channels, so none of the surround signals output from the CD or LD player's analog outputs. Before playing DTS signals for all 6.1 channels (including the SB channel) are output as PCM signals. consult the player's owner's manual for information on selecting the surround mode, see page 36) lights before turning up the master volume. 3 A DVD player with DTS-compatible digital output is required to achieve the same atmosphere with 2-channel sources as with 6.1-channel sources. Decoding...
... first time, turn down -mixed to the SL and SR channels, so none of the surround signals output from the CD or LD player's analog outputs. Before playing DTS signals for all 6.1 channels (including the SB channel) are output as PCM signals. consult the player's owner's manual for information on selecting the surround mode, see page 36) lights before turning up the master volume. 3 A DVD player with DTS-compatible digital output is required to achieve the same atmosphere with 2-channel sources as with 6.1-channel sources. Decoding...

Owners Manual
Page 64
... lit and sound not produced when power switch set to on . • Digital signals not input Digital input selected. • Connect securely. • Set to a suitable position. • Turn volume up to suitable level. • Switch off MUTING. • Input digital signals or select input jacks to which digital signals are being played from the subwoofer channel is LFE only (only when playing Dolby Digital or DTS signals) for initial factory settings (i.e., the setting of the front speaker is "LARGE" and the setting of the audio function button. • Volume control set 's power, then...
... lit and sound not produced when power switch set to on . • Digital signals not input Digital input selected. • Connect securely. • Set to a suitable position. • Turn volume up to suitable level. • Switch off MUTING. • Input digital signals or select input jacks to which digital signals are being played from the subwoofer channel is LFE only (only when playing Dolby Digital or DTS signals) for initial factory settings (i.e., the setting of the front speaker is "LARGE" and the setting of the audio function button. • Volume control set 's power, then...


