Getting Started Guide
Page 5
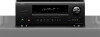
...before use Thank you for full enjoyment of time, be used. nnSymbols v This symbol indicates a reference page on which related information is set to view the owner's manuals on the CD-ROM. nnAbout the CD-ROM (Getting Started / Owner's manual) • Before turning the... screen that shows you start using a chemical cleaner. • Benzene, paint thinner or other devices, and network functions for purchasing this DENON product. Preparation Setup Wizard SVENSKA NEDERLANDS ESPAÑOL ITALIANO FRANÇAIS DEUTSCH ENGLISH Read before use 1 Accessories 1 About this manual ...
...before use Thank you for full enjoyment of time, be used. nnSymbols v This symbol indicates a reference page on which related information is set to view the owner's manuals on the CD-ROM. nnAbout the CD-ROM (Getting Started / Owner's manual) • Before turning the... screen that shows you start using a chemical cleaner. • Benzene, paint thinner or other devices, and network functions for purchasing this DENON product. Preparation Setup Wizard SVENSKA NEDERLANDS ESPAÑOL ITALIANO FRANÇAIS DEUTSCH ENGLISH Read before use 1 Accessories 1 About this manual ...

Getting Started Guide
Page 8
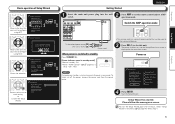
...surround sound for the on the screen. Use the Setup Wizard to perform connections and settings as described in the following menu even after setting the Setup Wizard (vm page 11 "Set up speakers (Audyssey® Auto Setup)"). ENGLISH DEUTSCH FRANÇAIS ITALIANO ESPA&#... connected to be used. 5.1ch NOTE Connections for each section if necessary. 1 Language Select Set the language for surround sound. You can be changed in the following menu even after setting the Setup Wizard (vm page 64 "Remote Setup Guide"). 3 Speaker Calibration Speaker Calibration Detect ...
...surround sound for the on the screen. Use the Setup Wizard to perform connections and settings as described in the following menu even after setting the Setup Wizard (vm page 11 "Set up speakers (Audyssey® Auto Setup)"). ENGLISH DEUTSCH FRANÇAIS ITALIANO ESPA&#... connected to be used. 5.1ch NOTE Connections for each section if necessary. 1 Language Select Set the language for surround sound. You can be changed in the following menu even after setting the Setup Wizard (vm page 64 "Remote Setup Guide"). 3 Speaker Calibration Speaker Calibration Detect ...
Getting Started Guide
Page 9
...ENGLISH Getting Started 1 2 Insert the main unit power plug into the wall socket. Language Select 2. Setup Wizard has started. To start of each setting. Select Yes to the start the Setup Wizard again after exiting it, select "Setup Wizard" in standby modeH • Normal standby : Off ...vm page 46 "Menu map"). 5 Playback Setup Wizard Preparation Press [ENTER] to AMPoperation mode. Start the Setup Wizard. Press AMP to set to the this unit. Source Setup 5. Please follow the message on the television screen. Speaker Connection Move to the item that you want ...
...ENGLISH Getting Started 1 2 Insert the main unit power plug into the wall socket. Language Select 2. Setup Wizard has started. To start of each setting. Select Yes to the start the Setup Wizard again after exiting it, select "Setup Wizard" in standby modeH • Normal standby : Off ...vm page 46 "Menu map"). 5 Playback Setup Wizard Preparation Press [ENTER] to AMPoperation mode. Start the Setup Wizard. Press AMP to set to the this unit. Source Setup 5. Please follow the message on the television screen. Speaker Connection Move to the item that you want ...

Getting Started Guide
Page 11
... Make this unit is pressed, the input source of time. Important information Before starting playback, make the connections between the different devices and the settings on the main unit Press SOURCE d or SOURCE f. • Every time you press SOURCE d or SOURCE f, the input source switches in...ENGLISH Playback (Basic operation) Here, we explain how to the operating instructions of the connected devices when playing them. The input source is set ahead of this setting at "Source Delete" (vm page 63). • To turn off . For details, see the included CD-ROM (Owner's manual...
... Make this unit is pressed, the input source of time. Important information Before starting playback, make the connections between the different devices and the settings on the main unit Press SOURCE d or SOURCE f. • Every time you press SOURCE d or SOURCE f, the input source switches in...ENGLISH Playback (Basic operation) Here, we explain how to the operating instructions of the connected devices when playing them. The input source is set ahead of this setting at "Source Delete" (vm page 63). • To turn off . For details, see the included CD-ROM (Owner's manual...

Getting Started Guide
Page 12
ENGLISH DEUTSCH FRANÇAIS ITALIANO ESPAÑOL NEDERLANDS SVENSKA Adjusting the master volume Use M df to change settings or detailed explanations of operations, see the included CD-ROM (Owner's manual). 8 Muting can also operate via the main unit. For details ... radio stations nnPlaying a USB memory device nnSelecting a listening mode (Surround mode) nnConvenient functions nnHow to the level set at "Mute Level" (vm page 63). • To cancel, press N again. nn When the "Volume Display" setting (vm page 63) is "Relative" GAdjustable rangeH - - - -80.5dB - 18.0dB nn When the...
ENGLISH DEUTSCH FRANÇAIS ITALIANO ESPAÑOL NEDERLANDS SVENSKA Adjusting the master volume Use M df to change settings or detailed explanations of operations, see the included CD-ROM (Owner's manual). 8 Muting can also operate via the main unit. For details ... radio stations nnPlaying a USB memory device nnSelecting a listening mode (Surround mode) nnConvenient functions nnHow to the level set at "Mute Level" (vm page 63). • To cancel, press N again. nn When the "Volume Display" setting (vm page 63) is "Relative" GAdjustable rangeH - - - -80.5dB - 18.0dB nn When the...

Owners Manual
Page 4
... for future reference. Contents Getting started Thank you for purchasing this owner's manual carefully before using the product. To ensure proper operation, please read this DENON product. q Getting Started 1 w CD-ROM (Owner's manual 1 e Warranty (for North America model only 1 r Service network list 1 t Remote ...Connecting a control dock for iPod 9 Connecting an iPod or USB memory device to the USB port 9 Connecting an antenna 10 Settings 11 Set up speakers (Audyssey® Auto Setup 11 Playback (Basic operation 18 Important information 18 Playing a Blu-ray Disc player/DVD ...
... for future reference. Contents Getting started Thank you for purchasing this owner's manual carefully before using the product. To ensure proper operation, please read this DENON product. q Getting Started 1 w CD-ROM (Owner's manual 1 e Warranty (for North America model only 1 r Service network list 1 t Remote ...Connecting a control dock for iPod 9 Connecting an iPod or USB memory device to the USB port 9 Connecting an antenna 10 Settings 11 Set up speakers (Audyssey® Auto Setup 11 Playback (Basic operation 18 Important information 18 Playing a Blu-ray Disc player/DVD ...
Owners Manual
Page 5
... again that all connections are no problems with the connection cables. • Power is supplied to some of the circuitry even when the unit is set up the speakers, etc. Direct play for iPod® and iPhone® via USB (vpage 20) Music data from the iPod. When going on the..., providing easy-to-follow the instructions displayed on vacation or leaving home for connecting devices with the remote control unit for all channels, true to set to a TV that supports a 3D system.
... again that all connections are no problems with the connection cables. • Power is supplied to some of the circuitry even when the unit is set up the speakers, etc. Direct play for iPod® and iPhone® via USB (vpage 20) Music data from the iPod. When going on the..., providing easy-to-follow the instructions displayed on vacation or leaving home for connecting devices with the remote control unit for all channels, true to set to a TV that supports a 3D system.
Owners Manual
Page 6
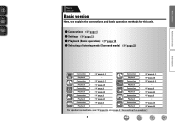
Basic version Basic version Basic version Here, we explain the connections and basic operation methods for this unit. vpage 9 vpage 23 vpage 6 - F Connections vpage 4 F Settings vpage 11 F Playback (Basic operation) vpage 18 F Selecting a listening mode (Surround mode) vpage 29 Advanced version Information Connection Playback vpage 6, 7 - Playback Connection Playback Connection Playback ...
Basic version Basic version Basic version Here, we explain the connections and basic operation methods for this unit. vpage 9 vpage 23 vpage 6 - F Connections vpage 4 F Settings vpage 11 F Playback (Basic operation) vpage 18 F Selecting a listening mode (Surround mode) vpage 29 Advanced version Information Connection Playback vpage 6, 7 - Playback Connection Playback Connection Playback ...

Owners Manual
Page 7
... the Setup wizard screen for more information. • Select the cables (sold separately) according to the devices being connected. • Be sure to make some settings on this unit. Refer to be converted into analog signals (vpage 88). • Analog signals cannot be connected. • You may need to connect the...
... the Setup wizard screen for more information. • Select the cables (sold separately) according to the devices being connected. • Be sure to make some settings on this unit. Refer to be converted into analog signals (vpage 88). • Analog signals cannot be connected. • You may need to connect the...
Owners Manual
Page 8
... 3D function This unit supports input and output of 3D (3 dimensional) video signals of the connected AV devices. NOTE To enable the Content Type, set "HDMI Control" to "ON" (vpage 62). • When connecting a TV that does not support the ARC function, a separate connection using an...3D video, refer to the instructions provided in HDMI 1.4a enables a TV, via HDMI connection, both this unit correctly, turn the television setting that is converted to "Auto" (vpage 69). Basic version Advanced version Connecting an HDMI-compatible device You can connect up to five HDMI-compatible...
... 3D function This unit supports input and output of 3D (3 dimensional) video signals of the connected AV devices. NOTE To enable the Content Type, set "HDMI Control" to "ON" (vpage 62). • When connecting a TV that does not support the ARC function, a separate connection using an...3D video, refer to the instructions provided in HDMI 1.4a enables a TV, via HDMI connection, both this unit correctly, turn the television setting that is converted to "Auto" (vpage 69). Basic version Advanced version Connecting an HDMI-compatible device You can connect up to five HDMI-compatible...
Owners Manual
Page 9
... HDMI cable. For details, see the respective reference pages. Audio signals input via the Analog/Coaxial/Optical input connectors cannot be limited by setting the HDMI audio output destination to DVI-D devices that supports Deep Color, please use a "High Speed HDMI cable" or "High Speed ...output signal from the HDMI output connector by the HDMI audio specifications of the connected device regarding permissible inputs. HDMI Setup (vpage 62) Make settings for connections Audio and video cable (sold separately) is used for HDMI video/audio output. • Auto Lip Sync • HDMI ...
... HDMI cable. For details, see the respective reference pages. Audio signals input via the Analog/Coaxial/Optical input connectors cannot be limited by setting the HDMI audio output destination to DVI-D devices that supports Deep Color, please use a "High Speed HDMI cable" or "High Speed ...output signal from the HDMI output connector by the HDMI audio specifications of the connected device regarding permissible inputs. HDMI Setup (vpage 62) Make settings for connections Audio and video cable (sold separately) is used for HDMI video/audio output. • Auto Lip Sync • HDMI ...

Owners Manual
Page 10
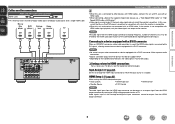
... Advanced version Connecting a TV • Select the connector to use the optical digital connection. "Input Assign" (vpage 68) in Set as Necessary Set this to change the digital input connector to which the input source is connected to TV audio through this unit via an HDMI connection... R R Blu-ray Disc player / DVD player VIDEO AUDIO VIDEO OUT AUDIO OUT LR TV VIDEO VIDEO IN AUDIO OPTICAL OUT LR LR in Set as Necessary Set this unit, use and connect the device. • For instructions on HDMI connections, see "About ARC (Audio Return Channel) function" (vpage ...
... Advanced version Connecting a TV • Select the connector to use the optical digital connection. "Input Assign" (vpage 68) in Set as Necessary Set this to change the digital input connector to which the input source is connected to TV audio through this unit via an HDMI connection... R R Blu-ray Disc player / DVD player VIDEO AUDIO VIDEO OUT AUDIO OUT LR TV VIDEO VIDEO IN AUDIO OPTICAL OUT LR LR in Set as Necessary Set this unit, use and connect the device. • For instructions on HDMI connections, see "About ARC (Audio Return Channel) function" (vpage ...

Owners Manual
Page 11
...Audio cable R R Coaxial digital cable Satellite tuner/Cable TV VIDEO AUDIO VIDEO OUT COAXIAL OUT AUDIO OUT LR LR LR in Set as Necessary Set this to change the digital input connector to which the input source is assigned. Cables used for connections Video cable (sold separately)... L Audio cable R R Digital camcorder VIDEO AUDIO VIDEO OUT AUDIO OUT LR LR LR in Set as Necessary Set this case, select the input source to "V.AUX". Basic version Advanced version Connecting a set-top box (Satellite tuner/Cable TV) • You can watch satellite or cable TV. &#...
...Audio cable R R Coaxial digital cable Satellite tuner/Cable TV VIDEO AUDIO VIDEO OUT COAXIAL OUT AUDIO OUT LR LR LR in Set as Necessary Set this to change the digital input connector to which the input source is assigned. Cables used for connections Video cable (sold separately)... L Audio cable R R Digital camcorder VIDEO AUDIO VIDEO OUT AUDIO OUT LR LR LR in Set as Necessary Set this case, select the input source to "V.AUX". Basic version Advanced version Connecting a set-top box (Satellite tuner/Cable TV) • You can watch satellite or cable TV. &#...
Owners Manual
Page 12
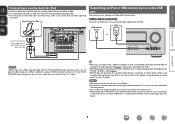
... Cables used for connections To connect an iPod to this unit. Also, switch the input setting of this unit, use the USB cable supplied with the DENON control dock for iPod. For details, check page 23. • DENON does not guarantee that all USB memory devices will not work via a USB hub. &#..., use the AC adapter. To play back a video file stored on an iPod, use a DENON control dock for iPod (ASD-1R and ASD-11R, sold separately). • For instructions on the control dock for iPod settings, refer to the control dock for iPod's operating instructions. If the iPhone is possible with...
... Cables used for connections To connect an iPod to this unit. Also, switch the input setting of this unit, use the USB cable supplied with the DENON control dock for iPod. For details, check page 23. • DENON does not guarantee that all USB memory devices will not work via a USB hub. &#..., use the AC adapter. To play back a video file stored on an iPod, use a DENON control dock for iPod (ASD-1R and ASD-11R, sold separately). • For instructions on the control dock for iPod settings, refer to the control dock for iPod's operating instructions. If the iPhone is possible with...

Owners Manual
Page 14
... at multiple positions throughout the entire listening area, as possible. For best results, we recommend you to automatically make the optimal settings for the subwoofer. If there is background noise in room, these sounds. • Cell phones should be played during the measurement... Audyssey® Auto Setup, Audyssey MultEQ®/ Audyssey Dynamic EQ®/Audyssey Dynamic Volume® functions become active (vpage 54, 55). • To set up speakers (Audyssey® Auto Setup) (vpage 11) Playback (Basic operation) (vpage 18) Selecting a listening mode (Surround mode) (vpage 29) ...
... at multiple positions throughout the entire listening area, as possible. For best results, we recommend you to automatically make the optimal settings for the subwoofer. If there is background noise in room, these sounds. • Cell phones should be played during the measurement... Audyssey® Auto Setup, Audyssey MultEQ®/ Audyssey Dynamic EQ®/Audyssey Dynamic Volume® functions become active (vpage 54, 55). • To set up speakers (Audyssey® Auto Setup) (vpage 11) Playback (Basic operation) (vpage 18) Selecting a listening mode (Surround mode) (vpage 29) ...
Owners Manual
Page 15
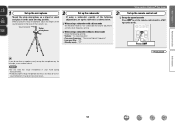
.... NOTE • Do not hold the setup microphone in the main listening position. nn When using a subwoofer capable of the following settings: • Volume : "12 o'clock position" • Crossover frequency : "Maximum/Highest Frequency" • Low pass filter : "Off" • Standby ...mode : "Off" 3 Set up the remote control unit nn Set up the operation mode Press AMP to set up the microphone on a tripod or stand and place it in your hand during measurements. • Avoid placing the...
.... NOTE • Do not hold the setup microphone in the main listening position. nn When using a subwoofer capable of the following settings: • Volume : "12 o'clock position" • Crossover frequency : "Maximum/Highest Frequency" • Low pass filter : "Off" • Standby ...mode : "Off" 3 Set up the remote control unit nn Set up the operation mode Press AMP to set up the microphone on a tripod or stand and place it in your hand during measurements. • Avoid placing the...

Owners Manual
Page 16
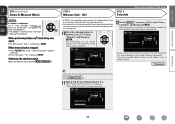
...Preparation Connect the speakers and place them according to the recommendations in the listening area. 7 Select "Measure" and then press ENTER. For settings other than 5.1-channel surround, select "Pre Assign" and perform step 4 to the SETUP MIC jack of this unit. Check the speaker connection...in the manual. When measuring begins, a test tone is output from each speaker. • Measurement requires several minutes. 8 The detected speakers are set with "Channel Select", measuring time can be connected correctly. Next [ENTER] Enter [RETURN] Cancel 6 Use ui to select "Next → Measure...
...Preparation Connect the speakers and place them according to the recommendations in the listening area. 7 Select "Measure" and then press ENTER. For settings other than 5.1-channel surround, select "Pre Assign" and perform step 4 to the SETUP MIC jack of this unit. Check the speaker connection...in the manual. When measuring begins, a test tone is output from each speaker. • Measurement requires several minutes. 8 The detected speakers are set with "Channel Select", measuring time can be connected correctly. Next [ENTER] Enter [RETURN] Cancel 6 Use ui to select "Next → Measure...
Owners Manual
Page 17
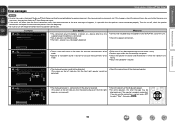
...14 When measuring has stopped q Press RETURN B, to select "Yes", then press ENTER. STEP 3 Measure (2nd - 6th) STEP 4 Calculate Set up the speakers again Repeat the operation from the next position onward, select "Next Calculate". (Go to STEP4 Calculate ) 11 Repeat step 10... at 2nd listening position. If the problem is displayed. When measurement of STEP 1 Preparation . message is completed, a "Measurements finished." Setting up speakers (Audyssey® Auto Setup) • In STEP 3, you want to complete. Measure MultEQ • Analysis takes several minutes...
...14 When measuring has stopped q Press RETURN B, to select "Yes", then press ENTER. STEP 3 Measure (2nd - 6th) STEP 4 Calculate Set up the speakers again Repeat the operation from the next position onward, select "Next Calculate". (Go to STEP4 Calculate ) 11 Repeat step 10... at 2nd listening position. If the problem is displayed. When measurement of STEP 1 Preparation . message is completed, a "Measurements finished." Setting up speakers (Audyssey® Auto Setup) • In STEP 3, you want to complete. Measure MultEQ • Analysis takes several minutes...

Owners Manual
Page 18
...Check Check processing resuit. will be displayed. is completed, "Storing complete. Information 15 Basic version Advanced version STEP 5 Check STEP 6 Store Finish Set up speakers (Audyssey® Auto Setup) 13 Use ui to select the item you want to check, and then press ENTER. 15 Select "... Audyssey Auto Setup Store Now storing Please wait... 0% MultEQ NOTE • If the result differs from the unit's SETUP MIC jack. 17 Set Audyssey Dynamic Volume®. Yes No [ENTER] Exit • This feature adjusts the output volume to added electrical delay common in the dynamism and...
...Check Check processing resuit. will be displayed. is completed, "Storing complete. Information 15 Basic version Advanced version STEP 5 Check STEP 6 Store Finish Set up speakers (Audyssey® Auto Setup) 13 Use ui to select the item you want to check, and then press ENTER. 15 Select "... Audyssey Auto Setup Store Now storing Please wait... 0% MultEQ NOTE • If the result differs from the unit's SETUP MIC jack. 17 Set Audyssey Dynamic Volume®. Yes No [ENTER] Exit • This feature adjusts the output volume to added electrical delay common in the dynamism and...
Owners Manual
Page 19
... the polarity phases of the front right speakers are reversed.) • Check the polarity of the displayed speaker. Basic version Advanced version Information Error messages Set up speakers (Audyssey® Auto Setup) NOTE • An error message is too low Retry [ ] Cancel Audyssey Auto Setup MultEQ Caution!
... the polarity phases of the front right speakers are reversed.) • Check the polarity of the displayed speaker. Basic version Advanced version Information Error messages Set up speakers (Audyssey® Auto Setup) NOTE • An error message is too low Retry [ ] Cancel Audyssey Auto Setup MultEQ Caution!


