
Literature/Product Sheet
Page 2
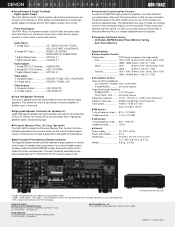
...the mode again for Easy Operation The AVR-1602 includes the Personal Memory Plus function that program. s Acclaimed Customization Feature As with remote control codes from digital sources such as CD. • Front Panel Inputs The AVR-1602's front panel includes 1 set of ... video and audio input terminals where you can easily connect your home theater system, including codes for the main (left and right) speakers. DIVISION OF DENON CORPORATION (USA) 19 CHAPIN ROAD, P.O. Input FRONT L/R, CENTER, SURROUND L/R, SUBWOOFER 1 Digital (Optical) Input OPTICAL X 1 1 Digital (Coaxial)...
...the mode again for Easy Operation The AVR-1602 includes the Personal Memory Plus function that program. s Acclaimed Customization Feature As with remote control codes from digital sources such as CD. • Front Panel Inputs The AVR-1602's front panel includes 1 set of ... video and audio input terminals where you can easily connect your home theater system, including codes for the main (left and right) speakers. DIVISION OF DENON CORPORATION (USA) 19 CHAPIN ROAD, P.O. Input FRONT L/R, CENTER, SURROUND L/R, SUBWOOFER 1 Digital (Optical) Input OPTICAL X 1 1 Digital (Coaxial)...
Owners Manual
Page 4
... Remove the cap covering the terminal when you for choosing the DENON A/V Surround receiver. This remarkable component has been engineered to provide superb surround sound listening with a V. Using the Remote Control Unit 15 ⁄0 Setting up the Speaker Systems 8 , Connections... purposes. • V. AUX terminal The AVR-1602's front panel is provided with an immense array of your favorite music sources. ENGLISH 2 INTRODUCTION Thank you want to use it. 4 Always set for North America model only 1 e Service station list 1 r Remote control unit (RC-896 1 r t t R6P...
... Remove the cap covering the terminal when you for choosing the DENON A/V Surround receiver. This remarkable component has been engineered to provide superb surround sound listening with a V. Using the Remote Control Unit 15 ⁄0 Setting up the Speaker Systems 8 , Connections... purposes. • V. AUX terminal The AVR-1602's front panel is provided with an immense array of your favorite music sources. ENGLISH 2 INTRODUCTION Thank you want to use it. 4 Always set for North America model only 1 e Service station list 1 r Remote control unit (RC-896 1 r t t R6P...

Owners Manual
Page 5
...playback range extending to the type of other major manufacturers are greatly reduced for , say, a vacation. 4 FEATURES 1. The remote control command codes for DENON remote controllable AV components as well as for LD players, video decks, TVs, etc., of source and the contents, so you leave ...If this unit or any other components. Dolby Digital decoder Dolby Digital, a digital discrete system in Dolby Surround. 5. Remote control unit with pre-memory function This unit comes with a remote control unit equipped with greater precision. 2. ENGLISH 0.3 ft (10 cm) or more B 0.3 ft (10 cm) ...
...playback range extending to the type of other major manufacturers are greatly reduced for , say, a vacation. 4 FEATURES 1. The remote control command codes for DENON remote controllable AV components as well as for LD players, video decks, TVs, etc., of source and the contents, so you leave ...If this unit or any other components. Dolby Digital decoder Dolby Digital, a digital discrete system in Dolby Surround. 5. Remote control unit with pre-memory function This unit comes with a remote control unit equipped with greater precision. 2. ENGLISH 0.3 ft (10 cm) or more B 0.3 ft (10 cm) ...

Owners Manual
Page 6
...) !6 CH VOL button 29) !7 MASTER VOLUME control 26) !8 STATUS button 27) !9 DIMMER button 27) @0 Master volume indicator (VOLUME LEVEL 26) @1 Display @2 TUNING UP/DOWN button 40) @3 MEMORY button 39, 41) @4 MODE button 40) @5 BAND button 40) @6 SIGNAL indicators 26) @7 INPUT mode indicators 26) @8 Remote control sensor (REMOTE SENSOR 15) @9 Power operation indicator #0 Input source...
...) !6 CH VOL button 29) !7 MASTER VOLUME control 26) !8 STATUS button 27) !9 DIMMER button 27) @0 Master volume indicator (VOLUME LEVEL 26) @1 Display @2 TUNING UP/DOWN button 40) @3 MEMORY button 39, 41) @4 MODE button 40) @5 BAND button 40) @6 SIGNAL indicators 26) @7 INPUT mode indicators 26) @8 Remote control sensor (REMOTE SENSOR 15) @9 Power operation indicator #0 Input source...
Owners Manual
Page 7
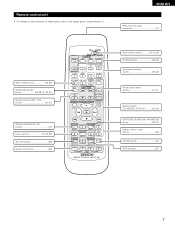
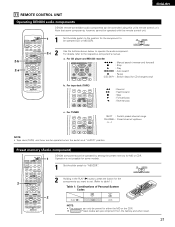
... SKIP+ TITLE 8 3 9 6 SYSTEM 2 7 SURROUND SET UP MENU MASTER CH SELECT VOL SELECT T.TONE STATUS MUTING RETURN DISPLAY CHANNEL TV VOLUME B REMOTE CONTROL UNIT RC-896 Mode selector switch 16, 21, 22) POWER buttons 22, 23) Input source selector buttons 25, 32) Preset station select buttons 21, ... Remote control signal transmitter 15) INPUT MODE button 25, 28) SURROUND MODE button 26, 29, 30, 32, 35) System buttons (TAPE, VCR) buttons 21, 23) SYSTEM (SYSTEM SET UP) buttons 16) Cursor buttons 16, 32, 35) Test tone button 29) System buttons (TV 23) CD MD/CDR AVR/AVC...
... SKIP+ TITLE 8 3 9 6 SYSTEM 2 7 SURROUND SET UP MENU MASTER CH SELECT VOL SELECT T.TONE STATUS MUTING RETURN DISPLAY CHANNEL TV VOLUME B REMOTE CONTROL UNIT RC-896 Mode selector switch 16, 21, 22) POWER buttons 22, 23) Input source selector buttons 25, 32) Preset station select buttons 21, ... Remote control signal transmitter 15) INPUT MODE button 25, 28) SURROUND MODE button 26, 29, 30, 32, 35) System buttons (TAPE, VCR) buttons 21, 23) SYSTEM (SYSTEM SET UP) buttons 16) Cursor buttons 16, 32, 35) Test tone button 29) System buttons (TV 23) CD MD/CDR AVR/AVC...

Owners Manual
Page 8
Step 2 (page 15) Next, insert the batteries into the remote control unit. Step 3 (page 16 to setup the Speakers and connecting the components. Step 1 (page 8 to 14) Choose the best location to 20) Finally, setting up ...
Step 2 (page 15) Next, insert the batteries into the remote control unit. Step 3 (page 16 to setup the Speakers and connecting the components. Step 1 (page 8 to 14) Choose the best location to 20) Finally, setting up ...

Owners Manual
Page 9
... other component equipped with digital output. If this unit's CD jacks using pin plug cords. 9 Never connect equipment whose total capacity is supplied from the remote control unit. Decoders with right). • Insert the plugs securely. LINE OUT AC CORD AC 120V, 60Hz SURROUND SUB WOOFER CENTER FRONT RL AM LOOP ANT...
... other component equipped with digital output. If this unit's CD jacks using pin plug cords. 9 Never connect equipment whose total capacity is supplied from the remote control unit. Decoders with right). • Insert the plugs securely. LINE OUT AC CORD AC 120V, 60Hz SURROUND SUB WOOFER CENTER FRONT RL AM LOOP ANT...
Owners Manual
Page 15
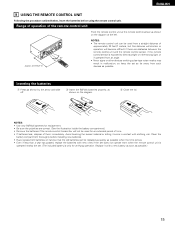
...possible. NOTES: • Use only R6P/AA batteries for replacement. • Be sure the polarities are obstacles between the remote control unit and the remote control sensor, if the remote control sensor is only for an extended period of time. • If batteries leak, dispose of them immediately. B Approx....type noise nearby may result in contact with a new battery as soon as shown on the diagram. ENGLISH 9 USING THE REMOTE CONTROL UNIT Following the procedure outlined below, insert the batteries before installing new batteries. • Have replacement batteries on hand so ...
...possible. NOTES: • Use only R6P/AA batteries for replacement. • Be sure the polarities are obstacles between the remote control unit and the remote control sensor, if the remote control sensor is only for an extended period of time. • If batteries leak, dispose of them immediately. B Approx....type noise nearby may result in contact with a new battery as soon as shown on the diagram. ENGLISH 9 USING THE REMOTE CONTROL UNIT Following the procedure outlined below, insert the batteries before installing new batteries. • Have replacement batteries on hand so ...

Owners Manual
Page 17
... 1 Check that point are correct, then press the POWER operation switch on the main unit or the POWER button on the remote control unit to turn on the power. (Main unit) (Remote control unit) 2 Press the SYSTEM button to enter the setting. *SYSTEM SET UP NOTE: Please make sure the "AUDIO" position of the...
... 1 Check that point are correct, then press the POWER operation switch on the main unit or the POWER button on the remote control unit to turn on the power. (Main unit) (Remote control unit) 2 Press the SYSTEM button to enter the setting. *SYSTEM SET UP NOTE: Please make sure the "AUDIO" position of the...
Owners Manual
Page 21
...+ TITLE 8 3 9 6 SYSTEM 2 7 SURROUND SET UP MENU MASTER CH SELECT VOL SELECT T.TONE STATUS MUTING RETURN DISPLAY CHANNEL TV VOLUME B REMOTE CONTROL UNIT RC-896 1 2 DENON components can be controlled using this remote control unit. 2-b 2-a CD MD/CDR AVR/AVC ON AUDIO POWER TV VCR VIDEO DVD/VDP OFF 1 CD DVD/VDP 2 3 V. For details, refer to the respective...
...+ TITLE 8 3 9 6 SYSTEM 2 7 SURROUND SET UP MENU MASTER CH SELECT VOL SELECT T.TONE STATUS MUTING RETURN DISPLAY CHANNEL TV VOLUME B REMOTE CONTROL UNIT RC-896 1 2 DENON components can be controlled using this remote control unit. 2-b 2-a CD MD/CDR AVR/AVC ON AUDIO POWER TV VCR VIDEO DVD/VDP OFF 1 CD DVD/VDP 2 3 V. For details, refer to the respective...

Owners Manual
Page 22
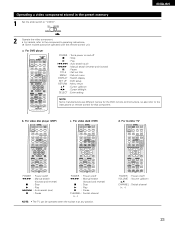
...See the list on the manufacturer. If there is equipped with several types of remote control codes which depend on pages 92 and 93for the preset codes (consisting of video component. ENGLISH Preset memory (Video component) DENON and other makes of components can be used . • The unit is no... operation, please change the preset code (a 2-digit number) and try again. 22 Operation is not possible for the pressed buttons are emitted while setting the preset memory. CD MD/CDR AVR/AVC ON...
...See the list on the manufacturer. If there is equipped with several types of remote control codes which depend on pages 92 and 93for the preset codes (consisting of video component. ENGLISH Preset memory (Video component) DENON and other makes of components can be used . • The unit is no... operation, please change the preset code (a 2-digit number) and try again. 22 Operation is not possible for the pressed buttons are emitted while setting the preset memory. CD MD/CDR AVR/AVC ON...
Owners Manual
Page 23
... STATUS MUTING RETURN DISPLAY CHANNEL TV VOLUME POWER : Power on remote control for that component. CD MD/CDR AUDIO VIDEO 2 Operate the video component. • For details, refer to "VIDEO". a. For video deck (VCR) AVR/AVC ON POWER TV VCR DVD/VDP OFF 1 CD DVD/... 6,7 : Manual search (forward and reverse) 2 : Stop 1 : Play 3 : Pause CHANNEL : Switch channel (+, -) NOTE: • The TV can be operated with this remote control unit. AUX 4 VCR 5 TV/DBS 6 7 INPUT MODE CDR / TAPE TUNER 8 9 0 SURROUND MODE TAPE·VCR 6 7 SHIFT 0 3 2 CHANNEL 0 VIDEO SELECT CD...
... STATUS MUTING RETURN DISPLAY CHANNEL TV VOLUME POWER : Power on remote control for that component. CD MD/CDR AUDIO VIDEO 2 Operate the video component. • For details, refer to "VIDEO". a. For video deck (VCR) AVR/AVC ON POWER TV VCR DVD/VDP OFF 1 CD DVD/... 6,7 : Manual search (forward and reverse) 2 : Stop 1 : Play 3 : Pause CHANNEL : Switch channel (+, -) NOTE: • The TV can be operated with this remote control unit. AUX 4 VCR 5 TV/DBS 6 7 INPUT MODE CDR / TAPE TUNER 8 9 0 SURROUND MODE TAPE·VCR 6 7 SHIFT 0 3 2 CHANNEL 0 VIDEO SELECT CD...

Owners Manual
Page 24
AUX 4 VCR 5 TV/DBS 6 7 Preparations: Check that prevents noise when the power switch is set to turn on the power. (Main unit) (Remote control unit) • ON/STANDBY When the button is output. When pressed again, the power turns off, the standby mode is turned on . (Main unit)... 24 Press the ON/STANDBY button on the main unit or AVR/AVC button on the remote control unit to turn the speaker on and off . Several seconds are proper. 1 Turn on and the display lights after approximately 1 second. This...
AUX 4 VCR 5 TV/DBS 6 7 Preparations: Check that prevents noise when the power switch is set to turn on the power. (Main unit) (Remote control unit) • ON/STANDBY When the button is output. When pressed again, the power turns off, the standby mode is turned on . (Main unit)... 24 Press the ON/STANDBY button on the main unit or AVR/AVC button on the remote control unit to turn the speaker on and off . Several seconds are proper. 1 Turn on and the display lights after approximately 1 second. This...

Owners Manual
Page 25
...separate input sources are played without passing through the surround circuitry. EX 1: CD CD 1 (Main unit) EX 2: CDR/TAPE (Remote control unit) CDR / TAPE 8 (Main unit) (Remote control unit) 2 Select the input mode. Notes on playing a source encoded with DTS • Noise may be generated at the beginning... of a DTS-CD or DTS-LD. 25 IN 8 (Remote control unit) 2 3 CD MD/CDR AVR/AVC ON AUDIO POWER TV VCR VIDEO DVD/VDP OFF 1 CD DVD/VDP 2 3 V. If so, play the component connected to ...
...separate input sources are played without passing through the surround circuitry. EX 1: CD CD 1 (Main unit) EX 2: CDR/TAPE (Remote control unit) CDR / TAPE 8 (Main unit) (Remote control unit) 2 Select the input mode. Notes on playing a source encoded with DTS • Noise may be generated at the beginning... of a DTS-CD or DTS-LD. 25 IN 8 (Remote control unit) 2 3 CD MD/CDR AVR/AVC ON AUDIO POWER TV VCR VIDEO DVD/VDP OFF 1 CD DVD/VDP 2 3 V. If so, play the component connected to ...

Owners Manual
Page 26
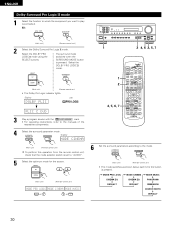
...'s manual. 5 Adjust the volume. MASTER VOLUME MASTER VOL The volume level is displayed on the master volume level display. (Main unit) (Remote control unit) The volume can be decreased to up to 18 dB. (In this case the maximum volume adjustment range is set as follows each ..." or "PCM" mode. SURROUND MODE (Main unit) To select the surround mode while adjusting the surround parameters, channel volume or tone control, press the surround mode button then operate the selector. (See page 29.) (Remote control unit) (Main unit) 4 Start playback on the input signal.
...'s manual. 5 Adjust the volume. MASTER VOLUME MASTER VOL The volume level is displayed on the master volume level display. (Main unit) (Remote control unit) The volume can be decreased to up to 18 dB. (In this case the maximum volume adjustment range is set as follows each ..." or "PCM" mode. SURROUND MODE (Main unit) To select the surround mode while adjusting the surround parameters, channel volume or tone control, press the surround mode button then operate the selector. (See page 29.) (Remote control unit) (Main unit) 4 Start playback on the input signal.

Owners Manual
Page 27
...panel display. Press the MUTING button. Muting will also be DISPLAY switched to check the unit's operating status (Main unit) (Remote control unit) while playing a source by pressing the main unit's DIMMER button repeatedly. (Main unit) The brightness changes in four steps...video source other than the VIDEO SELECT audio source. 3 2 0 Press the VIDEO SELECT button repeatedly until the desired source appears on (Main unit) (Remote control unit) 1 VIDEO SELECT CD·MD/CDR·DVD/VDP DISC SKIP+ TITLE 8 3 9 the display. 2 6 7 Cancelling simulcast playback. &#...
...panel display. Press the MUTING button. Muting will also be DISPLAY switched to check the unit's operating status (Main unit) (Remote control unit) while playing a source by pressing the main unit's DIMMER button repeatedly. (Main unit) The brightness changes in four steps...video source other than the VIDEO SELECT audio source. 3 2 0 Press the VIDEO SELECT button repeatedly until the desired source appears on (Main unit) (Remote control unit) 1 VIDEO SELECT CD·MD/CDR·DVD/VDP DISC SKIP+ TITLE 8 3 9 the display. 2 6 7 Cancelling simulcast playback. &#...

Owners Manual
Page 28
IN to switch the external input. (Main unit) (Remote control unit) Once this is connected, then set this mode. IN), the play modes other than the external input mode, the signals connected to the component's ... circuitry. IN) setting, press the INPUT MODE (AUTO, PCM, DTS) or ANALOG button to switch to the desired input mode. (See page 25.) 8 (Main unit) (Remote control unit) • When the input mode is output to 3 under "Playing the input source". 2 Start recording on every decks. AUX 4 VCR 5 TV/DBS 6 7 INPUT MODE...
IN to switch the external input. (Main unit) (Remote control unit) Once this is connected, then set this mode. IN), the play modes other than the external input mode, the signals connected to the component's ... circuitry. IN) setting, press the INPUT MODE (AUTO, PCM, DTS) or ANALOG button to switch to the desired input mode. (See page 25.) 8 (Main unit) (Remote control unit) • When the input mode is output to 3 under "Playing the input source". 2 Start recording on every decks. AUX 4 VCR 5 TV/DBS 6 7 INPUT MODE...

Owners Manual
Page 29
...SYSTEM 2 7 SURROUND SET UP MENU MASTER CH SELECT VOL SELECT T.TONE STATUS MUTING RETURN DISPLAY CHANNEL TV VOLUME 21 29 B (Main unit) (Remote control unit) The channel switches as described below each time the button is pressed. FL CNTR FR SR SL SW NOTE: Please make sure the "AUDIO..." position of the slide switch on the remote control unit. 2 Adjust the level of the selected speaker. (Main unit) (Remote control unit) The level of the selected speaker can be adjusted within the range of each speakers. ...
...SYSTEM 2 7 SURROUND SET UP MENU MASTER CH SELECT VOL SELECT T.TONE STATUS MUTING RETURN DISPLAY CHANNEL TV VOLUME 21 29 B (Main unit) (Remote control unit) The channel switches as described below each time the button is pressed. FL CNTR FR SR SL SW NOTE: Please make sure the "AUDIO..." position of the slide switch on the remote control unit. 2 Adjust the level of the selected speaker. (Main unit) (Remote control unit) The level of the selected speaker can be adjusted within the range of each speakers. ...
Owners Manual
Page 30
...instructions, refer to "AUDIO". 5 Select the optimum mode for the source. (Main unit) (Remote control unit) MODE PRO LOGIC MODE CINEMA MODE MUSIC or or 1 2 4, 6 2, 5, 7 1 2 4, 5, 6, 7 CD MD/CDR AVR/AVC ON AUDIO POWER TV VCR VIDEO DVD/VDP OFF 1 CD DVD/VDP 2 3 V.... SURROUND MODE button is pressed. Display SURROUND MODE CINEMA MENU (Main unit) (Remote control unit) To perform this operation from the remote control unit, check that the mode selector switch is ...
...instructions, refer to "AUDIO". 5 Select the optimum mode for the source. (Main unit) (Remote control unit) MODE PRO LOGIC MODE CINEMA MODE MUSIC or or 1 2 4, 6 2, 5, 7 1 2 4, 5, 6, 7 CD MD/CDR AVR/AVC ON AUDIO POWER TV VCR VIDEO DVD/VDP OFF 1 CD DVD/VDP 2 3 V.... SURROUND MODE button is pressed. Display SURROUND MODE CINEMA MENU (Main unit) (Remote control unit) To perform this operation from the remote control unit, check that the mode selector switch is ...

Owners Manual
Page 32
... sources. 4 SURROUND Set the surround parameter according to "AUTO" or DTS. 1 3 B 8 (Main unit) (Remote control unit) 2 Select the Dolby/DTS Surround mode. DIGITAL • The Dolby Digital indicator lights when Light playing Dolby Digital sources. 1 22 1 2 5, 6, 7, 8 CD MD/CDR AVR/AVC ON AUDIO POWER TV VCR VIDEO DVD/VDP OFF 1 CD DVD/VDP...
... sources. 4 SURROUND Set the surround parameter according to "AUTO" or DTS. 1 3 B 8 (Main unit) (Remote control unit) 2 Select the Dolby/DTS Surround mode. DIGITAL • The Dolby Digital indicator lights when Light playing Dolby Digital sources. 1 22 1 2 5, 6, 7, 8 CD MD/CDR AVR/AVC ON AUDIO POWER TV VCR VIDEO DVD/VDP OFF 1 CD DVD/VDP...


