Owner's Manual
Page 6
... 81 Beep Codes 82 System Messages 84 Dell Diagnostics 86 When to Use the Dell Diagnostics 86 Starting the Dell Diagnostics From Your Hard Drive 86 Starting the Dell Diagnostics From the Drivers and Utilities Media 87 Dell Diagnostics Main Menu 87 Drivers 89 What Is a Driver 89 Identifying Drivers 90 Reinstalling Drivers and Utilities 90 Restoring Your Operating System...
... 81 Beep Codes 82 System Messages 84 Dell Diagnostics 86 When to Use the Dell Diagnostics 86 Starting the Dell Diagnostics From Your Hard Drive 86 Starting the Dell Diagnostics From the Drivers and Utilities Media 87 Dell Diagnostics Main Menu 87 Drivers 89 What Is a Driver 89 Identifying Drivers 90 Reinstalling Drivers and Utilities 90 Restoring Your Operating System...
Owner's Manual
Page 13
... All. 4 Select the operating system and operating system language for correct operation of your computer, and click Submit. and Configuration Utilities, and click Dell Desktop System Software. Certified drivers, patches, and software updates • Desktop System Software (DSS)- Service call and order status, warranty, and repair information • Service and support - DSS...
... All. 4 Select the operating system and operating system language for correct operation of your computer, and click Submit. and Configuration Utilities, and click Dell Desktop System Software. Certified drivers, patches, and software updates • Desktop System Software (DSS)- Service call and order status, warranty, and repair information • Service and support - DSS...
Owner's Manual
Page 24
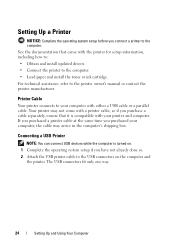
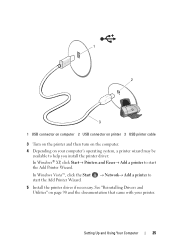
... operating system setup before you purchase a cable separately, ensure that came with the printer for setup information, including how to: • Obtain and install updated drivers. • Connect the printer to your computer with your computer, the cable may not come with a printer cable, so if you connect a printer to the...
... operating system setup before you purchase a cable separately, ensure that came with the printer for setup information, including how to: • Obtain and install updated drivers. • Connect the printer to your computer with your computer, the cable may not come with a printer cable, so if you connect a printer to the...
Owner's Manual
Page 25
... on page 90 and the documentation that came with your computer's operating system, a printer wizard may be available to help you install the printer driver: In Windows® XP, click Start→ Printers and Faxes→ Add a printer to start the Add Printer Wizard. → Network&#...8594; Add a printer to 5 Install the printer driver if necessary. Setting Up and Using Your Computer 25 See "Reinstalling Drivers and Utilities" on your printer. In Windows Vista™, click the Start start the Add Printer Wizard.
... on page 90 and the documentation that came with your computer's operating system, a printer wizard may be available to help you install the printer driver: In Windows® XP, click Start→ Printers and Faxes→ Add a printer to start the Add Printer Wizard. → Network&#...8594; Add a printer to 5 Install the printer driver if necessary. Setting Up and Using Your Computer 25 See "Reinstalling Drivers and Utilities" on your printer. In Windows Vista™, click the Start start the Add Printer Wizard.
Owner's Manual
Page 69
... SOFTWARE MANUFACTURER FOR TROUBLESHOOTING INFORMATION - • Ensure that the program is installed and configured properly. • Verify that your computer. • Ensure that the device drivers do not conflict with the operating system installed on your computer meets the minimum hardware requirements needed to run the software. BACK UP YOUR FILES...
... SOFTWARE MANUFACTURER FOR TROUBLESHOOTING INFORMATION - • Ensure that the program is installed and configured properly. • Verify that your computer. • Ensure that the device drivers do not conflict with the operating system installed on your computer meets the minimum hardware requirements needed to run the software. BACK UP YOUR FILES...
Owner's Manual
Page 73
... network port or device. Ensure that indicates no network communication exists. See "Restoring Your Operating System" on page 90. C H E C K T H E N E T W O R K L I N G S - Replace the network cable. C H E C K T H E N E T W O R K C A B L E C O N N E C T O R - See "Reinstalling Drivers and Utilities" on page 93. R U N T H E H A R D W A R E TR O U B L E S H O O T E R - R E I N S T A L L T H E M O U S E D R I V E R -
... network port or device. Ensure that indicates no network communication exists. See "Restoring Your Operating System" on page 90. C H E C K T H E N E T W O R K L I N G S - Replace the network cable. C H E C K T H E N E T W O R K C A B L E C O N N E C T O R - See "Reinstalling Drivers and Utilities" on page 93. R U N T H E H A R D W A R E TR O U B L E S H O O T E R - R E I N S T A L L T H E M O U S E D R I V E R -
Owner's Manual
Page 78
... 15). A D J U S T T H E W I S C O N N E C T H E A D P H O N E S F R O M T H E H E A D P H O N E C O N N E C T O R - Ensure that the volume is turned up and that the electrical outlet is working by testing it with the speakers. TE S T T H E E L E C T R I V E R - See "Manually Reinstalling Drivers" on page 93. R E I N S T A L L T H E S O U N D D R I C A L O U T L E T - See the setup diagram supplied with another device, such as a lamp. R U N T H E H A R D W A R E TR O U B L E S H O O T E R - Click or double-click the speaker icon in the lower...
... 15). A D J U S T T H E W I S C O N N E C T H E A D P H O N E S F R O M T H E H E A D P H O N E C O N N E C T O R - Ensure that the volume is turned up and that the electrical outlet is working by testing it with the speakers. TE S T T H E E L E C T R I V E R - See "Manually Reinstalling Drivers" on page 93. R E I N S T A L L T H E S O U N D D R I C A L O U T L E T - See the setup diagram supplied with another device, such as a lamp. R U N T H E H A R D W A R E TR O U B L E S H O O T E R - Click or double-click the speaker icon in the lower...

Owner's Manual
Page 85
... R - HARD DRIVE SELF MONITORING SYSTEM HAS REPORTED THAT A PARAMETER HAS EXCEEDED ITS NORMAL OPERATING RANGE. A chip on hard drive, no bootable floppy in floppy driver, the hard drive or floppy cable is loose, or no bootable device exists. • If the floppy drive is your computer. See "Contacting... Dell" on page 174. DELL RECOMMENDS THAT YOU BACK UP YOUR DATA REGULARLY. Troubleshooting Tools 85 See "Entering System Setup" on page 187 for the USB device....
... R - HARD DRIVE SELF MONITORING SYSTEM HAS REPORTED THAT A PARAMETER HAS EXCEEDED ITS NORMAL OPERATING RANGE. A chip on hard drive, no bootable floppy in floppy driver, the hard drive or floppy cable is loose, or no bootable device exists. • If the floppy drive is your computer. See "Contacting... Dell" on page 174. DELL RECOMMENDS THAT YOU BACK UP YOUR DATA REGULARLY. Troubleshooting Tools 85 See "Entering System Setup" on page 187 for the USB device....
Owner's Manual
Page 86
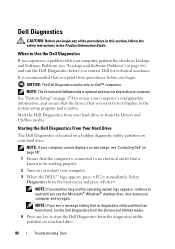
... no diagnostics utility partition has been found, run the Dell Diagnostics before you contact Dell for technical assistance. NOTE: If you see "Lockups and Software Problems" on page 66) and run the Dell Diagnostics from the Drivers and Utilities media. 4 Press any key to wait ... your computer, perform the checks in the Product Information Guide. NOTICE: The Dell Diagnostics works only on your computer. 3 When the DELL™ logo appears, press immediately. Select Diagnostics from the Drivers and Utilities media. When to an electrical outlet that you print these procedures ...
... no diagnostics utility partition has been found, run the Dell Diagnostics before you contact Dell for technical assistance. NOTE: If you see "Lockups and Software Problems" on page 66) and run the Dell Diagnostics from the Drivers and Utilities media. 4 Press any key to wait ... your computer, perform the checks in the Product Information Guide. NOTICE: The Dell Diagnostics works only on your computer. 3 When the DELL™ logo appears, press immediately. Select Diagnostics from the Drivers and Utilities media. When to an electrical outlet that you print these procedures ...

Owner's Manual
Page 87
...It is recommended that appears and press . 5 Type 1 to start the CD menu and press to proceed. 6 Select Run the 32 Bit Dell Diagnostics from the numbered list. NOTE: If you wait too long and the operating system logo appears, continue to run a complete test on your... appears, press immediately. NOTE: The next steps change the boot sequence for your computer. Starting the Dell Diagnostics From the Drivers and Utilities Media 1 Insert the Drivers and Utilities media. 2 Shut down your computer and try again. If multiple versions are listed, select the version appropriate for one...
...It is recommended that appears and press . 5 Type 1 to start the CD menu and press to proceed. 6 Select Run the 32 Bit Dell Diagnostics from the numbered list. NOTE: If you wait too long and the operating system logo appears, continue to run a complete test on your... appears, press immediately. NOTE: The next steps change the boot sequence for your computer. Starting the Dell Diagnostics From the Drivers and Utilities Media 1 Insert the Drivers and Utilities media. 2 Shut down your computer and try again. If multiple versions are listed, select the version appropriate for one...
Owner's Manual
Page 89
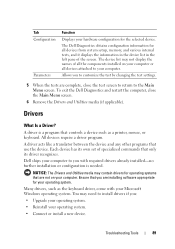
... the device list in the left pane of the screen. The Dell Diagnostics obtains configuration information for the selected device. Dell ships your operating system. • Connect or install a new device. Many drivers, such as a printer, mouse, or keyboard. All devices require a driver program. Troubleshooting Tools 89 Tab Configuration Parameters Function Displays your computer...
... the device list in the left pane of the screen. The Dell Diagnostics obtains configuration information for the selected device. Dell ships your operating system. • Connect or install a new device. Many drivers, such as a printer, mouse, or keyboard. All devices require a driver program. Troubleshooting Tools 89 Tab Configuration Parameters Function Displays your computer...
Owner's Manual
Page 90
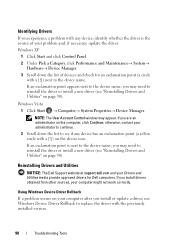
... Utilities NOTICE: The Dell Support website at support.dell.com and your administrator to continue. 2 Scroll down the list of your computer might not work correctly. Using Windows Device Driver Rollback If a problem occurs on your computer after you experience a problem with any... devices and check for Dell computers. If an exclamation point appears next to the device name, you install drivers obtained from other sources, your problem and, if necessary, update the driver. otherwise, contact your Drivers and Utilities media provide approved drivers for an exclamation point ...
... Utilities NOTICE: The Dell Support website at support.dell.com and your administrator to continue. 2 Scroll down the list of your computer might not work correctly. Using Windows Device Driver Rollback If a problem occurs on your computer after you experience a problem with any... devices and check for Dell computers. If an exclamation point appears next to the device name, you install drivers obtained from other sources, your problem and, if necessary, update the driver. otherwise, contact your Drivers and Utilities media provide approved drivers for an exclamation point ...
Owner's Manual
Page 91
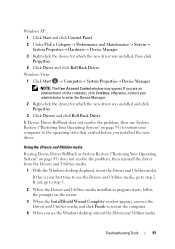
... program starts, follow the prompts on page 93) does not resolve the problem, then reinstall the driver from the Drivers and Utilities media. 1 With the Windows desktop displayed, insert the Drivers and Utilities media. Windows XP 1 Click Start and click Control Panel. 2 Under Pick a Category... Device Manager. 3 Right-click the device for which the new driver was installed and click Properties. 3 Click Drivers and click Roll Back Driver. If Device Driver Rollback does not resolve the problem, then use the Drivers and Utilities media, go to the operating state that existed before ...
... program starts, follow the prompts on page 93) does not resolve the problem, then reinstall the driver from the Drivers and Utilities media. 1 With the Windows desktop displayed, insert the Drivers and Utilities media. Windows XP 1 Click Start and click Control Panel. 2 Under Pick a Category... Device Manager. 3 Right-click the device for which the new driver was installed and click Properties. 3 Click Drivers and click Roll Back Driver. If Device Driver Rollback does not resolve the problem, then use the Drivers and Utilities media, go to the operating state that existed before ...
Owner's Manual
Page 92
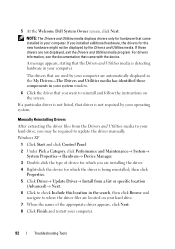
... When the name of device for which you may be displayed by your computer are used by the Drivers and Utilities media. If those drivers are installing the driver. 4 Right-click the device for hardware that came installed in the search, then click Browse and navigate... driver appears, click Next. 8 Click Finish and restart your hard drive, you are not displayed, exit the Drivers and Utilities media program. The drivers that the Drivers and Utilities media is not required by your computer. 5 At the Welcome Dell System Owner screen, click Next. For drivers information...
... When the name of device for which you may be displayed by your computer are used by the Drivers and Utilities media. If those drivers are installing the driver. 4 Right-click the device for hardware that came installed in the search, then click Browse and navigate... driver appears, click Next. 8 Click Finish and restart your hard drive, you are not displayed, exit the Drivers and Utilities media program. The drivers that the Drivers and Utilities media is not required by your computer. 5 At the Welcome Dell System Owner screen, click Next. For drivers information...
Owner's Manual
Page 93
... and preserving data files. • Dell PC Restore by Symantec (available in Windows XP) and Dell Factory Image Restore (available in when you previously copied the driver files. 6 When the name of the appropriate driver appears, click the name of the device for driver software. 5 Click Browse and browse ...of device for which you are installing the driver (for example, Audio or Video). 3 Double-click the name of the driver. 7 Click OK→ Next→ Finish and restart your computer, you received the computer. Use Dell PC Restore or Dell Factory Image Restore only if System Restore ...
... and preserving data files. • Dell PC Restore by Symantec (available in Windows XP) and Dell Factory Image Restore (available in when you previously copied the driver files. 6 When the name of the appropriate driver appears, click the name of the device for driver software. 5 Click Browse and browse ...of device for which you are installing the driver (for example, Audio or Video). 3 Double-click the name of the driver. 7 Click OK→ Next→ Finish and restart your computer, you received the computer. Use Dell PC Restore or Dell Factory Image Restore only if System Restore ...

Owner's Manual
Page 95
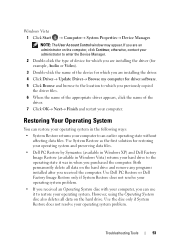
... purchased Troubleshooting Tools 95 regardless of free hard-disk space available, System Restore is unchecked. Using Dell PC Restore and Dell Factory Image Restore NOTICE: Using Dell PC Restore or Dell Factory Image Restore permanently deletes all open files and exit any open programs. Do not alter, ...open, or delete any programs or drivers installed after you received your hard drive to Windows XP. Windows Vista 1 Click Start . 2 In...
... purchased Troubleshooting Tools 95 regardless of free hard-disk space available, System Restore is unchecked. Using Dell PC Restore and Dell Factory Image Restore NOTICE: Using Dell PC Restore or Dell Factory Image Restore permanently deletes all open files and exit any open programs. Do not alter, ...open, or delete any programs or drivers installed after you received your hard drive to Windows XP. Windows Vista 1 Click Start . 2 In...
Owner's Manual
Page 98
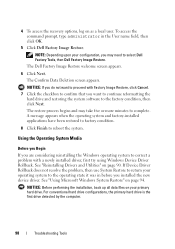
... Image Restore welcome screen appears. 6 Click Next. If Device Driver Rollback does not resolve the problem, then use System Restore to return your operating system to the operating state it was in the User name field, then click OK. 5 Click Dell Factory Image Restore. For conventional hard drive configurations, the primary hard...
... Image Restore welcome screen appears. 6 Click Next. If Device Driver Rollback does not resolve the problem, then use System Restore to return your operating system to the operating state it was in the User name field, then click OK. 5 Click Dell Factory Image Restore. For conventional hard drive configurations, the primary hard...

Owner's Manual
Page 99
... the operating system logo appears, continue to wait until you need the following items: • Dell™ Operating System media • Dell Drivers and Utilities media NOTE: The Dell Drivers and Utilities media contains drivers that are installed on the screen to complete. The options can take 1 to 2 hours to... immediately. On the next start-up, the computer boots according to Boot from which you ordered your hard drive. Use the Dell Drivers and Utilities media to load any key to the devices specified in the system setup program. 5 When the boot device list appears...
... the operating system logo appears, continue to wait until you need the following items: • Dell™ Operating System media • Dell Drivers and Utilities media NOTE: The Dell Drivers and Utilities media contains drivers that are installed on the screen to complete. The options can take 1 to 2 hours to... immediately. On the next start-up, the computer boots according to Boot from which you ordered your hard drive. Use the Dell Drivers and Utilities media to load any key to the devices specified in the system setup program. 5 When the boot device list appears...
Owner's Manual
Page 116
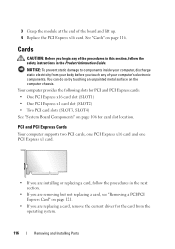
... you are removing but not replacing a card, see "Removing a PCI/PCI Express Card" on page 121. • If you are replacing a card, remove the current driver for card slot location. See "Cards" on the computer chassis.
... you are removing but not replacing a card, see "Removing a PCI/PCI Express Card" on page 121. • If you are replacing a card, remove the current driver for card slot location. See "Cards" on the computer chassis.
Owner's Manual
Page 121
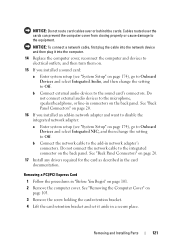
See "Back Panel Connectors" on page 20. 17 Install any drivers required for the card as described in a secure place. See "Removing the Computer Cover" on page 103. 3 Remove the screw holding the card retention bracket. 4 ...
See "Back Panel Connectors" on page 20. 17 Install any drivers required for the card as described in a secure place. See "Removing the Computer Cover" on page 103. 3 Remove the screw holding the card retention bracket. 4 ...


