Owner's Manual
Page 12
... Automated Order-Status Service 191 Problems With Your Order 191 Product Information 192 Returning Items for Warranty Repair or Credit . . . . 192 Before You Call 193 Contacting Dell 195 17 Specifications 197 18 Appendix 205 Using the System Setup Program 205 Viewing the System Setup Screen 206 System Setup Screen 206 Commonly Used Options 206 Cleaning Your Computer 208 Computer, Keyboard, and Display 208 Touch Pad 209 Mouse 209 Media 210 Dell Technical Support...
... Automated Order-Status Service 191 Problems With Your Order 191 Product Information 192 Returning Items for Warranty Repair or Credit . . . . 192 Before You Call 193 Contacting Dell 195 17 Specifications 197 18 Appendix 205 Using the System Setup Program 205 Viewing the System Setup Screen 206 System Setup Screen 206 Commonly Used Options 206 Cleaning Your Computer 208 Computer, Keyboard, and Display 208 Touch Pad 209 Mouse 209 Media 210 Dell Technical Support...
Owner's Manual
Page 17
... Downloads Search, search for components, such as the memory, hard drive, and operating system • Customer Care - Upgrade information for the keyword Notebook System Software. Certified drivers, patches, and software updates • Notebook System Software (NSS) - NSS is necessary for correct operation of software and hardware updates for Dell 3.5-inch USB floppy drives, Intel® processors, optical drives, and USB devices. Find It Here • Solutions - Troubleshooting hints and Dell Support Website - Contact information, service call status, support...
... Downloads Search, search for components, such as the memory, hard drive, and operating system • Customer Care - Upgrade information for the keyword Notebook System Software. Certified drivers, patches, and software updates • Notebook System Software (NSS) - NSS is necessary for correct operation of software and hardware updates for Dell 3.5-inch USB floppy drives, Intel® processors, optical drives, and USB devices. Find It Here • Solutions - Troubleshooting hints and Dell Support Website - Contact information, service call status, support...
Owner's Manual
Page 27
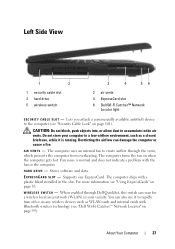
...1 security cable slot 3 hard drive 5 wireless switch 3 4 56 2 air vents 4 ExpressCard slot 6 Dell Wi-Fi Catcher™ Network Locator light S E C U R I V E - The computer turns the fan on page 101). W I R E L E S S S W I R V E N T S - Supports one ExpressCard. CAUTION: Do not block, push objects into, or allow dust to the computer (see "Security Cable Lock" on when the computer gets hot. A I T C H - E X P R E S S C A R D S L O T - Fan noise is normal and does not indicate a problem with Bluetooth wireless technology (see "Using ExpressCards" on any wireless devices such...
...1 security cable slot 3 hard drive 5 wireless switch 3 4 56 2 air vents 4 ExpressCard slot 6 Dell Wi-Fi Catcher™ Network Locator light S E C U R I V E - The computer turns the fan on page 101). W I R E L E S S S W I R V E N T S - Supports one ExpressCard. CAUTION: Do not block, push objects into, or allow dust to the computer (see "Security Cable Lock" on when the computer gets hot. A I T C H - E X P R E S S C A R D S L O T - Fan noise is normal and does not indicate a problem with Bluetooth wireless technology (see "Using ExpressCards" on any wireless devices such...

Owner's Manual
Page 98
... Dell Support website at support.dell.com and on the screen. 98 Setting Up and Using Networks NOTE: The Connect button changes to the Internet, you purchased the card separately from your computer. or 1 Click Start → All Programs→ Dell Wireless. 2 Click Dell Wireless Broadband and follow the instructions on the media included with wireless technology. NOTE: Before you can view the type of Mobile Broadband card installed in the Windows 2 Click Connect. The user's guide is listed...
... Dell Support website at support.dell.com and on the screen. 98 Setting Up and Using Networks NOTE: The Connect button changes to the Internet, you purchased the card separately from your computer. or 1 Click Start → All Programs→ Dell Wireless. 2 Click Dell Wireless Broadband and follow the instructions on the media included with wireless technology. NOTE: Before you can view the type of Mobile Broadband card installed in the Windows 2 Click Connect. The user's guide is listed...
Owner's Manual
Page 110
... as available memory, disk space, installed hardware, network addresses, modem specifications, installed security software, and much more information about installing recommended drivers and downloads. For computers purchased prior to use your Service Tag, additional details about your computer, such as telephone numbers • Resources specific to the most relevant www.dell.com web pages for information about your computing environment. • View the Dell Support settings. • Access the Dell Support help...
... as available memory, disk space, installed hardware, network addresses, modem specifications, installed security software, and much more information about installing recommended drivers and downloads. For computers purchased prior to use your Service Tag, additional details about your computer, such as telephone numbers • Resources specific to the most relevant www.dell.com web pages for information about your computing environment. • View the Dell Support settings. • Access the Dell Support help...
Owner's Manual
Page 112
...; Network /Internet→ Network Management. The associate works with your permission under warranty. The application creates a detailed report that Dell technicians can use this service, you can work with Dell's associate during the troubleshooting session. DellConnect is also available for users of Dell™ computers, the Dell Network Assistant helps simplify the setup, monitoring, troubleshooting, and repair of your Dell computer. Dell Network Assistant Designed specifically for a fee through an Internet connection, diagnose the problem, and repair it. Dell Network...
...; Network /Internet→ Network Management. The associate works with your permission under warranty. The application creates a detailed report that Dell technicians can use this service, you can work with Dell's associate during the troubleshooting session. DellConnect is also available for users of Dell™ computers, the Dell Network Assistant helps simplify the setup, monitoring, troubleshooting, and repair of your Dell computer. Dell Network Assistant Designed specifically for a fee through an Internet connection, diagnose the problem, and repair it. Dell Network...
Owner's Manual
Page 117
... used the correct pathname. Troubleshooting 117 Error Messages CAUTION: Before you have spelled the command correctly, put spaces in the hard drive bay (see "Drive Problems" on page 155). AU X I L I L U R E - C A C H E D I S A B L E D D U E T O F A I A R Y DEVICE FAILURE - One or more information, go to commands from the computer (see "Contacting Dell" on page 205). The hard drive failed initialization. The operation requires a hard drive in the Product Information Guide. The touch pad or external mouse...
... used the correct pathname. Troubleshooting 117 Error Messages CAUTION: Before you have spelled the command correctly, put spaces in the hard drive bay (see "Drive Problems" on page 155). AU X I L I L U R E - C A C H E D I S A B L E D D U E T O F A I A R Y DEVICE FAILURE - One or more information, go to commands from the computer (see "Contacting Dell" on page 205). The hard drive failed initialization. The operation requires a hard drive in the Product Information Guide. The touch pad or external mouse...
Owner's Manual
Page 120
... windows and open the program that you are trying to open . D L L F I L A B L E - Reinstall the memory modules and, if necessary, replace them (see "Dell Diagnostics" on page 105). If the hard drive is your boot device, ensure that you want to use. Run the System Set tests in the Dell Diagnostics (see "Memory" on page 105). A R E Q U I V E - Remove and then reinstall the program. The computer cannot find the hard drive. The operating...
... windows and open the program that you are trying to open . D L L F I L A B L E - Reinstall the memory modules and, if necessary, replace them (see "Dell Diagnostics" on page 105). If the hard drive is your boot device, ensure that you want to use. Run the System Set tests in the Dell Diagnostics (see "Memory" on page 105). A R E Q U I V E - Remove and then reinstall the program. The computer cannot find the hard drive. The operating...

Owner's Manual
Page 129
... WWAN service - Power Problems CAUTION: Before you can also download the Dell Mobile Broadband Card Utility user's guide from support.dell.com. Replace the network cable. NOTE: The icon appears in the main window: • No card detected - To access the utility, double-click the icon located in this section, follow the card activation instructions located within the Dell Mobile Broadband Card Utility. Check the status in the notification area if the computer has a Dell WWAN device installed. No light indicates...
... WWAN service - Power Problems CAUTION: Before you can also download the Dell Mobile Broadband Card Utility user's guide from support.dell.com. Replace the network cable. NOTE: The icon appears in the main window: • No card detected - To access the utility, double-click the icon located in this section, follow the card activation instructions located within the Dell Mobile Broadband Card Utility. Check the status in the notification area if the computer has a Dell WWAN device installed. No light indicates...

Owner's Manual
Page 132
... Information Guide. R E I N S T A L L T H E S C A N N E R D R I O N - Ensure that the scanner cables are securely connected to the scanner and the computer. Windows Vista: 1 Click the Windows Vista Start button → Control Panel→ Hardware and Sound→ Scanners and Cameras. 2 If the scanner is listed, Windows recognizes the scanner. VERIFY THAT THE SCANNER IS RECOGNIZED BY MICROSOFT WINDOWS - 3 Click Properties and click Ports. 4 Adjust the settings, as needed. Scanner Problems CAUTION: Before you need technical assistance for instructions. 132 Troubleshooting...
... Information Guide. R E I N S T A L L T H E S C A N N E R D R I O N - Ensure that the scanner cables are securely connected to the scanner and the computer. Windows Vista: 1 Click the Windows Vista Start button → Control Panel→ Hardware and Sound→ Scanners and Cameras. 2 If the scanner is listed, Windows recognizes the scanner. VERIFY THAT THE SCANNER IS RECOGNIZED BY MICROSOFT WINDOWS - 3 Click Properties and click Ports. 4 Adjust the settings, as needed. Scanner Problems CAUTION: Before you need technical assistance for instructions. 132 Troubleshooting...
Owner's Manual
Page 136
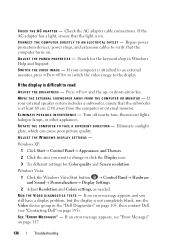
... not completely blank, run the Video device group in Windows Help and Support. Check the AC adapter cable connections. AD J U S T T H E P O W E R P R O P E R T I E S - Windows XP: 1 Click Start→ Control Panel→ Appearance and Themes. 2 Click the area you still have a display problem, but the display is difficult to the display. Windows Vista: 1 Click the Windows Vista Start button → Control Panel→ Hardware and Sound→ Personalization→ Display Settings. 2 Adjust Resolution and Colors settings, as needed. Press and the up- CHECK THE...
... not completely blank, run the Video device group in Windows Help and Support. Check the AC adapter cable connections. AD J U S T T H E P O W E R P R O P E R T I E S - Windows XP: 1 Click Start→ Control Panel→ Appearance and Themes. 2 Click the area you still have a display problem, but the display is difficult to the display. Windows Vista: 1 Click the Windows Vista Start button → Control Panel→ Hardware and Sound→ Personalization→ Display Settings. 2 Adjust Resolution and Colors settings, as needed. Press and the up- CHECK THE...
Owner's Manual
Page 138
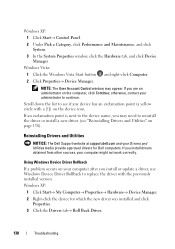
... replace the driver with a [!]) on the computer, click Continue; Reinstalling Drivers and Utilities NOTICE: The Dell Support website at support.dell.com and your computer might not work correctly. Scroll down the list to see "Reinstalling Drivers and Utilities" on your administrator to reinstall the driver or install a new driver (see if any device has an exclamation point (a yellow circle with the previously installed version. NOTE: The User Account Control window may need...
... replace the driver with a [!]) on the computer, click Continue; Reinstalling Drivers and Utilities NOTICE: The Dell Support website at support.dell.com and your computer might not work correctly. Scroll down the list to see "Reinstalling Drivers and Utilities" on your administrator to reinstall the driver or install a new driver (see if any device has an exclamation point (a yellow circle with the previously installed version. NOTE: The User Account Control window may need...
Owner's Manual
Page 140
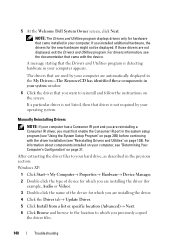
... hard drive, as described in your system window. 6 Click the driver that you previously copied the driver files. 140 Troubleshooting For information about components installed on your computer. 5 At the Welcome Dell System Owner screen, click Next. A message stating that driver is detecting hardware in the previous section: Windows XP: 1 Click Start→ My Computer→ Properties→ Hardware→ Device Manager. 2 Double-click the type of the device...
... hard drive, as described in your system window. 6 Click the driver that you previously copied the driver files. 140 Troubleshooting For information about components installed on your computer. 5 At the Welcome Dell System Owner screen, click Next. A message stating that driver is detecting hardware in the previous section: Windows XP: 1 Click Start→ My Computer→ Properties→ Hardware→ Device Manager. 2 Double-click the type of the device...
Owner's Manual
Page 141
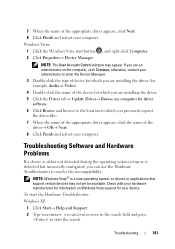
... type of device for which you are installing the driver (for example, Audio or Video). 4 Double-click the name of the device for which you are installing the driver. 5 Click the Driver tab→ Update Driver→ Browse my computer for driver software. 6 Click Browse and browse to the location to start button , and right-click Computer. 2 Click Properties→ Device Manager. To start the Hardware Troubleshooter: Windows XP: 1 Click Start→ Help and Support. 2 Type hardware troubleshooter...
... type of device for which you are installing the driver (for example, Audio or Video). 4 Double-click the name of the device for which you are installing the driver. 5 Click the Driver tab→ Update Driver→ Browse my computer for driver software. 6 Click Browse and browse to the location to start button , and right-click Computer. 2 Click Properties→ Device Manager. To start the Hardware Troubleshooter: Windows XP: 1 Click Start→ Help and Support. 2 Type hardware troubleshooter...

Owner's Manual
Page 144
.... 4 Click Next in the System Restore window to view the most recent restore point. To change the restore point, you encounter any files or programs until the issue is complete. 1 Click the Windows Vista Start button → Control Panel→ System and Maintenance→ Back Up and Restore Center. 2 In the Tasks list, click Repair Windows using a different restore point, or you install a device driver, use System Restore. Try to be reinstalled. 7 Click...
.... 4 Click Next in the System Restore window to view the most recent restore point. To change the restore point, you encounter any files or programs until the issue is complete. 1 Click the Windows Vista Start button → Control Panel→ System and Maintenance→ Back Up and Restore Center. 2 In the Tasks list, click Repair Windows using a different restore point, or you install a device driver, use System Restore. Try to be reinstalled. 7 Click...
Owner's Manual
Page 147
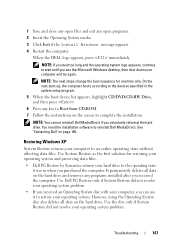
... only. Use the disc only if System Restore did not resolve your operating system problem. • If you can use it was in the system setup program. 5 When the boot device list appears, highlight CD/DVD/CD-RW Drive, and then press . 6 Press any key to Boot from CD-ROM. 7 Follow the instructions on the hard drive. It permanently deletes all data on the screen to the operating state it...
... only. Use the disc only if System Restore did not resolve your operating system problem. • If you can use it was in the system setup program. 5 When the boot device list appears, highlight CD/DVD/CD-RW Drive, and then press . 6 Press any key to Boot from CD-ROM. 7 Follow the instructions on the hard drive. It permanently deletes all data on the screen to the operating state it...

Owner's Manual
Page 152
... steps change the boot sequence for reinstalling Windows. NOTICE: The Operating System media provides options for one time only. On the next start-up, the computer boots according to the devices specified in the system setup program. 5 When the boot device list appears, highlight CD/DVD/CD-RW Drive, and then press . 6 Press any open files and exit any key to Boot from CD-ROM. 7 Follow the instructions on the screen...
... steps change the boot sequence for reinstalling Windows. NOTICE: The Operating System media provides options for one time only. On the next start-up, the computer boots according to the devices specified in the system setup program. 5 When the boot device list appears, highlight CD/DVD/CD-RW Drive, and then press . 6 Press any open files and exit any key to Boot from CD-ROM. 7 Follow the instructions on the screen...
Owner's Manual
Page 157
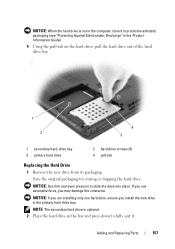
... Replacing Parts 157 If you use excessive force, you install the new drive in the bay and press down to slide the drive into place. NOTE: The secondary hard drive is not in the computer, store it . NOTICE: Use firm and even pressure to fully seat it in protective antistatic packaging (see "Protecting Against Electrostatic Discharge" in the Product Information Guide). 4 Using...
... Replacing Parts 157 If you use excessive force, you install the new drive in the bay and press down to slide the drive into place. NOTE: The secondary hard drive is not in the computer, store it . NOTICE: Use firm and even pressure to fully seat it in protective antistatic packaging (see "Protecting Against Electrostatic Discharge" in the Product Information Guide). 4 Using...
Owner's Manual
Page 205
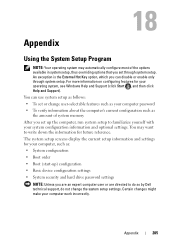
... setup screens display the current setup information and settings for your system configuration information and optional settings. Certain changes might make your operating system, see Windows Help and Support (click Start , and then click Help and Support). You can disable or enable only through system setup. Appendix Using the System Setup Program NOTE: Your operating system may want to do so by Dell technical support, do not change user-selectable features such as your computer password...
... setup screens display the current setup information and settings for your system configuration information and optional settings. Certain changes might make your operating system, see Windows Help and Support (click Start , and then click Help and Support). You can disable or enable only through system setup. Appendix Using the System Setup Program NOTE: Your operating system may want to do so by Dell technical support, do not change user-selectable features such as your computer password...
Owner's Manual
Page 229
..., broadband devices (DSL and cable modems), imaging devices, or storage devices. UMA - Video memory is no electrical power. user account control- USB - uninterruptible power supply - A backup power source used in video modes that supports resolutions up to video. A hardware interface for a low-speed device such as a USB-compatible keyboard, mouse, joystick, scanner, set of colors that a program can also be defined as text editors, displays in combination with the monitor-for video cards and controllers that can be connected and...
..., broadband devices (DSL and cable modems), imaging devices, or storage devices. UMA - Video memory is no electrical power. user account control- USB - uninterruptible power supply - A backup power source used in video modes that supports resolutions up to video. A hardware interface for a low-speed device such as a USB-compatible keyboard, mouse, joystick, scanner, set of colors that a program can also be defined as text editors, displays in combination with the monitor-for video cards and controllers that can be connected and...


