
User Guide
Page 7
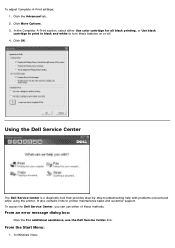
... that the printer detects. Advanced 2-sided Printing - More Options - Maintenance Install Ink Cartridges Clean Ink Cartridges Align Ink Cartridges Print a Test Page Network Support Dell Ink Management System Each time you to set the paper type manually, or have a photo cartridge installed. The number of pages remaining changes as you install a new ink cartridge. When one or both...
... that the printer detects. Advanced 2-sided Printing - More Options - Maintenance Install Ink Cartridges Clean Ink Cartridges Align Ink Cartridges Print a Test Page Network Support Dell Ink Management System Each time you to set the paper type manually, or have a photo cartridge installed. The number of pages remaining changes as you install a new ink cartridge. When one or both...
User Guide
Page 8
... Center is a diagnostic tool that provides step-by-step troubleshooting help with problems encountered while using the printer. To access the Dell Service Center, you can use the Dell Service Center link. In Windows Vista: From the Start Menu: 1. In the Complete-A-Print section, select .... From an error message dialog box: Click the For additional assistance, use either Use color cartridge for all black printing, or Use black cartridge to print in black and white to printer maintenance tasks and customer support. Click OK. Click the Advanced tab. 2. To adjust Complete-A-...
... Center is a diagnostic tool that provides step-by-step troubleshooting help with problems encountered while using the printer. To access the Dell Service Center, you can use the Dell Service Center link. In Windows Vista: From the Start Menu: 1. In the Complete-A-Print section, select .... From an error message dialog box: Click the For additional assistance, use either Use color cartridge for all black printing, or Use black cartridge to print in black and white to printer maintenance tasks and customer support. Click OK. Click the Advanced tab. 2. To adjust Complete-A-...

User Guide
Page 12
...: Part: Description: 8 Scanner Unit you use support.dell.com or contact technical support. NOTE: The Express Service Code is off when you unplug your printer when you lift to gain access to the printer. cartridge carrier 12 Express Service Identify your printer, the power will be off when you change ink... cable plugs connector into which you that power is removable. base unit 9 Scanner Part under scanner unit that holds two ink cartridges, one color ink and the other end of the printer. 10 Supplies To order ink cartridges or paper, visit www.dell.com/supplies.
...: Part: Description: 8 Scanner Unit you use support.dell.com or contact technical support. NOTE: The Express Service Code is off when you unplug your printer when you lift to gain access to the printer. cartridge carrier 12 Express Service Identify your printer, the power will be off when you change ink... cable plugs connector into which you that power is removable. base unit 9 Scanner Part under scanner unit that holds two ink cartridges, one color ink and the other end of the printer. 10 Supplies To order ink cartridges or paper, visit www.dell.com/supplies.
User Guide
Page 13
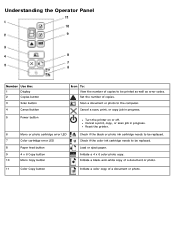
Initiate a 4 x 6 color photo copy. Cancel a print, copy, or scan job in progress. 5 Power button Turn the printer on or off. Initiate a black-and-white copy of a document or photo. 11 Color Copy button Initiate a color copy of copies. Scan a document or photo ... 4 Cancel button Icon To: View the number of copies to be replaced. Load or eject paper. Set the number of a document or photo. Reset the printer. 6 Mono or photo cartridge error LED 7 Color cartridge error LED 8 Paper feed button 9 4 x 6 Copy button 10 Mono Copy button Check if the black or photo ink...
Initiate a 4 x 6 color photo copy. Cancel a print, copy, or scan job in progress. 5 Power button Turn the printer on or off. Initiate a black-and-white copy of a document or photo. 11 Color Copy button Initiate a color copy of copies. Scan a document or photo ... 4 Cancel button Icon To: View the number of copies to be replaced. Load or eject paper. Set the number of a document or photo. Reset the printer. 6 Mono or photo cartridge error LED 7 Color cartridge error LED 8 Paper feed button 9 4 x 6 Copy button 10 Mono Copy button Check if the black or photo ink...

User Guide
Page 14
CAUTION: It is busy. 3. Remove the old ink cartridges. Dell™ ink cartridges are available only through Dell. You can order more ink online at the loading position unless the printer is recommended that Dell ink cartridges be used for problems caused by using accessories, parts, or components not supplied by phone. Press down on your Owner's Manual...
CAUTION: It is busy. 3. Remove the old ink cartridges. Dell™ ink cartridges are available only through Dell. You can order more ink online at the loading position unless the printer is recommended that Dell ink cartridges be used for problems caused by using accessories, parts, or components not supplied by phone. Press down on your Owner's Manual...

User Guide
Page 15
... tape from the back and bottom of each lid closed. 9. Close the printer. Insert the new ink cartridges. If you received with a photo cartridge. 8. For photo printing, replace the black cartridge with your photo cartridge, or dispose of the printer. Lower the scanner base unit until it rests on the bottom of the... printer. NOTICE: Do not touch the gold contact area on the side or the metal nozzles on the main body of the ink cartridges. 7. Lift the scanner base unit, and then push the scanner support back towards...
... tape from the back and bottom of each lid closed. 9. Close the printer. Insert the new ink cartridges. If you received with a photo cartridge. 8. For photo printing, replace the black cartridge with your photo cartridge, or dispose of the printer. Lower the scanner base unit until it rests on the bottom of the... printer. NOTICE: Do not touch the gold contact area on the side or the metal nozzles on the main body of the ink cartridges. 7. Lift the scanner base unit, and then push the scanner support back towards...
User Guide
Page 16
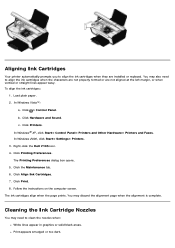
... Hardware and Sound. In Windows 2000, click Start® Settings® Printers. 3. Click Align Ink Cartridges. 7. The ink cartridges align when the page prints. Load plain paper. 2. Right-click the Dell V105 icon. 4. Cleaning the Ink Cartridge Nozzles You may need to align the ink cartridges when the characters are not properly formed or are installed or...
... Hardware and Sound. In Windows 2000, click Start® Settings® Printers. 3. Click Align Ink Cartridges. 7. The ink cartridges align when the page prints. Load plain paper. 2. Right-click the Dell V105 icon. 4. Cleaning the Ink Cartridge Nozzles You may need to align the ink cartridges when the characters are not properly formed or are installed or...
User Guide
Page 17
...paper exit tray. NOTICE: Using a damp cloth to clean the interior may damage the finish of the printer, making sure to verify the improved print quality. Right-click the Dell V105 icon. 4. Click Printing Preferences. The Printing Preferences dialog box opens. 5. If you are dry before ... Load plain paper. 2. Click ® Control Panel. Click Hardware and Sound. Click Clean Ink Cartridges. Remove paper from the wall outlet and disconnect all cables to the printer caused by not following the correct instructions for cleaning will not be covered under warranty. 5. Make sure...
...paper exit tray. NOTICE: Using a damp cloth to clean the interior may damage the finish of the printer, making sure to verify the improved print quality. Right-click the Dell V105 icon. 4. Click Printing Preferences. The Printing Preferences dialog box opens. 5. If you are dry before ... Load plain paper. 2. Click ® Control Panel. Click Hardware and Sound. Click Clean Ink Cartridges. Remove paper from the wall outlet and disconnect all cables to the printer caused by not following the correct instructions for cleaning will not be covered under warranty. 5. Make sure...
User Guide
Page 22
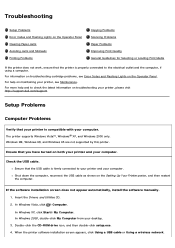
... Printer poster, and then restart the computer. For help and to check the latest information on maintaining your desktop. 3. For more help on troubleshooting your computer. In Windows XP, click Start® My Computer. Double-click the CD-ROM drive icon, and then double-click setup.exe. 4. For information on troubleshooting cartridge.... Setup Problems Computer Problems Verify that the USB cable is compatible with your computer. Troubleshooting Setup Problems Error Codes and Flashing Lights on both your printer and your printer, please visit http://support.dell.com/support.
... Printer poster, and then restart the computer. For help and to check the latest information on maintaining your desktop. 3. For more help on troubleshooting your computer. In Windows XP, click Start® My Computer. Double-click the CD-ROM drive icon, and then double-click setup.exe. 4. For information on troubleshooting cartridge.... Setup Problems Computer Problems Verify that the USB cable is compatible with your computer. Troubleshooting Setup Problems Error Codes and Flashing Lights on both your printer and your printer, please visit http://support.dell.com/support.

User Guide
Page 24
... and Flashing Lights on the Operator Panel. b. Print a job to clear the option. Check for blinking lights on What it to each cartridge. Ensure that the printer power cable is not selected. Right-click the Dell V105 icon. Right-click the Dell V105 icon. 3. To prevent multiple instances of the print object by right-clicking the...
... and Flashing Lights on the Operator Panel. b. Print a job to clear the option. Check for blinking lights on What it to each cartridge. Ensure that the printer power cable is not selected. Right-click the Dell V105 icon. Right-click the Dell V105 icon. 3. To prevent multiple instances of the print object by right-clicking the...
User Guide
Page 25
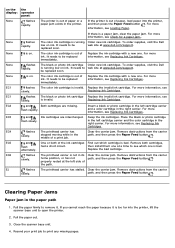
... rapidly. flashes rapidly. To order supplies, visit the Dell is invalid. The color ink cartridge is running Order new ink cartridges. flash rapidly. Insert a black or photo cartridge in the left cartridge carrier and a color cartridge in the right carrier. Remove obstructions from the carrier path...information, see Loading Paper. For more information, see which cartridge is too far into the printer, and then press the Paper Feed button . then install them one at the left cartridge carrier and the color cartridge in the right carrier. Clear the carrier jam. Remove...
... rapidly. flashes rapidly. To order supplies, visit the Dell is invalid. The color ink cartridge is running Order new ink cartridges. flash rapidly. Insert a black or photo cartridge in the left cartridge carrier and a color cartridge in the right carrier. Remove obstructions from the carrier path...information, see Loading Paper. For more information, see which cartridge is too far into the printer, and then press the Paper Feed button . then install them one at the left cartridge carrier and the color cartridge in the right carrier. Clear the carrier jam. Remove...

User Guide
Page 26
...To avoid ink smudging when you remove individual sheets from the input tray while printing. Turn off the printer. 2. Printing Problems Check the ink levels, and install new print cartridges if necessary. Orient the media according to dry: Photo/glossy paper Transparencies Labels Do not remove media ...from the paper exit tray. Firmly grasp the paper, and gently pull it to the instructions for the printer. Avoiding Jams and Misfeeds ...
...To avoid ink smudging when you remove individual sheets from the input tray while printing. Turn off the printer. 2. Printing Problems Check the ink levels, and install new print cartridges if necessary. Orient the media according to dry: Photo/glossy paper Transparencies Labels Do not remove media ...from the paper exit tray. Firmly grasp the paper, and gently pull it to the instructions for the printer. Avoiding Jams and Misfeeds ...
User Guide
Page 32
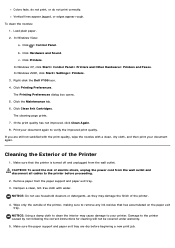
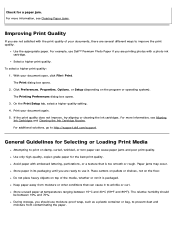
...or rough. To select a higher print quality: 1. The Print dialog box opens. 2. For more information, see Aligning Ink Cartridges and Cleaning the Ink Cartridge Nozzles. General Guidelines for Selecting or Loading Print Media Attempting to print on top of your documents, there are printing photos with... you are ready to http://support.dell.com/support. For example, use moisture-proof wrap, such as a plastic container or bag, to improve the print quality. If the print quality does not improve, try aligning or cleaning the ink cartridges. Check for the best print quality...
...or rough. To select a higher print quality: 1. The Print dialog box opens. 2. For more information, see Aligning Ink Cartridges and Cleaning the Ink Cartridge Nozzles. General Guidelines for Selecting or Loading Print Media Attempting to print on top of your documents, there are printing photos with... you are ready to http://support.dell.com/support. For example, use moisture-proof wrap, such as a plastic container or bag, to improve the print quality. If the print quality does not improve, try aligning or cleaning the ink cartridges. Check for the best print quality...
User Guide
Page 33
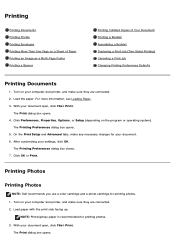
... Documents Printing Photos Printing Envelopes Printing More Than One Page on the program or operating system). The Printing Preferences dialog box closes. 7. Printing Photos Printing Photos NOTE: Dell recommends you use a color cartridge and a photo cartridge for printing photos. 3. With your document. 6. Turn on your computer and printer, and make sure they are connected. 2. The...
... Documents Printing Photos Printing Envelopes Printing More Than One Page on the program or operating system). The Printing Preferences dialog box closes. 7. Printing Photos Printing Photos NOTE: Dell recommends you use a color cartridge and a photo cartridge for printing photos. 3. With your document. 6. Turn on your computer and printer, and make sure they are connected. 2. The...

User Guide
Page 42
From the Maintenance tab: There are no print settings to set as default. Get information on sharing your printer on a network. From here, you want to set as default from the Maintenance tab. Change the default number of copies. From the Advanced tab, you can: Specify layouts that you can: Install, clean, and align ink cartridges. Print a test page. Change the default orientation. Make black and white printing and borderless printing the default setting.
From the Maintenance tab: There are no print settings to set as default. Get information on sharing your printer on a network. From here, you want to set as default from the Maintenance tab. Change the default number of copies. From the Advanced tab, you can: Specify layouts that you can: Install, clean, and align ink cartridges. Print a test page. Change the default orientation. Make black and white printing and borderless printing the default setting.


