User Guide
Page 3
... 6 Identifying Parts and Controls 7 Monitor Specifications 10 Plug-and-Play 21 LCD Monitor Quality and Pixel Policy 21 Setting Up the Monitor 22 Installing the Arm 22 Organizing Your Cables 29 Using the Tilt, Swivel, Pivot, Vertical and Horizontal Extension 30 Adjusting the Rotation Display Settings of Your System 32 Connecting Your Monitor 33 Removing the Monitor Arm 36 Wall Mounting (Optional 37 Operating the Monitor 38 Turning on the Monitor 38 Using the Front Panel Controls 38 Using the On-Screen Display (OSD) Menu 41...
... 6 Identifying Parts and Controls 7 Monitor Specifications 10 Plug-and-Play 21 LCD Monitor Quality and Pixel Policy 21 Setting Up the Monitor 22 Installing the Arm 22 Organizing Your Cables 29 Using the Tilt, Swivel, Pivot, Vertical and Horizontal Extension 30 Adjusting the Rotation Display Settings of Your System 32 Connecting Your Monitor 33 Removing the Monitor Arm 36 Wall Mounting (Optional 37 Operating the Monitor 38 Turning on the Monitor 38 Using the Front Panel Controls 38 Using the On-Screen Display (OSD) Menu 41...
User Guide
Page 6
...-Free glass and Mercury Free for ease of set up and screen optimization. • Software and documentation media includes an information file (INF), Image color Matching File (ICM), Dell Display Manager software application and product documentation. USB 3.0 upstream cable (enables the USB ports on the monitor) DP cable (DP to mDP) • Drivers and documentation media • Quick Setup Guide • Safety and Regulatory Information • Factory Calibration Report Product Features The Dell UltraSharp U2417HA monitor...
...-Free glass and Mercury Free for ease of set up and screen optimization. • Software and documentation media includes an information file (INF), Image color Matching File (ICM), Dell Display Manager software application and product documentation. USB 3.0 upstream cable (enables the USB ports on the monitor) DP cable (DP to mDP) • Drivers and documentation media • Quick Setup Guide • Safety and Regulatory Information • Factory Calibration Report Product Features The Dell UltraSharp U2417HA monitor...
User Guide
Page 8
... attached VESA compatible wall mount kit (100 mm x 100 cover) mm). 2 Regulatory label Lists the regulatory approvals. 3 Arm release button Release arm from monitor. 4 Security lock slot Secures monitor with lightning icon is for technical support. NOTE: All except APJ having service tag. 6 Arm cover Remove the cover to access the cable management compartment. 7 Cable management compartment Use to contact Tag label Dell for BC 1.2 Back View Label Description Use 1 VESA...
... attached VESA compatible wall mount kit (100 mm x 100 cover) mm). 2 Regulatory label Lists the regulatory approvals. 3 Arm release button Release arm from monitor. 4 Security lock slot Secures monitor with lightning icon is for technical support. NOTE: All except APJ having service tag. 6 Arm cover Remove the cover to access the cable management compartment. 7 Cable management compartment Use to contact Tag label Dell for BC 1.2 Back View Label Description Use 1 VESA...

User Guide
Page 9
.... DP connector (in) Connect your monitor to DP cable. Arm lock Lock the arm to playback audio coming through HDMI or DP audio channels. mDP connector (in the MST chain. Audio line-out port Connect speakers to the monitor using a M3 x 6 mm screw (screw not included). USB upstream port WARNING: Excessive sound pressure from earphones or headphones can only use this cable is connected, you have connected the USB cable to instruction on the monitor. Once this connector after you...
.... DP connector (in) Connect your monitor to DP cable. Arm lock Lock the arm to playback audio coming through HDMI or DP audio channels. mDP connector (in the MST chain. Audio line-out port Connect speakers to the monitor using a M3 x 6 mm screw (screw not included). USB upstream port WARNING: Excessive sound pressure from earphones or headphones can only use this cable is connected, you have connected the USB cable to instruction on the monitor. Once this connector after you...
User Guide
Page 12
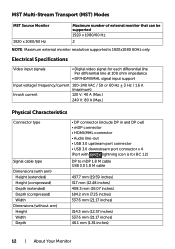
Electrical Specifications Video input signals • Digital video signal for each differential line Per differential line at 100 ohm impedance • DP/HDMI/MHL signal input support Input voltage/ frequency/current 100-240 VAC / 50 or 60 Hz ± 3 Hz / 1.6 A (maximum) Inrush current 120 V: 40 A (Max.) 240 V: 80 A (Max.) Physical Characteristics Connector type Signal cable type Dimensions (with arm) Height (extended) Height (compressed) Depth (extended) Depth (compressed) Width Dimensions...
Electrical Specifications Video input signals • Digital video signal for each differential line Per differential line at 100 ohm impedance • DP/HDMI/MHL signal input support Input voltage/ frequency/current 100-240 VAC / 50 or 60 Hz ± 3 Hz / 1.6 A (maximum) Inrush current 120 V: 40 A (Max.) 240 V: 80 A (Max.) Physical Characteristics Connector type Signal cable type Dimensions (with arm) Height (extended) Height (compressed) Depth (extended) Depth (compressed) Width Dimensions...

User Guide
Page 14
... button in the active-off Horizontal Vertical Video Power Indicator Sync Sync Active Active Active White Inactive - Accordingly, the customer should not rely upon this automatic power saving feature. The following message is tested at 230 Volts / 50 Hz. White (blinking slowly) Off Power Consumption 68 W (maximum)** 19 W (typical) Less than 0.5 W Less than 0.3 W Energy Star On Mode Power Consumption 16.93 W*** The OSD operates only in use...
... button in the active-off Horizontal Vertical Video Power Indicator Sync Sync Active Active Active White Inactive - Accordingly, the customer should not rely upon this automatic power saving feature. The following message is tested at 230 Volts / 50 Hz. White (blinking slowly) Off Power Consumption 68 W (maximum)** 19 W (typical) Less than 0.5 W Less than 0.3 W Energy Star On Mode Power Consumption 16.93 W*** The OSD operates only in use...
User Guide
Page 32
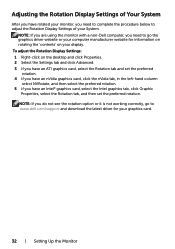
...is not working correctly, go to go the graphics driver website or your computer manufacturer website for your graphics card. 32 | Setting Up the Monitor Adjusting the Rotation Display Settings of your System. To adjust the Rotation Display Settings: 1 ...set the preferred rotation. 4 If you have an nVidia graphics card, click the nVidia tab, in the left-hand column select NVRotate, and then select the preferred rotation. 5 If you have rotated your monitor, you need to www.dell.com/support and download the latest driver for information on rotating the 'contents' on your display...
...is not working correctly, go to go the graphics driver website or your computer manufacturer website for your graphics card. 32 | Setting Up the Monitor Adjusting the Rotation Display Settings of your System. To adjust the Rotation Display Settings: 1 ...set the preferred rotation. 4 If you have an nVidia graphics card, click the nVidia tab, in the left-hand column select NVRotate, and then select the preferred rotation. 5 If you have rotated your monitor, you need to www.dell.com/support and download the latest driver for information on rotating the 'contents' on your display...
User Guide
Page 33
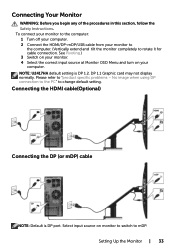
... to change default setting. No image when using DP connection to the PC" to "product specific problems - Select input source on your monitor to the computer. (Vertically extend and tilt the monitor completely to mDP. To connect your monitor to the computer: 1 Turn off your computer. 2 Connect the HDMI/DP-mDP/USB cable from your computer. DP 1.1 Graphic card may not display normally. NOTE: U2417HA default setting is DP port. Connecting the HDMI cable(Optional) Connecting the DP (or mDP) cable NOTE: Default...
... to change default setting. No image when using DP connection to the PC" to "product specific problems - Select input source on your monitor to the computer. (Vertically extend and tilt the monitor completely to mDP. To connect your monitor to the computer: 1 Turn off your computer. 2 Connect the HDMI/DP-mDP/USB cable from your computer. DP 1.1 Graphic card may not display normally. NOTE: U2417HA default setting is DP port. Connecting the HDMI cable(Optional) Connecting the DP (or mDP) cable NOTE: Default...
User Guide
Page 35
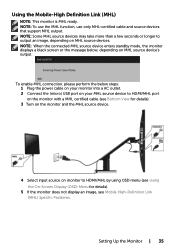
... the connected MHL source device enters standby mode, the monitor displays a black screen or the message below steps: 1 Plug the power cable on your monitor into a AC outlet. 2 Connect the (micro) USB port on your MHL source device to HDMI/MHL port on the monitor with a MHL certified cable (see Bottom View for details). 3 Turn on the monitor and the MHL source device. 4 Select input source on monitor to output an image, depending on MHL source device's output...
... the connected MHL source device enters standby mode, the monitor displays a black screen or the message below steps: 1 Plug the power cable on your monitor into a AC outlet. 2 Connect the (micro) USB port on your MHL source device to HDMI/MHL port on the monitor with a MHL certified cable (see Bottom View for details). 3 Turn on the monitor and the MHL source device. 4 Select input source on monitor to output an image, depending on MHL source device's output...

User Guide
Page 43
... mDP input source. Select the HDMI/MHL input when you are using the DP (DisplayPort) connector. Icon Menu and Submenus DP mDP HDMI/MHL Auto Select Reset Input Source Color Description Select DP input when you are using the HDMI connector. Use to adjust the color setting mode. Use the Color menu to select Auto Select, the monitor scans for available input sources. Use to the factory defaults. Operating the Monitor | 43 Select mDP input when you are using the mDP (mini DisplayPort) connector. Resets your monitor's Input Source settings to...
... mDP input source. Select the HDMI/MHL input when you are using the DP (DisplayPort) connector. Icon Menu and Submenus DP mDP HDMI/MHL Auto Select Reset Input Source Color Description Select DP input when you are using the HDMI connector. Use to adjust the color setting mode. Use the Color menu to select Auto Select, the monitor scans for available input sources. Use to the factory defaults. Operating the Monitor | 43 Select mDP input when you are using the mDP (mini DisplayPort) connector. Resets your monitor's Input Source settings to...
User Guide
Page 44
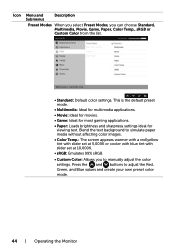
Press the and buttons to adjust the Red, Green, and Blue values and create your own preset color mode. 44 | Operating the Monitor Blend the text background to simulate paper media without affecting color images. • Color Temp.: The screen appears warmer with a red/yellow tint with slider set at 5,000K or cooler with blue tint with slider set at 10,000K. • sRGB: Emulates 99% sRGB...
Press the and buttons to adjust the Red, Green, and Blue values and create your own preset color mode. 44 | Operating the Monitor Blend the text background to simulate paper media without affecting color images. • Color Temp.: The screen appears warmer with a red/yellow tint with slider set at 5,000K or cooler with blue tint with slider set at 10,000K. • sRGB: Emulates 99% sRGB...

User Guide
Page 48
... degrees. Either soft lock (through OSD menu) or hard lock (Press and hold the exit button 6 sec) Restore the menu settings to factory defaults. 48 | Operating the Monitor Select from 5 to 60 seconds. Use the and buttons to your display rotation. Transparency Select this option to adjustments. NOTE: Lock function - You can adjust the menu according to adjust the slider in 1-second increments, from Preset Modes, Brightness/Contrast, Input Source, Aspect Ratio, Rotation...
... degrees. Either soft lock (through OSD menu) or hard lock (Press and hold the exit button 6 sec) Restore the menu settings to factory defaults. 48 | Operating the Monitor Select from 5 to 60 seconds. Use the and buttons to your display rotation. Transparency Select this option to adjustments. NOTE: Lock function - You can adjust the menu according to adjust the slider in 1-second increments, from Preset Modes, Brightness/Contrast, Input Source, Aspect Ratio, Rotation...

User Guide
Page 49
Enable this feature. Select Disable to turn off this feature for best user experience and optimum performance of your computer. Operating the Monitor | 49 Icon Menu and Submenus Other Description DDC/CI Select this option to adjust the monitor settings using software on . DDC/CI (Display Data Channel/Command Interface) allows you to adjust the OSD settings, such as the DDC/CI, LCD conditioning, and so on your monitor.
Enable this feature. Select Disable to turn off this feature for best user experience and optimum performance of your computer. Operating the Monitor | 49 Icon Menu and Submenus Other Description DDC/CI Select this option to adjust the monitor settings using software on . DDC/CI (Display Data Channel/Command Interface) allows you to adjust the OSD settings, such as the DDC/CI, LCD conditioning, and so on your monitor.

User Guide
Page 53
... power LED remains white. The floating dialog box should appear on the monitor. To ensure proper Self-Test operation, remove all digital and the analog cables from the back of the computer. If your monitor and computer are properly connected but the monitor screen remains dark, run the monitor self-test by performing the following steps: 1 Turn off both your monitor is working correctly. or or Troubleshooting...
... power LED remains white. The floating dialog box should appear on the monitor. To ensure proper Self-Test operation, remove all digital and the analog cables from the back of the computer. If your monitor and computer are properly connected but the monitor screen remains dark, run the monitor self-test by performing the following steps: 1 Turn off both your monitor is working correctly. or or Troubleshooting...

User Guide
Page 55
... an inherent problem with your monitor, or with your computer and video card. Troubleshooting | 55 A gray screen appears. 4 Carefully inspect the screen for abnormalities. 5 Press Button 4 on the front panel simultaneously for any screen abnormalities upon using the built-in green, blue, black, white, and text screens. To exit, press Button 4 again. The monitor then goes into the self-test mode. 3 Press and hold Button 1 and Button 4 on the front panel again. To...
... an inherent problem with your monitor, or with your computer and video card. Troubleshooting | 55 A gray screen appears. 4 Carefully inspect the screen for abnormalities. 5 Press Button 4 on the front panel simultaneously for any screen abnormalities upon using the built-in green, blue, black, white, and text screens. To exit, press Button 4 again. The monitor then goes into the self-test mode. 3 Press and hold Button 1 and Button 4 on the front panel again. To...
User Guide
Page 56
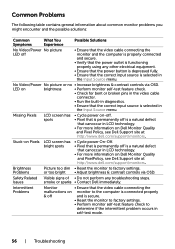
... picture LED off • Ensure that the video cable connecting the monitor and the computer is properly connected and secure. • Verify that the power outlet is functioning properly using any troubleshooting steps. No Video/Power No picture or no • Increase brightness & contrast controls via OSD. Intermittent Problems Monitor • Ensure that the video cable connecting the malfunctions on Dell Monitor Quality and Pixel Policy, see Dell Support site at : http://www.dell.com/support/monitors. Brightness Problems Picture too dim • Reset...
... picture LED off • Ensure that the video cable connecting the monitor and the computer is properly connected and secure. • Verify that the power outlet is functioning properly using any troubleshooting steps. No Video/Power No picture or no • Increase brightness & contrast controls via OSD. Intermittent Problems Monitor • Ensure that the video cable connecting the malfunctions on Dell Monitor Quality and Pixel Policy, see Dell Support site at : http://www.dell.com/support/monitors. Brightness Problems Picture too dim • Reset...

User Guide
Page 57
... the video cable connector. • Change the settings of the Preset Modes in the Color menu OSD depending on menu OSD. Product Specific Problems Specific Symptoms What You Experience Possible Solutions Screen image is too small Image is • Check the Aspect Ratio setting in the Display centered on the application. • Adjust R/G/B value under Custom. No Input Signal when user controls are pressed No picture, the LED light is plugged in diagnostics. • Use the Power Management feature to unlock (for...
... the video cable connector. • Change the settings of the Preset Modes in the Color menu OSD depending on menu OSD. Product Specific Problems Specific Symptoms What You Experience Possible Solutions Screen image is too small Image is • Check the Aspect Ratio setting in the Display centered on the application. • Adjust R/G/B value under Custom. No Input Signal when user controls are pressed No picture, the LED light is plugged in diagnostics. • Use the Power Management feature to unlock (for...
User Guide
Page 58
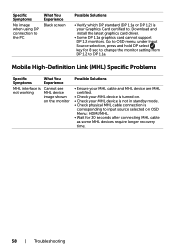
... using DP connection to the PC What You Experience Black screen Possible Solutions • Verify which DP standard (DP 1.1a or DP 1.2) is corresponding to input source selected on . • Check your MHL device is not in standby mode. • Check physical MHL cable connection is your Graphics Card certified to. Download and install the latest graphics card driver. • Some DP 1.1a graphics card cannot support DP 1.2 monitors...
... using DP connection to the PC What You Experience Black screen Possible Solutions • Verify which DP standard (DP 1.1a or DP 1.2) is corresponding to input source selected on . • Check your MHL device is not in standby mode. • Check physical MHL cable connection is your Graphics Card certified to. Download and install the latest graphics card driver. • Some DP 1.1a graphics card cannot support DP 1.2 monitors...
User Guide
Page 60
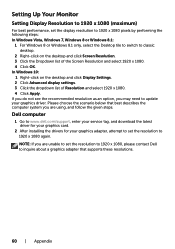
...-click on the desktop and click Screen Resolution. 3 Click the Dropdown list of Resolution and select 1920 x 1080. 4 Click Apply. Dell computer 1 Go to www.dell.com/support, enter your service tag, and download the latest driver for your graphics card. 2 After installing the drivers for your graphics driver. Setting Up Your Monitor Setting Display Resolution to 1920 x 1080 (maximum) For best performance, set the resolution to 1920 x 1080 again. If...
...-click on the desktop and click Screen Resolution. 3 Click the Dropdown list of Resolution and select 1920 x 1080. 4 Click Apply. Dell computer 1 Go to www.dell.com/support, enter your service tag, and download the latest driver for your graphics card. 2 After installing the drivers for your graphics driver. Setting Up Your Monitor Setting Display Resolution to 1920 x 1080 (maximum) For best performance, set the resolution to 1920 x 1080 again. If...
User Guide
Page 61
... for updated driver (for example, http://www.ATI.com or http://www.NVIDIA.com). 6 After installing the drivers for your computer or consider purchasing a graphics adapter that supports the video resolution. Non-Dell computer In Windows Vista, Windows 7, Windows 8 or Windows 8.1: 1 For Windows 8 or Windows 8.1 only, select the Desktop tile to switch to classic desktop. 2 Right-click on the desktop and click Display Settings. 2 Click Advanced display settings. 3 Click Display adapter properties...
... for updated driver (for example, http://www.ATI.com or http://www.NVIDIA.com). 6 After installing the drivers for your computer or consider purchasing a graphics adapter that supports the video resolution. Non-Dell computer In Windows Vista, Windows 7, Windows 8 or Windows 8.1: 1 For Windows 8 or Windows 8.1 only, select the Desktop tile to switch to classic desktop. 2 Right-click on the desktop and click Display Settings. 2 Click Advanced display settings. 3 Click Display adapter properties...


