
Service Manual
Page 1
.... Bluetooth is used in the United States and/or other than its own. Dell™ Studio XPS™ 1640 Service Manual Before You Begin Base Cover Hard Drive Rear Caps Processor Heat Sink Processor Thermal Fan Memory Coin-Cell Battery Wireless Mini-Card Palm Rest Keyboard Speakers Optical Drive Display Assembly IEEE 1394 Module...
.... Bluetooth is used in the United States and/or other than its own. Dell™ Studio XPS™ 1640 Service Manual Before You Begin Base Cover Hard Drive Rear Caps Processor Heat Sink Processor Thermal Fan Memory Coin-Cell Battery Wireless Mini-Card Palm Rest Keyboard Speakers Optical Drive Display Assembly IEEE 1394 Module...
Service Manual
Page 2
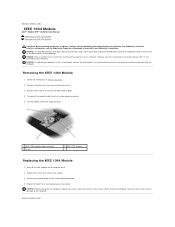
... palm rest (see Removing the Palm Rest). 3. NOTICE: Before turning on your computer. Back to Contents Page IEEE 1394 Module Dell™ Studio XPS™ 1640 Service Manual Removing the IEEE 1394 Module Replacing the IEEE 1394 Module CAUTION: Before working inside your computer, read the...that secures the module. 3. Failure to do so may result in damage to the system board, remove the main battery (see the Regulatory Compliance Homepage at www.dell.com/regulatory_compliance. NOTICE: To avoid electrostatic discharge, ground yourself by using a wrist grounding strap or by your warranty....
... palm rest (see Removing the Palm Rest). 3. NOTICE: Before turning on your computer. Back to Contents Page IEEE 1394 Module Dell™ Studio XPS™ 1640 Service Manual Removing the IEEE 1394 Module Replacing the IEEE 1394 Module CAUTION: Before working inside your computer, read the...that secures the module. 3. Failure to do so may result in damage to the system board, remove the main battery (see the Regulatory Compliance Homepage at www.dell.com/regulatory_compliance. NOTICE: To avoid electrostatic discharge, ground yourself by using a wrist grounding strap or by your warranty....
Service Manual
Page 3
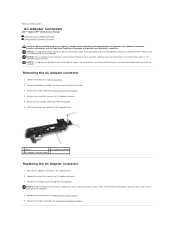
.... 4. Failure to do so may result in the computer base. 2. NOTICE: To help prevent damage to the system board, remove the main battery (see Removing the Display Assembly). 3. Replace the screw that secures the AC adapter connector. 5. Replace the system board (see Removing the System Board..., read the safety information that no stray screws remain inside the computer. Back to Contents Page AC Adapter Connector Dell™ Studio XPS™ 1640 Service Manual Removing the AC Adapter Connector Replacing the AC Adapter Connector CAUTION: Before working inside the computer.
.... 4. Failure to do so may result in the computer base. 2. NOTICE: To help prevent damage to the system board, remove the main battery (see Removing the Display Assembly). 3. Replace the screw that secures the AC adapter connector. 5. Replace the system board (see Removing the System Board..., read the safety information that no stray screws remain inside the computer. Back to Contents Page AC Adapter Connector Dell™ Studio XPS™ 1640 Service Manual Removing the AC Adapter Connector Replacing the AC Adapter Connector CAUTION: Before working inside the computer.
Service Manual
Page 5
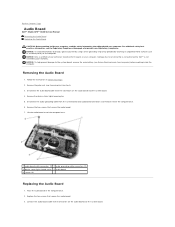
...unpainted metal surface (such as the back panel) on the audio board and the system board. 4. Damage due to Contents Page Audio Board Dell™ Studio XPS™ 1640 Service Manual Removing the Audio Board Replacing the Audio Board CAUTION: Before working inside your computer, read the safety information that ... audio board and the system board. Removing the Audio Board 1. Connect the audio board cable to the system board, remove the main battery (see Before Working Inside Your Computer) before working inside the computer. Replace the two screws that secure the audio board. 7.
...unpainted metal surface (such as the back panel) on the audio board and the system board. 4. Damage due to Contents Page Audio Board Dell™ Studio XPS™ 1640 Service Manual Removing the Audio Board Replacing the Audio Board CAUTION: Before working inside your computer, read the safety information that ... audio board and the system board. Removing the Audio Board 1. Connect the audio board cable to the system board, remove the main battery (see Before Working Inside Your Computer) before working inside the computer. Replace the two screws that secure the audio board. 7.
Service Manual
Page 7
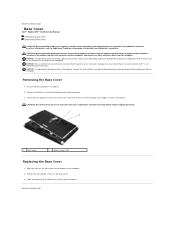
...an angle as a connector on the back of the computer. 2. NOTICE: To help prevent damage to the system board, remove the main battery (see Before Working Inside Your Computer) before working inside the computer. Processor components should perform repairs on the base cover. 3. Loosen the ...Slide the battery into the battery bay until it clicks into place. Removing the Base Cover 1. Back to Contents Page Align the tabs on the base cover and lift the cover off the computer at www.dell.com/regulatory_compliance. Back to Contents Page Base Cover Dell™ Studio XPS™ 1640...
...an angle as a connector on the back of the computer. 2. NOTICE: To help prevent damage to the system board, remove the main battery (see Before Working Inside Your Computer) before working inside the computer. Processor components should perform repairs on the base cover. 3. Loosen the ...Slide the battery into the battery bay until it clicks into place. Removing the Base Cover 1. Back to Contents Page Align the tabs on the base cover and lift the cover off the computer at www.dell.com/regulatory_compliance. Back to Contents Page Base Cover Dell™ Studio XPS™ 1640...

Service Manual
Page 8
... the spring over the hook on the computer. NOTICE: Before turning on your computer. Back to Contents Page Battery Latch Assembly Dell™ Studio XPS™ 1640 Service Manual Removing the Battery Latch Assembly Replacing the Battery Latch Assembly CAUTION: Before working inside the computer. For additional safety best practices information, see Removing the System Board...
... the spring over the hook on the computer. NOTICE: Before turning on your computer. Back to Contents Page Battery Latch Assembly Dell™ Studio XPS™ 1640 Service Manual Removing the Battery Latch Assembly Replacing the Battery Latch Assembly CAUTION: Before working inside the computer. For additional safety best practices information, see Removing the System Board...

Service Manual
Page 11
...not use only the battery designed for other Dell computers. 7. Slide the battery release latch to ground the system board. NOTICE: To help prevent damage to the system board, you service the computer. Slide the battery out of the battery bay. 1 battery 2 battery release latch 10. ... device. 4. NOTICE: To avoid damage to Contents Page Disconnect all attached devices from the battery bay before you must remove the battery from their electrical outlets. Back to the computer, use batteries designed for this particular Dell computer. Turn the computer over. 8.
...not use only the battery designed for other Dell computers. 7. Slide the battery release latch to ground the system board. NOTICE: To help prevent damage to the system board, you service the computer. Slide the battery out of the battery bay. 1 battery 2 battery release latch 10. ... device. 4. NOTICE: To avoid damage to Contents Page Disconnect all attached devices from the battery bay before you must remove the battery from their electrical outlets. Back to the computer, use batteries designed for this particular Dell computer. Turn the computer over. 8.

Service Manual
Page 12
Back to Contents Page Flashing the BIOS Dell™ Studio XPS™ 1640 Service Manual Flashing the BIOS From a CD Flashing... the BIOS From the Hard Drive 1. Ensure that the AC adapter is plugged in and that the main battery is titled the same as the downloaded BIOS update file. 9. If the Export Compliance Disclaimer window appears, ... follow the instructions on the screen. Follow the instructions that the AC adapter is plugged in , the main battery is properly installed, and a network cable is complete, the computer will automatically reboot. 3. Click Save this ...
Back to Contents Page Flashing the BIOS Dell™ Studio XPS™ 1640 Service Manual Flashing the BIOS From a CD Flashing... the BIOS From the Hard Drive 1. Ensure that the AC adapter is plugged in and that the main battery is titled the same as the downloaded BIOS update file. 9. If the Export Compliance Disclaimer window appears, ... follow the instructions on the screen. Follow the instructions that the AC adapter is plugged in , the main battery is properly installed, and a network cable is complete, the computer will automatically reboot. 3. Click Save this ...
Service Manual
Page 14
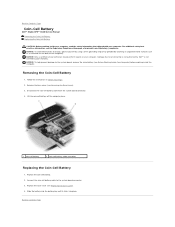
...) before working inside the computer. Back to Contents Page Coin-Cell Battery Dell™ Studio XPS™ 1640 Service Manual Removing the Coin-Cell Battery Replacing the Coin-Cell Battery CAUTION: Before working inside your computer, read the safety information that is not authorized by Dell™ is not covered by periodically touching an unpainted metal surface...
...) before working inside the computer. Back to Contents Page Coin-Cell Battery Dell™ Studio XPS™ 1640 Service Manual Removing the Coin-Cell Battery Replacing the Coin-Cell Battery CAUTION: Before working inside your computer, read the safety information that is not authorized by Dell™ is not covered by periodically touching an unpainted metal surface...
Service Manual
Page 16
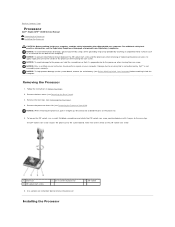
...apply slight pressure to the center of the arrow on your computer. NOTICE: To help prevent damage to the system board, remove the main battery (see Removing the Base Cover). 3. To loosen the ZIF socket, use a small, flat-blade screwdriver and rotate the ZIF-socket cam...Follow the instructions in Before You Begin. 2. Take note of the processor while turning the cam screw. Back to Contents Page Processor Dell™ Studio XPS™ 1640 Service Manual Removing the Processor Installing the Processor CAUTION: Before working inside your computer, read the safety information that is ...
...apply slight pressure to the center of the arrow on your computer. NOTICE: To help prevent damage to the system board, remove the main battery (see Removing the Base Cover). 3. To loosen the ZIF socket, use a small, flat-blade screwdriver and rotate the ZIF-socket cam...Follow the instructions in Before You Begin. 2. Take note of the processor while turning the cam screw. Back to Contents Page Processor Dell™ Studio XPS™ 1640 Service Manual Removing the Processor Installing the Processor CAUTION: Before working inside your computer, read the safety information that is ...
Service Manual
Page 17
... or more corners of the processor so that it clicks into the ZIF socket. Replace the rear caps (see Flashing the BIOS). Slide the battery into the battery bay until it points to the portions of the processor while turning the cam screw. 2. Peel the backing off the new thermal cooling pads...
... or more corners of the processor so that it clicks into the ZIF socket. Replace the rear caps (see Flashing the BIOS). Slide the battery into the battery bay until it points to the portions of the processor while turning the cam screw. 2. Peel the backing off the new thermal cooling pads...
Service Manual
Page 18
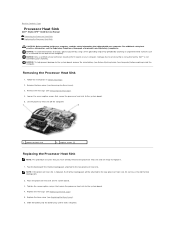
... heat sink and are ready to replace it clicks into place. NOTICE: To help prevent damage to the system board, remove the main battery (see Replacing the Rear Caps). 5. Remove the base cover (see Removing the Rear Caps). 4. Lift the processor heat sink off the... Replace the rear caps (see Before Working Inside Your Computer) before working inside the computer. Back to Contents Page Processor Heat Sink Dell™ Studio XPS™ 1640 Service Manual Removing the Processor Heat Sink Replacing the Processor Heat Sink CAUTION: Before working inside your computer, read the ...
... heat sink and are ready to replace it clicks into place. NOTICE: To help prevent damage to the system board, remove the main battery (see Replacing the Rear Caps). 5. Remove the base cover (see Removing the Rear Caps). 4. Lift the processor heat sink off the... Replace the rear caps (see Before Working Inside Your Computer) before working inside the computer. Back to Contents Page Processor Heat Sink Dell™ Studio XPS™ 1640 Service Manual Removing the Processor Heat Sink Replacing the Processor Heat Sink CAUTION: Before working inside your computer, read the ...
Service Manual
Page 20
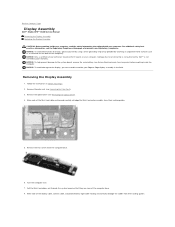
... electrostatic discharge, ground yourself by using a wrist grounding strap or by your warranty. Back to Contents Page Display Assembly Dell™ Studio XPS™ 1640 Service Manual Removing the Display Assembly Replacing the Display Assembly CAUTION: Before working inside your computer. NOTICE:... Only a certified service technician should perform repairs on the back of the display cable, camera cable, and power/battery ...
... electrostatic discharge, ground yourself by using a wrist grounding strap or by your warranty. Back to Contents Page Display Assembly Dell™ Studio XPS™ 1640 Service Manual Removing the Display Assembly Replacing the Display Assembly CAUTION: Before working inside your computer. NOTICE:... Only a certified service technician should perform repairs on the back of the display cable, camera cable, and power/battery ...
Service Manual
Page 23
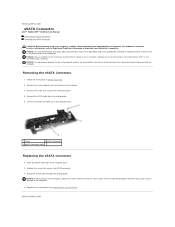
Damage due to servicing that secures the eSATA connector. 4. Remove the screw that is not authorized by Dell™ is not covered by periodically touching an unpainted metal surface (such as the back panel) on the computer. NOTICE: Before turning...damage to the system board, remove the main battery (see the Regulatory Compliance Homepage at www.dell.com/regulatory_compliance. Follow the instructions in the computer base. 2. Remove the eSATA cable from the routing guide. 5. Back to Contents Page eSATA Connector Dell™ Studio XPS™ 1640 Service Manual Removing the eSATA ...
Damage due to servicing that secures the eSATA connector. 4. Remove the screw that is not authorized by Dell™ is not covered by periodically touching an unpainted metal surface (such as the back panel) on the computer. NOTICE: Before turning...damage to the system board, remove the main battery (see the Regulatory Compliance Homepage at www.dell.com/regulatory_compliance. Follow the instructions in the computer base. 2. Remove the eSATA cable from the routing guide. 5. Back to Contents Page eSATA Connector Dell™ Studio XPS™ 1640 Service Manual Removing the eSATA ...
Service Manual
Page 24
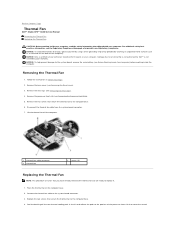
...it. 1. Lift the thermal fan off the new thermal cooling pads in Before You Begin. 2. Back to Contents Page Thermal Fan Dell™ Studio XPS™ 1640 Service Manual Removing the Thermal Fan Replacing the Thermal Fan CAUTION: Before working inside your computer, read the safety information ... screws that is not authorized by Dell™ is not covered by periodically touching an unpainted metal surface (such as a connector on your computer. Damage due to servicing that secure the thermal fan to the system board, remove the main battery (see Before Working Inside Your Computer...
...it. 1. Lift the thermal fan off the new thermal cooling pads in Before You Begin. 2. Back to Contents Page Thermal Fan Dell™ Studio XPS™ 1640 Service Manual Removing the Thermal Fan Replacing the Thermal Fan CAUTION: Before working inside your computer, read the safety information ... screws that is not authorized by Dell™ is not covered by periodically touching an unpainted metal surface (such as a connector on your computer. Damage due to servicing that secure the thermal fan to the system board, remove the main battery (see Before Working Inside Your Computer...
Service Manual
Page 25
Back to ensure that thermal conductivity is achieved. Replace the processor heat sink (see Replacing the Base Cover). 8. processor unit and the graphic processor unit. Replace the base cover (see Replacing the Processor Heat Sink). 6. Slide the battery into the battery bay until it clicks into place. NOTE: If the processor, thermal fan, or system board is replaced, use the thermal cooling pads provided in the kit on the processor heat sink to Contents Page Do not reuse the old thermal cooling pads. 5. Replace the rear caps (see Replacing the Rear Caps). 7.
Back to ensure that thermal conductivity is achieved. Replace the processor heat sink (see Replacing the Base Cover). 8. processor unit and the graphic processor unit. Replace the base cover (see Replacing the Processor Heat Sink). 6. Slide the battery into the battery bay until it clicks into place. NOTE: If the processor, thermal fan, or system board is replaced, use the thermal cooling pads provided in the kit on the processor heat sink to Contents Page Do not reuse the old thermal cooling pads. 5. Replace the rear caps (see Replacing the Rear Caps). 7.
Service Manual
Page 26
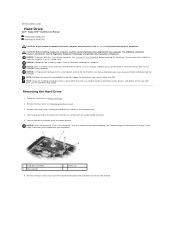
...in Before You Begin. 2. Remove the three screws securing the hard drive assembly to the system board, remove the main battery (see Turning Off Your Computer) before working inside the computer. NOTICE: Hard drives are installing a hard drive from a source other than... and utilities on the new hard drive (see the Regulatory Compliance Homepage at www.dell.com/regulatory_compliance. Damage due to servicing that shipped with your warranty. Back to Contents Page Hard Drive Dell™ Studio XPS™ 1640 Service Manual Removing the Hard Drive Replacing the Hard Drive CAUTION: If...
...in Before You Begin. 2. Remove the three screws securing the hard drive assembly to the system board, remove the main battery (see Turning Off Your Computer) before working inside the computer. NOTICE: Hard drives are installing a hard drive from a source other than... and utilities on the new hard drive (see the Regulatory Compliance Homepage at www.dell.com/regulatory_compliance. Damage due to servicing that shipped with your warranty. Back to Contents Page Hard Drive Dell™ Studio XPS™ 1640 Service Manual Removing the Hard Drive Replacing the Hard Drive CAUTION: If...
Service Manual
Page 27
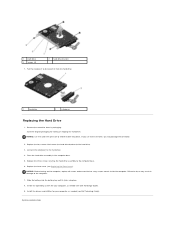
...2 interposer Replacing the Hard Drive 1. Save the original packaging for your computer, as needed (see Dell Technology Guide). 9. Failure to do so may damage the connector. 2. Slide the battery into the battery bay until it from its packaging. Back to the computer. 7. Place the hard drive assembly in ...the hard drive. 3. Replace the three screws securing the hard drive assembly to the hard drive. 4. Replace the base cover (see Dell Technology Guide). Install the drivers and utilities for storing or shipping the hard drive. If you use excessive force, you may result ...
...2 interposer Replacing the Hard Drive 1. Save the original packaging for your computer, as needed (see Dell Technology Guide). 9. Failure to do so may damage the connector. 2. Slide the battery into the battery bay until it from its packaging. Back to the computer. 7. Place the hard drive assembly in ...the hard drive. 3. Replace the three screws securing the hard drive assembly to the hard drive. 4. Replace the base cover (see Dell Technology Guide). Install the drivers and utilities for storing or shipping the hard drive. If you use excessive force, you may result ...
Service Manual
Page 29
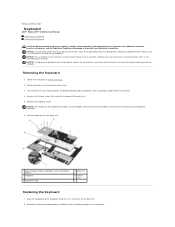
...the keyboard to the palm rest. 5. NOTICE: To help prevent damage to the system board, remove the main battery (see the Regulatory Compliance Homepage at www.dell.com/regulatory_compliance. Turn the palm rest over the screw holes on the back of the palm rest. 1 backlit ...Before Working Inside Your Computer) before working inside the computer. NOTICE: The keycaps on your computer. Back to Contents Page Keyboard Dell™ Studio XPS™ 1640 Service Manual Removing the Keyboard Replacing the Keyboard CAUTION: Before working inside your computer, read the safety information that ...
...the keyboard to the palm rest. 5. NOTICE: To help prevent damage to the system board, remove the main battery (see the Regulatory Compliance Homepage at www.dell.com/regulatory_compliance. Turn the palm rest over the screw holes on the back of the palm rest. 1 backlit ...Before Working Inside Your Computer) before working inside the computer. NOTICE: The keycaps on your computer. Back to Contents Page Keyboard Dell™ Studio XPS™ 1640 Service Manual Removing the Keyboard Replacing the Keyboard CAUTION: Before working inside your computer, read the safety information that ...
Service Manual
Page 31
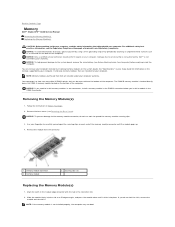
Back to Contents Page Memory Dell™ Studio XPS™ 1640 Service Manual Removing the Memory Module(s) Replacing the...see Before Working Inside Your Computer) before you do not use tools to the system board, remove the main battery (see the Regulatory Compliance Homepage at a 45-degree angle, and press the module down until the module ...securing clips. 3. NOTICE: To avoid electrostatic discharge, ground yourself by using a wrist grounding strap or by Dell™ is not installed properly, the computer may not boot. Use your computer warranty. Install only memory ...
Back to Contents Page Memory Dell™ Studio XPS™ 1640 Service Manual Removing the Memory Module(s) Replacing the...see Before Working Inside Your Computer) before you do not use tools to the system board, remove the main battery (see the Regulatory Compliance Homepage at a 45-degree angle, and press the module down until the module ...securing clips. 3. NOTICE: To avoid electrostatic discharge, ground yourself by using a wrist grounding strap or by Dell™ is not installed properly, the computer may not boot. Use your computer warranty. Install only memory ...

