Service Manual
Page 1
Dell™ Studio XPS™ 1640 Service Manual Before You Begin Base Cover Hard Drive Rear Caps Processor Heat Sink Processor Thermal Fan Memory Coin-Cell Battery Wireless Mini-Card Palm Rest Keyboard Speakers Optical Drive Display Assembly IEEE 1394 Module Subwoofer Audio Board System Board TV Tuner Card (Optional) eSATA Connector AC Adapter Connector Battery Latch Assembly Flashing the BIOS Notes, Notices, and Cautions NOTE: A NOTE indicates important information that helps you how to avoid the problem. Reproduction...
Dell™ Studio XPS™ 1640 Service Manual Before You Begin Base Cover Hard Drive Rear Caps Processor Heat Sink Processor Thermal Fan Memory Coin-Cell Battery Wireless Mini-Card Palm Rest Keyboard Speakers Optical Drive Display Assembly IEEE 1394 Module Subwoofer Audio Board System Board TV Tuner Card (Optional) eSATA Connector AC Adapter Connector Battery Latch Assembly Flashing the BIOS Notes, Notices, and Cautions NOTE: A NOTE indicates important information that helps you how to avoid the problem. Reproduction...
Service Manual
Page 5
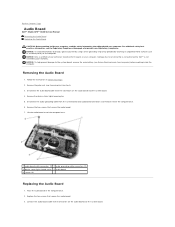
..., ground yourself by using a wrist grounding strap or by your computer. Disconnect the audio board cable from the computer base. 6. Lift the audio board out of the computer base. 1 audio board cable connectors (2) 2 audio grounding cable connectors (2) 3 device status lights board mylar 4 audio board 5 screws (2) Replacing the Audio Board 1. Place the audio board in Before You Begin. 2. Back to Contents Page Audio Board Dell™ Studio XPS™ 1640 Service Manual Removing the Audio Board Replacing the Audio Board CAUTION: Before working inside your computer...
..., ground yourself by using a wrist grounding strap or by your computer. Disconnect the audio board cable from the computer base. 6. Lift the audio board out of the computer base. 1 audio board cable connectors (2) 2 audio grounding cable connectors (2) 3 device status lights board mylar 4 audio board 5 screws (2) Replacing the Audio Board 1. Place the audio board in Before You Begin. 2. Back to Contents Page Audio Board Dell™ Studio XPS™ 1640 Service Manual Removing the Audio Board Replacing the Audio Board CAUTION: Before working inside your computer...

Service Manual
Page 10
... You Begin Dell™ Studio XPS™ 1640 Service Manual Recommended Tools Turning Off Your Computer Before Working Inside Your Computer This section provides procedures for removing and installing the components in this section, follow the safety instructions that the following conditions exist: l You have performed the steps in reverse order. Recommended Tools The procedures in your computer. 1. Some cables have connectors...
... You Begin Dell™ Studio XPS™ 1640 Service Manual Recommended Tools Turning Off Your Computer Before Working Inside Your Computer This section provides procedures for removing and installing the components in this section, follow the safety instructions that the following conditions exist: l You have performed the steps in reverse order. Recommended Tools The procedures in your computer. 1. Some cables have connectors...

Service Manual
Page 12
... Flashing the BIOS Dell™ Studio XPS™ 1640 Service Manual Flashing the BIOS From a CD Flashing the BIOS From the Hard Drive If a BIOS upgrade CD is titled the same as the downloaded BIOS update file. 9. Turn on the screen. The file icon appears on the screen. Flashing the BIOS From a CD 1. Back to save configuration changes. 8. Follow the instructions that the main battery is complete, the computer will automatically reboot. 3. When the flash update is installed properly. The File Download window...
... Flashing the BIOS Dell™ Studio XPS™ 1640 Service Manual Flashing the BIOS From a CD Flashing the BIOS From the Hard Drive If a BIOS upgrade CD is titled the same as the downloaded BIOS update file. 9. Turn on the screen. The file icon appears on the screen. Flashing the BIOS From a CD 1. Back to save configuration changes. 8. Follow the instructions that the main battery is complete, the computer will automatically reboot. 3. When the flash update is installed properly. The File Download window...
Service Manual
Page 20
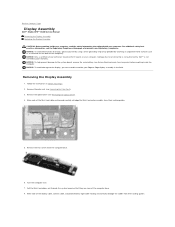
... Before Working Inside Your Computer) before working inside the computer. Damage due to the system board, remove the main battery (see Removing the Palm Rest). 3. NOTICE: To help prevent damage to servicing that is not authorized by Dell™ is not covered by periodically touching an unpainted metal surface (such as a connector on your computer. Make note of the display cable, camera cable, and power/battery light cable routing...
... Before Working Inside Your Computer) before working inside the computer. Damage due to the system board, remove the main battery (see Removing the Palm Rest). 3. NOTICE: To help prevent damage to servicing that is not authorized by Dell™ is not covered by periodically touching an unpainted metal surface (such as a connector on your computer. Make note of the display cable, camera cable, and power/battery light cable routing...
Service Manual
Page 26
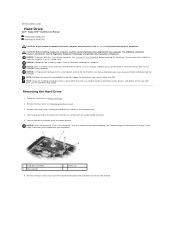
... than Dell, you need to install an operating system, drivers, and utilities on your computer (see the Dell Technology Guide). Follow the instructions in the safety instructions that is not authorized by your computer). 1 hard drive assembly 3 blue pull-tab 2 screws (3) 6. Remove the base cover (see the Regulatory Compliance Homepage at www.dell.com/regulatory_compliance. Back to Contents Page Hard Drive Dell™ Studio XPS™ 1640 Service Manual Removing the Hard Drive Replacing the Hard Drive CAUTION...
... than Dell, you need to install an operating system, drivers, and utilities on your computer (see the Dell Technology Guide). Follow the instructions in the safety instructions that is not authorized by your computer). 1 hard drive assembly 3 blue pull-tab 2 screws (3) 6. Remove the base cover (see the Regulatory Compliance Homepage at www.dell.com/regulatory_compliance. Back to Contents Page Hard Drive Dell™ Studio XPS™ 1640 Service Manual Removing the Hard Drive Replacing the Hard Drive CAUTION...
Service Manual
Page 31
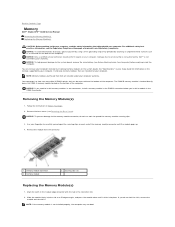
... two user-accessible SODIMM sockets that are covered under your computer memory by your computer. Back to Contents Page Memory Dell™ Studio XPS™ 1640 Service Manual Removing the Memory Module(s) Replacing the Memory Module(s) CAUTION: Before working inside your computer, read the safety information that is not authorized by Dell™ is not covered by installing memory modules on the system board. NOTICE: To avoid electrostatic discharge, ground yourself by using a wrist...
... two user-accessible SODIMM sockets that are covered under your computer memory by your computer. Back to Contents Page Memory Dell™ Studio XPS™ 1640 Service Manual Removing the Memory Module(s) Replacing the Memory Module(s) CAUTION: Before working inside your computer, read the safety information that is not authorized by Dell™ is not covered by installing memory modules on the system board. NOTICE: To avoid electrostatic discharge, ground yourself by using a wrist...
Service Manual
Page 33
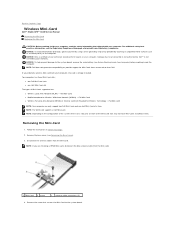
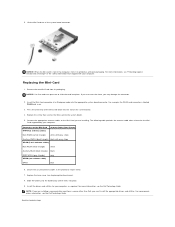
... Mini-Card 1. Remove the base cover (see Before Working Inside Your Computer) before working inside the computer. If you are : l Wireless Local Area Network (WLAN) - Full Mini-Card l Wireless Personal Area Network (WPAN) or Internal Card with Bluetooth® Wireless Technology - NOTICE: To help prevent damage to the system board, remove the main battery (see Removing the Base Cover). 3. Back to Contents Page Wireless Mini-Card Dell™ Studio XPS™ 1640 Service Manual Removing the Mini-Card Replacing...
... Mini-Card 1. Remove the base cover (see Before Working Inside Your Computer) before working inside the computer. If you are : l Wireless Local Area Network (WLAN) - Full Mini-Card l Wireless Personal Area Network (WPAN) or Internal Card with Bluetooth® Wireless Technology - NOTICE: To help prevent damage to the system board, remove the main battery (see Removing the Base Cover). 3. Back to Contents Page Wireless Mini-Card Dell™ Studio XPS™ 1640 Service Manual Removing the Mini-Card Replacing...
Service Manual
Page 34
... blue 6. NOTE: If you are installing. Lift the Mini-Card out of the Mini-Card down into the appropriate system board connector. Connect the appropriate antenna cables to Contents Page Replace the base cover (see the Dell Technology Guide. Install the drivers and utilities for the MiniCard supported by your computer, as required. For more generic driver information, see Replacing the Base Cover). 8. NOTICE: When the Mini...
... blue 6. NOTE: If you are installing. Lift the Mini-Card out of the Mini-Card down into the appropriate system board connector. Connect the appropriate antenna cables to Contents Page Replace the base cover (see the Dell Technology Guide. Install the drivers and utilities for the MiniCard supported by your computer, as required. For more generic driver information, see Replacing the Base Cover). 8. NOTICE: When the Mini...
Service Manual
Page 41
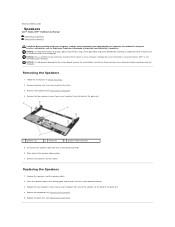
... (4) 3 speaker cable connector 5. Follow the instructions in the routing guide and connect it to the back of the palm rest. 4. Replace the speakers and the speaker cables. 2. Replacing the Speakers 1. For additional safety best practices information, see Before Working Inside Your Computer) before working inside the computer. Back to Contents Page Speakers Dell™ Studio XPS™ 1640 Service Manual Removing the Speakers Replacing the Speakers...
... (4) 3 speaker cable connector 5. Follow the instructions in the routing guide and connect it to the back of the palm rest. 4. Replace the speakers and the speaker cables. 2. Replacing the Speakers 1. For additional safety best practices information, see Before Working Inside Your Computer) before working inside the computer. Back to Contents Page Speakers Dell™ Studio XPS™ 1640 Service Manual Removing the Speakers Replacing the Speakers...
Service Manual
Page 44
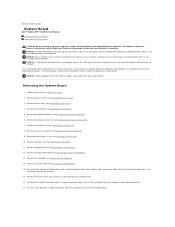
...Page System Board Dell™ Studio XPS™ 1640 Service Manual Removing the System Board Replacing the System Board CAUTION: Before working inside your warranty. Removing the System Board 1. Remove the processor heat sink (see Removing the Optical Drive). 12. Remove the optical drive (see Removing the Processor Heat Sink). 7. Remove the subwoofer (see Removing the Thermal Fan). 8. Remove the thermal fan (see Removing the Subwoofer). 14. Remove the hard drive (see Removing the Audio Board). 15. Remove the audio board (see Removing the Hard Drive). 5. Disconnect...
...Page System Board Dell™ Studio XPS™ 1640 Service Manual Removing the System Board Replacing the System Board CAUTION: Before working inside your warranty. Removing the System Board 1. Remove the processor heat sink (see Removing the Optical Drive). 12. Remove the optical drive (see Removing the Processor Heat Sink). 7. Remove the subwoofer (see Removing the Thermal Fan). 8. Remove the thermal fan (see Removing the Subwoofer). 14. Remove the hard drive (see Removing the Audio Board). 15. Remove the audio board (see Removing the Hard Drive). 5. Disconnect...

Setup Guide
Page 5
...Wireless Button 7 Set Up Microsoft Windows 8 Create System Recovery Media (Recommended 8 Connecting to the Internet (Optional 9 Setting Up the TV Tuner (Optional 12 Setting Up the 5.1 Audio Connections (Optional 13 Using Your Studio XPS Laptop 14 Device Status Lights 14 Right Side Features 16 Left Side Features 20 Display Features 22 Media, Wireless, and Power Controls 23 Computer Base and Keyboard Features 24 Using the Optical Drive 26 Removing and Replacing the Battery 27 Software Features 28 Dell Dock 29 Dell DataSafe Online Backup 30 Solving Problems 31 Network Problems...
...Wireless Button 7 Set Up Microsoft Windows 8 Create System Recovery Media (Recommended 8 Connecting to the Internet (Optional 9 Setting Up the TV Tuner (Optional 12 Setting Up the 5.1 Audio Connections (Optional 13 Using Your Studio XPS Laptop 14 Device Status Lights 14 Right Side Features 16 Left Side Features 20 Display Features 22 Media, Wireless, and Power Controls 23 Computer Base and Keyboard Features 24 Using the Optical Drive 26 Removing and Replacing the Battery 27 Software Features 28 Dell Dock 29 Dell DataSafe Online Backup 30 Solving Problems 31 Network Problems...
Setup Guide
Page 10
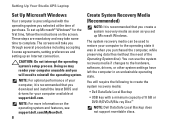
... Studio XPS Laptop Set Up Microsoft Windows Your computer is preconfigured with a minimum capacity of the Operating System disc). The screens will need of 8 GB or DVD-R/DVD+R/Blu-ray Disc™ NOTE: Dell DataSafe Local Backup does not support rewritable discs. NOTE: For optimal performance of purchase. You will require the following to create the system recovery media: • Dell DataSafe Local Backup • USB key with the operating system you selected at support.dell...
... Studio XPS Laptop Set Up Microsoft Windows Your computer is preconfigured with a minimum capacity of the Operating System disc). The screens will need of 8 GB or DVD-R/DVD+R/Blu-ray Disc™ NOTE: Dell DataSafe Local Backup does not support rewritable discs. NOTE: For optimal performance of purchase. You will require the following to create the system recovery media: • Dell DataSafe Local Backup • USB key with the operating system you selected at support.dell...

Setup Guide
Page 11
.... 9 Click Start → Programs→ Dell DataSafe Local Backup. 4. NOTE: For information on using a DSL or cable/satellite modem connection, contact your ISP or cellular telephone service for setup instructions. To complete setting up your Internet connection. • If you are using a dial-up connection, connect the telephone line to the optional external USB modem and to the Internet, you can purchase one at www.dell.com. Setting Up Your Studio XPS Laptop To create a system recovery media: 1.
.... 9 Click Start → Programs→ Dell DataSafe Local Backup. 4. NOTE: For information on using a DSL or cable/satellite modem connection, contact your ISP or cellular telephone service for setup instructions. To complete setting up your Internet connection. • If you are using a dial-up connection, connect the telephone line to the optional external USB modem and to the Internet, you can purchase one at www.dell.com. Setting Up Your Studio XPS Laptop To create a system recovery media: 1.
Setup Guide
Page 23
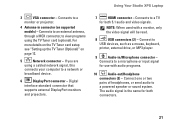
... two pairs of headphones, or send audio to view programs using a cabled network signal, this connects your computer to a microphone or input signal for both 5.1 audio and video signals. Connect to USB devices, such as a mouse, keyboard, printer, external drive, or MP3 player. 9 Audio-in connector (on page 12. 5 Network connector - For more details on the TV Tuner card setup see "Setting up the TV Tuner (Optional)" on supported models) - Using Your Studio XPS Laptop 3 VGA connector -
... two pairs of headphones, or send audio to view programs using a cabled network signal, this connects your computer to a microphone or input signal for both 5.1 audio and video signals. Connect to USB devices, such as a mouse, keyboard, printer, external drive, or MP3 player. 9 Audio-in connector (on page 12. 5 Network connector - For more details on the TV Tuner card setup see "Setting up the TV Tuner (Optional)" on supported models) - Using Your Studio XPS Laptop 3 VGA connector -
Setup Guide
Page 33
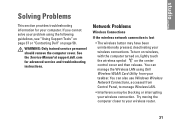
... Service Manual at support.dell.com for your computer. Network Problems Wireless Connections If the wireless network connection is lost • The wireless button may be blocking or interrupting your wireless router. 31 If you cannot solve your problem using Dell Wireless WLAN Card Utility from Control Panel, to your wireless connection. Try moving the computer closer to manage Wireless LAN. • Interference may have been unintentionally pressed, deactivating your taskbar. To turn on wireless, with the computer turned on, lightly touch...
... Service Manual at support.dell.com for your computer. Network Problems Wireless Connections If the wireless network connection is lost • The wireless button may be blocking or interrupting your wireless router. 31 If you cannot solve your problem using Dell Wireless WLAN Card Utility from Control Panel, to your wireless connection. Try moving the computer closer to manage Wireless LAN. • Interference may have been unintentionally pressed, deactivating your taskbar. To turn on wireless, with the computer turned on, lightly touch...
Setup Guide
Page 36
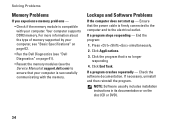
... includes installation instructions in its documentation or on page 41). • Reseat the memory modules (see the Service Manual at support.dell.com) to the electrical outlet. Your computer supports DDR3 memory. Lockups and Software Problems If the computer does not start up - Click End Task. If necessary, uninstall and then reinstall the program. Check the software documentation. For more information about the type of memory supported...
... includes installation instructions in its documentation or on page 41). • Reseat the memory modules (see the Service Manual at support.dell.com) to the electrical outlet. Your computer supports DDR3 memory. Lockups and Software Problems If the computer does not start up - Click End Task. If necessary, uninstall and then reinstall the program. Check the software documentation. For more information about the type of memory supported...

Setup Guide
Page 43
... located on a hidden diagnostic utility partition on page 58). 1. Press during POST (Power On Self Test) to be working properly. 2. Using Support Tools Starting Dell Diagnostics From Your Hard Drive The Dell Diagnostics is connected to an electrical outlet that you see "Contacting Dell" on your computer cannot display a screen image, contact Dell (see the Microsoft® Windows® desktop; NOTE: If you wait too long and the operating...
... located on a hidden diagnostic utility partition on page 58). 1. Press during POST (Power On Self Test) to be working properly. 2. Using Support Tools Starting Dell Diagnostics From Your Hard Drive The Dell Diagnostics is connected to an electrical outlet that you see "Contacting Dell" on your computer cannot display a screen image, contact Dell (see the Microsoft® Windows® desktop; NOTE: If you wait too long and the operating...
Setup Guide
Page 64
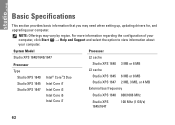
Basic Specifications This section provides basic information that you may vary by region. For more information regarding the configuration of your computer, click Start → Help and Support and select the option to view information about your computer. System Model Processor Studio XPS 1640/1645/1647 L2 cache Processor Type Studio XPS 1640 Studio XPS 1645 Studio XPS 1647 Intel® Core™2 Duo Intel Core...
Basic Specifications This section provides basic information that you may vary by region. For more information regarding the configuration of your computer, click Start → Help and Support and select the option to view information about your computer. System Model Processor Studio XPS 1640/1645/1647 L2 cache Processor Type Studio XPS 1640 Studio XPS 1645 Studio XPS 1647 Intel® Core™2 Duo Intel Core...
Setup Guide
Page 77
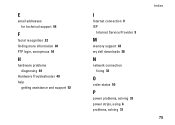
E email addresses for technical support 54 F facial recognition 22 finding more information 60 FTP login, anonymous 54 H hardware problems diagnosing 40 Hardware Troubleshooter 40 help getting assistance and support 52 I Internet connection 9 ISP Internet Service Provider 9 M memory support 63 my dell downloads 38 N network connection fixing 32 O order status 55 P power problems, solving 33 power strips, using 6 problems, solving 31 Index 75
E email addresses for technical support 54 F facial recognition 22 finding more information 60 FTP login, anonymous 54 H hardware problems diagnosing 40 Hardware Troubleshooter 40 help getting assistance and support 52 I Internet connection 9 ISP Internet Service Provider 9 M memory support 63 my dell downloads 38 N network connection fixing 32 O order status 55 P power problems, solving 33 power strips, using 6 problems, solving 31 Index 75


