User Guide
Page 2
... trade names other countries. Other trademarks and trade names may be used in this text: Dell and the DELL logo are trademarks of Microsoft Corporation in this document is strictly forbidden. disclaims any manner whatsoever without notice. © 2010 Dell Inc. Model S500/S500wi December 2010 Rev. CAUTION: A CAUTION indicates potential damage to either trademarks...
... trade names other countries. Other trademarks and trade names may be used in this text: Dell and the DELL logo are trademarks of Microsoft Corporation in this document is strictly forbidden. disclaims any manner whatsoever without notice. © 2010 Dell Inc. Model S500/S500wi December 2010 Rev. CAUTION: A CAUTION indicates potential damage to either trademarks...
User Guide
Page 3
Contents 1 Your Dell Projector 7 About Your Projector 9 About Your Interactive Pen (for S500wi only) . . . . 10 2 Connecting Your Projector 12 Installing the Optional Wireless Dongle 13 Install the Cable Cover 14 Connecting to a Computer 15 Connecting a Computer Using a VGA Cable . . . . 15 Monitor Loop-Through Connection Using VGA Cables 16 Connecting a Computer Using a RS232 cable . . . 17 Connecting a Computer...
Contents 1 Your Dell Projector 7 About Your Projector 9 About Your Interactive Pen (for S500wi only) . . . . 10 2 Connecting Your Projector 12 Installing the Optional Wireless Dongle 13 Install the Cable Cover 14 Connecting to a Computer 15 Connecting a Computer Using a VGA Cable . . . . 15 Monitor Loop-Through Connection Using VGA Cables 16 Connecting a Computer Using a RS232 cable . . . 17 Connecting a Computer...
User Guide
Page 4
...Installation for Driving Automatic Screen 25 Connection With Commercial RS232 Control Box . 26 Connecting With Your Interactive Pen (for S500wi only 27 3 Using Your Projector 29 Turning Your Projector On 29 Turning Your Projector Off 29 Adjusting the Projected Image 30 Raising the .... . . . 31 Adjusting Projection Image Size 32 Using the Control Panel 34 Using the Remote Control 36 Using the Interactive Pen (for S500wi only) 44 4 Contents out of range 40 Combinations of buttons 40 Using the Wrist Strap (for S500wi only 42 Installing the Remote Control Batteries 43 Charging the ...
...Installation for Driving Automatic Screen 25 Connection With Commercial RS232 Control Box . 26 Connecting With Your Interactive Pen (for S500wi only 27 3 Using Your Projector 29 Turning Your Projector On 29 Turning Your Projector Off 29 Adjusting the Projected Image 30 Raising the .... . . . 31 Adjusting Projection Image Size 32 Using the Control Panel 34 Using the Remote Control 36 Using the Interactive Pen (for S500wi only) 44 4 Contents out of range 40 Combinations of buttons 40 Using the Wrist Strap (for S500wi only 42 Installing the Remote Control Batteries 43 Charging the ...
User Guide
Page 5
... 45 Charging the Interactive Pen Battery by Docking Charger 47 Operating Range with Remote Control 49 Operating Range with Interactive Pen (for S500wi only 50 Using the On-Screen Display 51 INPUT SOURCE 51 AUTO ADJUST 52 BRIGHTNESS/CONTRAST 53 VIDEO MODE 53 VOLUME 54 AUDIO INPUT 54 ADVANCED SETTINGS 54 ...
... 45 Charging the Interactive Pen Battery by Docking Charger 47 Operating Range with Remote Control 49 Operating Range with Interactive Pen (for S500wi only 50 Using the On-Screen Display 51 INPUT SOURCE 51 AUTO ADJUST 52 BRIGHTNESS/CONTRAST 53 VIDEO MODE 53 VOLUME 54 AUDIO INPUT 54 ADVANCED SETTINGS 54 ...
User Guide
Page 10
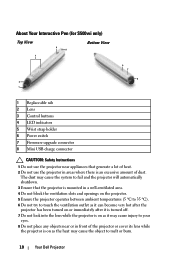
... may cause injury to your eyes. 8 Do not place any objects near appliances that generate a lot of dust. About Your Interactive Pen (for S500wi only) Top View 3 4 5 Bottom View 2 1 6 7 8 1 Replaceable nib 2 Lens 3 Control buttons 4 LED indicators 5 Wrist ...strap holder 6 Power switch 7 Firmware upgrade connector 8 Mini USB charge connector CAUTION: Safety Instructions 1 Do not use the projector near or in front of the projector or cover its lens while the projector is an excessive amount of heat. 2 Do not...may cause the object to melt or burn. 10 Your Dell Projector
... may cause injury to your eyes. 8 Do not place any objects near appliances that generate a lot of dust. About Your Interactive Pen (for S500wi only) Top View 3 4 5 Bottom View 2 1 6 7 8 1 Replaceable nib 2 Lens 3 Control buttons 4 LED indicators 5 Wrist ...strap holder 6 Power switch 7 Firmware upgrade connector 8 Mini USB charge connector CAUTION: Safety Instructions 1 Do not use the projector near or in front of the projector or cover its lens while the projector is an excessive amount of heat. 2 Do not...may cause the object to melt or burn. 10 Your Dell Projector
User Guide
Page 11
... that shipped with your projector. • The S500/S500wi projector can only be installed by yourself. Your Dell Projector 11 It should be used indoors. 9 Do not use the wireless projector near cardiac pacemakers. 10 Do not use the wireless projector near medical equipment. 11 Do not use the wireless projector near microwave ovens. NOTE: •...
... that shipped with your projector. • The S500/S500wi projector can only be installed by yourself. Your Dell Projector 11 It should be used indoors. 9 Do not use the wireless projector near cardiac pacemakers. 10 Do not use the wireless projector near medical equipment. 11 Do not use the wireless projector near microwave ovens. NOTE: •...
User Guide
Page 13
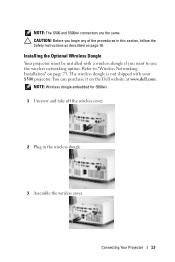
...shipped with a wireless dongle if you begin any of the procedures in the wireless dongle. 3 Assemble the wireless cover. NOTE: Wireless dongle embedded for S500wi. 1 Unscrew and take off the wireless cover. 2 Plug in this section, follow the Safety Instructions as described on page 10. NOTE: The S500 ...and S500wi connectors are the same. Connecting Your Projector 13 You can purchase it on page 73. Installing the Optional Wireless Dongle Your projector must be ...
...shipped with a wireless dongle if you begin any of the procedures in the wireless dongle. 3 Assemble the wireless cover. NOTE: Wireless dongle embedded for S500wi. 1 Unscrew and take off the wireless cover. 2 Plug in this section, follow the Safety Instructions as described on page 10. NOTE: The S500 ...and S500wi connectors are the same. Connecting Your Projector 13 You can purchase it on page 73. Installing the Optional Wireless Dongle Your projector must be ...
User Guide
Page 15
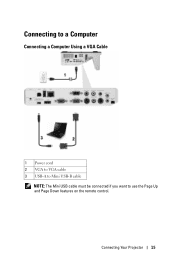
Connecting to a Computer Connecting a Computer Using a VGA Cable 1 Power cord 2 VGA to VGA cable 3 USB-A to Mini USB-B cable NOTE: The Mini USB cable must be connected if you want to use the Page Up and Page Down features on the remote control. Connecting Your Projector 15
Connecting to a Computer Connecting a Computer Using a VGA Cable 1 Power cord 2 VGA to VGA cable 3 USB-A to Mini USB-B cable NOTE: The Mini USB cable must be connected if you want to use the Page Up and Page Down features on the remote control. Connecting Your Projector 15
User Guide
Page 16
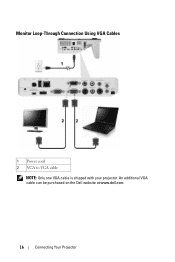
Monitor Loop-Through Connection Using VGA Cables 1 Power cord 2 VGA to VGA cable NOTE: Only one VGA cable is shipped with your projector. An additional VGA cable can be purchased on the Dell website at www.dell.com. 16 Connecting Your Projector
Monitor Loop-Through Connection Using VGA Cables 1 Power cord 2 VGA to VGA cable NOTE: Only one VGA cable is shipped with your projector. An additional VGA cable can be purchased on the Dell website at www.dell.com. 16 Connecting Your Projector
User Guide
Page 17
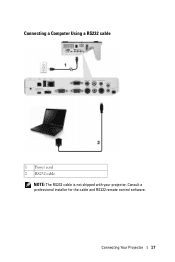
Connecting a Computer Using a RS232 cable 1 Power cord 2 RS232 cable NOTE: The RS232 cable is not shipped with your projector. Consult a professional installer for the cable and RS232 remote control software. Connecting Your Projector 17
Connecting a Computer Using a RS232 cable 1 Power cord 2 RS232 cable NOTE: The RS232 cable is not shipped with your projector. Consult a professional installer for the cable and RS232 remote control software. Connecting Your Projector 17
User Guide
Page 19
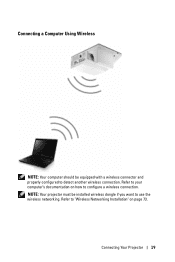
Connecting Your Projector 19 NOTE: Your projector must be equipped with a wireless connector and properly configured to "Wireless Networking Installation" on how to use the wireless networking. Refer to your computer's documentation on page 73. Refer to detect another wireless connection. Connecting a Computer Using Wireless NOTE: Your computer should be installed wireless dongle if you want to configure a wireless connection.
Connecting Your Projector 19 NOTE: Your projector must be equipped with a wireless connector and properly configured to "Wireless Networking Installation" on how to use the wireless networking. Refer to your computer's documentation on page 73. Refer to detect another wireless connection. Connecting a Computer Using Wireless NOTE: Your computer should be installed wireless dongle if you want to configure a wireless connection.

User Guide
Page 20
You can purchase the S-Video extension (50 ft/100 ft) cable on the Dell website at www.dell.com. 20 Connecting Your Projector Connecting a DVD Player Connecting a DVD Player Using an S-Video Cable 1 Power cord 2 S-Video cable NOTE: The S-Video cable is not shipped with your projector.
You can purchase the S-Video extension (50 ft/100 ft) cable on the Dell website at www.dell.com. 20 Connecting Your Projector Connecting a DVD Player Connecting a DVD Player Using an S-Video Cable 1 Power cord 2 S-Video cable NOTE: The S-Video cable is not shipped with your projector.
User Guide
Page 21
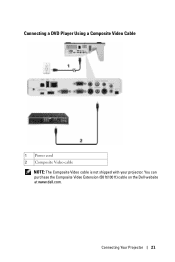
Connecting a DVD Player Using a Composite Video Cable 1 Power cord 2 Composite Video cable NOTE: The Composite Video cable is not shipped with your projector. Connecting Your Projector 21 You can purchase the Composite Video Extension (50 ft/100 ft) cable on the Dell website at www.dell.com.
Connecting a DVD Player Using a Composite Video Cable 1 Power cord 2 Composite Video cable NOTE: The Composite Video cable is not shipped with your projector. Connecting Your Projector 21 You can purchase the Composite Video Extension (50 ft/100 ft) cable on the Dell website at www.dell.com.
User Guide
Page 22
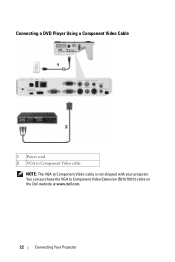
You can purchase the VGA to Component Video cable is not shipped with your projector. Connecting a DVD Player Using a Component Video Cable 1 Power cord 2 VGA to Component Video cable NOTE: The VGA to Component Video Extension (50 ft/100 ft) cable on the Dell website at www.dell.com. 22 Connecting Your Projector
You can purchase the VGA to Component Video cable is not shipped with your projector. Connecting a DVD Player Using a Component Video Cable 1 Power cord 2 VGA to Component Video cable NOTE: The VGA to Component Video Extension (50 ft/100 ft) cable on the Dell website at www.dell.com. 22 Connecting Your Projector
User Guide
Page 23
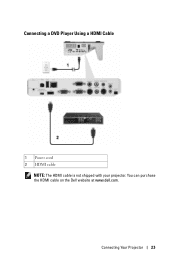
Connecting a DVD Player Using a HDMI Cable 1 Power cord 2 HDMI cable NOTE: The HDMI cable is not shipped with your projector. Connecting Your Projector 23 You can purchase the HDMI cable on the Dell website at www.dell.com.
Connecting a DVD Player Using a HDMI Cable 1 Power cord 2 HDMI cable NOTE: The HDMI cable is not shipped with your projector. Connecting Your Projector 23 You can purchase the HDMI cable on the Dell website at www.dell.com.
User Guide
Page 25
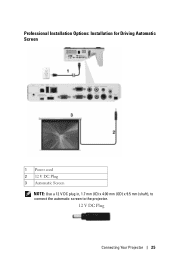
Professional Installation Options: Installation for Driving Automatic Screen 1 Power cord 2 12 V DC Plug 3 Automatic Screen NOTE: Use a 12 V DC plug in, 1.7 mm (ID) x 4.00 mm (OD) x 9.5 mm (shaft), to connect the automatic screen to the projector. 12 V DC Plug Connecting Your Projector 25
Professional Installation Options: Installation for Driving Automatic Screen 1 Power cord 2 12 V DC Plug 3 Automatic Screen NOTE: Use a 12 V DC plug in, 1.7 mm (ID) x 4.00 mm (OD) x 9.5 mm (shaft), to connect the automatic screen to the projector. 12 V DC Plug Connecting Your Projector 25
User Guide
Page 28
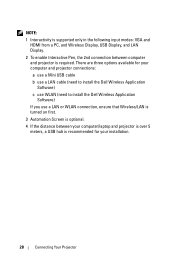
... projector is over 5 meters, a USB hub is recommended for your computer and projector connections: a use a Mini USB cable b use a LAN cable (need to install the Dell Wireless Application Software) c use WLAN (need to install the Dell Wireless Application Software) If you use a LAN or WLAN connection, ensure that Wireless/LAN is turned on first. 3 Automation Screen...
... projector is over 5 meters, a USB hub is recommended for your computer and projector connections: a use a Mini USB cable b use a LAN cable (need to install the Dell Wireless Application Software) c use WLAN (need to install the Dell Wireless Application Software) If you use a LAN or WLAN connection, ensure that Wireless/LAN is turned on first. 3 Automation Screen...
User Guide
Page 29
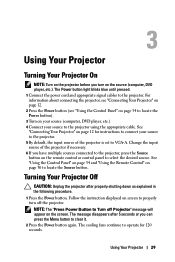
...page 36 to the projector. For information about connecting the projector, see "Connecting Your Projector" on page 12. 2 Press the Power button (see "Using the Control Panel" on page 34 to locate the Power button). 3 Turn on your source (computer, DVD player, etc.) 4 Connect your source to...to connect your source to properly turn on the source (computer, DVD player, etc.). Follow the instruction displayed on screen to the projector using the appropriate cable. The Power button light blinks blue until pressed. 1 Connect the power cord and appropriate signal cables to locate the Source...
...page 36 to the projector. For information about connecting the projector, see "Connecting Your Projector" on page 12. 2 Press the Power button (see "Using the Control Panel" on page 34 to locate the Power button). 3 Turn on your source (computer, DVD player, etc.) 4 Connect your source to...to connect your source to properly turn on the source (computer, DVD player, etc.). Follow the instruction displayed on screen to the projector using the appropriate cable. The Power button light blinks blue until pressed. 1 Connect the power cord and appropriate signal cables to locate the Source...
User Guide
Page 30
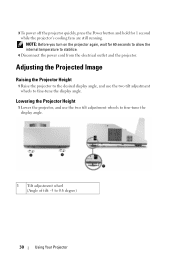
... two tilt adjustment wheels to fine-tune the display angle. 1 Tilt adjustment wheel (Angle of tilt: -3 to 0.6 degree) 30 Using Your Projector Lowering the Projector Height 1 Lower the projector, and use the two tilt adjustment wheels to fine-tune the display angle. NOTE: Before you turn on the projector again, wait for...
... two tilt adjustment wheels to fine-tune the display angle. 1 Tilt adjustment wheel (Angle of tilt: -3 to 0.6 degree) 30 Using Your Projector Lowering the Projector Height 1 Lower the projector, and use the two tilt adjustment wheels to fine-tune the display angle. NOTE: Before you turn on the projector again, wait for...
User Guide
Page 31
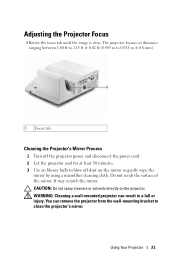
... a fall or injury. CAUTION: Do not spray cleaners or solvents directly on the mirror or gently wipe the mirror by using a microfiber cleaning cloth. Do not scrub the surface of the mirror. Using Your Projector 31 WARNING: Cleaning a wall-mounted projector can remove the projector from the wall-mounting bracket to blow... tab Cleaning the Projector's Mirror Process 1 Turn off the projector power and disconnect the power cord. 2 Let the projector cool for at least 30 minutes. 3 Use air blower bulb to clean the projector's mirror.
... a fall or injury. CAUTION: Do not spray cleaners or solvents directly on the mirror or gently wipe the mirror by using a microfiber cleaning cloth. Do not scrub the surface of the mirror. Using Your Projector 31 WARNING: Cleaning a wall-mounted projector can remove the projector from the wall-mounting bracket to blow... tab Cleaning the Projector's Mirror Process 1 Turn off the projector power and disconnect the power cord. 2 Let the projector cool for at least 30 minutes. 3 Use air blower bulb to clean the projector's mirror.


