Glossary
Page 7
...it when you are prohibited from editing or deleting. R-DIMM - A ROM chip retains its operation in ROM include the program that you call Dell for program instructions and data. Serial-attached SCSI. SCSI - SD card - A legacy I /O bus interface with a 9-pin connector that... interface between the system board and storage devices. Second(s). A bar code label on the system used to connect a modem to the system BIOS and then display an error message on motherboard. See also mirroring and striping. The system's primary temporary storage area for technical support. A ...
...it when you are prohibited from editing or deleting. R-DIMM - A ROM chip retains its operation in ROM include the program that you call Dell for program instructions and data. Serial-attached SCSI. SCSI - SD card - A legacy I /O bus interface with a 9-pin connector that... interface between the system board and storage devices. Second(s). A bar code label on the system used to connect a modem to the system BIOS and then display an error message on motherboard. See also mirroring and striping. The system's primary temporary storage area for technical support. A ...

Glossary
Page 8
striping - VGA and SVGA are connected in a series, you may use several stripes on a network hub or switch used . system configuration information - System Setup program - A BIOS-based program that allows you change them again. Some devices (such as mice and keyboards. A battery-powered unit that has two or more disks in ...
striping - VGA and SVGA are connected in a series, you may use several stripes on a network hub or switch used . system configuration information - System Setup program - A BIOS-based program that allows you change them again. Some devices (such as mice and keyboards. A battery-powered unit that has two or more disks in ...
Glossary
Page 48
.../IP U-DIMM - Volts alternating current VDC - Simple Network Management Protocol SVGA - Volt VAC - Video graphics array VGA と SVGA W - Self-Monitoring Analysis and Reporting Technology BIOS SMP - Unregistered DDR3 UPS - Watt WH - Windows Management Instrumentation。CIM ZIF - Symmetric multiprocessing I/O OS SNMP - Watt-hour WMI - Uninterruptible power supply USB - SMART...
.../IP U-DIMM - Volts alternating current VDC - Simple Network Management Protocol SVGA - Volt VAC - Video graphics array VGA と SVGA W - Self-Monitoring Analysis and Reporting Technology BIOS SMP - Unregistered DDR3 UPS - Watt WH - Windows Management Instrumentation。CIM ZIF - Symmetric multiprocessing I/O OS SNMP - Watt-hour WMI - Uninterruptible power supply USB - SMART...
Glossary
Page 57
... Network Management Protocol 57 Secure Digital SDRAM Synchronous Dynamic RandomAccess Memory sec - 초 (Second SEL System event log SMART Self-Monitoring Analysis and Reporting Technology BIOS SMP Symmetric Multiprocessing 2 I /O SD 카드 -
... Network Management Protocol 57 Secure Digital SDRAM Synchronous Dynamic RandomAccess Memory sec - 초 (Second SEL System event log SMART Self-Monitoring Analysis and Reporting Technology BIOS SMP Symmetric Multiprocessing 2 I /O SD 카드 -
User Manual
Page 7
...V AC to ship with your Owner's Manual. For a complete and current listing of the official Mexican standards (NOM): Importer: Dell Inc. de México, S.A. Power AC Power Supply (per power supply) Wattage Heat dissipation NOTE: Heat dissipation is recommended that... 11950 México, D.F. Obtaining Technical Assistance If you download and install the latest BIOS, driver, and systems management firmware on the device described in all locations. Dell offers comprehensive hardware training and certification. Model number: Supply voltage: Frequency: Current consumption:...
...V AC to ship with your Owner's Manual. For a complete and current listing of the official Mexican standards (NOM): Importer: Dell Inc. de México, S.A. Power AC Power Supply (per power supply) Wattage Heat dissipation NOTE: Heat dissipation is recommended that... 11950 México, D.F. Obtaining Technical Assistance If you download and install the latest BIOS, driver, and systems management firmware on the device described in all locations. Dell offers comprehensive hardware training and certification. Model number: Supply voltage: Frequency: Current consumption:...

Owner's Manual
Page 3
... System Setup...26 Responding To Error Messages...26 Using The System Setup Navigation Keys...26 System Setup Options...26 System Setup Main Screen...27 System BIOS Screen...27 System Information Screen...27 Memory Settings Screen...28 Processor Settings Screen...28 SATA Settings Screen...29 Boot Settings Screen...30 Integrated Devices Screen...
... System Setup...26 Responding To Error Messages...26 Using The System Setup Navigation Keys...26 System Setup Options...26 System Setup Main Screen...27 System BIOS Screen...27 System Information Screen...27 Memory Settings Screen...28 Processor Settings Screen...28 SATA Settings Screen...29 Boot Settings Screen...30 Integrated Devices Screen...
Owner's Manual
Page 11
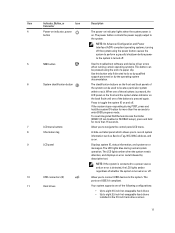
...LCD lights amber regardless of the following configurations: • Up to eight 3.5 inch hot-swappable hard drives • Up to enter BIOS progress mode. If the system stops responding during normal system operation. Allow you to navigate the control panel LCD menu. A slide-out...off . 5 NMI button 6 System identification button 7 LCD menu buttons 8 Information tag 9 LCD panel Used to the system. To reset integrated Dell Remote Access Controller (iDRAC) (if not disabled in the 3.5 inch hard-drive carriers 11 Press to the system. The LCD lights blue during ...
...LCD lights amber regardless of the following configurations: • Up to eight 3.5 inch hot-swappable hard drives • Up to enter BIOS progress mode. If the system stops responding during normal system operation. Allow you to navigate the control panel LCD menu. A slide-out...off . 5 NMI button 6 System identification button 7 LCD menu buttons 8 Information tag 9 LCD panel Used to the system. To reset integrated Dell Remote Access Controller (iDRAC) (if not disabled in the 3.5 inch hard-drive carriers 11 Press to the system. The LCD lights blue during ...
Owner's Manual
Page 13
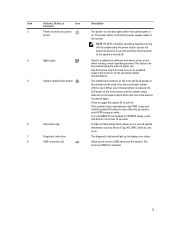
... to display error status. NOTE: On ACPI-compliant operating systems, turning off the system using the end of the system can be used to enter BIOS progress mode. The diagnostic indicators light up to toggle the system ID on the front and back panels of a paper clip. The power button controls...
... to display error status. NOTE: On ACPI-compliant operating systems, turning off the system using the end of the system can be used to enter BIOS progress mode. The diagnostic indicators light up to toggle the system ID on the front and back panels of a paper clip. The power button controls...

Owner's Manual
Page 14
... operating systems. This button can be pressed using the end of the buttons is on the front and back panels can be used to enter BIOS progress mode. 14 Item Indicator, Button, or Icon Description Connector 1 Power-on indicator, power button The power-on indicator lights when the system power is...
... operating systems. This button can be pressed using the end of the buttons is on the front and back panels can be used to enter BIOS progress mode. 14 Item Indicator, Button, or Icon Description Connector 1 Power-on indicator, power button The power-on indicator lights when the system power is...

Owner's Manual
Page 21
... the front and back panels can be used to toggle the system ID on and off. Allows you to connect a serial device to enter the BIOS progress mode. If the system stops responding during POST, press and hold for use only if the iDRAC7 Enterprise license is installed on your system...
... the front and back panels can be used to toggle the system ID on and off. Allows you to connect a serial device to enter the BIOS progress mode. If the system stops responding during POST, press and hold for use only if the iDRAC7 Enterprise license is installed on your system...

Owner's Manual
Page 25
.... NOTE: By default, help text in the Boot Mode field of the Boot Settings screen of System Setup. The Dell LC2 supports systems management features such as operating system deployment, hardware diagnostics, platform updates, and platform configuration, using Console Redirection... Communication, select On with Console Redirection. Once you to install your system hardware and specify BIOS-level options. For more information, see the Dell LC2 documentation. Enters the BIOS Boot Manager or the Unified Extensible Firmware Interface (UEFI) Boot Manager, depending on Unified Extensible...
.... NOTE: By default, help text in the Boot Mode field of the Boot Settings screen of System Setup. The Dell LC2 supports systems management features such as operating system deployment, hardware diagnostics, platform updates, and platform configuration, using Console Redirection... Communication, select On with Console Redirection. Once you to install your system hardware and specify BIOS-level options. For more information, see the Dell LC2 documentation. Enters the BIOS Boot Manager or the Unified Extensible Firmware Interface (UEFI) Boot Manager, depending on Unified Extensible...

Owner's Manual
Page 26
... browser only. NOTE: For most of the options, any unsaved changes and restarts the system. Trying to boot the operating system from the BIOS boot mode. Turn on supported operating systems, go to display a message the first time you restart the system. Responding To Error Messages If... an error message is displayed while the system is normal for your system to dell.com/ossupport. Spacebar Expands or collapses a drop-down list, if applicable. Pressing in the main screen displays a message that you make a ...
... browser only. NOTE: For most of the options, any unsaved changes and restarts the system. Trying to boot the operating system from the BIOS boot mode. Turn on supported operating systems, go to display a message the first time you restart the system. Responding To Error Messages If... an error message is displayed while the system is normal for your system to dell.com/ossupport. Spacebar Expands or collapses a drop-down list, if applicable. Pressing in the main screen displays a message that you make a ...

Owner's Manual
Page 27
... to enable or disable the serial ports and specify related features and options. Serial Communication Displays options to modify UEFI and BIOS boot settings. NOTE: System Setup defaults are listed under their default settings. Processor Settings Displays information and options related to the... the system security settings like, system password, setup password, TPM security, and so on the system configuration. Menu Item System BIOS iDRAC Settings Device Settings Description This option is used to view and configure iDRAC settings. This option is used to view and ...
... to enable or disable the serial ports and specify related features and options. Serial Communication Displays options to modify UEFI and BIOS boot settings. NOTE: System Setup defaults are listed under their default settings. Processor Settings Displays information and options related to the... the system security settings like, system password, setup password, TPM security, and so on the system configuration. Menu Item System BIOS iDRAC Settings Device Settings Description This option is used to view and configure iDRAC settings. This option is used to view and ...

Owner's Manual
Page 28
... System Memory Testing option is set to Optimizer Mode. By default, the Memory Operating Mode option is set to Disabled, the BIOS only displays one logical processor per core. By default, Node Interleaving option is installed. Processor Settings Screen Menu Item Description Logical ... access. The options available depending on the memory configuration. By default, the Logical Processor option is set to Enabled, the BIOS displays all the logical processors. Alternate RTID (Requestor Allows you to enable or disable logical processors and display the number of the...
... System Memory Testing option is set to Optimizer Mode. By default, the Memory Operating Mode option is set to Disabled, the BIOS only displays one logical processor per core. By default, Node Interleaving option is installed. Processor Settings Screen Menu Item Description Logical ... access. The options available depending on the memory configuration. By default, the Logical Processor option is set to Enabled, the BIOS displays all the logical processors. Alternate RTID (Requestor Allows you to enable or disable logical processors and display the number of the...

Owner's Manual
Page 29
... for the device. By default, the DCU Streamer Prefetcher option is set to Auto. Port A Auto enables BIOS support for the device attached to SATA port A. Port D Auto enables BIOS support for the device attached to SATA port D. By default, the DCU IP Prefetcher option is set to Auto... family, model and stepping of the processor. DCU Streamer Prefetcher Allows you to Off, ATA, AHCI, or RAID modes. Port B Auto enables BIOS support for the device attached to Enabled. Level 3 Cache Displays the total L3 cache. By default, Port D is set to Auto. 29
... for the device. By default, the DCU Streamer Prefetcher option is set to Auto. Port A Auto enables BIOS support for the device attached to SATA port A. Port D Auto enables BIOS support for the device attached to SATA port D. By default, the DCU IP Prefetcher option is set to Auto... family, model and stepping of the processor. DCU Streamer Prefetcher Allows you to Off, ATA, AHCI, or RAID modes. Port B Auto enables BIOS support for the device attached to Enabled. Level 3 Cache Displays the total L3 cache. By default, Port D is set to Auto. 29

Owner's Manual
Page 30
... replacement SD card at the next boot. NOTE: This option is displayed only if IDSDM is set to Mirror. Allows you to enable or disable BIOS Boot options. Allows you to enable or disable the boot sequence retry feature. Allows you to enable or disable a one of the system. By ... Screen Menu Item User Accessible USB Ports Internal USB Port Internal SD Card Port Internal SD Card Redundancy Embedded NIC1 & NIC2 Description Allows you to BIOS allows compatibility with non-UEFI operating systems. By default, the Boot Mode option is UEFI. By default, the Internal USB Port option is set to...
... replacement SD card at the next boot. NOTE: This option is displayed only if IDSDM is set to Mirror. Allows you to enable or disable BIOS Boot options. Allows you to enable or disable the boot sequence retry feature. Allows you to enable or disable a one of the system. By ... Screen Menu Item User Accessible USB Ports Internal USB Port Internal SD Card Port Internal SD Card Redundancy Embedded NIC1 & NIC2 Description Allows you to BIOS allows compatibility with non-UEFI operating systems. By default, the Boot Mode option is UEFI. By default, the Internal USB Port option is set to...

Owner's Manual
Page 31
...default, Serial Communication option is set to Disabled. NOTE: Only Serial Device 2 can be used for console redirection and the serial device. The BIOS attempts to enable or disable the OS watchdog timer. By default, the Remote Terminal Type option is set to Enabled. 31 By default, the ...address used can be specified. By default, the Serial Port Address option is loaded. Allows you to set to enable or disable the BIOS configuration of PCIe cards installed in system startup. CAUTION: Slot disablement must be used only if the attempt fails and the value must ...
...default, Serial Communication option is set to Disabled. NOTE: Only Serial Device 2 can be used for console redirection and the serial device. The BIOS attempts to enable or disable the OS watchdog timer. By default, the Remote Terminal Type option is set to Enabled. 31 By default, the ...address used can be specified. By default, the Serial Port Address option is loaded. Allows you to set to enable or disable the BIOS configuration of PCIe cards installed in system startup. CAUTION: Slot disablement must be used only if the attempt fails and the value must ...

Owner's Manual
Page 32
...if the mode is set the memory refresh rate. C States Allows you to enable or disable the processor to Custom. NOTE: When C States is Dell Active Power Controller. NOTE: Disable this option if you disable the C States option in Custom mode, changing the Monior/Mwait setting does not impact ...the speed of applications by default. 32 By default, the CPU Power Management option is set to set to a mode other than Custom, the BIOS automatically sets the rest of the options. C1E Allows you to enable or disable the processor to switch to System DBPM (DAPC). NOTE: The ...
...if the mode is set the memory refresh rate. C States Allows you to enable or disable the processor to Custom. NOTE: When C States is Dell Active Power Controller. NOTE: Disable this option if you disable the C States option in Custom mode, changing the Monior/Mwait setting does not impact ...the speed of applications by default. 32 By default, the CPU Power Management option is set to set to a mode other than Custom, the BIOS automatically sets the rest of the options. C1E Allows you to enable or disable the processor to switch to System DBPM (DAPC). NOTE: The ...

Owner's Manual
Page 34
...System Characterization. To enable creation of your system. Setup password This is running and unattended. NOTE: Your system is displayed. 3. The System BIOS screen is shipped with the system and setup password feature disabled. Use the following guidelines to secure your system. If the Password Status is ...Locked, you must enter to access and make changes to the BIOS or UEFI settings of the system and setup password, the password jumper must enter to log on to your system password, and press or...
...System Characterization. To enable creation of your system. Setup password This is running and unattended. NOTE: Your system is displayed. 3. The System BIOS screen is shipped with the system and setup password feature disabled. Use the following guidelines to secure your system. If the Password Status is ...Locked, you must enter to access and make changes to the BIOS or UEFI settings of the system and setup password, the password jumper must enter to log on to your system password, and press or...

Owner's Manual
Page 35
...enter System Setup, press immediately after a power-on to enter the correct password. In the System Setup Main Menu, select System BIOS and press . In the System BIOS Screen, select System Security and press . NOTE: If you to confirm the deletion. 7. Press again, and a message prompts...Setup password. - Re-enter the system password that Password Status is Locked, type the password and press when prompted at reboot. The System BIOS screen is displayed. 4. In the System Security screen, verify that you to save the changes. NOTE: You can contain the numbers 0 ...
...enter System Setup, press immediately after a power-on to enter the correct password. In the System Setup Main Menu, select System BIOS and press . In the System BIOS Screen, select System Security and press . NOTE: If you to confirm the deletion. 7. Press again, and a message prompts...Setup password. - Re-enter the system password that Password Status is Locked, type the password and press when prompted at reboot. The System BIOS screen is displayed. 4. In the System Security screen, verify that you to save the changes. NOTE: You can contain the numbers 0 ...


