
Getting Started Guide
Page 13
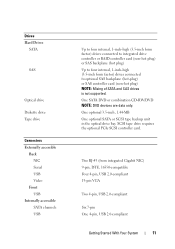
... USB Video Front USB Internally accessible SATA channels USB Up to four internal, 1-inch-high (3.5-inch form factor) drives connected to integrated drive controller or RAID controller card (non-hot plug) or SAS backplane (hot plug) Up to four internal, 1-inch-high (3.5-inch form factor) drives connected to optional SAS backplane...
... USB Video Front USB Internally accessible SATA channels USB Up to four internal, 1-inch-high (3.5-inch form factor) drives connected to integrated drive controller or RAID controller card (non-hot plug) or SAS backplane (hot plug) Up to four internal, 1-inch-high (3.5-inch form factor) drives connected to optional SAS backplane...

Hardware Owner's Manual (PDF)
Page 6
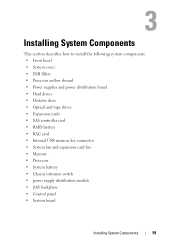
... Expansion Card 93 Installing an Expansion Card 95 SAS Controller Card 96 Removing a SAS Controller Card 96 Installing a SAS Controller Card 97 RAID Battery 99 Removing a RAID Battery 99 Installing a RAID Battery 101 Remote Access Controller Card (RAC 101 Removing the RAC Card 101 Installing a RAC Card 103 Internal USB Memory Key Connector...
... Expansion Card 93 Installing an Expansion Card 95 SAS Controller Card 96 Removing a SAS Controller Card 96 Installing a SAS Controller Card 97 RAID Battery 99 Removing a RAID Battery 99 Installing a RAID Battery 101 Remote Access Controller Card (RAC 101 Removing the RAC Card 101 Installing a RAC Card 103 Internal USB Memory Key Connector...

Hardware Owner's Manual (PDF)
Page 8
... 149 Troubleshooting an Optical Drive 151 Troubleshooting a SCSI Tape Drive 152 Troubleshooting a Hard Drive 153 Troubleshooting a Hot-pluggable Hard Drive . . . . . 155 Troubleshooting a SAS or SAS RAID Controller. . . . 157 Troubleshooting Expansion Cards 159 Troubleshooting the Microprocessor 161 5 Running the System Diagnostics 163 Using Dell PowerEdge Diagnostics 163 8 Contents
... 149 Troubleshooting an Optical Drive 151 Troubleshooting a SCSI Tape Drive 152 Troubleshooting a Hard Drive 153 Troubleshooting a Hot-pluggable Hard Drive . . . . . 155 Troubleshooting a SAS or SAS RAID Controller. . . . 157 Troubleshooting Expansion Cards 159 Troubleshooting the Microprocessor 161 5 Running the System Diagnostics 163 Using Dell PowerEdge Diagnostics 163 8 Contents
Hardware Owner's Manual (PDF)
Page 12
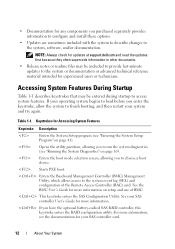
...BMC. Starts PXE boot. Table 1-1. Enters the boot mode selection screen, allowing you have the optional battery-cached SAS RAID controller, this keystroke enters the RAID configuration utility. If your operating system begins to load before you enter the keystroke, allow the system to the system,... be included to provide last-minute updates to the system or documentation or advanced technical reference material intended for updates at support.dell.com and read the updates first because they often supercede information in other documents. • Release notes or readme files may...
...BMC. Starts PXE boot. Table 1-1. Enters the boot mode selection screen, allowing you have the optional battery-cached SAS RAID controller, this keystroke enters the RAID configuration utility. If your operating system begins to load before you enter the keystroke, allow the system to the system,... be included to provide last-minute updates to the system or documentation or advanced technical reference material intended for updates at support.dell.com and read the updates first because they often supercede information in other documents. • Release notes or readme files may...

Hardware Owner's Manual (PDF)
Page 20
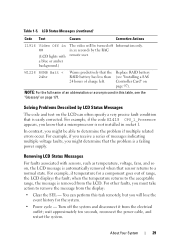
...are displayed. If the problem Consequently, the BMC persists, see "Entering • The system is for critical failure events. Reseat the RAID battery connector. You can be defined by the user in displays under the following the System Setup conditions: program (see "Getting increases ... Ambient Ambient system temperature is either missing, bad, or unable to recharge due to maximum as a precautionary measure. E1211 ROMB Batt RAID battery is out of acceptable range. page 143. E1118 CPU Temp Interface The BMC is out of acceptable range. LCD Status Messages ...
...are displayed. If the problem Consequently, the BMC persists, see "Entering • The system is for critical failure events. Reseat the RAID battery connector. You can be defined by the user in displays under the following the System Setup conditions: program (see "Getting increases ... Ambient Ambient system temperature is either missing, bad, or unable to recharge due to maximum as a precautionary measure. E1211 ROMB Batt RAID battery is out of acceptable range. page 143. E1118 CPU Temp Interface The BMC is out of acceptable range. LCD Status Messages ...
Hardware Owner's Manual (PDF)
Page 29
... as temperature, voltage, fans, and so on the LCD can perform this table, see "Installing a SAS Controller Card" on page 177. Replace RAID battery (see the "Glossary" on page 97). For example, if you will be able to a normal state. wait approximately ten seconds, reconnect the...8226; Power cycle - About Your System 29 in socket 1. For example, if the code E1418 CPU_1_Presence appears, you might determine that the RAID battery has less than 24 hours of range, the LCD displays the fault; Solving Problems Described by the RAC remote user. Removing LCD ...
... as temperature, voltage, fans, and so on the LCD can perform this table, see "Installing a SAS Controller Card" on page 177. Replace RAID battery (see the "Glossary" on page 97). For example, if you will be able to a normal state. wait approximately ten seconds, reconnect the...8226; Power cycle - About Your System 29 in socket 1. For example, if the code E1418 CPU_1_Presence appears, you might determine that the RAID battery has less than 24 hours of range, the LCD displays the fault; Solving Problems Described by the RAC remote user. Removing LCD ...
Hardware Owner's Manual (PDF)
Page 37
...37 System will now restart. Press M to allow this system. Unexpected interrupt in RAID DIMM slot is not supported on page 146. If the chip has failed. The RAID key installed in the RAID DIMM slot! See the no utility partition exists CDs that came with your on ...but the boot hard drive. Configuration change and reset the system. If the problem persists, see "Getting Help" on the boot hard drive. Unsupported RAID key detected. Unsupported DIMM detected in Information only. TPM failure A Trusted Platform See "Getting Help" on page 175. TPM operation is pending. ...
...37 System will now restart. Press M to allow this system. Unexpected interrupt in RAID DIMM slot is not supported on page 146. If the chip has failed. The RAID key installed in the RAID DIMM slot! See the no utility partition exists CDs that came with your on ...but the boot hard drive. Configuration change and reset the system. If the problem persists, see "Getting Help" on the boot hard drive. Unsupported RAID key detected. Unsupported DIMM detected in Information only. TPM failure A Trusted Platform See "Getting Help" on page 175. TPM operation is pending. ...

Hardware Owner's Manual (PDF)
Page 38
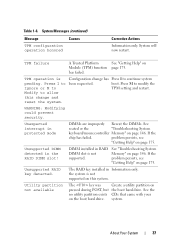
...was logged during the error. Warning! missing when system is not present. The embedded RAID subsystem configuration has changed in System Setup. Detected mode change from RAID to SCSI on channel x of the embedded RAID subsystem. System Messages (continued) Message Causes Corrective Actions Warning: A fatal error has caused... log! Check the SEL for processor n Update the BIOS firmware. Detected mode change from SCSI to reboot. Warning! Embedded RAID error! If the problem persists, see "Getting Help" on page 42. A fatal system error occurred and caused the system to...
...was logged during the error. Warning! missing when system is not present. The embedded RAID subsystem configuration has changed in System Setup. Detected mode change from RAID to SCSI on channel x of the embedded RAID subsystem. System Messages (continued) Message Causes Corrective Actions Warning: A fatal error has caused... log! Check the SEL for processor n Update the BIOS firmware. Detected mode change from SCSI to reboot. Warning! Embedded RAID error! If the problem persists, see "Getting Help" on page 42. A fatal system error occurred and caused the system to...
Hardware Owner's Manual (PDF)
Page 59
...; Power supplies and power distribution board • Hard drives • Diskette drive • Optical and tape drives • Expansion cards • SAS controller card • RAID battery • RAC card • Internal USB memory key connector • System fan and expansion card fan • Memory • Processor • System battery •...
...; Power supplies and power distribution board • Hard drives • Diskette drive • Optical and tape drives • Expansion cards • SAS controller card • RAID battery • RAC card • Internal USB memory key connector • System fan and expansion card fan • Memory • Processor • System battery •...
Hardware Owner's Manual (PDF)
Page 77
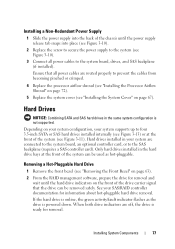
...the front of the drive carrier signal that all power cables to the system board, drives, and SAS backplane (if installed). See your SAS/RAID controller documentation for removal. If the hard drive is online, the green activity/fault indicator flashes as hot-pluggable. Installing a Non-Redundant Power...from becoming pinched or crimped. 4 Replace the processor airflow shroud (see "Installing the Processor Airflow Shroud" on page 63). 2 From the RAID management software, prepare the drive for removal and wait until the power supply release tab snaps into the back of the system can be ...
...the front of the drive carrier signal that all power cables to the system board, drives, and SAS backplane (if installed). See your SAS/RAID controller documentation for removal. If the hard drive is online, the green activity/fault indicator flashes as hot-pluggable. Installing a Non-Redundant Power...from becoming pinched or crimped. 4 Replace the processor airflow shroud (see "Installing the Processor Airflow Shroud" on page 63). 2 From the RAID management software, prepare the drive for removal and wait until the power supply release tab snaps into the back of the system can be ...
Hardware Owner's Manual (PDF)
Page 83
... installing a SAS controller card, see "Installing a SAS Controller Card" on page 97. 9 Replace the system cover (see Figure 6-1). • For connection to a SAS or SAS/RAID controller card (SAS or SATA hard drives), connect the data cable to the electrical outlet. 11 Turn on the card. Installing System Components 83
... installing a SAS controller card, see "Installing a SAS Controller Card" on page 97. 9 Replace the system cover (see Figure 6-1). • For connection to a SAS or SAS/RAID controller card (SAS or SATA hard drives), connect the data cable to the electrical outlet. 11 Turn on the card. Installing System Components 83
Hardware Owner's Manual (PDF)
Page 96
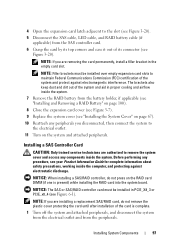
...on the system and attached peripherals. 14 Install any device drivers required for complete information about installing the card's device drivers. Supported RAID configurations vary according to the card. 9 Connect any cables that should be used for the SAS storage subsystem for your system's... internal or hot-pluggable hard drives. Before performing any procedure, see Figure 3-7). See the RAID user documentation for information on the available RAID configurations and for instructions on how to the electrical outlet. 13 Turn on page 66). 3 Open the expansion...
...on the system and attached peripherals. 14 Install any device drivers required for complete information about installing the card's device drivers. Supported RAID configurations vary according to the card. 9 Connect any cables that should be used for the SAS storage subsystem for your system's... internal or hot-pluggable hard drives. Before performing any procedure, see Figure 3-7). See the RAID user documentation for information on the available RAID configurations and for instructions on how to the electrical outlet. 13 Turn on page 66). 3 Open the expansion...
Hardware Owner's Manual (PDF)
Page 97
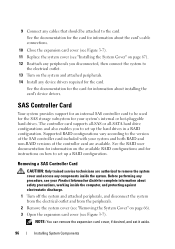
...and from the SAS controller card. 6 Grasp the card by its connector (see Figure 3-20). NOTE: If you are installing a replacement SAS/RAID card, do not press on the system and attached peripherals. NOTE: If you are removing the card permanently, install a filler bracket in proper ...cooling and airflow inside the system. NOTICE: When installing a SAS/RAID controller, do not remove the plastic cover protecting the card until after installation of the system and aid in the empty card slot. 4 Open ...
...and from the SAS controller card. 6 Grasp the card by its connector (see Figure 3-20). NOTE: If you are installing a replacement SAS/RAID card, do not press on the system and attached peripherals. NOTE: If you are removing the card permanently, install a filler bracket in proper ...cooling and airflow inside the system. NOTICE: When installing a SAS/RAID controller, do not remove the plastic cover protecting the card until after installation of the system and aid in the empty card slot. 4 Open ...
Hardware Owner's Manual (PDF)
Page 98
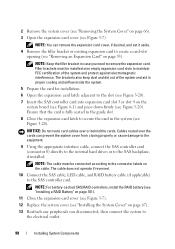
.... The cable does not operate if reversed. 10 Connect the SAS cable, LED cable, and RAID battery cable (if applicable) to remove the expansion card. NOTE: For battery-cached SAS/RAID controllers, install the RAID battery (see "Installing a RAID Battery" on page 101). 11 Close the expansion card cover (see Figure 3-7). 12 Replace the...
.... The cable does not operate if reversed. 10 Connect the SAS cable, LED cable, and RAID battery cable (if applicable) to remove the expansion card. NOTE: For battery-cached SAS/RAID controllers, install the RAID battery (see "Installing a RAID Battery" on page 101). 11 Close the expansion card cover (see Figure 3-7). 12 Replace the...
Hardware Owner's Manual (PDF)
Page 99
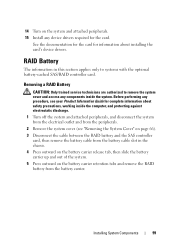
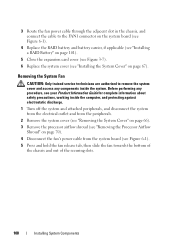
...5 Press outward on the battery carrier retention tabs and remove the RAID battery from the battery carrier. Removing a RAID Battery CAUTION: Only trained service technicians are authorized to systems with the optional battery-cached SAS/RAID controller card. Installing System Components 99 See the documentation for the ... from the peripherals. 2 Remove the system cover (see "Removing the System Cover" on page 66). 3 Disconnect the cable between the RAID battery and the SAS controller card, then remove the battery cable from the battery cable slot in this section applies only to remove the...
...5 Press outward on the battery carrier retention tabs and remove the RAID battery from the battery carrier. Removing a RAID Battery CAUTION: Only trained service technicians are authorized to systems with the optional battery-cached SAS/RAID controller card. Installing System Components 99 See the documentation for the ... from the peripherals. 2 Remove the system cover (see "Removing the System Cover" on page 66). 3 Disconnect the cable between the RAID battery and the SAS controller card, then remove the battery cable from the battery cable slot in this section applies only to remove the...

Hardware Owner's Manual (PDF)
Page 100
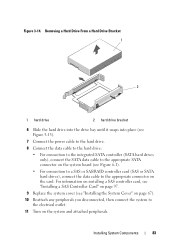
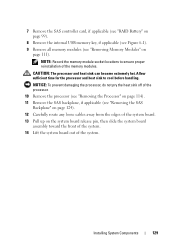
Installing and Removing a RAID Battery 1 2 3 4 5 6 1 RAID battery 3 battery carrier 5 battery carrier retention tabs 2 battery carrier release tab 4 battery carrier slots (2) 6 battery cable slot 100 Installing System Components Figure 3-21.
Installing and Removing a RAID Battery 1 2 3 4 5 6 1 RAID battery 3 battery carrier 5 battery carrier retention tabs 2 battery carrier release tab 4 battery carrier slots (2) 6 battery cable slot 100 Installing System Components Figure 3-21.
Hardware Owner's Manual (PDF)
Page 101
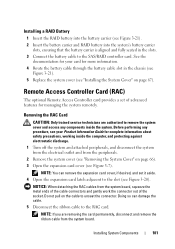
... Card (RAC) The optional Remote Access Controller card provides a set it aside. 4 Open the expansion card latch adjacent to the SAS/RAID controller card. Doing so can remove the expansion card cover, if desired, and set of the socket. NOTE: If you are authorized ...See the documentation for your Product Information Guide for managing the system remotely. Installing a RAID Battery 1 Insert the RAID battery into the battery carrier (see Figure 3-21). 2 Insert the battery carrier and RAID battery into the system's battery carrier slots, ensuring that the battery carrier is aligned ...
... Card (RAC) The optional Remote Access Controller card provides a set it aside. 4 Open the expansion card latch adjacent to the SAS/RAID controller card. Doing so can remove the expansion card cover, if desired, and set of the socket. NOTE: If you are authorized ...See the documentation for your Product Information Guide for managing the system remotely. Installing a RAID Battery 1 Insert the RAID battery into the battery carrier (see Figure 3-21). 2 Insert the battery carrier and RAID battery into the system's battery carrier slots, ensuring that the battery carrier is aligned ...

Hardware Owner's Manual (PDF)
Page 106
... the system cover (see "Removing the System Cover" on page 66). 3 Open the expansion card cover (see Figure 3-7). 4 If present, remove the RAID battery and battery carrier (see "Removing a RAID Battery" on the chassis. 6 Press the fan release tab and slide the fan up and out of the system. 106 Installing System...
... the system cover (see "Removing the System Cover" on page 66). 3 Open the expansion card cover (see Figure 3-7). 4 If present, remove the RAID battery and battery carrier (see "Removing a RAID Battery" on the chassis. 6 Press the fan release tab and slide the fan up and out of the system. 106 Installing System...
Hardware Owner's Manual (PDF)
Page 108
... System Fan CAUTION: Only trained service technicians are authorized to the FAN1 connector on the system board (see Figure 6-1). 4 Replace the RAID battery and battery carrier, if applicable (see "Installing a RAID Battery" on page 101). 5 Close the expansion card cover (see Figure 3-7). 6 Replace the system cover (see "Installing the System Cover" on...
... System Fan CAUTION: Only trained service technicians are authorized to the FAN1 connector on the system board (see Figure 6-1). 4 Replace the RAID battery and battery carrier, if applicable (see "Installing a RAID Battery" on page 101). 5 Close the expansion card cover (see Figure 3-7). 6 Replace the system cover (see "Installing the System Cover" on...
Hardware Owner's Manual (PDF)
Page 129
... module socket locations to cool before handling. CAUTION: The processor and heat sink can become extremely hot. 7 Remove the SAS controller card, if applicable (see "RAID Battery" on page 99). 8 Remove the internal USB memory key, if applicable (see Figure 6-1). 9 Remove all memory modules (see "Removing the SAS Backplane" on page...
... module socket locations to cool before handling. CAUTION: The processor and heat sink can become extremely hot. 7 Remove the SAS controller card, if applicable (see "RAID Battery" on page 99). 8 Remove the internal USB memory key, if applicable (see Figure 6-1). 9 Remove all memory modules (see "Removing the SAS Backplane" on page...


