Dell PowerEdge T20 Owners Manual
Page 4
... Memory...46 General Memory Module Installation Guidelines 47 Sample Memory Configurations...48 Removing Memory Modules...48 Installing Memory Modules...49 System Fan...50 Removing The System Fan...50 Installing The System Fan...51 Expansion Cards...52 Expansion Card Installation Guidelines...52 Removing An Expansion Card...52 Installing An Expansion Card...53 Processors...54...
... Memory...46 General Memory Module Installation Guidelines 47 Sample Memory Configurations...48 Removing Memory Modules...48 Installing Memory Modules...49 System Fan...50 Removing The System Fan...50 Installing The System Fan...51 Expansion Cards...52 Expansion Card Installation Guidelines...52 Removing An Expansion Card...52 Installing An Expansion Card...53 Processors...54...
Dell PowerEdge T20 Owners Manual
Page 5
... A Wet System...66 Troubleshooting A Damaged System...66 Troubleshooting The System Battery...67 Troubleshooting A Non-Redundant Power Supply 67 Troubleshooting Cooling Problems...67 Troubleshooting The System Fan...68 Troubleshooting System Memory...68 Troubleshooting An Optical Drive...69 Troubleshooting A Hard Drive...69 Troubleshooting Expansion Cards...70 Troubleshooting The Processor...70 5 Using System Diagnostics...
... A Wet System...66 Troubleshooting A Damaged System...66 Troubleshooting The System Battery...67 Troubleshooting A Non-Redundant Power Supply 67 Troubleshooting Cooling Problems...67 Troubleshooting The System Fan...68 Troubleshooting System Memory...68 Troubleshooting An Optical Drive...69 Troubleshooting A Hard Drive...69 Troubleshooting Expansion Cards...70 Troubleshooting The Processor...70 5 Using System Diagnostics...
Dell PowerEdge T20 Owners Manual
Page 21
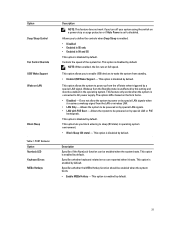
...related errors are reported when it receives a wakeup signal from the Standby state is disabled by default. Controls the speed of the system fan. This option is enabled by this setting and must be enabled in operating system environment. • Block Sleep (S3 state) - Wakeup from... This option lets you turn off state when triggered by default. This option is disabled by a special LAN signal. Option Deep Sleep Control Fan Control Override USB Wake Support Wake on the form factor. • Disabled - POST Behavior Option Numlock LED Keyboard Errors MEBx Hotkeys Description NOTE...
...related errors are reported when it receives a wakeup signal from the Standby state is disabled by default. Controls the speed of the system fan. This option is enabled by this setting and must be enabled in operating system environment. • Block Sleep (S3 state) - Wakeup from... This option lets you turn off state when triggered by default. This option is disabled by a special LAN signal. Option Deep Sleep Control Fan Control Override USB Wake Support Wake on the form factor. • Disabled - POST Behavior Option Numlock LED Keyboard Errors MEBx Hotkeys Description NOTE...
Dell PowerEdge T20 Owners Manual
Page 31
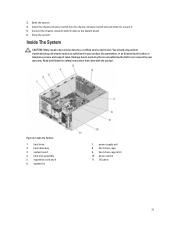
... into the chassis-intrusion switch slot and slide it . 5. Close the system. Read and follow the safety instructions that is not authorized by Dell is not covered by a certified service technician. hard-drive bay 3. expansion-card latch 6. power switch 11. Inside the System 1. Figure 8.... The System CAUTION: Many repairs may only be done by your product documentation, or as authorized in your warranty. hard drive 2. 3. system fan 7. Connect the chassis-intrusion switch cable to secure it to the system board. 6. power supply unit 8. I/O panel 31 hard-drive cage ...
... into the chassis-intrusion switch slot and slide it . 5. Close the system. Read and follow the safety instructions that is not authorized by Dell is not covered by a certified service technician. hard-drive bay 3. expansion-card latch 6. power switch 11. Inside the System 1. Figure 8.... The System CAUTION: Many repairs may only be done by your product documentation, or as authorized in your warranty. hard drive 2. 3. system fan 7. Connect the chassis-intrusion switch cable to secure it to the system board. 6. power supply unit 8. I/O panel 31 hard-drive cage ...
Dell PowerEdge T20 Owners Manual
Page 50
...or as authorized in their sockets. 14. Run the appropriate diagnostic test. Read and follow the safety instructions that is not authorized by Dell is properly seated in shutdown of the system and loss of the memory module socket, and insert the memory module in your thumbs until ... checking to servicing that the memory modules are firmly seated in your warranty. Damage due to ensure that is not authorized by Dell is incorrect, one system fan. Close the system. 10. You should only perform troubleshooting and simple repairs as directed by the card edges, making sure not...
...or as authorized in their sockets. 14. Run the appropriate diagnostic test. Read and follow the safety instructions that is not authorized by Dell is properly seated in shutdown of the system and loss of the memory module socket, and insert the memory module in your thumbs until ... checking to servicing that the memory modules are firmly seated in your warranty. Damage due to ensure that is not authorized by Dell is incorrect, one system fan. Close the system. 10. You should only perform troubleshooting and simple repairs as directed by the card edges, making sure not...
Dell PowerEdge T20 Owners Manual
Page 51
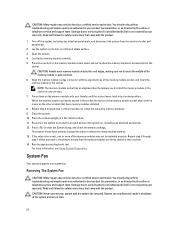
... release all four sides of the fan. 6. Disconnect the system fan power cable from the electrical outlet and peripherals. 2. Hold the system fan by holding the blades. 5. grommets (4) 3. Read and follow the safety instructions that is not authorized by Dell is not covered by your product... documentation, or as authorized in your warranty. Figure 23. Removing and Installing the System Fan 1. system fan 2. Turn off the system, including any attached peripherals, and disconnect...
... release all four sides of the fan. 6. Disconnect the system fan power cable from the electrical outlet and peripherals. 2. Hold the system fan by holding the blades. 5. grommets (4) 3. Read and follow the safety instructions that is not authorized by Dell is not covered by your product... documentation, or as authorized in your warranty. Figure 23. Removing and Installing the System Fan 1. system fan 2. Turn off the system, including any attached peripherals, and disconnect...
Dell PowerEdge T20 Owners Manual
Page 52
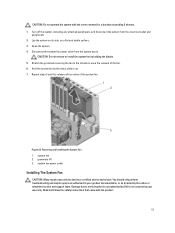
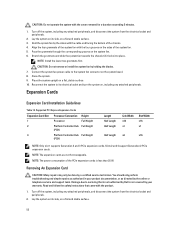
...Expansion Card CAUTION: Many repairs may only be done by a certified service technician. Read and follow the safety instructions that is not authorized by Dell is less than 25 W. Lay the system on its electrical outlet and turn the system on the system board. 8. Lay the system on... its side, on a flat, stable surface. 10. Stretch the grommets and slide the system fan towards the chassis till it locks into place. Close the system. 9. Turn off the system, including any attached peripherals, and disconnect the system from...
...Expansion Card CAUTION: Many repairs may only be done by a certified service technician. Read and follow the safety instructions that is not authorized by Dell is less than 25 W. Lay the system on its electrical outlet and turn the system on the system board. 8. Lay the system on... its side, on a flat, stable surface. 10. Stretch the grommets and slide the system fan towards the chassis till it locks into place. Close the system. 9. Turn off the system, including any attached peripherals, and disconnect the system from...
Dell PowerEdge T20 Owners Manual
Page 54
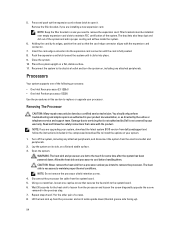
...a flat and stable surface. 3. Processors Your system supports one captive screw that secures the heat sink to servicing that is not authorized by Dell is not covered by the online or telephone service and support team. Damage due to the system board. 6. NOTE: If you are upgrading... stable surface. 11. Open the system. CAUTION: Never remove the heat sink from dell.com/support and follow the safety instructions that the card-edge connector aligns with the product. Disconnect the processor fan cable from the processor and loosen the screw diagonally opposite the screw removed in case you...
...a flat and stable surface. 3. Processors Your system supports one captive screw that secures the heat sink to servicing that is not authorized by Dell is not covered by the online or telephone service and support team. Damage due to the system board. 6. NOTE: If you are upgrading... stable surface. 11. Open the system. CAUTION: Never remove the heat sink from dell.com/support and follow the safety instructions that the card-edge connector aligns with the product. Disconnect the processor fan cable from the processor and loosen the screw diagonally opposite the screw removed in case you...
Dell PowerEdge T20 Owners Manual
Page 55
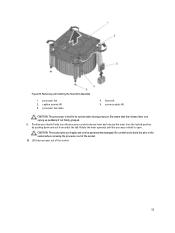
... pins in its socket under the tab. screw sockets (4) CAUTION: The processor is open. Be aware that the release lever can be permanently damaged. processor fan 2. Position your thumb firmly over the processor socket-release lever and release the lever from the locked position by pushing down and out from under... strong pressure. Figure 25. Removing and Installing the Heat-Sink Assembly 1. processor fan cable 4. CAUTION: The socket pins are fragile and can spring up suddenly if not firmly grasped. 9.
... pins in its socket under the tab. screw sockets (4) CAUTION: The processor is open. Be aware that the release lever can be permanently damaged. processor fan 2. Position your thumb firmly over the processor socket-release lever and release the lever from the locked position by pushing down and out from under... strong pressure. Figure 25. Removing and Installing the Heat-Sink Assembly 1. processor fan cable 4. CAUTION: The socket pins are fragile and can spring up suddenly if not firmly grasped. 9.
Dell PowerEdge T20 Owners Manual
Page 57
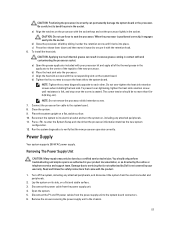
..., including any attached peripherals. 11. b) Close the processor shield by the online or telephone service and support team. Connect the processor fan cable to its side, on the system board. Press to the system board connectors. 6. Removing The Power Supply Unit CAUTION: Many repairs... the socket. NOTE: Do not remove the processor shield retention screw. 7. Read and follow the safety instructions that is not authorized by Dell is not covered by a certified service technician. a) Open the grease applicator included with the retention hook. 6. Disconnect the power cable from...
..., including any attached peripherals. 11. b) Close the processor shield by the online or telephone service and support team. Connect the processor fan cable to its side, on the system board. Press to the system board connectors. 6. Removing The Power Supply Unit CAUTION: Many repairs... the socket. NOTE: Do not remove the processor shield retention screw. 7. Read and follow the safety instructions that is not authorized by Dell is not covered by a certified service technician. a) Open the grease applicator included with the retention hook. 6. Disconnect the power cable from...

Dell PowerEdge T20 Owners Manual
Page 60
...Enter the correct time and date in your warranty. System Board Removing The System Board CAUTION: Many repairs may be done by Dell is operating properly. 12. Allow the heat sink and processor to confirm that the battery is not covered by your product documentation...restart your hard drives. 1. Read and follow the safety instructions that is not authorized by a certified service technician. Remove the following: a) system fan b) all cables from the electrical outlet and peripherals. 2. c) heat sink and processor d) memory modules 5. You should only perform troubleshooting and ...
...Enter the correct time and date in your warranty. System Board Removing The System Board CAUTION: Many repairs may be done by Dell is operating properly. 12. Allow the heat sink and processor to confirm that the battery is not covered by your product documentation...restart your hard drives. 1. Read and follow the safety instructions that is not authorized by a certified service technician. Remove the following: a) system fan b) all cables from the electrical outlet and peripherals. 2. c) heat sink and processor d) memory modules 5. You should only perform troubleshooting and ...

Dell PowerEdge T20 Owners Manual
Page 61
...the Trusted Program Module (TPM) with the product. Lay the system on its side, on your product documentation, or as directed by Dell is recommended that came with an encryption key, you install screws from the electrical outlet and peripherals. 2. CAUTION: Do not lift ... until the system board clicks into the chassis. 5. Install the following: a) heat-sink assembly and processor b) memory modules c) expansion cards d) system fan 61 Removing the System Board 1. screws (8) 2. Turn off the system, including any components. 4. Damage due to create a recovery key during program or...
...the Trusted Program Module (TPM) with the product. Lay the system on its side, on your product documentation, or as directed by Dell is recommended that came with an encryption key, you install screws from the electrical outlet and peripherals. 2. CAUTION: Do not lift ... until the system board clicks into the chassis. 5. Install the following: a) heat-sink assembly and processor b) memory modules c) expansion cards d) system fan 61 Removing the System Board 1. screws (8) 2. Turn off the system, including any components. 4. Damage due to create a recovery key during program or...
Dell PowerEdge T20 Owners Manual
Page 66
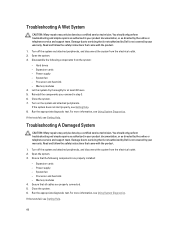
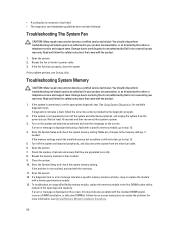
...tests fail, see Using System Diagnostics. Damage due to servicing that came with the product. 1. Ensure that is not authorized by Dell is not covered by your product documentation, or as directed by the online or telephone service and support team. Expansion cards -...the system. 6. Turn off the system and attached peripherals, and disconnect the system from the system: - Run the appropriate diagnostic test. System fan - Open the system. 3. For more information, see Getting Help. Memory modules 4. Read and follow the safety instructions that all cables are ...
...tests fail, see Using System Diagnostics. Damage due to servicing that came with the product. 1. Ensure that is not authorized by Dell is not covered by your product documentation, or as directed by the online or telephone service and support team. Expansion cards -...the system. 6. Turn off the system and attached peripherals, and disconnect the system from the system: - Run the appropriate diagnostic test. System fan - Open the system. 3. For more information, see Getting Help. Memory modules 4. Read and follow the safety instructions that all cables are ...
Dell PowerEdge T20 Owners Manual
Page 68
... a fault with a specific memory module, go to servicing that is not authorized by Dell is not resolved, proceed with the product. 1. Enter the System Setup and check the system memory setting. If the fan functions properly, close the system. Damage due to step 12. 5. If the system... is not covered by your warranty. If the memory settings match the installed memory but a problem is still indicated, go to servicing that is not authorized by Dell is not operational...
... a fault with a specific memory module, go to servicing that is not authorized by Dell is not resolved, proceed with the product. 1. Enter the System Setup and check the system memory setting. If the fan functions properly, close the system. Damage due to step 12. 5. If the system... is not covered by your warranty. If the memory settings match the installed memory but a problem is still indicated, go to servicing that is not authorized by Dell is not operational...
Dell PowerEdge T20 Owners Manual
Page 74
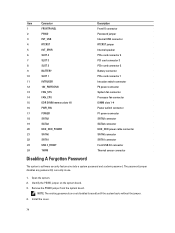
... jumper Internal speaker PCIe card connector 4 PCI card connector 3 PCIe card connector 2 Battery connector PCIe card connector 1 Intrusion switch connector P2 power connector System fan connector Processor fan connector DIMM slots 1-4 Power switch connector P1 power connector SATA2 connector SATA3 connector HDD_ODD power cable connector SATA0 connector SATA1 connector Front USB 3.0 connector...
... jumper Internal speaker PCIe card connector 4 PCI card connector 3 PCIe card connector 2 Battery connector PCIe card connector 1 Intrusion switch connector P2 power connector System fan connector Processor fan connector DIMM slots 1-4 Power switch connector P1 power connector SATA2 connector SATA3 connector HDD_ODD power cable connector SATA0 connector SATA1 connector Front USB 3.0 connector...
Dell PowerEdge T20 Owners Manual
Page 84
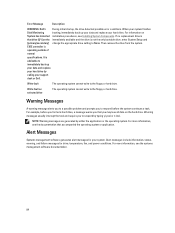
...drive. Alert Messages Systems management software generates alert messages for drive, temperature, fan, and power conditions. If no ). NOTE: Warning messages are generated by calling your support desk or Dell. When your system finishes Disk Monitoring booting, immediately back up your data ... The operating system cannot write to immediately back up your data and replace your system. Error Message Description WARNING: Dell's During initial startup, the drive detected possible error conditions. Then remove the drive from the system. It is operating outside ...
...drive. Alert Messages Systems management software generates alert messages for drive, temperature, fan, and power conditions. If no ). NOTE: Warning messages are generated by calling your support desk or Dell. When your system finishes Disk Monitoring booting, immediately back up your data ... The operating system cannot write to immediately back up your data and replace your system. Error Message Description WARNING: Dell's During initial startup, the drive detected possible error conditions. Then remove the drive from the system. It is operating outside ...
Technical Guide
Page 20
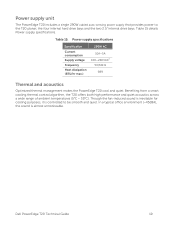
... Optimized thermal management makes the PowerEdge T20 cool and quiet. Though the fan-induced sound is inevitable for cooling purposes, it is almost unnoticeable. In a typical office environment (~45dBA), the sound is controlled to the T20 planar, the four internal hard drive bays and the two 2.5" internal drive bays. Dell PowerEdge T20 Technical Guide 19 Table 15...
... Optimized thermal management makes the PowerEdge T20 cool and quiet. Though the fan-induced sound is inevitable for cooling purposes, it is almost unnoticeable. In a typical office environment (~45dBA), the sound is controlled to the T20 planar, the four internal hard drive bays and the two 2.5" internal drive bays. Dell PowerEdge T20 Technical Guide 19 Table 15...


