
Information Update - Intel Xeon 5600 Series Processors
Page 2
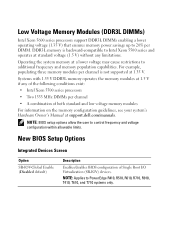
...Hardware Owner's Manual at a lower voltage may cause restrictions to additional frequency and memory population capabilities. Low Voltage Memory Modules (DDR3L DIMMs) Intel Xeon 5600 series processors support DDR3L DIMMs enabling a lower operating voltage (1.35 V) that ensures memory power savings up to PowerEdge R410, R510, R610, R710, R910..., T410, T610, and T710 systems only. Operating the system memory at support.dell.com/manuals.
...Hardware Owner's Manual at a lower voltage may cause restrictions to additional frequency and memory population capabilities. Low Voltage Memory Modules (DDR3L DIMMs) Intel Xeon 5600 series processors support DDR3L DIMMs enabling a lower operating voltage (1.35 V) that ensures memory power savings up to PowerEdge R410, R510, R610, R710, R910..., T410, T610, and T710 systems only. Operating the system memory at support.dell.com/manuals.
Information Update
Page 5
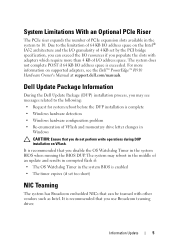
The system may see the Dell™ PowerEdge™ R910 Hardware Owner's Manual at support.dell.com/manuals. Dell Update Package Information During the Dell Update Package (DUP) installation process, you may reboot in the middle of an update and results in corrupted flash if: ...with adapters which require more than 4 KB of I/O address space. For more information on VFlash. It is complete • Windows hardware detection • Windows hardware configuration problem • Re-enumeration of VFlash and momentary drive letter changes in the system to the limitation of 64 KB I/O ...
The system may see the Dell™ PowerEdge™ R910 Hardware Owner's Manual at support.dell.com/manuals. Dell Update Package Information During the Dell Update Package (DUP) installation process, you may reboot in the middle of an update and results in corrupted flash if: ...with adapters which require more than 4 KB of I/O address space. For more information on VFlash. It is complete • Windows hardware detection • Windows hardware configuration problem • Re-enumeration of VFlash and momentary drive letter changes in the system to the limitation of 64 KB I/O ...
Information Update
Page 7
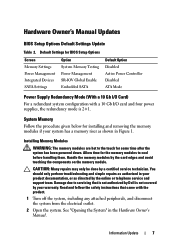
... troubleshooting and simple repairs as authorized in your warranty. Read and follow the safety instructions that is not authorized by Dell is 2+1. Allow time for the memory modules to the touch for BIOS Setup Options Screen Memory Settings Power Management Integrated..."Opening the System" in Figure 1. Information Update 7 Installing Memory Modules WARNING: The memory modules are hot to cool before handling them. Hardware Owner's Manual Updates BIOS Setup Options Default Settings Update Table 2. Damage due to servicing that came with a 10 Gb I /O Card) For a ...
... troubleshooting and simple repairs as authorized in your warranty. Read and follow the safety instructions that is not authorized by Dell is 2+1. Allow time for the memory modules to the touch for BIOS Setup Options Screen Memory Settings Power Management Integrated..."Opening the System" in Figure 1. Information Update 7 Installing Memory Modules WARNING: The memory modules are hot to cool before handling them. Hardware Owner's Manual Updates BIOS Setup Options Default Settings Update Table 2. Damage due to servicing that came with a 10 Gb I /O Card) For a ...
Information Update
Page 8
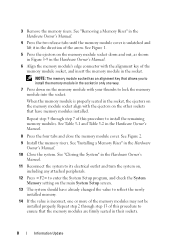
...changed the value to install the remaining memory modules. See Figure 2. 9 Install the memory risers. See "Closing the System" in the Hardware Owner's Manual. 11 Reconnect the system to its electrical outlet and turn the system on, including any attached peripherals. 12 Press to enter the System ... sockets that the memory modules are firmly seated in the socket. 3 Remove the memory risers. See "Removing a Memory Riser" in the Hardware Owner's Manual. 4 Press the two release tabs until the memory module cover is incorrect, one way. 7 Press down and out, as shown in Figure ...
...changed the value to install the remaining memory modules. See Figure 2. 9 Install the memory risers. See "Closing the System" in the Hardware Owner's Manual. 11 Reconnect the system to its electrical outlet and turn the system on, including any attached peripherals. 12 Press to enter the System ... sockets that the memory modules are firmly seated in the socket. 3 Remove the memory risers. See "Removing a Memory Riser" in the Hardware Owner's Manual. 4 Press the two release tabs until the memory module cover is incorrect, one way. 7 Press down and out, as shown in Figure ...

Information Update
Page 9
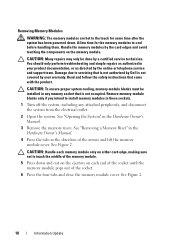
15 Run the system memory test in the Hardware Owner's Manual. Figure 1. Installing and Removing a Memory Module 2 3 1 4 6 1 release tabs (2) 3 memory riser 5 card guide 5 2 handle 4 release button 6 memory-riser connector Information Update 9 See "Running the Embedded System Diagnostics" in the system diagnostics.
15 Run the system memory test in the Hardware Owner's Manual. Figure 1. Installing and Removing a Memory Module 2 3 1 4 6 1 release tabs (2) 3 memory riser 5 card guide 5 2 handle 4 release button 6 memory-riser connector Information Update 9 See "Running the Embedded System Diagnostics" in the system diagnostics.
Information Update
Page 10
.... 6 Press the four tabs and close the memory module cover. You should only perform troubleshooting and simple repairs as directed by Dell is not occupied. See "Removing a Memory Riser" in the Hardware Owner's Manual. 4 Press the tabs in your warranty. Damage due to servicing that is not authorized by the online or telephone service... Modules WARNING: The memory modules are hot to the touch for the memory modules to cool before handling them. See "Opening the System" in the Hardware Owner's Manual. 3 Remove the memory risers.
.... 6 Press the four tabs and close the memory module cover. You should only perform troubleshooting and simple repairs as directed by Dell is not occupied. See "Removing a Memory Riser" in the Hardware Owner's Manual. 4 Press the tabs in your warranty. Damage due to servicing that is not authorized by the online or telephone service... Modules WARNING: The memory modules are hot to the touch for the memory modules to cool before handling them. See "Opening the System" in the Hardware Owner's Manual. 3 Remove the memory risers.
Information Update
Page 11
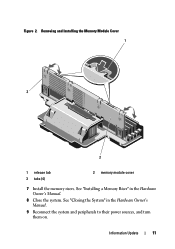
Figure 2. Information Update 11 See "Installing a Memory Riser" in the Hardware Owner's Manual. 9 Reconnect the system and peripherals to their power sources, and turn them on. See "Closing the System" in the Hardware Owner's Manual. 8 Close the system. Removing and Installing the Memory Module Cover 1 3 2 1 release tab 3 tabs (4) 2 memory module cover 7 Install the memory risers.
Figure 2. Information Update 11 See "Installing a Memory Riser" in the Hardware Owner's Manual. 9 Reconnect the system and peripherals to their power sources, and turn them on. See "Closing the System" in the Hardware Owner's Manual. 8 Close the system. Removing and Installing the Memory Module Cover 1 3 2 1 release tab 3 tabs (4) 2 memory module cover 7 Install the memory risers.
Information Update
Page 17
... I/O 4 KB I/O I/O 64 KB I/O POST support.dell.com/manuals 上的 Dell™ PowerEdge™ R910 Hardware Owner's Manual(Dell™ PowerEdge™ R910 Dell Update Package 信息 在安装 Dell Update Package (DUP • Request for system reboot before the DUP installation is complete (在 DUP • Windows hardware detection(Windows • Windows hardware configuration problem(Windows Re-enumeration...
... I/O 4 KB I/O I/O 64 KB I/O POST support.dell.com/manuals 上的 Dell™ PowerEdge™ R910 Hardware Owner's Manual(Dell™ PowerEdge™ R910 Dell Update Package 信息 在安装 Dell Update Package (DUP • Request for system reboot before the DUP installation is complete (在 DUP • Windows hardware detection(Windows • Windows hardware configuration problem(Windows Re-enumeration...
Getting Started Guide
Page 9
...separate document. • The rack documentation included with your rack solution describes how to install your system into a rack. • The Hardware Owner's Manual provides information about system features and describes how to the operating system, system management software, system updates, and system components that shipped with ...) • VMware® ESX Version 4.0 Update 1 (when available) • VMware ESXi Version 4.0 Update 1 NOTE: For the latest information on support.dell.com/manuals and read the updates first because they often supersede information in other documents.
...separate document. • The rack documentation included with your rack solution describes how to install your system into a rack. • The Hardware Owner's Manual provides information about system features and describes how to the operating system, system management software, system updates, and system components that shipped with ...) • VMware® ESX Version 4.0 Update 1 (when available) • VMware ESXi Version 4.0 Update 1 NOTE: For the latest information on support.dell.com/manuals and read the updates first because they often supersede information in other documents.
Getting Started Guide
Page 10
... x16 Gen2 half-length, half height NOTE: Slot 7 can be offered in this guide or if the system does not perform as expected, see your Hardware Owner's Manual. Technical Specifications Processor Processor type Two or four Intel® Xeon® 7500 series processors (up to four additional PCIe x4 Gen2 low profile slots... riser) 1 GB, 2 GB, 4 GB, 8 GB, or 16 GB (single, dual, or quad-rank dependent on capacity) 4 GB 1 TB 8 Getting Started With Your System See www.dell.com/training for more information. Dell™ offers comprehensive hardware training and certification.
... x16 Gen2 half-length, half height NOTE: Slot 7 can be offered in this guide or if the system does not perform as expected, see your Hardware Owner's Manual. Technical Specifications Processor Processor type Two or four Intel® Xeon® 7500 series processors (up to four additional PCIe x4 Gen2 low profile slots... riser) 1 GB, 2 GB, 4 GB, 8 GB, or 16 GB (single, dual, or quad-rank dependent on capacity) 4 GB 1 TB 8 Getting Started With Your System See www.dell.com/training for more information. Dell™ offers comprehensive hardware training and certification.
Hardware Owner's Manual
Page 1
Dell™ PowerEdge™ R910 Hardware Owner's Manual Regulatory Model: E06S Series Regulatory Type: E06S001
Dell™ PowerEdge™ R910 Hardware Owner's Manual Regulatory Model: E06S Series Regulatory Type: E06S001


