Secured Component Verification Version 1.5 1.5.1 1.6 1.7 and 1.8 Reference Guide for Servers and Chassis
Page 31
...; Documentation feedback Contacting Dell Dell provides several online and telephone based support and service options. 8 Getting help 31 The support page that lists the various support categories is displayed. 5. Go to videos, and more: ○ www.dell.com/support/idrac ● iDRAC User Guide and other manuals: ○ www.dell.com/idracmanuals ● For information about your feedback on the lower right corner of Dell Global Technical Support: a. Select...
...; Documentation feedback Contacting Dell Dell provides several online and telephone based support and service options. 8 Getting help 31 The support page that lists the various support categories is displayed. 5. Go to videos, and more: ○ www.dell.com/support/idrac ● iDRAC User Guide and other manuals: ○ www.dell.com/idracmanuals ● For information about your feedback on the lower right corner of Dell Global Technical Support: a. Select...
Host Bus Adapter Users Guide HBA 355 and 350 Series
Page 4
... on Windows Server 2016 or later......41 Linux driver installation...42 Install or update a RPM driver package using the KMOD support 42 Install or update a RPM driver package using the KMP support 42 Load the driver while installing an operating system 43 Chapter 7: Manage Dell HBA355i Adapter, Dell HBA355i Front, Dell HBA355e Adapter, Dell HBA350i MX, Dell HBA350i Adapter, and Dell HBA350i MM using HII configuration utility........45 Enter the HII configuration utility...45 Exit the HII configuration utility...46 Navigate to the configuration utility...46 Controller management ...46 View...
... on Windows Server 2016 or later......41 Linux driver installation...42 Install or update a RPM driver package using the KMOD support 42 Install or update a RPM driver package using the KMP support 42 Load the driver while installing an operating system 43 Chapter 7: Manage Dell HBA355i Adapter, Dell HBA355i Front, Dell HBA355e Adapter, Dell HBA350i MX, Dell HBA350i Adapter, and Dell HBA350i MM using HII configuration utility........45 Enter the HII configuration utility...45 Exit the HII configuration utility...46 Navigate to the configuration utility...46 Controller management ...46 View...
Host Bus Adapter Users Guide HBA 355 and 350 Series
Page 21
... replacing faulty storage controller/FC/NIC card with the same type of card, after next server boot; Damage due to the same firmware and configuration of the replaced one . NOTE: It is not covered by the online or telephone service and support team. You should only perform troubleshooting and simple repairs as authorized in your product documentation, or as directed by your system • Remove the Dell HBA355i Adapter • Install the Dell...
... replacing faulty storage controller/FC/NIC card with the same type of card, after next server boot; Damage due to the same firmware and configuration of the replaced one . NOTE: It is not covered by the online or telephone service and support team. You should only perform troubleshooting and simple repairs as authorized in your product documentation, or as directed by your system • Remove the Dell HBA355i Adapter • Install the Dell...
Host Bus Adapter Users Guide HBA 355 and 350 Series
Page 43
... operating system version. For example, when you to match with the command linuxefi/boot/x86_64/loader/linux splash=silent dud=1. Attach the driver media (ISO, USB). 6. Steps 1. Uncompress the gzipped tarball driver release package. 2. At a terminal window, type the following steps to take effect. c. When prompted, select the driver media. Driver support for the updated driver to update or install the driver for a new kernel: Steps 1. See operating system installation manuals...
... operating system version. For example, when you to match with the command linuxefi/boot/x86_64/loader/linux splash=silent dud=1. Attach the driver media (ISO, USB). 6. Steps 1. Uncompress the gzipped tarball driver release package. 2. At a terminal window, type the following steps to take effect. c. When prompted, select the driver media. Driver support for the updated driver to update or install the driver for a new kernel: Steps 1. See operating system installation manuals...
Host Bus Adapter Users Guide HBA 355 and 350 Series
Page 49
... Linux, run the executable file in the Linux environment. For iDRAC, click System iDRAC > Maintenance > System Update, upload Windows executable, and then install. 8 Update the firmware of Dell HBA355i Adapter, Dell HBA355i Front, Dell HBA355e Adapter, Dell HBA350i MX, Dell HBA350i Adapter, and Dell HBA350i MM using DUP Topics: • Upgrade firmware controller using Dell Update Package (DUP) Upgrade firmware controller using iDRAC or the PERC CLI. 4. Download the DUP file. Locate your controller. 3. Go to the Drivers and Downloads page on the support site...
... Linux, run the executable file in the Linux environment. For iDRAC, click System iDRAC > Maintenance > System Update, upload Windows executable, and then install. 8 Update the firmware of Dell HBA355i Adapter, Dell HBA355i Front, Dell HBA355e Adapter, Dell HBA350i MX, Dell HBA350i Adapter, and Dell HBA350i MM using DUP Topics: • Upgrade firmware controller using Dell Update Package (DUP) Upgrade firmware controller using iDRAC or the PERC CLI. 4. Download the DUP file. Locate your controller. 3. Go to the Drivers and Downloads page on the support site...
Host Bus Adapter Users Guide HBA 355 and 350 Series
Page 50
... system Service Tag in your Dell server, storage, and networking devices. Select your Dell devices and automatically detects hardware issues, both proactively and predictively. ● Automated case creation - Receiving automated support with details to www.dell.com/support/home. 2. The availability of services varies depending on the lower right corner of Dell Global Technical Support: a. For customized support: a. The support page that automates technical support for sales, technical assistance, or customer service issues...
... system Service Tag in your Dell server, storage, and networking devices. Select your Dell devices and automatically detects hardware issues, both proactively and predictively. ● Automated case creation - Receiving automated support with details to www.dell.com/support/home. 2. The availability of services varies depending on the lower right corner of Dell Global Technical Support: a. For customized support: a. The support page that automates technical support for sales, technical assistance, or customer service issues...
Installation and Service Manual
Page 3
... this document...8 Chapter 2: DellPowerEdge R760xa system overview 9 Front view of the system...9 Left control panel view...11 Right control panel view...12 Rear view of the system...13 Inside the system...15 Locating the Express Service Code and Service Tag 16 System information labels...16 Rail sizing and rack compatibility matrix...19 Chapter 3: Technical specifications 20 Chassis dimensions ...21 System weight...21 Processor specifications...22 PSU specifications...22 Supported operating systems...22 Cooling fan specifications...23 System battery specifications...23 Expansion card...
... this document...8 Chapter 2: DellPowerEdge R760xa system overview 9 Front view of the system...9 Left control panel view...11 Right control panel view...12 Rear view of the system...13 Inside the system...15 Locating the Express Service Code and Service Tag 16 System information labels...16 Rail sizing and rack compatibility matrix...19 Chapter 3: Technical specifications 20 Chassis dimensions ...21 System weight...21 Processor specifications...22 PSU specifications...22 Supported operating systems...22 Cooling fan specifications...23 System battery specifications...23 Expansion card...
Installation and Service Manual
Page 7
... LED indicator codes...195 LCD panel...196 Viewing Home screen...196 Setup menu...197 View menu...197 NIC indicator codes...198 Power supply unit indicator codes...198 Drive indicator codes...200 Using system diagnostics...201 Dell Embedded System Diagnostics...201 Chapter 11: Getting help...203 Recycling or End-of-Life service information...203 Contacting Dell Technologies...203 Accessing system information by using QRL...203 Quick Resource Locator for PowerEdge R760xa system 204 Receiving automated support with Secure Connect...
... LED indicator codes...195 LCD panel...196 Viewing Home screen...196 Setup menu...197 View menu...197 NIC indicator codes...198 Power supply unit indicator codes...198 Drive indicator codes...200 Using system diagnostics...201 Dell Embedded System Diagnostics...201 Chapter 11: Getting help...203 Recycling or End-of-Life service information...203 Contacting Dell Technologies...203 Accessing system information by using QRL...203 Quick Resource Locator for PowerEdge R760xa system 204 Receiving automated support with Secure Connect...
Installation and Service Manual
Page 34
...clear the web browser cache before downloading the drivers and firmware. Download the drivers to the system are displayed. 4. NOTE: To determine the most recent iDRAC release for system specific Integrated Dell Remote Access Controller User's Guide, go to download and install OS drivers. On the Drivers & Downloads page, all products, and navigate to www.dell.com/support/drivers. 2. Table 31. Options to download firmware (continued) Option Documentation link Using Dell Repository Manager (DRM) www.dell.com/openmanagemanuals > Repository Manager Using Dell Server Update Utility...
...clear the web browser cache before downloading the drivers and firmware. Download the drivers to the system are displayed. 4. NOTE: To determine the most recent iDRAC release for system specific Integrated Dell Remote Access Controller User's Guide, go to download and install OS drivers. On the Drivers & Downloads page, all products, and navigate to www.dell.com/support/drivers. 2. Table 31. Options to download firmware (continued) Option Documentation link Using Dell Repository Manager (DRM) www.dell.com/openmanagemanuals > Repository Manager Using Dell Server Update Utility...

Installation and Service Manual
Page 36
... Information Memory Settings Processor Settings SATA Settings NVMe Settings Boot Settings Network Settings Description Provides information about the system such as system password, setup password, Trusted Platform Module (TPM) security, and UEFI secure boot. Enables you to change the processor power management settings, memory frequency. Specifies options to UEFI. System Information To view the System Information screen, power on the system, press F2, and click System Setup Main Menu > System BIOS. Sets the redundant OS information for devices such as speed and...
... Information Memory Settings Processor Settings SATA Settings NVMe Settings Boot Settings Network Settings Description Provides information about the system such as system password, setup password, Trusted Platform Module (TPM) security, and UEFI secure boot. Enables you to change the processor power management settings, memory frequency. Specifies options to UEFI. System Information To view the System Information screen, power on the system, press F2, and click System Setup Main Menu > System BIOS. Sets the redundant OS information for devices such as speed and...

Installation and Service Manual
Page 41
... CPU constraint. The following settings are installed. Specifies the total L3 cache. This option is the QPI Link Control for cases of PCIe Port3 (PE3) when operating at post reset. Disabled - NOTE: The processor bus speed option displays only when both processors are displayed for collection of previous crash data from UPI Port3 affecting lane 0 Rx margins of multiple recoverable faults that are detected close, which is set to Enabled by default...
... CPU constraint. The following settings are installed. Specifies the total L3 cache. This option is the QPI Link Control for cases of PCIe Port3 (PE3) when operating at post reset. Disabled - NOTE: The processor bus speed option displays only when both processors are displayed for collection of previous crash data from UPI Port3 affecting lane 0 Rx margins of multiple recoverable faults that are detected close, which is set to Enabled by default...

Installation and Service Manual
Page 42
... Settings This option sets the NVMe drive mode. The Boot Settings only support UEFI mode. ● UEFI: The Unified Extensible Firmware Interface (UEFI) is applicable only for the embedded SATA drives during POST. This option is a new interface between operating systems and platform firmware. You may also need to change the Boot Mode setting to UEFI by default. SATA Settings To view the SATA Settings screen, power on the system, press F2, and click System Setup Main Menu > System BIOS > Boot Settings. Enables or disables the command for AHCI Mode. Boot Settings...
... Settings This option sets the NVMe drive mode. The Boot Settings only support UEFI mode. ● UEFI: The Unified Extensible Firmware Interface (UEFI) is applicable only for the embedded SATA drives during POST. This option is a new interface between operating systems and platform firmware. You may also need to change the Boot Mode setting to UEFI by default. SATA Settings To view the SATA Settings screen, power on the system, press F2, and click System Setup Main Menu > System BIOS > Boot Settings. Enables or disables the command for AHCI Mode. Boot Settings...

Installation and Service Manual
Page 43
... UEFI boot mode you to Disabled by default. Boot Settings details (continued) Option Description CAUTION: Switching the boot mode may prevent the system from the BIOS boot mode. This option is set to Yes, BIOS will be installed from booting if the operating system is an enhanced 64-bit boot interface. From the System Setup Main Menu, click Boot Settings, and select Boot Mode. 2. NOTE: Changing the drive boot sequence is set to Enabled and the system fails to UEFI disables the BIOS Boot Settings menu. Boot Sequence Retry Enables or disables...
... UEFI boot mode you to Disabled by default. Boot Settings details (continued) Option Description CAUTION: Switching the boot mode may prevent the system from the BIOS boot mode. This option is set to Yes, BIOS will be installed from booting if the operating system is an enhanced 64-bit boot interface. From the System Setup Main Menu, click Boot Settings, and select Boot Mode. 2. NOTE: Changing the drive boot sequence is set to Enabled and the system fails to UEFI disables the BIOS Boot Settings menu. Boot Sequence Retry Enables or disables...

Installation and Service Manual
Page 47
... Menu > System BIOS > Integrated Devices. The iDRAC Direct USB port is used as the primary display. This option is set of the system. Enables or disables the OS interface of Embedded Video Controller as the primary display. Enables or disables the I/O Acceleration Technology (I /OAT DMA Engine Embedded Video Controller Description Configures the user accessible USB ports. I /O can help improve performance on workloads where throughput and latency are multiple add-in graphic cards installed in certain USB ports during POST...
... Menu > System BIOS > Integrated Devices. The iDRAC Direct USB port is used as the primary display. This option is set of the system. Enables or disables the OS interface of Embedded Video Controller as the primary display. Enables or disables the I/O Acceleration Technology (I /OAT DMA Engine Embedded Video Controller Description Configures the user accessible USB ports. I /O can help improve performance on workloads where throughput and latency are multiple add-in graphic cards installed in certain USB ports during POST...

Installation and Service Manual
Page 49
... the BIOS default settings from within the BIOS setup utility may not always revert this option. This option is set to System DBPM (DAPC) by default. This option is set to 115200 by default. Pre-operating system management applications 49 Sets the remote console terminal type. This option is set to Serial Device 1, Serial Device 2, or the Remote Access Device by default. Other option includes Maximum Performance, OS DBPM. Serial Port Address Enables you to associate the External Serial Connector to...
... the BIOS default settings from within the BIOS setup utility may not always revert this option. This option is set to System DBPM (DAPC) by default. This option is set to 115200 by default. Pre-operating system management applications 49 Sets the remote console terminal type. This option is set to Serial Device 1, Serial Device 2, or the Remote Access Device by default. Other option includes Maximum Performance, OS DBPM. Serial Port Address Enables you to associate the External Serial Connector to...
Installation and Service Manual
Page 56
... boot options are found. System Utilities Enables you can use the Preboot Execution Environment (PXE) option to boot and configure the networked systems remotely. LC is started during POST instead of -band solution and Dell system embedded Unified Extensible Firmware Interface (UEFI) applications. One-shot Boot Menu Enables you to access boot menu, where you to launch System Utilities menu such as storage controllers or network cards. PXE boot You can select a one-time boot device to boot from BIOS Setup. To access the PXE boot option, boot...
... boot options are found. System Utilities Enables you can use the Preboot Execution Environment (PXE) option to boot and configure the networked systems remotely. LC is started during POST instead of -band solution and Dell system embedded Unified Extensible Firmware Interface (UEFI) applications. One-shot Boot Menu Enables you to access boot menu, where you to launch System Utilities menu such as storage controllers or network cards. PXE boot You can select a one-time boot device to boot from BIOS Setup. To access the PXE boot option, boot...

Installation and Service Manual
Page 59
.... WARNING: Do not operate the system without the system cover can result in your product documentation, or as authorized in component damage. Operating the system without the cover for liquid cooling module • Optional BOSS-N1 module • System battery • Optional internal USB card • Intrusion switch • Optional OCP card • Power supply unit • Trusted Platform Module • System board • LOM card and rear I/O board • Control panel Safety instructions...
.... WARNING: Do not operate the system without the system cover can result in your product documentation, or as authorized in component damage. Operating the system without the cover for liquid cooling module • Optional BOSS-N1 module • System battery • Optional internal USB card • Intrusion switch • Optional OCP card • Power supply unit • Trusted Platform Module • System board • LOM card and rear I/O board • Control panel Safety instructions...

Installation and Service Manual
Page 110
... to replace the processor or system board. The tubes leading towards the rear of the system. 2. Tilt the liquid cooling ring holder and using a Phillips #2 screwdriver, tighten the captive screw on the system board. Connect the liquid cooling leak detection cable to locked position (outward position). 3. Place the module on the processor slot and set all the anti-tilt wires to the connector on...
... to replace the processor or system board. The tubes leading towards the rear of the system. 2. Tilt the liquid cooling ring holder and using a Phillips #2 screwdriver, tighten the captive screw on the system board. Connect the liquid cooling leak detection cable to locked position (outward position). 3. Place the module on the processor slot and set all the anti-tilt wires to the connector on...
Installation and Service Manual
Page 204
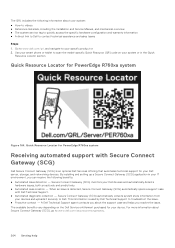
...; How-to videos ● Reference materials, including the Installation and Service Manual, and mechanical overview ● The system service tag to quickly access the specific hardware configuration and warranty information ● A direct link to Dell to contact technical assistance and sales teams Steps 1. The QRL includes the following benefits: ● Automated issue detection - Quick Resource Locator for PowerEdge R760xa system Receiving automated support with Dell Technical Support. ● Automated diagnostic collection -
...; How-to videos ● Reference materials, including the Installation and Service Manual, and mechanical overview ● The system service tag to quickly access the specific hardware configuration and warranty information ● A direct link to Dell to contact technical assistance and sales teams Steps 1. The QRL includes the following benefits: ● Automated issue detection - Quick Resource Locator for PowerEdge R760xa system Receiving automated support with Dell Technical Support. ● Automated diagnostic collection -

Microsoft Word - SOV InfoDev Enterprise R760xa CB MayFY24 20230518.docx
Page 1
..., remote access controllers, and storage controllers) is not information, functional if corrupted or UEFI removed. memory write protected? BIOS SPI Non- 1 U121 32 MB SPI Flash No Boot code, SPI interface Software write Not possible with any Flash Volatile system via PCH protected utilities or applications configuration and system is available by component separately. Volatile components lose their data even after the power has been removed from the component. Dell PowerEdge R760xa Dell PowerEdge R760xa contains...
..., remote access controllers, and storage controllers) is not information, functional if corrupted or UEFI removed. memory write protected? BIOS SPI Non- 1 U121 32 MB SPI Flash No Boot code, SPI interface Software write Not possible with any Flash Volatile system via PCH protected utilities or applications configuration and system is available by component separately. Volatile components lose their data even after the power has been removed from the component. Dell PowerEdge R760xa Dell PowerEdge R760xa contains...


