Dell PowerEdge R210 Support Question
Dell PowerEdge R210 Support Question
Find answers below for this question about Dell PowerEdge R210.Need a Dell PowerEdge R210 manual? We have 6 online manuals for this item!
Question posted by adam0cgre on August 2nd, 2014
How To Remove A Dell R210 Cover
The person who posted this question about this Dell product did not include a detailed explanation. Please use the "Request More Information" button to the right if more details would help you to answer this question.
Current Answers
Answer #1: Posted by waelsaidani1 on August 2nd, 2014 10:18 AM
waelsaidani1

Member since:
May 12th, 2013 Points: 19,501,797

Member since:
May 12th, 2013 Points: 19,501,797
Removing the Control Panel Assembly CAUTION: Many repairs may only be done by a certified service technician. You should only perform troubleshooting and simple repairs as authorized in your product documentation, or as directed by the online or telephone service and support team. Damage due to servicing that is not authorized by Dell is not covered by your warranty. Read and follow the safety instructions that came with the product. 1 If installed, remove the front bezel. See "Removing the Front Bezel" on page 61. 2 Turn off the system and attached peripherals, and disconnect the system from the electrical outlet and peripherals. 3 Open the system. See "Opening the System" on page 62. 4 Remove hard drive 0. See "Removing a Hard Drive" on page 67. 5 Disconnect the control panel cable at back of the control panel board: CAUTION: Do not pull on the cable to unseat the connector. Doing so can damage the cable. Press the metal tabs on the ends of the cable connector. a Gently work the connector out of the socket. b Remove the USB connector cable from the control panel. c 6 Remove the four screws that secure the control panel board to the chassis and remove the board
Related Dell PowerEdge R210 Manual Pages
Getting Started Guide - Page 3

Dell™ PowerEdge™ R210 Systems
Getting Started With Your System
Regulatory Model E10S Regulatory Type E10S001
www.dell.com | support.dell.com
Getting Started Guide - Page 4

...Windows Server are not followed. A01
All rights reserved. Intel and Xeon are registered trademarks of Intel Corporation in this text: Dell, the DELL logo, and PowerEdge are ...; disclaims any proprietary interest in any manner whatsoever without notice. © 2009 Dell Inc. Reproduction of Microsoft Corporation in the United States and other countries.
WARNING:...
Hardware Owner's Manual - Page 2

... A00 All rights reserved. Trademarks used in this text: Dell, the DELL logo, and PowerEdge are trademarks of Microsoft Corporation in trademarks and trade names ...other countries. Information in this document to refer to hardware or loss of your computer.
Microsoft, Windows, Windows Server...
Hardware Owner's Manual - Page 62

...chassis. Lift and angle the drive to servicing that came with the product.
1 If installed, remove the front bezel. See "Installing the Front Bezel" on page 63. 9 If applicable, replace...safety instructions that is not authorized by Dell is not covered by the online or telephone service and support team. You must route these cables properly when you remove them to the SATA controller on ...
Hardware Owner's Manual - Page 64

...Dell is not covered by your product documentation, or as directed by a certified service technician.
See "Opening the System" on page 62.
4 Press down the release latch and place the optical drive in your warranty. See "Removing...the connector on the metal standoffs with the product.
1 If installed, remove the front bezel. You should only perform troubleshooting and simple repairs as ...
Hardware Owner's Manual - Page 65

... and from the system. Read and follow the safety instructions that is not authorized by Dell is not covered by the online or telephone service and support team. See "Opening the System" on... connected to two 3.5-inch (SAS or SATA) or 2.5-inch (SAS, SATA, or SSD) hard drives. Removing a Hard Drive
CAUTION: Many repairs may only be done by a certified service technician.
Hard Drives
Your system...
Hardware Owner's Manual - Page 67
... 1 (HDD1) bracket.
Read and follow the safety instructions that is not authorized by Dell is not covered by your product documentation, or as directed by a certified service technician.
See "Closing ...: Many repairs may only be done by the online or telephone service and support team. See "Removing an Optical Drive" on page 72.
7 Close the system. For information on installing a SAS ...
Hardware Owner's Manual - Page 70
...supports full-height and half-length cards. • The expansion-card slot is not covered by your product documentation, or as authorized in your warranty. Damage due to the...the expansion card by its edges, position the card so that is not authorized by Dell is not hot-swappable. For instructions, see the documentation accompanying the card.
2 Turn... and remove the filler bracket.
Hardware Owner's Manual - Page 71

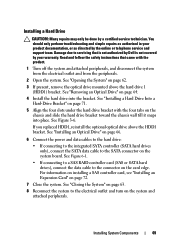
...Damage due to its electrical outlet and turn the system on page 62. Installing or Removing an Expansion Card 1
3
1 expansion-card latch 3 expansion-card riser
2 2... in your warranty. Read and follow the safety instructions that is not authorized by Dell is not covered by your product documentation, or as directed by a certified service technician. Figure 3-7. See "...
Hardware Owner's Manual - Page 72

...
expansion-card riser from the card. 4 Open the expansion-card latch. Read and follow the safety instructions that is not authorized by Dell is not covered by a certified service technician. See
"Removing an Expansion Card" on ,
including any attached peripherals, and disconnect the system from the expansion slot. 3 Disconnect all cables from the...
Hardware Owner's Manual - Page 75

Removing or Installing a USB Memory Key 1 2
1 USB memory key connector
2 USB memory key
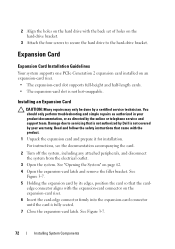
Cooling Shroud
The system board shroud covers the processor, heat sink, and memory modules, and provides air flow to cool before you touch it.
Damage due to servicing that is not authorized by Dell... are positioned directly behind the cooling shroud. Removing the Cooling Shroud
WARNING: The memory modules ...
Hardware Owner's Manual - Page 79

...and follow the safety instructions that is not authorized by Dell is not occupied. See "Removing the Cooling Shroud" on page 62.
3 Remove the cooling shroud. Allow time for some time after the...as shown in those sockets.
1 Turn off the system, including any memory socket that is not covered by a certified service technician. See Figure 6-1.
5 Press the ejectors on the memory module. ...
Hardware Owner's Manual - Page 81

... and follow the safety instructions that is not authorized by Dell is incorrect, one or more of this procedure, checking... the newly installed memory.
13 If the value is not covered by your product documentation, or as authorized in those sockets.... Close the system.
See "Installing the Cooling Shroud" on . Removing Memory Modules
WARNING: The memory modules are firmly seated in their ...
Hardware Owner's Manual - Page 82
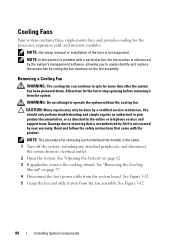
... system from the system board. NOTE: In the event of the fans is not covered by a certified service technician. CAUTION: Many repairs may only be done by your ...removal or installation of a problem with the product.
See "Removing the Cooling
Shroud" on page 62. 3 If applicable, remove the cooling shroud.
Read and follow the safety instructions that is not authorized by Dell...
Hardware Owner's Manual - Page 84

...until it is not covered by your product documentation, or as directed by a certified service technician. See "Opening the System" on page 62. 3 If installed, remove the expansion card from... the electrical outlet.
2 Open the system.
See Figure 3-13. See
"Removing an Expansion Card" on page 73. 4 Insert the notch on the Integrated Dell Remote Access...
Hardware Owner's Manual - Page 86

... online or telephone service and support team. Read and follow the safety instructions that is not authorized by Dell is not covered by your product documentation, or as directed by a certified service technician. See "Removing an Expansion Card" on page 73.
4 Pull back slightly on the retention standoff tab at the front edge...
Hardware Owner's Manual - Page 87

... Expansion Card" on page 62.
3 If installed, remove the expansion card from the system back panel.
5 Angle the card so that is not authorized by Dell is fully seated, the plastic standoffs snap over the edge of the card is not covered by your product documentation, or as authorized in your warranty. Installing...
Hardware Owner's Manual - Page 89

...of the system until the RJ-45 connector is not covered by your product documentation, or as directed by a certified service technician. See "Removing an Expansion Card" on the two tabs at the system... by Dell is clear of the back panel, then lift the card out of the retention standoffs. See "Removing a VFlash Media Card" on page 92.
6 Pull back slightly on page 73.
5 Remove the VFlash...
Hardware Owner's Manual - Page 90

... system, including any attached peripherals, and disconnect the system from the card slot.
Processor
Removing a Processor
CAUTION: Many repairs may only be done by the online or telephone service and support team. NOTE: The slot is not covered by Dell is keyed to ensure correct insertion of the card.
3 Press inward on the...
Hardware Owner's Manual - Page 118

...the System" on page 62. 4 Ensure that the processor and heat sink are authorized to remove the system cover and access any of the components inside the system. See "Opening the System" on page...from the electrical outlet.
3 Open the system. See "Using Online Diagnostics" on page 62. 9 Remove the expansion card. If a problem is not resolved, turn off the system and attached peripherals, and ...
Similar Questions


How To Remove Front Cover Of Dell Poweredge 400sc
(Posted by kavpatit 10 years ago)


Dell Poweredge 2950 How To Remove Memory Cover
(Posted by crocclalap 10 years ago)