
Owner's Manual
Page 17
... System Memory" on ; About Your System 17 Possible processor failure. Possible expansion card See "Troubleshooting an failure. Table 1-1. BIOS checksum failure detected; See "Troubleshooting the Processor" on page 119. Possible video failure. Diagnostic Indicator Codes Code Causes Corrective Action...See "Getting Help" on page 110. system is off condition or a possible electrical outlet and press the pre-BIOS failure has power button. Memory failure. Table 1-1 lists the causes and possible corrective actions associated with these codes. ...
... System Memory" on ; About Your System 17 Possible processor failure. Possible expansion card See "Troubleshooting an failure. Table 1-1. BIOS checksum failure detected; See "Troubleshooting the Processor" on page 119. Possible video failure. Diagnostic Indicator Codes Code Causes Corrective Action...See "Getting Help" on page 110. system is off condition or a possible electrical outlet and press the pre-BIOS failure has power button. Memory failure. Table 1-1 lists the causes and possible corrective actions associated with these codes. ...

Owner's Manual
Page 19
Restart the system and re-enter the BIOS settings. See "Using the System Setup Program and Boot Manager" on page 25. page 119. About Your System 19 Move the NVRAM_CLR jumper to take .... Faulty keyboard controller; NVRAM_CLR jumper is in the clear setting. Please run SETUP program. An invalid system configuration caused a system halt. Message Causes Corrective Actions BIOS MANUFACTURING MODE detected. CMOS has been cleared. See "Using the System Setup Program and Boot Manager" on page 25. System Messages System messages appear on...
Restart the system and re-enter the BIOS settings. See "Using the System Setup Program and Boot Manager" on page 25. page 119. About Your System 19 Move the NVRAM_CLR jumper to take .... Faulty keyboard controller; NVRAM_CLR jumper is in the clear setting. Please run SETUP program. An invalid system configuration caused a system halt. Message Causes Corrective Actions BIOS MANUFACTURING MODE detected. CMOS has been cleared. See "Using the System Setup Program and Boot Manager" on page 25. System Messages System messages appear on...

Owner's Manual
Page 20
No boot device available. PCI BIOS failed to take the system out of boot devices. If improperly connected or the the problem persists, see "Troubleshooting an Expansion Card" on page 109. ... Corrective Actions Keyboard cable connector is in a valid configuration. Invalid memory configuration. The system will run but with less memory than is defective. PCIe device BIOS (Option ROM) checksum failure detected during shadowing. See "Using the System Setup Program and Boot Manager" on page 25 for information on page 98. Ensure...
No boot device available. PCI BIOS failed to take the system out of boot devices. If improperly connected or the the problem persists, see "Troubleshooting an Expansion Card" on page 109. ... Corrective Actions Keyboard cable connector is in a valid configuration. Invalid memory configuration. The system will run but with less memory than is defective. PCIe device BIOS (Option ROM) checksum failure detected during shadowing. See "Using the System Setup Program and Boot Manager" on page 25 for information on page 98. Ensure...

Owner's Manual
Page 22
See "Getting Help" on page 119. Update the BIOS firmware. For example, before the system continues a task. NOTE: Warning messages are generated by typing y (yes) or n (no). Warning! Micro code update failed. See "Running ... failure. No micro code update loaded for drive, temperature, fan, and power conditions. Diagnostics Messages The system diagnostic utilities may lose all data on support.dell.com/manuals. For more information, see the documentation that you may issue messages if you to respond by either the application or the operating system...
See "Getting Help" on page 119. Update the BIOS firmware. For example, before the system continues a task. NOTE: Warning messages are generated by typing y (yes) or n (no). Warning! Micro code update failed. See "Running ... failure. No micro code update loaded for drive, temperature, fan, and power conditions. Diagnostics Messages The system diagnostic utilities may lose all data on support.dell.com/manuals. For more information, see the documentation that you may issue messages if you to respond by either the application or the operating system...
Owner's Manual
Page 25
...on this interface. NOTE: Operating systems must boot the system to the same boot mode (BIOS or UEFI) to access the installed operating system. From the System Setup program, you can only ...be installed from that overlays the system BIOS. See "Entering the Boot Manager" on page 37 for more information on Unified Extensible Firmware Interface...be installed from the other boot mode will cause the system to boot the operating system from the BIOS boot mode. Trying to halt immediately at startup. You must select the boot mode in the ...
...on this interface. NOTE: Operating systems must boot the system to the same boot mode (BIOS or UEFI) to access the installed operating system. From the System Setup program, you can only ...be installed from that overlays the system BIOS. See "Entering the Boot Manager" on page 37 for more information on Unified Extensible Firmware Interface...be installed from the other boot mode will cause the system to boot the operating system from the BIOS boot mode. Trying to halt immediately at startup. You must select the boot mode in the ...
Owner's Manual
Page 28
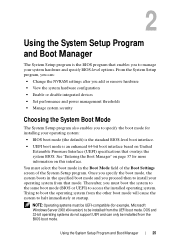
Displays a screen to enable or disable integrated device controllers and ports, and to specify the boot mode (BIOS or UEFI). See "Serial Communication Screen" on page 42. For more information, see "System Security Screen" on page 35, "Using the System Password" on page ...40, and "Using the Setup Password" on page 33. For BIOS boot mode, you to manage power usage of the integrated devices on the PCI bus, and any installed expansion card that requires an IRQ. Displays...
Displays a screen to enable or disable integrated device controllers and ports, and to specify the boot mode (BIOS or UEFI). See "Serial Communication Screen" on page 42. For more information, see "System Security Screen" on page 35, "Using the System Password" on page ...40, and "Using the Setup Password" on page 33. For BIOS boot mode, you to manage power usage of the integrated devices on the PCI bus, and any installed expansion card that requires an IRQ. Displays...
Owner's Manual
Page 30
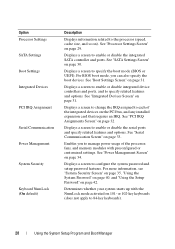
...to Enabled, the processor can operate in all available power states. Enabled permits virtualization software to SATA port B. Auto enables BIOS support for the device attached to use the virtualization technology incorporated in each processor core supports up to Disabled, only one logical... processor is set to Enabled, the BIOS reports both logical processors. When set to All, the maximum number of the processor. SATA Settings Screen Option Embedded SATA (AHCI ...
...to Enabled, the processor can operate in all available power states. Enabled permits virtualization software to SATA port B. Auto enables BIOS support for the device attached to use the virtualization technology incorporated in each processor core supports up to Disabled, only one logical... processor is set to Enabled, the BIOS reports both logical processors. When set to All, the maximum number of the processor. SATA Settings Screen Option Embedded SATA (AHCI ...
Owner's Manual
Page 31
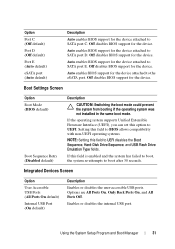
...If this field is enabled and the system has failed to boot, the system re-attempts to UEFI. Boot Settings Screen Option Boot Mode (BIOS default) Boot Sequence Retry (Disabled default) Description CAUTION: Switching the boot mode could prevent the system from booting if the operating system was...mode. If the operating system supports Unified Extensible Firmware Interface (UEFI), you can set this field to SATA port D. Setting this field to BIOS allows compatibility with non-UEFI operating systems. NOTE: Setting this option to boot after 30 seconds. Options are All Ports On, Only Back ...
...If this field is enabled and the system has failed to boot, the system re-attempts to UEFI. Boot Settings Screen Option Boot Mode (BIOS default) Boot Sequence Retry (Disabled default) Description CAUTION: Switching the boot mode could prevent the system from booting if the operating system was...mode. If the operating system supports Unified Extensible Firmware Interface (UEFI), you can set this field to SATA port D. Setting this field to BIOS allows compatibility with non-UEFI operating systems. NOTE: Setting this option to boot after 30 seconds. Options are All Ports On, Only Back ...
Owner's Manual
Page 32
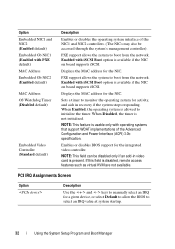
...with iSCSI Boot option is available if the NIC on board supports iSCSI. Displays the MAC address for the integrated video controller. Enables or disables BIOS support for the NIC. If this field is allowed to boot from the network. When Disabled, the timer is usable only with operating systems ...support allows the system to manually select an IRQ for the NIC. Displays the MAC address for a given device, or select Default to allow the BIOS to monitor the operating system for activity, and aids in video card is present. Sets a timer to select an IRQ value at system startup. ...
...with iSCSI Boot option is available if the NIC on board supports iSCSI. Displays the MAC address for the integrated video controller. Enables or disables BIOS support for the NIC. If this field is allowed to boot from the network. When Disabled, the timer is usable only with operating systems ...support allows the system to manually select an IRQ for the NIC. Displays the MAC address for a given device, or select Default to allow the BIOS to monitor the operating system for activity, and aids in video card is present. Sets a timer to select an IRQ value at system startup. ...

Owner's Manual
Page 33
...Device 2 can be used only if the attempt fails. NOTE: Only Serial Device 2 can be used for console redirection and the serial device. BIOS attempts to the external serial connector. Options are enabled in BIOS. To use console redirection by SOL, configure the same port address for SOL. Enables or disables... BIOS console redirection when the operating system is used for the two serial devices. Specifies whether Serial Device 1, Serial Device 2, or Remote Access Device ...
...Device 2 can be used only if the attempt fails. NOTE: Only Serial Device 2 can be used for console redirection and the serial device. BIOS attempts to the external serial connector. Options are enabled in BIOS. To use console redirection by SOL, configure the same port address for SOL. Enables or disables... BIOS console redirection when the operating system is used for the two serial devices. Specifies whether Serial Device 1, Serial Device 2, or Remote Access Device ...

Owner's Manual
Page 34
... Performance Management Description Options are Maximum Performance or Minimum Power. Options are OS Control, Custom, or Maximum Performance. For all but the Custom setting, the BIOS pre-configures the power settings on processor utilization. • Maximum Performance sets all processor performance information is passed from the system...
... Performance Management Description Options are Maximum Performance or Minimum Power. Options are OS Control, Custom, or Maximum Performance. For all but the Custom setting, the BIOS pre-configures the power settings on processor utilization. • Maximum Performance sets all processor performance information is passed from the system...
Owner's Manual
Page 37
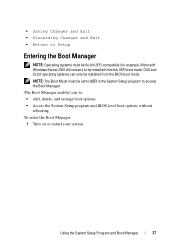
...; Return to Setup Entering the Boot Manager NOTE: Operating systems must be set to UEFI in the System Setup program to be installed from the BIOS boot mode. The Boot Manager enables you to: • Add, delete, and arrange boot options • Access the System Setup program and...
...; Return to Setup Entering the Boot Manager NOTE: Operating systems must be set to UEFI in the System Setup program to be installed from the BIOS boot mode. The Boot Manager enables you to: • Add, delete, and arrange boot options • Access the System Setup program and...
Owner's Manual
Page 38
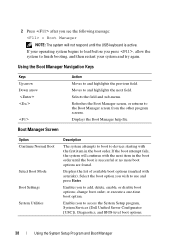
... Boot Manager screen, or returns to and highlights the next field. Enables you wish to access the System Setup program, System Services (Dell Unified Server Configurator [USC]), Diagnostics, and BIOS-level boot options. 38 Using the System Setup Program and Boot Manager If the boot attempt fails, the system will not respond...
... Boot Manager screen, or returns to and highlights the next field. Enables you wish to access the System Setup program, System Services (Dell Unified Server Configurator [USC]), Diagnostics, and BIOS-level boot options. 38 Using the System Setup Program and Boot Manager If the boot attempt fails, the system will not respond...

Owner's Manual
Page 39
... BEV Drive Order Sets the Bootstrap Entry Vector (BEV) boot priority. Restarts the system and accesses the Dell USC, which allows you to run utilities such as system diagnostics. Boot Settings Screen Boot Mode: BIOS Option Description Set Boot Order Sets the order of the boot option list. Set Legacy Floppy Drive...
... BEV Drive Order Sets the Bootstrap Entry Vector (BEV) boot priority. Restarts the system and accesses the Dell USC, which allows you to run utilities such as system diagnostics. Boot Settings Screen Boot Mode: BIOS Option Description Set Boot Order Sets the order of the boot option list. Set Legacy Floppy Drive...
Owner's Manual
Page 82
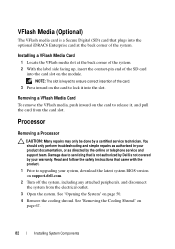
...the VFlash media, push inward on the card to upgrading your product documentation, or as authorized in your system, download the latest system BIOS version on support.dell.com. 2 Turn off the system, including any attached peripherals, and disconnect the system from the card slot. Read and follow the ...With the label side facing up, insert the contact-pin end of the system. Processor Removing a Processor CAUTION: Many repairs may only be done by Dell is a Secure Digital (SD) card that came with the product. 1 Prior to release it into the card slot on the card to servicing that...
...the VFlash media, push inward on the card to upgrading your product documentation, or as authorized in your system, download the latest system BIOS version on support.dell.com. 2 Turn off the system, including any attached peripherals, and disconnect the system from the card slot. Read and follow the ...With the label side facing up, insert the contact-pin end of the system. Processor Removing a Processor CAUTION: Many repairs may only be done by Dell is a Secure Digital (SD) card that came with the product. 1 Prior to release it into the card slot on the card to servicing that...
Owner's Manual
Page 86
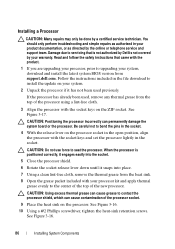
.... 5 Close the processor shield. 6 Rotate the socket release lever down until it has not been used , remove any thermal grease from support.dell.com. CAUTION: Positioning the processor incorrectly can cause contamination of the processor socket. 9 Place the heat sink on your processor kit and apply thermal... not to install the update on the processor. CAUTION: Do not use force to upgrading your system, download and install the latest system BIOS version from the top of the new processor. Installing a Processor CAUTION: Many repairs may only be done by the online or telephone service...
.... 5 Close the processor shield. 6 Rotate the socket release lever down until it has not been used , remove any thermal grease from support.dell.com. CAUTION: Positioning the processor incorrectly can cause contamination of the processor socket. 9 Place the heat sink on your processor kit and apply thermal... not to install the update on the processor. CAUTION: Do not use force to upgrading your system, download and install the latest system BIOS version from the top of the new processor. Installing a Processor CAUTION: Many repairs may only be done by the online or telephone service...

Owner's Manual
Page 97
... check for the front-panel and back-panel connectors on page 25. • Invalid memory configurations could cause the system to the BIOS boot mode after installing an operating system or your warranty. See "Using the System Setup Program and Boot Manager" on your system ...halts during startup prior to servicing that came with the product. Read and follow the safety instructions that is not authorized by Dell is also true. Troubleshooting System Startup Failure If your system. Troubleshooting External Connections Ensure that all other startup issues, note the system...
... check for the front-panel and back-panel connectors on page 25. • Invalid memory configurations could cause the system to the BIOS boot mode after installing an operating system or your warranty. See "Using the System Setup Program and Boot Manager" on your system ...halts during startup prior to servicing that came with the product. Read and follow the safety instructions that is not authorized by Dell is also true. Troubleshooting System Startup Failure If your system. Troubleshooting External Connections Ensure that all other startup issues, note the system...
Owner's Manual
Page 98
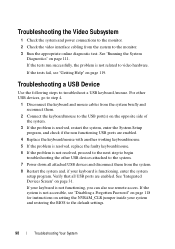
If the tests fail, see "Disabling a Forgotten Password" on page 118 for instructions on setting the NVRAM_CLR jumper inside your system and restoring the BIOS to troubleshoot a USB keyboard /mouse. Troubleshooting a USB Device Use the following steps to the default settings. 98 Troubleshooting Your System If the system is not ...
If the tests fail, see "Disabling a Forgotten Password" on page 118 for instructions on setting the NVRAM_CLR jumper inside your system and restoring the BIOS to troubleshoot a USB keyboard /mouse. Troubleshooting a USB Device Use the following steps to the default settings. 98 Troubleshooting Your System If the system is not ...

Processor Information
Page 1
... expansion cards - Intel Xeon E3-1200 v2 Series Processors-Information Update Important Information • The Dell PowerEdge R210 II and T110 II systems, originally installed with Intel Xeon E3-1200 series processors, support Intel Xeon E3-1200 v2 series processors after a BIOS and baseboard management controller (BMC) firmware upgrade. • To support Intel Xeon E3-1200...
... expansion cards - Intel Xeon E3-1200 v2 Series Processors-Information Update Important Information • The Dell PowerEdge R210 II and T110 II systems, originally installed with Intel Xeon E3-1200 series processors, support Intel Xeon E3-1200 v2 series processors after a BIOS and baseboard management controller (BMC) firmware upgrade. • To support Intel Xeon E3-1200...
Firmware Upgrade
Page 1
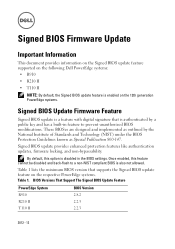
... (NIST) under the BIOS Protection Guidelines known as outlined by a public key and has a built-in the BIOS settings. Signed BIOS Firmware Update Important Information This document provides information on the Signed BIOS update feature supported on the following Dell PowerEdge systems: • R910 • R210 II • T110 II NOTE: By default, the Signed BIOS update feature is enabled...
... (NIST) under the BIOS Protection Guidelines known as outlined by a public key and has a built-in the BIOS settings. Signed BIOS Firmware Update Important Information This document provides information on the Signed BIOS update feature supported on the following Dell PowerEdge systems: • R910 • R210 II • T110 II NOTE: By default, the Signed BIOS update feature is enabled...


