Information Update (.pdf)
Page 1
... do not turn the manufacturing mode off the manufacturing mode, the BIOS and CMOS settings are trademarks of Dell Inc. Information in this text: Dell and the DELL logo are repeatedly lost, the system may be able to flash update the BIOS. Other trademarks and trade names may not boot correctly, or you will not be used in this document is subject to change without the...
... do not turn the manufacturing mode off the manufacturing mode, the BIOS and CMOS settings are trademarks of Dell Inc. Information in this text: Dell and the DELL logo are repeatedly lost, the system may be able to flash update the BIOS. Other trademarks and trade names may not boot correctly, or you will not be used in this document is subject to change without the...
Service Manual (.htm)
Page 2
... important information that helps you how to avoid the problem. Information in this document is subject to hardware or loss of data and tells you make better use of Dell Computer Corporation is strictly forbidden. Dell Computer Corporation disclaims any proprietary interest in any manner ...whatsoever without notice. © 2003 Dell Computer Corporation. CAUTION: A CAUTION indicates a potential for property damage, personal injury, or death. Trademarks used in this document to refer to either potential damage to change without the written permission of your computer...
... important information that helps you how to avoid the problem. Information in this document is subject to hardware or loss of data and tells you make better use of Dell Computer Corporation is strictly forbidden. Dell Computer Corporation disclaims any proprietary interest in any manner ...whatsoever without notice. © 2003 Dell Computer Corporation. CAUTION: A CAUTION indicates a potential for property damage, personal injury, or death. Trademarks used in this document to refer to either potential damage to change without the written permission of your computer...
Service Manual (.htm)
Page 3
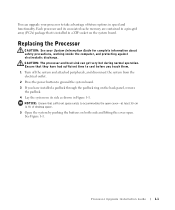
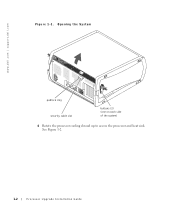
... power button to accommodate the open . NOTICE: Ensure that is installed in Figure 1-1. Processor Upgrade Installation Guide 1-1 CAUTION: The processor and heat sink can upgrade your System Information Guide for complete information about safety precautions, working inside the computer, and protecting against electrostatic discharge. See Figure 1-1. You can get very hot during normal operation. Each processor and its associated cache memory are contained in a pin-grid array...
... power button to accommodate the open . NOTICE: Ensure that is installed in Figure 1-1. Processor Upgrade Installation Guide 1-1 CAUTION: The processor and heat sink can upgrade your System Information Guide for complete information about safety precautions, working inside the computer, and protecting against electrostatic discharge. See Figure 1-1. You can get very hot during normal operation. Each processor and its associated cache memory are contained in a pin-grid array...
Service Manual (.htm)
Page 4
See Figure 1-2. 1-2 Processor Upgrade Installation Guide Opening the System padlock ring security cable slot buttons (2) (one on each side of the system) 6 Rotate the processor cooling shroud up to access the processor and heat sink. www.dell.com | support.dell.com Figure 1-1.
See Figure 1-2. 1-2 Processor Upgrade Installation Guide Opening the System padlock ring security cable slot buttons (2) (one on each side of the system) 6 Rotate the processor cooling shroud up to access the processor and heat sink. www.dell.com | support.dell.com Figure 1-1.
Service Manual (.htm)
Page 5
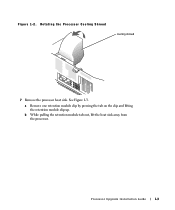
Rotating the Processor Cooling Shroud cooling shroud 7 Remove the processor heat sink. See Figure 1-3. a Remove one retention module clip by pressing the tab on the clip and lifting the retention module clip up. Processor Upgrade Installation Guide 1-3 b While pulling the retention module tab out, lift the heat sink away from the processor. Figure 1-2.
Rotating the Processor Cooling Shroud cooling shroud 7 Remove the processor heat sink. See Figure 1-3. a Remove one retention module clip by pressing the tab on the clip and lifting the retention module clip up. Processor Upgrade Installation Guide 1-3 b While pulling the retention module tab out, lift the heat sink away from the processor. Figure 1-2.
Service Manual (.htm)
Page 6
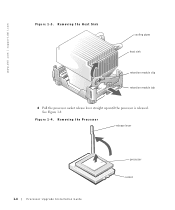
Removing the Heat Sink cooling pipes heat sink retention module clip retention module tab 8 Pull the processor socket release lever straight up until the processor is released. Figure 1-4. Removing the Processor release lever 1-4 Processor Upgrade Installation Guide processor socket See Figure 1-4. www.dell.com | support.dell.com Figure 1-3.
Removing the Heat Sink cooling pipes heat sink retention module clip retention module tab 8 Pull the processor socket release lever straight up until the processor is released. Figure 1-4. Removing the Processor release lever 1-4 Processor Upgrade Installation Guide processor socket See Figure 1-4. www.dell.com | support.dell.com Figure 1-3.
Service Manual (.htm)
Page 7
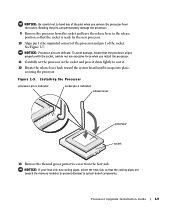
... back toward the memory modules to prevent damage to bend any of the socket. To avoid damage, ensure that the processor aligns properly with the socket, and do not use excessive force when you install the processor. 11 Carefully set the processor in the release position so that the cooling pipes are delicate. NOTICE: If your heat sink has...
... back toward the memory modules to prevent damage to bend any of the socket. To avoid damage, ensure that the processor aligns properly with the socket, and do not use excessive force when you install the processor. 11 Carefully set the processor in the release position so that the cooling pipes are delicate. NOTICE: If your heat sink has...
Service Manual (.htm)
Page 8
... to the electrical outlet, and turn on the tab and lowering that end of the heat sink under the retention module tab on the side opposite the removed clip, and lower the heat sink onto the processor until the heat sink snaps securely in on the system and attached peripherals. 1-6 Processor Upgrade Installation Guide www.dell.com | support.dell.com 14 Place one end...
... to the electrical outlet, and turn on the tab and lowering that end of the heat sink under the retention module tab on the side opposite the removed clip, and lower the heat sink onto the processor until the heat sink snaps securely in on the system and attached peripherals. 1-6 Processor Upgrade Installation Guide www.dell.com | support.dell.com 14 Place one end...
Service Manual (.htm)
Page 34
Dell Computer Corporation Dell および DELL ロゴは Dell Computer Corporation Dell Computer Corporation 2003 年 6 月 P/N Y1336 Rev. A00 All rights reserved. 2003 Dell Computer Corporation.
Dell Computer Corporation Dell および DELL ロゴは Dell Computer Corporation Dell Computer Corporation 2003 年 6 月 P/N Y1336 Rev. A00 All rights reserved. 2003 Dell Computer Corporation.


