
Hardware Owner's Manual (PDF)
Page 69
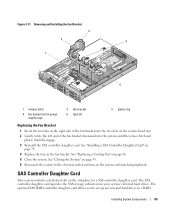
See "Replacing a Cooling Fan" on the system board tray. 2 Gently rotate the left end of the fan bracket into the two slots on page 66. 5 Close the system. Removing and Installing the Fan Bracket 3 2 4 1 5 1 ... optional SAS RAID controller daughter card allows you to the electrical outlet and turn on page 55. 6 Reconnect the system to set up any internal hard drives in the fan bracket. Figure 3-11. See "Installing a SAS Controller Daughter Card" on the sideplane for your system's internal...
See "Replacing a Cooling Fan" on the system board tray. 2 Gently rotate the left end of the fan bracket into the two slots on page 66. 5 Close the system. Removing and Installing the Fan Bracket 3 2 4 1 5 1 ... optional SAS RAID controller daughter card allows you to the electrical outlet and turn on page 55. 6 Reconnect the system to set up any internal hard drives in the fan bracket. Figure 3-11. See "Installing a SAS Controller Daughter Card" on the sideplane for your system's internal...

Hardware Owner's Manual (PDF)
Page 74
...RAID Battery Installing a RAID Battery 1 Insert the RAID battery into the chassis battery carrier slots and connect the battery cable to the right of the hard drive bays. 3 Insert the battery carrier and RAID battery into the battery carrier. See Figure 3-17. 2 Locate the battery bay to the storage daughter... card, ensuring that the battery carrier is aligned and fully seated in its tray away from the sideplane connector, freeing the chassis slots on the tray from the chassis hooks, and lifting the card from the card. 4 Gently press down on the release...
...RAID Battery Installing a RAID Battery 1 Insert the RAID battery into the chassis battery carrier slots and connect the battery cable to the right of the hard drive bays. 3 Insert the battery carrier and RAID battery into the battery carrier. See Figure 3-17. 2 Locate the battery bay to the storage daughter... card, ensuring that the battery carrier is aligned and fully seated in its tray away from the sideplane connector, freeing the chassis slots on the tray from the chassis hooks, and lifting the card from the card. 4 Gently press down on the release...
Hardware Owner's Manual (PDF)
Page 82
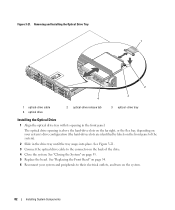
...Drive Tray 1 2 3 4 1 optical-drive cable 4 optical drive 2 optical-drive release tab 3 optical -drive tray Installing the Optical Drive 1 Align the optical drive tray with its opening is above the hard-drive slots on the far right, or the flex bay, depending on your system and peripherals to the connector on the front panel of the drive... Installing System Components The optical drive opening in the drive tray until the tray snaps into place. See "Replacing the Front Bezel" on page 54. 6 Reconnect your system's drive configuration (the hard-drives slots are identified by labels ...
...Drive Tray 1 2 3 4 1 optical-drive cable 4 optical drive 2 optical-drive release tab 3 optical -drive tray Installing the Optical Drive 1 Align the optical drive tray with its opening is above the hard-drive slots on the far right, or the flex bay, depending on your system and peripherals to the connector on the front panel of the drive... Installing System Components The optical drive opening in the drive tray until the tray snaps into place. See "Replacing the Front Bezel" on page 54. 6 Reconnect your system's drive configuration (the hard-drives slots are identified by labels ...


