Activating the Integrated RAID Controller
Page 5
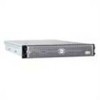
... on the hard drives before changing the mode of operation of the integrated SCSI controller from the electrical outlet. 3 Open the system. 4 If you have a PowerEdge 2800 system, go...instructions on the riser card. If you have a PowerEdge 2850, remove the riser card. 5 Locate the RAID memory module connector on removing or replacing components. 1 Remove the bezel (if applicable). ... If you perform the following procedures, ensure that is not present on Dell™ PowerEdge™ 1850, 2800, and 2850 systems. Your upgrade kit includes a RAID controller memory module, RAID hardware...
... on the hard drives before changing the mode of operation of the integrated SCSI controller from the electrical outlet. 3 Open the system. 4 If you have a PowerEdge 2800 system, go...instructions on the riser card. If you have a PowerEdge 2850, remove the riser card. 5 Locate the RAID memory module connector on removing or replacing components. 1 Remove the bezel (if applicable). ... If you perform the following procedures, ensure that is not present on Dell™ PowerEdge™ 1850, 2800, and 2850 systems. Your upgrade kit includes a RAID controller memory module, RAID hardware...
Updating Your NIC Teaming Drivers (.pdf)
Page 6
... cam lever to secure the insulator. 11 Reconnect the fan power cables. 12 Replace the SCSI backplane board and reinstall the SCSI hard drives. www.dell.com | support.dell.com 5 Replace the processor(s). 6 If applicable, replace the RAC card. 7 If applicable, replace the RAID key. 8 Replace the power supply(s). 9 Install the new riser board provided in the Service...
... cam lever to secure the insulator. 11 Reconnect the fan power cables. 12 Replace the SCSI backplane board and reinstall the SCSI hard drives. www.dell.com | support.dell.com 5 Replace the processor(s). 6 If applicable, replace the RAC card. 7 If applicable, replace the RAID key. 8 Replace the power supply(s). 9 Install the new riser board provided in the Service...
Updating Your NIC Teaming Drivers (.pdf)
Page 7
... Raise the drive-bay retraction bar and swing it on the new system board. 11 Remove the back fans and the back-fan tray. 12 If applicable, remove the RAC card. See Figure 1-3. Upgrading Your System Board and Riser Board 7 Removing and Replacing the System Board and Riser Board In A Dell PowerEdge 2850 System Removing...
... Raise the drive-bay retraction bar and swing it on the new system board. 11 Remove the back fans and the back-fan tray. 12 If applicable, remove the RAC card. See Figure 1-3. Upgrading Your System Board and Riser Board 7 Removing and Replacing the System Board and Riser Board In A Dell PowerEdge 2850 System Removing...
Updating Your NIC Teaming Drivers (.pdf)
Page 9
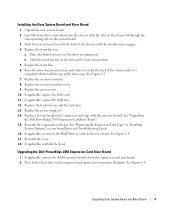
...Board and Riser Board 1 Unpack the new system board. 2 Carefully lower the system board into position. 5 Replace the front fans. 6 Raise the drive-bay retraction bar and rotate it toward the back of the chassis until it locks into the chassis until ...Replace the riser board in the expansion-card cage with the top of the chassis until it is completely flush with the new riser board. Upgrading Your System Board and Riser Board 9 See Figure 1-4. See "Upgrading the Dell PowerEdge 2850 Expansion-Card Riser Board." 15 Reinstall the expansion-card-cage. Upgrading the Dell PowerEdge 2850...
...Board and Riser Board 1 Unpack the new system board. 2 Carefully lower the system board into position. 5 Replace the front fans. 6 Raise the drive-bay retraction bar and rotate it toward the back of the chassis until it locks into the chassis until ...Replace the riser board in the expansion-card cage with the top of the chassis until it is completely flush with the new riser board. Upgrading Your System Board and Riser Board 9 See Figure 1-4. See "Upgrading the Dell PowerEdge 2850 Expansion-Card Riser Board." 15 Reinstall the expansion-card-cage. Upgrading the Dell PowerEdge 2850...


