
Installing the DRAC 4/P (.pdf)
Page 1
... this issue, download updated drivers from the Dell Support website at support.dell.com. To correct this issue, download updated drivers from the Dell Support website at support.dell.com. Driver Issues When Running the Red Hat® Enterprise Linux Operating System Intel NIC drivers, version 7.1, ians file versions 2.4.12d and 2.4.12g, may fail when running the Red Hat Enterprise Linux (version 2.1) or Red Hat Enterprise Linux (version 3) operating system. All rights reserved. Driver Issues When Running the Dynamic Link Aggregation on...
... this issue, download updated drivers from the Dell Support website at support.dell.com. To correct this issue, download updated drivers from the Dell Support website at support.dell.com. Driver Issues When Running the Red Hat® Enterprise Linux Operating System Intel NIC drivers, version 7.1, ians file versions 2.4.12d and 2.4.12g, may fail when running the Red Hat Enterprise Linux (version 2.1) or Red Hat Enterprise Linux (version 3) operating system. All rights reserved. Driver Issues When Running the Dynamic Link Aggregation on...
Upgrade the BIOS Before Upgrading Your System (.pdf)
Page 1
... if required. See the Dell Server Update Utility 1.0 User's Guide located at the Dell Support website at support.dell.com for information on your system with their respective operating system install technologies. SUU compares the drivers and firmware versions on updating your specific PowerEdge system. January 2005 See the Dell OpenManage Server Administrator Compatibility Guide located on your Dell PowerEdge™ systems (for a list of supported PowerEdge systems and operating systems. NOTE: The Dell OpenManage Subscription Service CD Kit includes the Dell PowerEdge Updates...
... if required. See the Dell Server Update Utility 1.0 User's Guide located at the Dell Support website at support.dell.com for information on your system with their respective operating system install technologies. SUU compares the drivers and firmware versions on updating your specific PowerEdge system. January 2005 See the Dell OpenManage Server Administrator Compatibility Guide located on your Dell PowerEdge™ systems (for a list of supported PowerEdge systems and operating systems. NOTE: The Dell OpenManage Subscription Service CD Kit includes the Dell PowerEdge Updates...
Upgrade the BIOS Before Upgrading Your System (.pdf)
Page 2
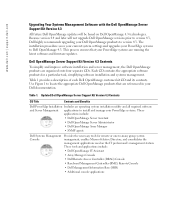
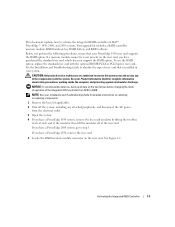
... kit CD and its contents. Use Figure 1 to locate the appropriate Dell OpenManage products that your PowerEdge systems are organized onto four separate CDs. Dell OpenManage Server Support Kit Version 4.3 Contents To simplify and improve software installation and server management, the Dell OpenManage products are running the latest software and firmware updates. Updated Dell OpenManage Server Support Kit Version 4.3 Contents CD Title Contents and Benefits Dell PowerEdge Installation Includes an operating system installation utility and all required software and Server Management...
... kit CD and its contents. Use Figure 1 to locate the appropriate Dell OpenManage products that your PowerEdge systems are organized onto four separate CDs. Dell OpenManage Server Support Kit Version 4.3 Contents To simplify and improve software installation and server management, the Dell OpenManage products are running the latest software and firmware updates. Updated Dell OpenManage Server Support Kit Version 4.3 Contents CD Title Contents and Benefits Dell PowerEdge Installation Includes an operating system installation utility and all required software and Server Management...
Upgrade the BIOS Before Upgrading Your System (.pdf)
Page 3
... Dell PowerEdge Services and Diagnostic Utilities Contents and Benefits Provides operating system-level diagnostics and software components to detect and resolve hardware issues. These components include: • System troubleshooting using Dell PowerEdge Diagnostics • Utilities for installing the latest BIOS, drivers, and firmware NOTE: See the Dell Support website at support.dell.com for all PowerEdge systems updated by the Dell OpenManage Server Support Kit Version 4.3 CDs. This documentation includes: • Installation and Troubleshooting Guides • User's Guides...
... Dell PowerEdge Services and Diagnostic Utilities Contents and Benefits Provides operating system-level diagnostics and software components to detect and resolve hardware issues. These components include: • System troubleshooting using Dell PowerEdge Diagnostics • Utilities for installing the latest BIOS, drivers, and firmware NOTE: See the Dell Support website at support.dell.com for all PowerEdge systems updated by the Dell OpenManage Server Support Kit Version 4.3 CDs. This documentation includes: • Installation and Troubleshooting Guides • User's Guides...
Upgrade the BIOS Before Upgrading Your System (.pdf)
Page 17
....dell.com Dell OpenManage Server Support Kit 4.3 Dell OpenManage 4.3 Server Support Kit Dell OpenManage 4.3 Dell™ Server Update Utility Dell OpenManage Server Support Kit 4.3 による OpenManage Systems Management Software Dell OpenManage Server Support Kit 4.3 の目次 Dell OpenManage 4.3 Dell OpenManage 4.3 は、Systems Management Software を Dell PowerEdge Microsoft® Installer Utility [MSI]、Red Hat® Package Manger [RPM Novell® IPS Microsoft Windows PowerEdge Dell OpenManage Service Pack Dell...
....dell.com Dell OpenManage Server Support Kit 4.3 Dell OpenManage 4.3 Server Support Kit Dell OpenManage 4.3 Dell™ Server Update Utility Dell OpenManage Server Support Kit 4.3 による OpenManage Systems Management Software Dell OpenManage Server Support Kit 4.3 の目次 Dell OpenManage 4.3 Dell OpenManage 4.3 は、Systems Management Software を Dell PowerEdge Microsoft® Installer Utility [MSI]、Red Hat® Package Manger [RPM Novell® IPS Microsoft Windows PowerEdge Dell OpenManage Service Pack Dell...

Processor Upgrade Installation Guide (.pdf)
Page 3
... card NIC connector standoffs (4) RAC card connector 15 Enter the System Setup program and verify that the setting for CDROM and LS-120. When the system boots, the Remote Access Control Detected message displays and the option ROM and firmware information for the RAC. Printed in trademarks and trade names other than its own. Other trademarks and trade names may be used in your User's Guide. Reproduction in this document...
... card NIC connector standoffs (4) RAC card connector 15 Enter the System Setup program and verify that the setting for CDROM and LS-120. When the system boots, the Remote Access Control Detected message displays and the option ROM and firmware information for the RAC. Printed in trademarks and trade names other than its own. Other trademarks and trade names may be used in your User's Guide. Reproduction in this document...

Upgrade the BIOS Before Upgrading Your System
Page 1
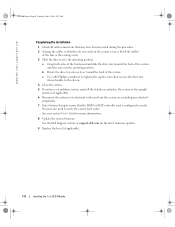
... that requires removal of the system cover is on your Product Information Guide for complete information about safety precautions, working inside the computer and protecting against electrostatic discharge. See "Installing System Components" or "Installing System Options" in the System Setup program. October 2005 Download the system BIOS version on support.dell.com if it is fully supported. 1 Verify your system BIOS version in the system documentation...
... that requires removal of the system cover is on your Product Information Guide for complete information about safety precautions, working inside the computer and protecting against electrostatic discharge. See "Installing System Components" or "Installing System Options" in the System Setup program. October 2005 Download the system BIOS version on support.dell.com if it is fully supported. 1 Verify your system BIOS version in the system documentation...

Information Update
Page 5
... Windows Server 2003 operating system installations • PCI-e hot-plug support • Failure to load usb-ohci driver message on systems running Red Hat® Enterprise Linux (version 2.1) • NIC teaming limitations • Changing the LCD display of the system ID and name • LCD status messages update • Installing the cable-management arm Enabling Video Hardware Acceleration in the Display Properties window, and then click Advanced. 3 Click the Troubleshoot tab, and move the hardware acceleration slider from None to Control Panel...
... Windows Server 2003 operating system installations • PCI-e hot-plug support • Failure to load usb-ohci driver message on systems running Red Hat® Enterprise Linux (version 2.1) • NIC teaming limitations • Changing the LCD display of the system ID and name • LCD status messages update • Installing the cable-management arm Enabling Video Hardware Acceleration in the Display Properties window, and then click Advanced. 3 Click the Troubleshoot tab, and move the hardware acceleration slider from None to Control Panel...
Information Update
Page 6
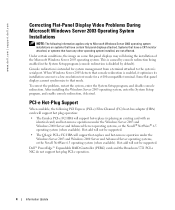
... management from a terminal attached to Microsoft Windows Server 2003 operating system installations on some flat-panel displays may roll during the installation of the Microsoft Windows Server 2003 operating system. PCI-e Hot-Plug Support When available, the following information applies only to the system's serial port. Hot-add will not be supported. When Windows Server 2003 detects that mode. Console redirection is disabled by default). Dell™ PowerEdge™ Expandable RAID Controller (PERC) cards and the Broadcom 5721 PCI-e NIC do not support hot-plug PCI-e operation...
... management from a terminal attached to Microsoft Windows Server 2003 operating system installations on some flat-panel displays may roll during the installation of the Microsoft Windows Server 2003 operating system. PCI-e Hot-Plug Support When available, the following information applies only to the system's serial port. Hot-add will not be supported. When Windows Server 2003 detects that mode. Console redirection is disabled by default). Dell™ PowerEdge™ Expandable RAID Controller (PERC) cards and the Broadcom 5721 PCI-e NIC do not support hot-plug PCI-e operation...

Information Update
Page 7
... displayed when Initializing USB controller (usb-ohci) appears during startup. Normal teaming functionality Normal teaming functionality Information Update 5 Failure to Load usb-ohci Driver Message on Systems Running Red Hat Enterprise Linux (Version 2.1) A failure message may be affected because of loss of management traffic. Otherwise, install Red Hat Enterprise Linux (version 2.1) Update 4 to access the system using the first integrated NIC (NIC1), teaming functionality and BMC functionality will issue a warning message about the loss of warning message...
... displayed when Initializing USB controller (usb-ohci) appears during startup. Normal teaming functionality Normal teaming functionality Information Update 5 Failure to Load usb-ohci Driver Message on Systems Running Red Hat Enterprise Linux (Version 2.1) A failure message may be affected because of loss of management traffic. Otherwise, install Red Hat Enterprise Linux (version 2.1) Update 4 to access the system using the first integrated NIC (NIC1), teaming functionality and BMC functionality will issue a warning message about the loss of warning message...

Information Update
Page 8
... each message. LCD Status Messages Update Table 1-2 lists updates to events recorded in the User's Guide and select Embedded Server Management from the main setup screen. This message is created AFT, ALB/RLB, and SFT Teaming Mode Effect Normal teaming functionality IEEE 802.3ad and Ether Channel Teaming Mode Effect Normal teaming functionality NOTE: To avoid false error messages, use only the Intel® NIC drivers provided by Dell. www.dell.com | support.dell...
... each message. LCD Status Messages Update Table 1-2 lists updates to events recorded in the User's Guide and select Embedded Server Management from the main setup screen. This message is created AFT, ALB/RLB, and SFT Teaming Mode Effect Normal teaming functionality IEEE 802.3ad and Ether Channel Teaming Mode Effect Normal teaming functionality NOTE: To avoid false error messages, use only the Intel® NIC drivers provided by Dell. www.dell.com | support.dell...
Information Update
Page 10
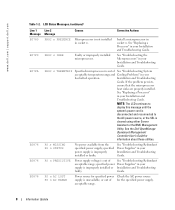
...Troubleshooting Guide. See the Dell OpenManage Baseboard Management Controller User's Guide for specified power Check the AC power source supply is cleared using either Server Assistant or the BMC Management Utility. See "Troubleshooting Redundant Power Supplies" in your Installation and Troubleshooting Guide. If the problem persists, ensure that the microprocessor heat sinks are properly installed. PS n MISSING PS n STATUS No power available from the specified power supply; specified power Power Supplies" in socket n. PROC n IERR Faulty or improperly installed...
...Troubleshooting Guide. See the Dell OpenManage Baseboard Management Controller User's Guide for specified power Check the AC power source supply is cleared using either Server Assistant or the BMC Management Utility. See "Troubleshooting Redundant Power Supplies" in your Installation and Troubleshooting Guide. If the problem persists, ensure that the microprocessor heat sinks are properly installed. PS n MISSING PS n STATUS No power available from the specified power supply; specified power Power Supplies" in socket n. PROC n IERR Faulty or improperly installed...
Information Update
Page 11
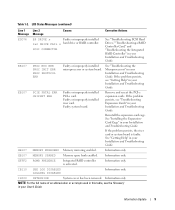
... Update 9 Faulty system board. EB107 MEMORY MIRRORED Memory mirroring enabled. Information only. SCSI CONNECTOR See "Troubleshooting SCSI Hard Drives," "Troubleshooting a RAID Controller Card," and "Troubleshooting the Integrated RAID Controller" in your Installation and Troubleshooting Guide. See "Troubleshooting the Microprocessors" in your Installation and Troubleshooting Guide. If the problem persists, see the "Glossary" in your Installation and Troubleshooting Guide. Remove and reseat the PCI-e expansion cards. Information only. IB110 SBE LOG DISABLED LOGGING DISABLED...
... Update 9 Faulty system board. EB107 MEMORY MIRRORED Memory mirroring enabled. Information only. SCSI CONNECTOR See "Troubleshooting SCSI Hard Drives," "Troubleshooting a RAID Controller Card," and "Troubleshooting the Integrated RAID Controller" in your Installation and Troubleshooting Guide. See "Troubleshooting the Microprocessors" in your Installation and Troubleshooting Guide. If the problem persists, see the "Glossary" in your Installation and Troubleshooting Guide. Remove and reseat the PCI-e expansion cards. Information only. IB110 SBE LOG DISABLED LOGGING DISABLED...

Installing the 1 x 2 SCSI Backplane
Page 5
... Information Guide for instructions on removing or replacing components. Before You Begin NOTICE: Before you have a standalone system, locate a flat, nonconductive surface, remove the stabilizers, and lay the system on the hard drives before installing the backplanes and changing the drive configuration. If you install the backplane, update the BIOS to install the backplane: 1 Record the system configuration settings. Installing the 1 x 2 SCSI Module 1-3 Before you perform this procedure, read the safety instructions in your User's Guide for...
... Information Guide for instructions on removing or replacing components. Before You Begin NOTICE: Before you have a standalone system, locate a flat, nonconductive surface, remove the stabilizers, and lay the system on the hard drives before installing the backplanes and changing the drive configuration. If you install the backplane, update the BIOS to install the backplane: 1 Record the system configuration settings. Installing the 1 x 2 SCSI Module 1-3 Before you perform this procedure, read the safety instructions in your User's Guide for...
Installing the 1 x 2 SCSI Backplane
Page 10
... system in the operating position. See your system User's Guide for the latest firmware updates. 9 Replace the bezel (if applicable). 1-8 Installing the 1 x 2 SCSI Module www.dell.com | support.dell.com F6590bk0.book Page 8 Tuesday, July 6, 2004 4:33 PM Completing the Installation 1 Check all cable connections that may also need to verify the correct boot order. a Grasp both sides of the front panel and slide the drive tray towards the...
... system in the operating position. See your system User's Guide for the latest firmware updates. 9 Replace the bezel (if applicable). 1-8 Installing the 1 x 2 SCSI Module www.dell.com | support.dell.com F6590bk0.book Page 8 Tuesday, July 6, 2004 4:33 PM Completing the Installation 1 Check all cable connections that may also need to verify the correct boot order. a Grasp both sides of the front panel and slide the drive tray towards the...

Installing the SCSI Backplane Daughter Card
Page 6
...'s User's Guide for more information. 13 Replace the bezel (if applicable). 1-4 Installing the SCSI Backplane Daughter Card b Connect SCSI channel B on the riser card to connector SCSIB on the SCSI backplane. This channel controls the boot drive (drive 0) and drives 1, 2, and 3. b Rotate the drive tray release lever toward the back of the front panel and slide the drive tray backwards until the tray is configured correctly. This channel controls the boot drive (drive 0) and drives 1, 2, and 3. To use...
...'s User's Guide for more information. 13 Replace the bezel (if applicable). 1-4 Installing the SCSI Backplane Daughter Card b Connect SCSI channel B on the riser card to connector SCSIB on the SCSI backplane. This channel controls the boot drive (drive 0) and drives 1, 2, and 3. b Rotate the drive tray release lever toward the back of the front panel and slide the drive tray backwards until the tray is configured correctly. This channel controls the boot drive (drive 0) and drives 1, 2, and 3. To use...

Installing the SCSI Backplane Daughter Card
Page 9
... controls the boot drive (drive 0) and drive 1. NOTE: If a cable is configured correctly. Otherwise, the system will display an error message. 10 Rotate the drive bay retraction bar toward the back of the system. 11 Close the system. 12 Enter System Setup to ensure that the RAID or SCSI controller card is connected to the SCSIB backplane connector, the SCSI backplane daughter card must be installed to activate the 2/4 split backplane configuration. See your system's User's Guide...
... controls the boot drive (drive 0) and drive 1. NOTE: If a cable is configured correctly. Otherwise, the system will display an error message. 10 Rotate the drive bay retraction bar toward the back of the system. 11 Close the system. 12 Enter System Setup to ensure that the RAID or SCSI controller card is connected to the SCSIB backplane connector, the SCSI backplane daughter card must be installed to activate the 2/4 split backplane configuration. See your system's User's Guide...
Activating the Integrated RAID Controller
Page 5
If a memory module connector is installed in your Product Information Guide for detailed instructions on Dell™ PowerEdge™ 1850, 2800, and 2850 systems. Your upgrade kit includes a RAID controller memory module, RAID hardware key, RAID battery, and RAID software. See Figure 1-1. See your system. NOTICE: To avoid possible data loss, back up all data on the riser card, you have a PowerEdge 1850 system, remove the riser card insulator by lifting the two blue rivets at each end of...
If a memory module connector is installed in your Product Information Guide for detailed instructions on Dell™ PowerEdge™ 1850, 2800, and 2850 systems. Your upgrade kit includes a RAID controller memory module, RAID hardware key, RAID battery, and RAID software. See Figure 1-1. See your system. NOTICE: To avoid possible data loss, back up all data on the riser card, you have a PowerEdge 1850 system, remove the riser card insulator by lifting the two blue rivets at each end of...

Rack- to-Tower Conversion Guide
Page 22
... rack mounting hardware from the rack cabinet includes the following tasks: • Removing the rack doors • Removing the cable-management arm and the cable tray • Removing the system from the rack • Installing the tower trim panel • Removing the bezel and cover • Removing the rack control panel assembly and rack front panel • Installing the tower front panel and tower control panel assembly • Installing the metal feet and bezel • Replacing the rack doors Removing...
... rack mounting hardware from the rack cabinet includes the following tasks: • Removing the rack doors • Removing the cable-management arm and the cable tray • Removing the system from the rack • Installing the tower trim panel • Removing the bezel and cover • Removing the rack control panel assembly and rack front panel • Installing the tower front panel and tower control panel assembly • Installing the metal feet and bezel • Replacing the rack doors Removing...

Rack Installation Guide
Page 8
... holes; This guide includes procedures for the following rack kits: • RapidRails kit in a four-post rack cabinet • VersaRails kit in a four-post rack cabinet • Two-post kit (installed in a rack. 1-6 Rack Installation Guide Use only the rack kit for trained service technicians installing one or more information on the front and back panels to the rack. Installation Instructions This installation guide provides instructions for your system User's Guide. The procedures for installing both RapidRails and VersaRails rack kits are similar.
... holes; This guide includes procedures for the following rack kits: • RapidRails kit in a four-post rack cabinet • VersaRails kit in a four-post rack cabinet • Two-post kit (installed in a rack. 1-6 Rack Installation Guide Use only the rack kit for trained service technicians installing one or more information on the front and back panels to the rack. Installation Instructions This installation guide provides instructions for your system User's Guide. The procedures for installing both RapidRails and VersaRails rack kits are similar.


