Information Update
Page 11
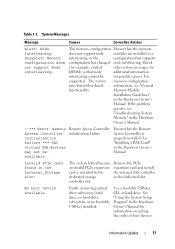
...the Remote Access Controller is installed in the the internal SAS controller dedicated storage in the dedicated slot. No boot device available Faulty or missing optical drive subsystem, hard drive, or hard-drive subsystem, or no bootable USB key installed. See "...information interleaving cannot be available... Table 1-1. For supported. Information Update 11 Use a bootable USB key, CD, or hard drive. System Messages Message Causes Corrective Actions Alert! Node Interleaving disabled! Memory Module Installation Guidelines" in the Internal_Storage slot! ...
...the Remote Access Controller is installed in the the internal SAS controller dedicated storage in the dedicated slot. No boot device available Faulty or missing optical drive subsystem, hard drive, or hard-drive subsystem, or no bootable USB key installed. See "...information interleaving cannot be available... Table 1-1. For supported. Information Update 11 Use a bootable USB key, CD, or hard drive. System Messages Message Causes Corrective Actions Alert! Node Interleaving disabled! Memory Module Installation Guidelines" in the Internal_Storage slot! ...

Hardware Owner's Manual (PDF)
Page 5
... the Optical Drive Tray 73 Installing the Optical Drive Tray 74 Hard Drives 75 Before You Begin 75 Removing a Drive Blank 75 Installing a Drive Blank 76 Installing a Hot-Plug Hard Drive 76 Replacing a Hard-Drive Carrier 78 Removing a Hard Drive From a Hard-Drive Carrier 78 Installing a SAS Hard Drive Into a SATAu Drive Carrier 78 Installing a SATA Hard Drive Into a SATA Drive Carrier 79 Installing a SATA Hard Drive and Interposer Card Into a SATAu Hard-Drive Carrier...
... the Optical Drive Tray 73 Installing the Optical Drive Tray 74 Hard Drives 75 Before You Begin 75 Removing a Drive Blank 75 Installing a Drive Blank 76 Installing a Hot-Plug Hard Drive 76 Replacing a Hard-Drive Carrier 78 Removing a Hard Drive From a Hard-Drive Carrier 78 Installing a SAS Hard Drive Into a SATAu Drive Carrier 78 Installing a SATA Hard Drive Into a SATA Drive Carrier 79 Installing a SATA Hard Drive and Interposer Card Into a SATAu Hard-Drive Carrier...
Hardware Owner's Manual (PDF)
Page 7
... Power Supplies 100 Troubleshooting System Cooling Problems 101 Troubleshooting a Fan 101 Troubleshooting System Memory 102 Troubleshooting an Optical Drive 103 Troubleshooting a Hard Drive 104 Troubleshooting a SAS or SAS RAID Controller Daughter Card 105 Troubleshooting Expansion Cards 107 Troubleshooting the Microprocessors 108 5 Running the System Diagnostics Using...113 6 Jumpers and Connectors System Board Jumpers 115 Disabling a Forgotten Password 117 System Board Connectors 118 SAS/SATA Backplane Board Connectors 120 Expansion-Card Riser-Board Components and PCI Buses 122...
... Power Supplies 100 Troubleshooting System Cooling Problems 101 Troubleshooting a Fan 101 Troubleshooting System Memory 102 Troubleshooting an Optical Drive 103 Troubleshooting a Hard Drive 104 Troubleshooting a SAS or SAS RAID Controller Daughter Card 105 Troubleshooting Expansion Cards 107 Troubleshooting the Microprocessors 108 5 Running the System Diagnostics Using...113 6 Jumpers and Connectors System Board Jumpers 115 Disabling a Forgotten Password 117 System Board Connectors 118 SAS/SATA Backplane Board Connectors 120 Expansion-Card Riser-Board Components and PCI Buses 122...
Hardware Owner's Manual (PDF)
Page 12
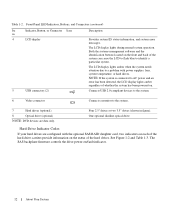
The LCD display lights amber when the system needs attention due to a problem with the optional SAS RAID daughter card, two indicators on each of the hard-drive carriers provide information on /fault indicator. 12 About Your System Connects USB 2.0-compliant devices to the ...LCD to flash blue to the system. 7 Hard drives (optional) 8 Optical drive (optional) NOTE: DVD devices are configured with power supplies, fans, system temperature, or hard drives. The SAS backplane firmware controls the drive power-on the status of the hard drives. Front-Panel LED Indicators, Buttons, and ...
The LCD display lights amber when the system needs attention due to a problem with the optional SAS RAID daughter card, two indicators on each of the hard-drive carriers provide information on /fault indicator. 12 About Your System Connects USB 2.0-compliant devices to the ...LCD to flash blue to the system. 7 Hard drives (optional) 8 Optical drive (optional) NOTE: DVD devices are configured with power supplies, fans, system temperature, or hard drives. The SAS backplane firmware controls the drive power-on the status of the hard drives. Front-Panel LED Indicators, Buttons, and ...
Hardware Owner's Manual (PDF)
Page 20
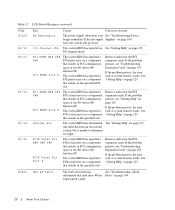
...that resides in the specified slot. If the problem persists, see "Troubleshooting Expansion Cards" on page 104. Unknown Err The system BIOS has determined that hard drive ## has Drive" on page 107. The system BIOS has reported a PCIe fatal error on a component that resides in PCI configuration space at bus ##, device ##, function... # The system BIOS has reported a PCIe fatal error on page 125. Remove and reseat the PCI expansion cards. E1810 HDD ## Fault The SAS subsystem has See "Troubleshooting a Hard determined that there has been an error in the specified slot.
...that resides in the specified slot. If the problem persists, see "Troubleshooting Expansion Cards" on page 104. Unknown Err The system BIOS has determined that hard drive ## has Drive" on page 107. The system BIOS has reported a PCIe fatal error on a component that resides in PCI configuration space at bus ##, device ##, function... # The system BIOS has reported a PCIe fatal error on page 125. Remove and reseat the PCI expansion cards. E1810 HDD ## Fault The SAS subsystem has See "Troubleshooting a Hard determined that there has been an error in the specified slot.

Hardware Owner's Manual (PDF)
Page 21
... is missing or bad. DMA Controller DMA controller failure. See "Troubleshooting a Hard Drive" on page 56. Reseat the cable. See the BMC User's Guide for more information on page 56. SAS Cable B SAS cable B is configured, but is installed in the system. Reseat the cable... memory. Error detected during memory configuration. Table 1-7. HDD ## Removed The specified hard drive has been Information only. Update to copy its See "Troubleshooting System flash image into memory. See "SAS Controller Daughter Card" on setup and use of BMC. Shadow BIOS Fail The ...
... is missing or bad. DMA Controller DMA controller failure. See "Troubleshooting a Hard Drive" on page 56. Reseat the cable. See the BMC User's Guide for more information on page 56. SAS Cable B SAS cable B is configured, but is installed in the system. Reseat the cable... memory. Error detected during memory configuration. Table 1-7. HDD ## Removed The specified hard drive has been Information only. Update to copy its See "Troubleshooting System flash image into memory. See "SAS Controller Daughter Card" on setup and use of BMC. Shadow BIOS Fail The ...
Hardware Owner's Manual (PDF)
Page 34
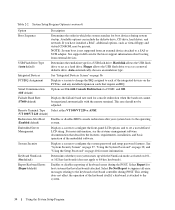
... features. Select Do Not Report to suppress all error messages relating to a SAS or SCSI adapter. NOTE: System boot is attached to the operating system. Hard disk allows the USB flash drive to 84-key keyboards). Integrated Devices See "Integrated Devices Screen" on 101or 102...apply to act as a removal diskette drive. Serial Communication (Off default) Options are On with the NumLock mode activated on page 36. Report Keyboard Errors (Report default) Enables or disables reporting of the embedded software. See support.dell.com for boot devices during POST. ...
... features. Select Do Not Report to suppress all error messages relating to a SAS or SCSI adapter. NOTE: System boot is attached to the operating system. Hard disk allows the USB flash drive to 84-key keyboards). Integrated Devices See "Integrated Devices Screen" on 101or 102...apply to act as a removal diskette drive. Serial Communication (Off default) Options are On with the NumLock mode activated on page 36. Report Keyboard Errors (Report default) Enables or disables reporting of the embedded software. See support.dell.com for boot devices during POST. ...
Hardware Owner's Manual (PDF)
Page 43
... modules • Cooling shrouds • Power supplies • SAS controller daughter card or SAS RAID controller daughter card • RAID battery • RAID controller expansion card • Expansion cards • Boot drive • System memory • Processors • RAC card • Optical drive • Hard drives • SAS backplane boards • Risers • Sideplane board • System...
... modules • Cooling shrouds • Power supplies • SAS controller daughter card or SAS RAID controller daughter card • RAID battery • RAID controller expansion card • Expansion cards • Boot drive • System memory • Processors • RAC card • Optical drive • Hard drives • SAS backplane boards • Risers • Sideplane board • System...
Hardware Owner's Manual (PDF)
Page 45
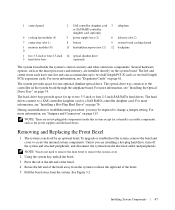
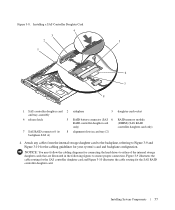
...information, see "Jumpers and Connectors" on page 76. Unless you may be required to a SAS controller daughter card or a SAS RAID controller daughter card. The hard-drive bays provide space for one slot and can accommodate up to access the internal system components. NOTE...enclosed by an optional bezel. See Figure 3-2. To upgrade or troubleshoot the system, remove the bezel and cover to two 3.5-inch or four 2.5-inch SAS/SATA hard drives. The left riser (slot 2) 7 center riser (slot 1) 8 battery 9 system board cooling shroud 1 memory modules (8) 0 11 heatsink/microprocessor ...
...information, see "Jumpers and Connectors" on page 76. Unless you may be required to a SAS controller daughter card or a SAS RAID controller daughter card. The hard-drive bays provide space for one slot and can accommodate up to access the internal system components. NOTE...enclosed by an optional bezel. See Figure 3-2. To upgrade or troubleshoot the system, remove the bezel and cover to two 3.5-inch or four 2.5-inch SAS/SATA hard drives. The left riser (slot 2) 7 center riser (slot 1) 8 battery 9 system board cooling shroud 1 memory modules (8) 0 11 heatsink/microprocessor ...
Hardware Owner's Manual (PDF)
Page 56
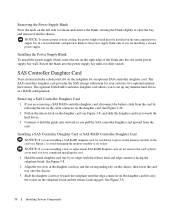
...into the slot in a non-redundant configuration. The optional SAS RAID controller daughter card allows you are installing a SAS RAID daughter card, be installed on the sideplane for your system's two optional internal hard drives. Removing a SAS Controller Daughter Card 1 If you to avoid damaging the memory... module or its edges with the release latch and edge connector facing the sideplane board. to set up any internal hard drives in the daughter card tray ...
...into the slot in a non-redundant configuration. The optional SAS RAID controller daughter card allows you are installing a SAS RAID daughter card, be installed on the sideplane for your system's two optional internal hard drives. Removing a SAS Controller Daughter Card 1 If you to avoid damaging the memory... module or its edges with the release latch and edge connector facing the sideplane board. to set up any internal hard drives in the daughter card tray ...
Hardware Owner's Manual (PDF)
Page 57
NOTICE: You must follow the cabling diagrams for the SAS RAID controller daughter card. Figure 3-8. Figure 3-9 illustrates the cable routing for the SAS controller daughter card and Figure 3-10 illustrates the cable routing for connecting the hard drives to either of the internal storage daughter cards that... are illustrated in card tray (2) daughter card socket RAID memory module (DIMM) (SAS RAID controller daughter card only) 4 Attach any cables from ...
NOTICE: You must follow the cabling diagrams for the SAS RAID controller daughter card. Figure 3-8. Figure 3-9 illustrates the cable routing for the SAS controller daughter card and Figure 3-10 illustrates the cable routing for connecting the hard drives to either of the internal storage daughter cards that... are illustrated in card tray (2) daughter card socket RAID memory module (DIMM) (SAS RAID controller daughter card only) 4 Attach any cables from ...
Hardware Owner's Manual (PDF)
Page 60
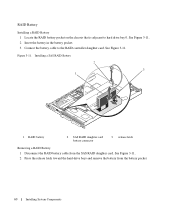
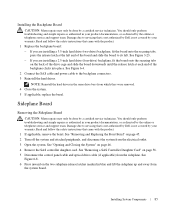
... Battery 2 3 1 1 RAID battery 2 SAS RAID daughter card battery connector 3 release latch Removing a RAID Battery 1 Disconnect the RAID battery cable from the battery pocket. 60 Installing System Components See Figure 3-... chassis that is adjacent to the RAID controller daughter card. See Figure 3-11. 2 Insert the battery in the battery pocket. 3 Connect the battery cable to hard drive bay 0. See Figure 3-11. 2 Press the release latch toward the hard-drive bays and remove the battery from the SAS RAID daughter card. Figure 3-11.
... Battery 2 3 1 1 RAID battery 2 SAS RAID daughter card battery connector 3 release latch Removing a RAID Battery 1 Disconnect the RAID battery cable from the battery pocket. 60 Installing System Components See Figure 3-... chassis that is adjacent to the RAID controller daughter card. See Figure 3-11. 2 Insert the battery in the battery pocket. 3 Connect the battery cable to hard drive bay 0. See Figure 3-11. 2 Press the release latch toward the hard-drive bays and remove the battery from the SAS RAID daughter card. Figure 3-11.
Hardware Owner's Manual (PDF)
Page 75
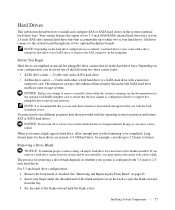
... hard drives. Hard Drives This subsection describes how to either a SAS hard drive or a SATA hard drive with a universal interposer card. Your system features the option of the following two drive carrier types: • SATA drive carrier - All drives connect to the system board through one of two 3.5-inch (SAS/SATA) internal hard-drive bays or four 2.5-inch (SAS only) internal hard-drive bays that makes the SATA hard drive...
... hard drives. Hard Drives This subsection describes how to either a SAS hard drive or a SATA hard drive with a universal interposer card. Your system features the option of the following two drive carrier types: • SATA drive carrier - All drives connect to the system board through one of two 3.5-inch (SAS/SATA) internal hard-drive bays or four 2.5-inch (SAS only) internal hard-drive bays that makes the SATA hard drive...

Hardware Owner's Manual (PDF)
Page 78
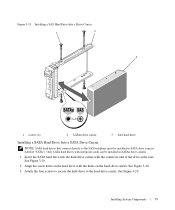
... release the connector. Installing a SAS Hard Drive Into a SATAu Drive Carrier NOTE: SAS hard drives must be flush with the rear of the interposer card. The SATAu drive carrier is labeled "SATAu" and also has marks indicating the SAS and SATA mounting screws. 1 Insert the SAS hard drive into the hard-drive carrier with the hole labeled "SAS" on the hard drive with the connector end of...
... release the connector. Installing a SAS Hard Drive Into a SATAu Drive Carrier NOTE: SAS hard drives must be flush with the rear of the interposer card. The SATAu drive carrier is labeled "SATAu" and also has marks indicating the SAS and SATA mounting screws. 1 Insert the SAS hard drive into the hard-drive carrier with the hole labeled "SAS" on the hard drive with the connector end of...
Hardware Owner's Manual (PDF)
Page 79
... cards can be installed in SATAu drive carriers. 1 Insert the SATA hard drive into the hard-drive carrier with the holes on the hard drive with the connector end of the drive at the rear. Installing a SAS Hard Drive Into a Drive Carrier 1 2 3 1 screws (4) 2 SATAu drive carrier 3 SAS hard drive Installing a SATA Hard Drive Into a SATA Drive Carrier NOTE: SATA hard drives that connect directly to the hard-drive carrier. See Figure 3-20. Figure...
... cards can be installed in SATAu drive carriers. 1 Insert the SATA hard drive into the hard-drive carrier with the holes on the hard drive with the connector end of the drive at the rear. Installing a SAS Hard Drive Into a Drive Carrier 1 2 3 1 screws (4) 2 SATAu drive carrier 3 SAS hard drive Installing a SATA Hard Drive Into a SATA Drive Carrier NOTE: SATA hard drives that connect directly to the hard-drive carrier. See Figure 3-20. Figure...

Hardware Owner's Manual (PDF)
Page 80
... the SAS and SATA mounting screws. 1 Insert the SATA hard drive into a SATAu drive carrier, you must install an interposer card onto the back of the drive at the rear. Installing a SATA Hard Drive Into a SATA Drive Carrier 2 1 3 1 screws (4) 2 SATA drive carrier 3 SATA hard drive Installing a SATA Hard Drive and Interposer Card Into a SATAu Hard-Drive Carrier NOTE: When you install a SATA hard drive into the SATAu hard-drive...
... the SAS and SATA mounting screws. 1 Insert the SATA hard drive into a SATAu drive carrier, you must install an interposer card onto the back of the drive at the rear. Installing a SATA Hard Drive Into a SATA Drive Carrier 2 1 3 1 screws (4) 2 SATA drive carrier 3 SATA hard drive Installing a SATA Hard Drive and Interposer Card Into a SATAu Hard-Drive Carrier NOTE: When you install a SATA hard drive into the SATAu hard-drive...
Hardware Owner's Manual (PDF)
Page 83
...the system. NOTICE: To properly reinstall the hard drives, ensure that you record which hard drive you are removing a 2.5-inch hard drive (four-drive) backplane, see Figure 3-23. - Installing...drive) backplane, see Figure 6-4. 4 If applicable, remove the expansion card from the riser. 5 Press the release latch(es) on page 46. 5 Replace the bezel. Read and follow the safety instructions that is not authorized by Dell is not covered by Dell...riser board until the edge connector(s) on which bay. 5 Disconnect the SAS cable and power cable from the electrical outlet. 3 Open the system....
...the system. NOTICE: To properly reinstall the hard drives, ensure that you record which hard drive you are removing a 2.5-inch hard drive (four-drive) backplane, see Figure 3-23. - Installing...drive) backplane, see Figure 6-4. 4 If applicable, remove the expansion card from the riser. 5 Press the release latch(es) on page 46. 5 Replace the bezel. Read and follow the safety instructions that is not authorized by Dell is not covered by Dell...riser board until the edge connector(s) on which bay. 5 Disconnect the SAS cable and power cable from the electrical outlet. 3 Open the system....
Hardware Owner's Manual (PDF)
Page 84
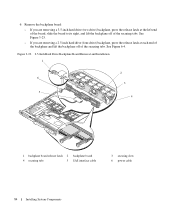
... 3-23. - See Figure 6-4. 6 Remove the backplane board: - Figure 3-23. 2.5-Inch Hard Drive Backplane Board Removal and Installation 1 2 6 3 5 4 1 backplane board release latch 2 backplane board 4 securing tabs 5 SAS interface cable 3 securing slots 6 power cable 84 Installing System Components If you are removing a 3.5-inch hard drive (two-drive) backplane, press the release latch at each end of the backplane...
... 3-23. - See Figure 6-4. 6 Remove the backplane board: - Figure 3-23. 2.5-Inch Hard Drive Backplane Board Removal and Installation 1 2 6 3 5 4 1 backplane board release latch 2 backplane board 4 securing tabs 5 SAS interface cable 3 securing slots 6 power cable 84 Installing System Components If you are removing a 3.5-inch hard drive (two-drive) backplane, press the release latch at each end of the backplane...
Hardware Owner's Manual (PDF)
Page 85
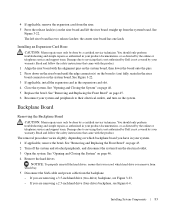
... authorized by Dell is not covered by your warranty. You should only perform troubleshooting and simple repairs as authorized in your product documentation, or as directed by the online or telephone service and support team. If you are installing a 3.5-inch hard drive (two-drive) backplane,... Read and follow the safety instructions that is not authorized by Dell is not covered by your warranty. See Figure 3-23. - See "Removing a SAS Controller Daughter Card" on page 46. 4 Remove the SAS controller daughter card. Installing the Backplane Board CAUTION: Many repairs may...
... authorized by Dell is not covered by your warranty. You should only perform troubleshooting and simple repairs as authorized in your product documentation, or as directed by the online or telephone service and support team. If you are installing a 3.5-inch hard drive (two-drive) backplane,... Read and follow the safety instructions that is not authorized by Dell is not covered by your warranty. See Figure 3-23. - See "Removing a SAS Controller Daughter Card" on page 46. 4 Remove the SAS controller daughter card. Installing the Backplane Board CAUTION: Many repairs may...
Hardware Owner's Manual (PDF)
Page 104
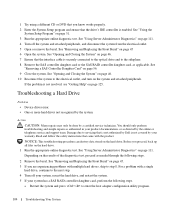
... 9 Close the system. See "Opening and Closing the System" on page 46. 7 Ensure that is not authorized by Dell is securely connected to the optical drive and to the electrical outlet, and turn on the results of the diagnostics test, proceed as directed by the system. See... "Removing a SAS Controller Daughter Card" on page 111. Depending on the system and attached peripherals. Read and follow the safety instructions that came with a single hard drive, continue to servicing that the interface cable is not covered by a...
... 9 Close the system. See "Opening and Closing the System" on page 46. 7 Ensure that is not authorized by Dell is securely connected to the optical drive and to the electrical outlet, and turn on the results of the diagnostics test, proceed as directed by the system. See... "Removing a SAS Controller Daughter Card" on page 111. Depending on the system and attached peripherals. Read and follow the safety instructions that came with a single hard drive, continue to servicing that the interface cable is not covered by a...


