
User's Guide (.htm)
Page 4
... Power Supplies 45 Stack ID Button 47 Reset Button 47 Ventilation System 47 3 Installing the PowerConnect 3424/P and PowerConnect 3448/P Site Preparation 49 Unpacking 49 Package Contents 49 Unpacking the Device 50 Mounting the Device 50 Installing in a Rack 50 Installing on a Flat Surface 51 Installing the Device on a Wall 52 Connecting to a Terminal...
... Power Supplies 45 Stack ID Button 47 Reset Button 47 Ventilation System 47 3 Installing the PowerConnect 3424/P and PowerConnect 3448/P Site Preparation 49 Unpacking 49 Package Contents 49 Unpacking the Device 50 Mounting the Device 50 Installing in a Rack 50 Installing on a Flat Surface 51 Installing the Device on a Wall 52 Connecting to a Terminal...

User's Guide (.htm)
Page 10
... LEDs 44 Stacking LEDs 45 Power Connection 46 Bracket Installation for Rack Mounting 51 Bracket Installation for Mounting on a Wall . . . . . 52 Mounting a Device on a Wall 53 Back-Panel Power Connector 54 Stacking Cable Diagram 55 Stacking Configuration and Identification Panel . . . 56 Connecting to PowerConnect 3400 Series Console Port 58 10 Contents Figure 2-11. Figure 3-6. Figure...
... LEDs 44 Stacking LEDs 45 Power Connection 46 Bracket Installation for Rack Mounting 51 Bracket Installation for Mounting on a Wall . . . . . 52 Mounting a Device on a Wall 53 Back-Panel Power Connector 54 Stacking Cable Diagram 55 Stacking Configuration and Identification Panel . . . 56 Connecting to PowerConnect 3400 Series Console Port 58 10 Contents Figure 2-11. Figure 3-6. Figure...

User's Guide (.htm)
Page 49
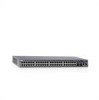
...PowerConnect 3424/P and PowerConnect 3448/P Site Preparation The PowerConnect 3424 /P and PowerConnect 3448/P devices can be mounted in a standard 48.26-am (19-inch) equipment rack, placed on a tabletop or mounted on the front panel are included: • Device/Switch • AC power cable • RS-232 crossover cable • Self-adhesive rubber pads • Rack-mount...percent, nonconducting. Allow clearance for rack installation or wall mounting kit • Documentation CD • Product Information Guide Installing the PowerConnect 3424/P and PowerConnect 3448/P 49 The cabling is...
...PowerConnect 3424/P and PowerConnect 3448/P Site Preparation The PowerConnect 3424 /P and PowerConnect 3448/P devices can be mounted in a standard 48.26-am (19-inch) equipment rack, placed on a tabletop or mounted on the front panel are included: • Device/Switch • AC power cable • RS-232 crossover cable • Self-adhesive rubber pads • Rack-mount...percent, nonconducting. Allow clearance for rack installation or wall mounting kit • Documentation CD • Product Information Guide Installing the PowerConnect 3424/P and PowerConnect 3448/P 49 The cabling is...
User's Guide (.htm)
Page 50
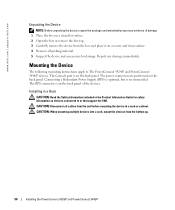
www.dell.com | support.dell.com Unpacking the Device NOTE: Before unpacking the device, inspect the package and immediately report any damage immediately. Report any evidence of the devices. The ... on a secure and clean surface. 4 Remove all cables from the bottom up. 50 Installing the PowerConnect 3424/P and PowerConnect 3448/P CAUTION: When mounting multiple devices into a rack, mount the devices from the unit before mounting the device in the Product Information Guide for damage. Mounting the Device The following mounting instructions apply to or that support the SWI.
www.dell.com | support.dell.com Unpacking the Device NOTE: Before unpacking the device, inspect the package and immediately report any damage immediately. Report any evidence of the devices. The ... on a secure and clean surface. 4 Remove all cables from the bottom up. 50 Installing the PowerConnect 3424/P and PowerConnect 3448/P CAUTION: When mounting multiple devices into a rack, mount the devices from the unit before mounting the device in the Product Information Guide for damage. Mounting the Device The following mounting instructions apply to or that support the SWI.
User's Guide (.htm)
Page 51
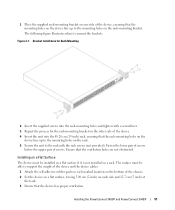
...a Flat Surface The device must be installed on a flat surface if it is not installed on the rack. 5 Secure the unit to the rack with a screwdriver. 3 Repeat the process for the rack-mounting bracket on the other side of the device. 4 Insert the unit into the 48.26 cm (19... the lower pair of screws before the upper pair of screws. Installing the PowerConnect 3424/P and PowerConnect 3448/P 51 The following figure illustrates where to mount the brackets. 1 Place the supplied rack-mounting bracket on one side of the device, ensuring that the mounting holes on the device line up to the...
...a Flat Surface The device must be installed on a flat surface if it is not installed on the rack. 5 Secure the unit to the rack with a screwdriver. 3 Repeat the process for the rack-mounting bracket on the other side of the device. 4 Insert the unit into the 48.26 cm (19... the lower pair of screws before the upper pair of screws. Installing the PowerConnect 3424/P and PowerConnect 3448/P 51 The following figure illustrates where to mount the brackets. 1 Place the supplied rack-mounting bracket on one side of the device, ensuring that the mounting holes on the device line up to the...

User's Guide (.htm)
Page 52
...rack-mounting holes and tighten with screws (not provided). Figure 3-2. Ensure that the mounting holes on the device line up to the wall with a screwdriver. 3 Repeat the process for the wall-mounting bracket on the other side of the device, ensuring that the ventilation holes are not obstructed. 52 Installing the PowerConnect 3424/P and PowerConnect... 3448/P www.dell.com | support.dell.com Installing the Device on a Wall 1 Place the supplied wall-mounting bracket on one side of the device. ...
...rack-mounting holes and tighten with screws (not provided). Figure 3-2. Ensure that the mounting holes on the device line up to the wall with a screwdriver. 3 Repeat the process for the wall-mounting bracket on the other side of the device, ensuring that the ventilation holes are not obstructed. 52 Installing the PowerConnect 3424/P and PowerConnect... 3448/P www.dell.com | support.dell.com Installing the Device on a Wall 1 Place the supplied wall-mounting bracket on one side of the device. ...
