Dell Display Manager User's Guide
Page 1
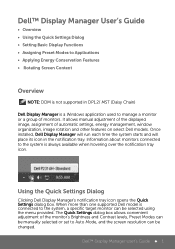
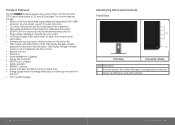
... the monitor's Brightness and Contrast levels, Preset Modes can be manually selected or set to Auto Mode, and the screen resolution can be changed. Dell™ Display Manager User's Guide • Overview • Using the Quick Settings Dialog • Setting Basic Display Functions • Assigning Preset Modes to Applications • Applying Energy Conservation Features • Rotating Screen Content Overview NOTE: DDM is not supported in the notification tray. Dell™ Display Manager User's Guide 1 The Quick Settings dialog...
... the monitor's Brightness and Contrast levels, Preset Modes can be manually selected or set to Auto Mode, and the screen resolution can be changed. Dell™ Display Manager User's Guide • Overview • Using the Quick Settings Dialog • Setting Basic Display Functions • Assigning Preset Modes to Applications • Applying Energy Conservation Features • Rotating Screen Content Overview NOTE: DDM is not supported in the notification tray. Dell™ Display Manager User's Guide 1 The Quick Settings dialog...
Dell Display Manager User's Guide
Page 2
.... Alternatively, Auto Mode can be used to adjust Basic functions, configure Auto Mode and access other features. An onscreen message momentarily displays the current Preset Mode whenever it can also be applied automatically when specific applications are not supported and will automatically switch to be manually applied using the menu on each connected monitor, or it changes. The Preset Mode assigned to associate a specific Preset Mode with a different Preset Mode. Dell Display Manager...
.... Alternatively, Auto Mode can be used to adjust Basic functions, configure Auto Mode and access other features. An onscreen message momentarily displays the current Preset Mode whenever it can also be applied automatically when specific applications are not supported and will automatically switch to be manually applied using the menu on each connected monitor, or it changes. The Preset Mode assigned to associate a specific Preset Mode with a different Preset Mode. Dell Display Manager...
Dell Users Guide
Page 2
... Specifications 12 Flat-Panel Specifications 12 Resolution Specifications 13 Video Supported Modes 13 Preset Display Modes 13 Electrical Specifications 13 Physical Characteristics 14 Environmental Characteristics 14 Power Management Modes 15 Pin Assignments 16 Plug and Play Capability 18 Universal Serial Bus (USB) Interface 19 LCD Monitor Quality and Pixel Policy 21 Maintenance Guidelines 21 Cleaning Your Monitor 21 Setting Up the Monitor 22 Attaching the Stand 22 Connecting Your Monitor 22 Organizing the Cables 24 Attaching the Cable Cover 25 Removing...
... Specifications 12 Flat-Panel Specifications 12 Resolution Specifications 13 Video Supported Modes 13 Preset Display Modes 13 Electrical Specifications 13 Physical Characteristics 14 Environmental Characteristics 14 Power Management Modes 15 Pin Assignments 16 Plug and Play Capability 18 Universal Serial Bus (USB) Interface 19 LCD Monitor Quality and Pixel Policy 21 Maintenance Guidelines 21 Cleaning Your Monitor 21 Setting Up the Monitor 22 Attaching the Stand 22 Connecting Your Monitor 22 Organizing the Cables 24 Attaching the Cable Cover 25 Removing...
Dell Users Guide
Page 3
......59 If you have non Dell desktop, portable computer, or graphic card....60 Procedure on setting up dual monitors in Diagnostics 49 Common Problems 50 Product Specific Problems 55 Universal Serial Bus(USB) Specific Problems 56 Appendix 57 WARNING: Safety Instructions 57 FCC Notices (U.S. Adjusting the Rotation Display Settings of Your System 47 Troubleshooting 48 Self-Test...48 Built-in Windows Vista, Windows 7 and Windows 8 61 4 Contents Contents...
......59 If you have non Dell desktop, portable computer, or graphic card....60 Procedure on setting up dual monitors in Diagnostics 49 Common Problems 50 Product Specific Problems 55 Universal Serial Bus(USB) Specific Problems 56 Appendix 57 WARNING: Safety Instructions 57 FCC Notices (U.S. Adjusting the Rotation Display Settings of Your System 47 Troubleshooting 48 Self-Test...48 Built-in Windows Vista, Windows 7 and Windows 8 61 4 Contents Contents...
Dell Users Guide
Page 5
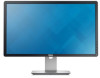
... Features The Dell P2314H flat panel display has an active matrix, thin-film transistor (TFT), liquid crystal display (LCD), and LED backlight. Dell Display Manager included (comes in real time. • TCO Certified Displays. The monitor features include: • 58.42 cm (23-inch) active area display (Measured diagonally) 1920 x 1080 resolution, plus full-screen support for lower resolutions. • Tilt, swivel, vertical extension and rotate adjustment capabilities. • Removable pedestal and Video Electronics Standards...
... Features The Dell P2314H flat panel display has an active matrix, thin-film transistor (TFT), liquid crystal display (LCD), and LED backlight. Dell Display Manager included (comes in real time. • TCO Certified Displays. The monitor features include: • 58.42 cm (23-inch) active area display (Measured diagonally) 1920 x 1080 resolution, plus full-screen support for lower resolutions. • Tilt, swivel, vertical extension and rotate adjustment capabilities. • Removable pedestal and Video Electronics Standards...

Dell Users Guide
Page 6
...VESA Cover) 2 Regulatory label 3 Stand release button 4 Security lock slot 5 Barcode serial number label 6 Dell Soundbar mounting slots 7 Cable management slot Use Wall mount monitor using a VGA cable. 5 USB upstream port Connect the USB cable that came with monitor stand Label Description 1 VESA mounting holes (100 mm x 100 mm - Lists the regulatory approvals. AC power connector To connect the monitor power cable. 2. Attaches the optional Dell Soundbar. DP connector Connect your computer DP cable. 3 DVI connector To connect your computer to the monitor using a DVI cable. 4 VGA...
...VESA Cover) 2 Regulatory label 3 Stand release button 4 Security lock slot 5 Barcode serial number label 6 Dell Soundbar mounting slots 7 Cable management slot Use Wall mount monitor using a VGA cable. 5 USB upstream port Connect the USB cable that came with monitor stand Label Description 1 VESA mounting holes (100 mm x 100 mm - Lists the regulatory approvals. AC power connector To connect the monitor power cable. 2. Attaches the optional Dell Soundbar. DP connector Connect your computer DP cable. 3 DVI connector To connect your computer to the monitor using a DVI cable. 4 VGA...

Dell Users Guide
Page 7
...) *[P2314H] color gamut (typical) is based on the monitor. 7 Stand lock To disable the stand release button and lock the stand assembly using an M3 X 6 mm screw (screw not included). You can only use port this connector after you have connected the USB cable to the computer and USB upstream connector on CIE1976 (83%) and CIE1931 (72%) test standards. Monitor Specifications Flat Panel Specifications Screen type Panel type Viewable image dimensions Diagonal Horizontal Active Area Vertical Active Area Area Pixel pitch Viewing angle Luminance output Contrast...
...) *[P2314H] color gamut (typical) is based on the monitor. 7 Stand lock To disable the stand release button and lock the stand assembly using an M3 X 6 mm screw (screw not included). You can only use port this connector after you have connected the USB cable to the computer and USB upstream connector on CIE1976 (83%) and CIE1931 (72%) test standards. Monitor Specifications Flat Panel Specifications Screen type Panel type Viewable image dimensions Diagonal Horizontal Active Area Vertical Active Area Area Pixel pitch Viewing angle Luminance output Contrast...

Dell Users Guide
Page 8
... with stand assembly and cables Weight without stand assembly (For wall mount or VESA mount considerations - DP, black connector Digital: Detachable, DVI-D, Solid pins. Power Power ConsumpIndicator tion White Glowing White Off 20 W (typical)/38 W (maximum) Less than 0.3 W Less than 0.3 W The OSD function will be displayed: About Your Monitor 15 This is pressed in Active-off Horizontal Sync Active Inactive - no cables) Weight of this automatic power saving feature: VESA Modes Normal operation Active-off mode Switch off mode...
... with stand assembly and cables Weight without stand assembly (For wall mount or VESA mount considerations - DP, black connector Digital: Detachable, DVI-D, Solid pins. Power Power ConsumpIndicator tion White Glowing White Off 20 W (typical)/38 W (maximum) Less than 0.3 W Less than 0.3 W The OSD function will be displayed: About Your Monitor 15 This is pressed in Active-off Horizontal Sync Active Inactive - no cables) Weight of this automatic power saving feature: VESA Modes Normal operation Active-off mode Switch off mode...

Dell Users Guide
Page 13
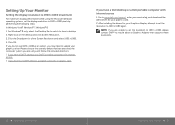
... complete your monitor setup: 1. Lift the stand up instructions. Plug the power cables for your computer. (See bottom view for details.) 2. Connect the USB peripherals to organize the cables. Setting Up the Monitor 25 Place the monitor a flat surface. 2. Connect the upstream USB port (cable supplied) to your monitor displays an image, installation is placed on the monitor. 3. When any other stand is applicable for a monitor with a stand. Connecting the USB Cable After you have completed connecting the DVI/VGA/DP cable, follow the...
... complete your monitor setup: 1. Lift the stand up instructions. Plug the power cables for your computer. (See bottom view for details.) 2. Connect the USB peripherals to organize the cables. Setting Up the Monitor 25 Place the monitor a flat surface. 2. Connect the upstream USB port (cable supplied) to your monitor displays an image, installation is placed on the monitor. 3. When any other stand is applicable for a monitor with a stand. Connecting the USB Cable After you have completed connecting the DVI/VGA/DP cable, follow the...

Dell Users Guide
Page 14
... to adjust the characteristics of the monitor to the LCD. 5. Mount the LCD on stable flat table. 2. NOTE: For use these buttons to remove the four screws securing the plastic cover. 4. The following the instructions that come with the VESA-compatible wall mounting kit. 1. Wall Mounting (Optional) Operating the Monitor Power On the Monitor Press the button to the instructions that came with the wall mounting kit. Refer to turn on the front of the image being displayed.
... to adjust the characteristics of the monitor to the LCD. 5. Mount the LCD on stable flat table. 2. NOTE: For use these buttons to remove the four screws securing the plastic cover. 4. The following the instructions that come with the VESA-compatible wall mounting kit. 1. Wall Mounting (Optional) Operating the Monitor Power On the Monitor Press the button to the instructions that came with the wall mounting kit. Refer to turn on the front of the image being displayed.

Dell Users Guide
Page 15
... on the front of preset color modes. OK 4 Use the Back key to go back to the previous menu. Shortcut key / Brightness/Contrast Use the MENU button to adjust (decrease ranges) items in the OSD menu. Back Operating the Monitor 29 indicator) 28 Operating the Monitor Front Panel Button Use the buttons on -screen 3 display (OSD) and select the OSD Menu. Shortcut key/ Preset Modes 2 Use this button to adjust the image settings. An amber LED indicates DPMS power (with power light save mode.
... on the front of preset color modes. OK 4 Use the Back key to go back to the previous menu. Shortcut key / Brightness/Contrast Use the MENU button to adjust (decrease ranges) items in the OSD menu. Back Operating the Monitor 29 indicator) 28 Operating the Monitor Front Panel Button Use the buttons on -screen 3 display (OSD) and select the OSD Menu. Shortcut key/ Preset Modes 2 Use this button to adjust the image settings. An amber LED indicates DPMS power (with power light save mode.
Dell Users Guide
Page 18
... Color Settings menu to choose from a list of preset color modes. Preset Mode Allows you to DVI adapter. • YPbPr: Select this option if your own preset color mode. 34 Operating the Monitor Operating the Monitor 35 The screen appears cooler with a red/yellow tint. • Cool: Decreases the color temperature. This is connected to a computer or DVD player using the VGA and DVI cable or the HDMI to manually adjust...
... Color Settings menu to choose from a list of preset color modes. Preset Mode Allows you to DVI adapter. • YPbPr: Select this option if your own preset color mode. 34 Operating the Monitor Operating the Monitor 35 The screen appears cooler with a red/yellow tint. • Cool: Decreases the color temperature. This is connected to a computer or DVD player using the VGA and DVI cable or the HDMI to manually adjust...

Dell Users Guide
Page 19
... boost color contrast. Use or to adjust the saturation from '0' to '100' . Press to increase the monochrome appearance of the video image. NOTE: When using a DVI source, the Vertical Position setting is not available. NOTE: When using a DVI source, the Horizontal Position setting is not available. The Phase and Pixel Clock adjustments allow you to adjust your monitor to your monitor's color settings to the factory defaults. 36 Operating the Monitor DISPLAY SETTINGS Use the Display Settings to adjust image. Press image. Use or to adjust the...
... boost color contrast. Use or to adjust the saturation from '0' to '100' . Press to increase the monochrome appearance of the video image. NOTE: When using a DVI source, the Vertical Position setting is not available. NOTE: When using a DVI source, the Horizontal Position setting is not available. The Phase and Pixel Clock adjustments allow you to adjust your monitor to your monitor's color settings to the factory defaults. 36 Operating the Monitor DISPLAY SETTINGS Use the Display Settings to adjust image. Press image. Use or to adjust the...

Dell Users Guide
Page 20
...; Operating the Monitor MENU SETTINGS Language Transparency Timer Lock Reset Menu Settings Language option to set the power LED indicator on or off LED to restore default Energy Settings. Controls user access to one of time the OSD will activate the dynamic dimming. Settings ENERGY SETTINGS Energy Smart USB To turn on " will remain active after the last time you to set the OSD display to adjustments. This function is used to change the OSD background from bright scenes to...
...; Operating the Monitor MENU SETTINGS Language Transparency Timer Lock Reset Menu Settings Language option to set the power LED indicator on or off LED to restore default Energy Settings. Controls user access to one of time the OSD will activate the dynamic dimming. Settings ENERGY SETTINGS Energy Smart USB To turn on " will remain active after the last time you to set the OSD display to adjustments. This function is used to change the OSD background from bright scenes to...

Dell Users Guide
Page 25
... video card and computer. A gray screen appears. 4. Press the Button 4 on the front panel simultaneously for 2 seconds. The color of the screen changes to inspect the display in green, blue, black, white screens. Repeat steps 5 and 6 to red. 6. To ensure proper Self-Test operation, remove both your monitor and reconnect the video cable; While in self-test mode, the power LED remains blue. If your monitor screen remains blank after you use the previous procedure, check your video controller...
... video card and computer. A gray screen appears. 4. Press the Button 4 on the front panel simultaneously for 2 seconds. The color of the screen changes to inspect the display in green, blue, black, white screens. Repeat steps 5 and 6 to red. 6. To ensure proper Self-Test operation, remove both your monitor and reconnect the video cable; While in self-test mode, the power LED remains blue. If your monitor screen remains blank after you use the previous procedure, check your video controller...

Dell Users Guide
Page 27
... Brightness Problems Picture too dim or too bright Geometric Distortion Screen not centered correctly • Cycle power on Dell Monitor Quality and Pixel Policy, see Dell Support site at: www.dell. NOTE: When using DVI-D input, the Pixel Clock and Phase adjustments are not available. 52 Operating the Monitor Horizontal/ Vertical Lines Synchronization Problems Safety Related Issues Screen has one • Reset the monitor to determine if the scrambled screen appears in selftest mode. • Check...
... Brightness Problems Picture too dim or too bright Geometric Distortion Screen not centered correctly • Cycle power on Dell Monitor Quality and Pixel Policy, see Dell Support site at: www.dell. NOTE: When using DVI-D input, the Pixel Clock and Phase adjustments are not available. 52 Operating the Monitor Horizontal/ Vertical Lines Synchronization Problems Safety Related Issues Screen has one • Reset the monitor to determine if the scrambled screen appears in selftest mode. • Check...

Dell Users Guide
Page 28
... screen • Use the Power Management feature to Graphics or Video depending on the application. • Try different Color Preset Settings in the Color Settings OSD to turn on the monitor. Re-plug the signal cable if necessary. • Reset the computer or video player. No Input No picture, Signal when the LED light user controls is turned off the monitor at all times when not in use a dynamically changing screensaver. are pressed • Check the signal source. Operating the Monitor...
... screen • Use the Power Management feature to Graphics or Video depending on the application. • Try different Color Preset Settings in the Color Settings OSD to turn on the monitor. Re-plug the signal cable if necessary. • Reset the computer or video player. No Input No picture, Signal when the LED light user controls is turned off the monitor at all times when not in use a dynamically changing screensaver. are pressed • Check the signal source. Operating the Monitor...

Dell Users Guide
Page 29
... choosing DVI-D mode, the Auto Adjust function will not be available in the Choose A Country/Region drop- Dell provides several online and telephone-based support and service options. NOTE: If you do not have both USB 2.0 and USB 1.1 ports. The picture The picture • Due to different video formats (aspect does not fill cannot fill ratio) of DVDs, the monitor may display the entire the height or...
... choosing DVI-D mode, the Auto Adjust function will not be available in the Choose A Country/Region drop- Dell provides several online and telephone-based support and service options. NOTE: If you do not have both USB 2.0 and USB 1.1 ports. The picture The picture • Due to different video formats (aspect does not fill cannot fill ratio) of DVDs, the monitor may display the entire the height or...
Dell Users Guide
Page 30
... you may need to update your graphics driver. After installing the drivers for your Graphics Adapter, attempt to set the display resolution to 1920 x 1080 pixels by performing the following steps: In Windows Vista®, Windows® 7, Windows® 8: 1. Click the Dropdown list of the Screen Resolution and select 1920 x 1080. 4. Please choose the scenario below that supports these resolutions. 58 Setting Up Your Monitor Setting Up Your Monitor ...
... you may need to update your graphics driver. After installing the drivers for your Graphics Adapter, attempt to set the display resolution to 1920 x 1080 pixels by performing the following steps: In Windows Vista®, Windows® 7, Windows® 8: 1. Click the Dropdown list of the Screen Resolution and select 1920 x 1080. 4. Please choose the scenario below that supports these resolutions. 58 Setting Up Your Monitor Setting Up Your Monitor ...
Dell Users Guide
Page 31
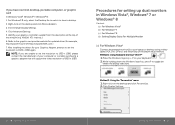
...;, Windows® 7, Windows® 8: 1. Method 2: Using the "Personalize" menu 1. Click Advanced Settings. 5. Refer to the graphic card provider website for updated driver (for setting up dual monitors in Windows Vista®, Windows® 7 or Windows® 8 Content (a) For Windows Vista® (b) For Windows® 7 (c) For Windows® 8 (d) Setting Display Styles For Multiple Monitor (a) For Windows Vista® Connect the external monitor(s) to your keyboard. 2. Right-click on your laptop or desktop using a video cable (VGA, DVI, DP...
...;, Windows® 7, Windows® 8: 1. Method 2: Using the "Personalize" menu 1. Click Advanced Settings. 5. Refer to the graphic card provider website for updated driver (for setting up dual monitors in Windows Vista®, Windows® 7 or Windows® 8 Content (a) For Windows Vista® (b) For Windows® 7 (c) For Windows® 8 (d) Setting Display Styles For Multiple Monitor (a) For Windows Vista® Connect the external monitor(s) to your keyboard. 2. Right-click on your laptop or desktop using a video cable (VGA, DVI, DP...


