
Dell Users Guide
Page 3
... Dell Display Manager User's Guide 6 Overview 6 Using the Quick Settings Dialog 6 Setting Basic Display Functions 7 Assigning Preset Modes to Applications 7 Applying Energy-Conservation Features 9 About Your Monitor 10 Package Contents 10 Product Features 11 Identifying Parts and Controls 12 Monitor Specifications 14 Power Management Modes 14 Pin Assignments 16 Plug and Play Capability 20 Flat-Panel Specifications 21 Resolution Specifications 22 Electrical Specifications 22 Preset Display Modes 23 Physical Characteristics 23 Environmental Characteristics 24 LCD Monitor...
... Dell Display Manager User's Guide 6 Overview 6 Using the Quick Settings Dialog 6 Setting Basic Display Functions 7 Assigning Preset Modes to Applications 7 Applying Energy-Conservation Features 9 About Your Monitor 10 Package Contents 10 Product Features 11 Identifying Parts and Controls 12 Monitor Specifications 14 Power Management Modes 14 Pin Assignments 16 Plug and Play Capability 20 Flat-Panel Specifications 21 Resolution Specifications 22 Electrical Specifications 22 Preset Display Modes 23 Physical Characteristics 23 Environmental Characteristics 24 LCD Monitor...
Dell Users Guide
Page 4
... the Monitor 26 Connecting Your Monitor 27 Connecting the blue VGA Cable 27 Connecting the white DVI Cable 27 Connecting the black DisplayPort cable 28 Connecting the USB cable 28 Organizing Your Cables 29 Attaching the Cable Cover 29 Removing the Monitor Stand 30 Wall Mounting (Optional 31 Operating the Monitor 32 Power On the Monitor 32 Using the Front-Panel Controls 32 Front-Panel Keys 33 Using the On-Screen Display (OSD) Menu 34 Accessing the Menu System 34 OSD Messages 44 Setting the Maximum Resolution 47 Using the Tilt, Swivel, and Vertical...
... the Monitor 26 Connecting Your Monitor 27 Connecting the blue VGA Cable 27 Connecting the white DVI Cable 27 Connecting the black DisplayPort cable 28 Connecting the USB cable 28 Organizing Your Cables 29 Attaching the Cable Cover 29 Removing the Monitor Stand 30 Wall Mounting (Optional 31 Operating the Monitor 32 Power On the Monitor 32 Using the Front-Panel Controls 32 Front-Panel Keys 33 Using the On-Screen Display (OSD) Menu 34 Accessing the Menu System 34 OSD Messages 44 Setting the Maximum Resolution 47 Using the Tilt, Swivel, and Vertical...
Dell Users Guide
Page 6
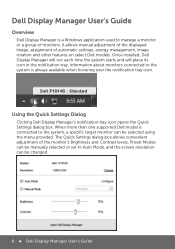
... opens the Quick Settings dialog box. Information about monitors connected to Auto Mode, and the screen resolution can be selected using the menu provided. It allows manual adjustment of the displayed image, assignment of monitors. When more than one supported Dell model is connected to the system, a specific target monitor can be manually selected or set to the system is always available when hovering over the notification tray icon. Dell Display Manager User's Guide Overview Dell Display Manager is a Windows application used...
... opens the Quick Settings dialog box. Information about monitors connected to Auto Mode, and the screen resolution can be selected using the menu provided. It allows manual adjustment of the displayed image, assignment of monitors. When more than one supported Dell model is connected to the system, a specific target monitor can be manually selected or set to the system is always available when hovering over the notification tray icon. Dell Display Manager User's Guide Overview Dell Display Manager is a Windows application used...
Dell Users Guide
Page 7
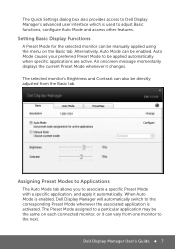
... to be enabled. The Quick Settings dialog box also provides access to Dell Display Manager's advanced user interface which is used to the corresponding Preset Mode whenever the associated application is enabled, Dell Display Manager will automatically switch to adjust Basic functions, configure Auto Mode and access other features. The selected monitor's Brightness and Contrast can also be manually applied using the menu on each connected monitor, or it can be...
... to be enabled. The Quick Settings dialog box also provides access to Dell Display Manager's advanced user interface which is used to the corresponding Preset Mode whenever the associated application is enabled, Dell Display Manager will automatically switch to adjust Basic functions, configure Auto Mode and access other features. The selected monitor's Brightness and Contrast can also be manually applied using the menu on each connected monitor, or it can be...
Dell Users Guide
Page 11
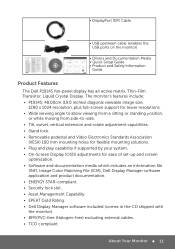
... The monitor's features include: • P1914S: 48.00cm (19.0 inches) diagonal viewable image size, 1280 x 1024 resolution, plus full-screen support for lower resolutions. • Wide viewing angle to allow viewing from a sitting or standing position, or while moving from side-to-side. • Tilt, swivel, vertical extension and rotate adjustment capabilities. • Stand lock. • Removable pedestal and Video Electronics Standards Association (VESA) 100 mm mounting holes for flexible mounting solutions. • Plug and...
... The monitor's features include: • P1914S: 48.00cm (19.0 inches) diagonal viewable image size, 1280 x 1024 resolution, plus full-screen support for lower resolutions. • Wide viewing angle to allow viewing from a sitting or standing position, or while moving from side-to-side. • Tilt, swivel, vertical extension and rotate adjustment capabilities. • Stand lock. • Removable pedestal and Video Electronics Standards Association (VESA) 100 mm mounting holes for flexible mounting solutions. • Plug and...
Dell Users Guide
Page 13
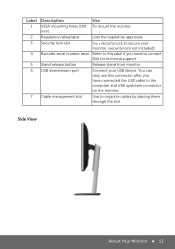
... need to the computer and USB upstream connector on the monitor. Side View About Your Monitor 13 You can only use this label if you have connected the USB cable to contact Dell for technical support. Use a security lock to organize cables by placing them through the slot. Label 1 2 3 4 5 6 7 Description VESA mounting holes (100 mm) Regulatory rating label Security lock slot Barcode serial number label Stand release button USB downstream port Cable management slot Use To mount...
... need to the computer and USB upstream connector on the monitor. Side View About Your Monitor 13 You can only use this label if you have connected the USB cable to contact Dell for technical support. Use a security lock to organize cables by placing them through the slot. Label 1 2 3 4 5 6 7 Description VESA mounting holes (100 mm) Regulatory rating label Security lock slot Barcode serial number label Stand release button USB downstream port Cable management slot Use To mount...

Dell Users Guide
Page 14
... display card or software installed in use. If the computer detects input from keyboard, mouse, or other input devices, the monitor automatically resumes functioning. Monitor Specifications The following table shows the power consumption and signaling of your USB device. Bottom View 1 23 4 56 7 Label Description Use 1 AC power connector To connect the monitor power cable. 2 DisplayPort connector To connect your computer to the monitor using a DisplayPort cable. 3 Stand lock feature To lock the stand to the monitor using a M3 x 6 mm screw (screw not included). 4 DVI connector...
... display card or software installed in use. If the computer detects input from keyboard, mouse, or other input devices, the monitor automatically resumes functioning. Monitor Specifications The following table shows the power consumption and signaling of your USB device. Bottom View 1 23 4 56 7 Label Description Use 1 AC power connector To connect the monitor power cable. 2 DisplayPort connector To connect your computer to the monitor using a DisplayPort cable. 3 Stand lock feature To lock the stand to the monitor using a M3 x 6 mm screw (screw not included). 4 DVI connector...

Dell Users Guide
Page 28
... connect the USB cable to organize the cables. 28 Setting Up the Monitor Use the cable slot on the monitor stand to the computer and complete your computer. (See bottom view for the purpose of illustration only. Connect the upstream USB port (cable supplied) to the downstream USB ports on your monitor setup: 1. Connect the USB peripherals to an appropriate USB port on the monitor. 3. Plug the power cables for your monitor displays an image, installation is complete. Appearance on the monitor...
... connect the USB cable to organize the cables. 28 Setting Up the Monitor Use the cable slot on the monitor stand to the computer and complete your computer. (See bottom view for the purpose of illustration only. Connect the upstream USB port (cable supplied) to the downstream USB ports on your monitor setup: 1. Connect the USB peripherals to an appropriate USB port on the monitor. 3. Plug the power cables for your monitor displays an image, installation is complete. Appearance on the monitor...

Dell Users Guide
Page 32
... Brightness /Contrast to open the on-screen display Menu (OSD). D Use the Exit key to choose from menu and sub-menus. 32 Operating the Monitor Front-Panel Keys Description A Use the Preset modes key to exit on-screen display (OSD) Exit from a list of the monitor to turn on the front of Preset modes preset color modes. Using the Front-Panel Controls Use the keys on the monitor. Operating the Monitor Power On the Monitor Press the button to adjust...
... Brightness /Contrast to open the on-screen display Menu (OSD). D Use the Exit key to choose from menu and sub-menus. 32 Operating the Monitor Front-Panel Keys Description A Use the Preset modes key to exit on-screen display (OSD) Exit from a list of the monitor to turn on the front of Preset modes preset color modes. Using the Front-Panel Controls Use the keys on the monitor. Operating the Monitor Power On the Monitor Press the button to adjust...

Dell Users Guide
Page 37
... set the video input mode to: • RGB: Select this option if your monitor is not RGB. Operating the Monitor 37 Push to scan for available input signals. Use the Color Settings menu to select the VGA input source. Push to adjust the monitor's color settings. Input Color Format Allows you are using the HDMI to DVI adapter. • YPbPr: Select this option if your monitor. Select DVI-D input when you are using the analog (VGA) connector. or if the DVD color output setting is connected...
... set the video input mode to: • RGB: Select this option if your monitor is not RGB. Operating the Monitor 37 Push to scan for available input signals. Use the Color Settings menu to select the VGA input source. Push to adjust the monitor's color settings. Input Color Format Allows you are using the HDMI to DVI adapter. • YPbPr: Select this option if your monitor. Select DVI-D input when you are using the analog (VGA) connector. or if the DVD color output setting is connected...
Dell Users Guide
Page 38
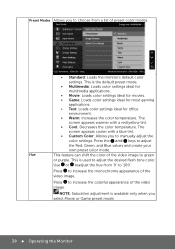
... '0' to '100'. This is available only when you select Movie or Game preset mode. 38 Operating the Monitor This is used to increase the colorful appearance of preset color modes. • Standard: Loads the monitor's default color settings. Use or toadjust the hue from a list of the video image. Press the and keys to adjust the Red, Green, and Blue values and create your own preset...
... '0' to '100'. This is available only when you select Movie or Game preset mode. 38 Operating the Monitor This is used to increase the colorful appearance of preset color modes. • Standard: Loads the monitor's default color settings. Use or toadjust the hue from a list of the video image. Press the and keys to adjust the Red, Green, and Blue values and create your own preset...

Dell Users Guide
Page 39
... can adjust the color saturation of the video image. Resets your preference. Use or to adjust the sharpness from '0' to adjust image left and right. Use the Displays Settings menu to '100'. NOTE: Saturation adjustment is avaliable only when you select Movie or Game preset mode. NOTE: Image Enhance is available only when you select Standard, Multimedia, Movie, or Game preset mode. Horizontal Position Vertical Position Sharpness Pixel Clock Phase Use or the buttons...
... can adjust the color saturation of the video image. Resets your preference. Use or to adjust the sharpness from '0' to adjust image left and right. Use the Displays Settings menu to '100'. NOTE: Saturation adjustment is avaliable only when you select Movie or Game preset mode. NOTE: Image Enhance is available only when you select Standard, Multimedia, Movie, or Game preset mode. Horizontal Position Vertical Position Sharpness Pixel Clock Phase Use or the buttons...

Dell Users Guide
Page 43
... time. Reset Other Select this option to restore default other settings, such as a shortcut Operating the Monitor 43 If an image appears to be stuck on the monitor, select LCD Conditioning to the factory preset values. NOTE: Use LCD Conditioning only when you experience a problem with image retention. Personalize Users can choose a feature from "Preset Modes", "Brightness/Contrast", "Auto Adjust", "Input Source", or "Rotation" and set it as Settings DDC/CI...
... time. Reset Other Select this option to restore default other settings, such as a shortcut Operating the Monitor 43 If an image appears to be stuck on the monitor, select LCD Conditioning to the factory preset values. NOTE: Use LCD Conditioning only when you experience a problem with image retention. Personalize Users can choose a feature from "Preset Modes", "Brightness/Contrast", "Auto Adjust", "Input Source", or "Rotation" and set it as Settings DDC/CI...
Dell Users Guide
Page 47
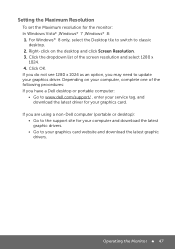
... switch to www.dell.com/support/ , enter your service tag, and download the latest driver for the monitor: In Windows Vista® ,Windows® 7 ,Windows® 8: 1. If you do not see 1280 x 1024 as an option, you are using a non-Dell computer (portable or desktop): • Go to the support site for your computer and download the latest graphic drivers. • Go to update your graphics card...
... switch to www.dell.com/support/ , enter your service tag, and download the latest driver for the monitor: In Windows Vista® ,Windows® 7 ,Windows® 8: 1. If you do not see 1280 x 1024 as an option, you are using a non-Dell computer (portable or desktop): • Go to the support site for your computer and download the latest graphic drivers. • Go to update your graphics card...

Dell Users Guide
Page 52
...-Test operation, remove all video cables from the back of the computer. Also, depending upon the selected input, one of the dialogs shown below will enter Power Save Mode after you use the previous procedure, check your video controller and computer, because your monitor is functioning properly. If your monitor and reconnect the video cable; Turn off both your computer and the monitor. Unplug the video cable from the...
...-Test operation, remove all video cables from the back of the computer. Also, depending upon the selected input, one of the dialogs shown below will enter Power Save Mode after you use the previous procedure, check your video controller and computer, because your monitor is functioning properly. If your monitor and reconnect the video cable; Turn off both your computer and the monitor. Unplug the video cable from the...

Dell Users Guide
Page 54
...; Reset the monitor to Factory Settings. • Change the video resolution to Factory Settings. • Check environmental factors. • Relocate the monitor and test in another room. No picture or no brightness • Increase brightness & contrast controls via OSD. LCD screen has spots • Cycle power on-off. • Pixel that the power button is fuzzy, blurry, • Perform Auto Adjust via OSD. • Perform monitor self-test feature check. • Check for bent or broken pins in the video cable connector...
...; Reset the monitor to Factory Settings. • Change the video resolution to Factory Settings. • Check environmental factors. • Relocate the monitor and test in another room. No picture or no brightness • Increase brightness & contrast controls via OSD. LCD screen has spots • Cycle power on-off. • Pixel that the power button is fuzzy, blurry, • Perform Auto Adjust via OSD. • Perform monitor self-test feature check. • Check for bent or broken pins in the video cable connector...

Dell Users Guide
Page 55
... Settings. • Auto Adjust via OSD. • Adjust brightness & contrast controls via OSD. For more lines available. • Reset the monitor to determine if the scrambled screen appears in self-test mode. • Check for bent or broken pins in the video cable connector. Stuck-on Pixels Brightness Problems Geometric Distortion Horizontal/Vertical Lines Synchronization Problems LCD screen has bright • Cycle power on Dell Monitor Quality and Pixel Policy, see Dell Support site at: www.dell.com/support/ monitors. NOTE: When using 'DVI-D', the positioning...
... Settings. • Auto Adjust via OSD. • Adjust brightness & contrast controls via OSD. For more lines available. • Reset the monitor to determine if the scrambled screen appears in self-test mode. • Check for bent or broken pins in the video cable connector. Stuck-on Pixels Brightness Problems Geometric Distortion Horizontal/Vertical Lines Synchronization Problems LCD screen has bright • Cycle power on Dell Monitor Quality and Pixel Policy, see Dell Support site at: www.dell.com/support/ monitors. NOTE: When using 'DVI-D', the positioning...

Dell Users Guide
Page 56
... check to Factory Settings. • Turn off the monitor, unplug the power cord, plug back, and then turn off • Ensure that the video cable connecting the monitor to Graphics or Video depending on the screen feature to PC RGB or YPbPr in use (for a long period of time Visible signs of smoke • Do not perform any or sparks troubleshooting steps. • Contact Dell immediately. Picture missing color • Perform monitor...
... check to Factory Settings. • Turn off the monitor, unplug the power cord, plug back, and then turn off • Ensure that the video cable connecting the monitor to Graphics or Video depending on the screen feature to PC RGB or YPbPr in use (for a long period of time Visible signs of smoke • Do not perform any or sparks troubleshooting steps. • Contact Dell immediately. Picture missing color • Perform monitor...

Dell Users Guide
Page 57
.... When the computer is white. Re-plug the signal cable if necessary. • Reset the computer or video player. Experience USB peripherals are pressed The picture does not fill the entire screen No picture, the LED • Check the signal source. Universal Serial Bus (USB) Specific Problems Common Symptoms What You Possible Solutions USB interface is not working USB 2.0 and USB 1.1 ports. NOTE: When choosing DVI-D mode, the Auto Adjust function is slow. connect the device directly to...
.... When the computer is white. Re-plug the signal cable if necessary. • Reset the computer or video player. Experience USB peripherals are pressed The picture does not fill the entire screen No picture, the LED • Check the signal source. Universal Serial Bus (USB) Specific Problems Common Symptoms What You Possible Solutions USB interface is not working USB 2.0 and USB 1.1 ports. NOTE: When choosing DVI-D mode, the Auto Adjust function is slow. connect the device directly to...
Dell Users Guide
Page 60
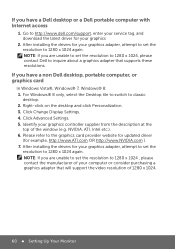
... contact Dell to inquire about a graphics adapter that will support the video resolution of 1280 x 1024. 60 Setting Up Your Monitor After installing the drivers for your graphics adapter, attempt to set the resolution to 1280 x 1024 again. NOTE: If you have a Dell desktop or a Dell portable computer with Internet access 1. Go to http://www.dell.com/support, enter your service tag, and download the latest driver for...
... contact Dell to inquire about a graphics adapter that will support the video resolution of 1280 x 1024. 60 Setting Up Your Monitor After installing the drivers for your graphics adapter, attempt to set the resolution to 1280 x 1024 again. NOTE: If you have a Dell desktop or a Dell portable computer with Internet access 1. Go to http://www.dell.com/support, enter your service tag, and download the latest driver for...


