
Reference and Installation Guide (.pdf)
Page 7
...8226; Everyone should read the first several sections of the systems or who uses a Dell OptiPlex Gn or Gn+ low-profile computer system. Warranty and Return Policy Information Dell Computer Corporation ("Dell") manufactures its hardware products from parts and components that are new or equivalent to ...2, "Using the System Setup Program," to upgrade their system to learn about the Dell warranty for anyone who want to install or remove options inside the computer, such as dual in-line memory modules (DIMMs), expansion cards, or drives. • Appendix A, "Technical Specifications...
...8226; Everyone should read the first several sections of the systems or who uses a Dell OptiPlex Gn or Gn+ low-profile computer system. Warranty and Return Policy Information Dell Computer Corporation ("Dell") manufactures its hardware products from parts and components that are new or equivalent to ...2, "Using the System Setup Program," to upgrade their system to learn about the Dell warranty for anyone who want to install or remove options inside the computer, such as dual in-line memory modules (DIMMs), expansion cards, or drives. • Appendix A, "Technical Specifications...
Reference and Installation Guide (.pdf)
Page 11
... the System Setup Program 2-2 System Setup Categories 2-4 Time 2-4 Date 2-4 Diskette Drive A and Diskette Drive B 2-4 Drives: Primary and Secondary 2-4 EIDE Devices 2-5 If You Have a Problem 2-5 Reserved Memory 2-5 CPU Speed 2-6 Num Lock 2-6 Keyboard Errors 2-6 System Password 2-6 xiii
... the System Setup Program 2-2 System Setup Categories 2-4 Time 2-4 Date 2-4 Diskette Drive A and Diskette Drive B 2-4 Drives: Primary and Secondary 2-4 EIDE Devices 2-5 If You Have a Problem 2-5 Reserved Memory 2-5 CPU Speed 2-6 Num Lock 2-6 Keyboard Errors 2-6 System Password 2-6 xiii
Reference and Installation Guide (.pdf)
Page 14
Inside Your Computer 5-4 Jumpers 5-4 System Board Labels 5-8 Chapter 6 Installing System Board Options 6-1 Expansion Cards 6-2 Expansion Slots 6-2 Installing an Expansion Card 6-2 Removing an Expansion Card 6-4 Adding Memory 6-4 Performing a Memory Upgrade 6-5 Installing a DIMM 6-6 Removing a DIMM 6-6 Upgrading the Microprocessor 6-6 Replacing the System Battery 6-9 Chapter 7 Installing Drives 7-1 Removing and Replacing Front-Panel Inserts 7-1 EIDE Drive Addressing 7-2 Connecting...
Inside Your Computer 5-4 Jumpers 5-4 System Board Labels 5-8 Chapter 6 Installing System Board Options 6-1 Expansion Cards 6-2 Expansion Slots 6-2 Installing an Expansion Card 6-2 Removing an Expansion Card 6-4 Adding Memory 6-4 Performing a Memory Upgrade 6-5 Installing a DIMM 6-6 Removing a DIMM 6-6 Upgrading the Microprocessor 6-6 Replacing the System Battery 6-9 Chapter 7 Installing Drives 7-1 Removing and Replacing Front-Panel Inserts 7-1 EIDE Drive Addressing 7-2 Connecting...
Reference and Installation Guide (.pdf)
Page 19
... unreliable. Plug and Play support included in your initial requirements and then add Dell-supported upgrades as necessary. See "Adding Memory" in -line memory modules (DIMMs). Chapter 1 Introduction Dell® OptiPlex® Gn and Gn+ low-profile systems are SMART-compliant. • Full compliance with 512 KB... Analysis Reporting Technology (SMART) support, which warns you to your computer. All hard-disk drives shipped with OptiPlex Gn or Gn+ systems are high-speed, expandable personal computers designed around Intel® Pentium® microprocessors.
... unreliable. Plug and Play support included in your initial requirements and then add Dell-supported upgrades as necessary. See "Adding Memory" in -line memory modules (DIMMs). Chapter 1 Introduction Dell® OptiPlex® Gn and Gn+ low-profile systems are SMART-compliant. • Full compliance with 512 KB... Analysis Reporting Technology (SMART) support, which warns you to your computer. All hard-disk drives shipped with OptiPlex Gn or Gn+ systems are high-speed, expandable personal computers designed around Intel® Pentium® microprocessors.
Reference and Installation Guide (.pdf)
Page 20
... the Asset Tag utility and viewed on by default, provide a single connection point for diskette drives, and automatic display of video memory. NOTE: An optional Wakeup On LAN-capable network card is required to 33 MB/sec. • Two high-performance serial ports... to provide faster data throughput. Each interface supports high-capacity EIDE drives, as well as devices such as maximizing your system is included with Dell OptiPlex Gn+ systems (which supports a 3.5-inch diskette drive and, optionally, a second diskette drive or tape drive. • Enhanced integrated drive electronics ...
... the Asset Tag utility and viewed on by default, provide a single connection point for diskette drives, and automatic display of video memory. NOTE: An optional Wakeup On LAN-capable network card is required to 33 MB/sec. • Two high-performance serial ports... to provide faster data throughput. Each interface supports high-capacity EIDE drives, as well as devices such as maximizing your system is included with Dell OptiPlex Gn+ systems (which supports a 3.5-inch diskette drive and, optionally, a second diskette drive or tape drive. • Enhanced integrated drive electronics ...
Reference and Installation Guide (.pdf)
Page 27
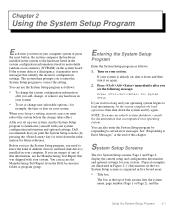
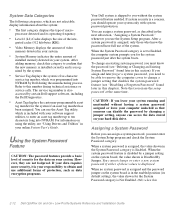
...button, the system compares the hardware installed in the system to the hardware listed in the system configuration information stored in nonvolatile random-access memory (NVRAM) on again. 2. NOTE: To ensure an orderly system shutdown, consult the documentation that you set or change , or remove ... Each time you to enter the System Setup program to correct the setting. You can access the Manufacturing Test Report from the Dell Accessories folder or program group. Press immediately after you add, change user-selectable options-for System Setup If you are illustrated in...
...button, the system compares the hardware installed in the system to the hardware listed in the system configuration information stored in nonvolatile random-access memory (NVRAM) on again. 2. NOTE: To ensure an orderly system shutdown, consult the documentation that you set or change , or remove ... Each time you to enter the System Setup program to correct the setting. You can access the Manufacturing Test Report from the Dell Accessories folder or program group. Press immediately after you add, change user-selectable options-for System Setup If you are illustrated in...
Reference and Installation Guide (.pdf)
Page 29
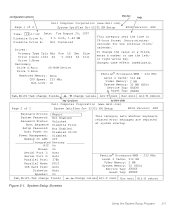
...512 KB Video Memory: 2 MB System Memory: 32 MB (EDO) Service Tag: XXXXX Asset Tag: XXXXX Tab,Shift-Tab change fields change values Alt-P next Esc exit Alt-B reboot key functions system data Dell Computer Corporation (www.dell.com) Page 2 of 2 Dell Computer Corporation (www.dell.com) System OptiPlex Gn+ 5233L EM... Device Drive 1:None Reserved Memory: None CPU Speed: 233 MHz Num Lock: On Size 2111 This category sets the time in a field, enter a number or use the leftor right-arrow key. configuration options title box help Page 1 of 2 System OptiPlex Gn+ 5233L EM Setup BIOS ...
...512 KB Video Memory: 2 MB System Memory: 32 MB (EDO) Service Tag: XXXXX Asset Tag: XXXXX Tab,Shift-Tab change fields change values Alt-P next Esc exit Alt-B reboot key functions system data Dell Computer Corporation (www.dell.com) Page 2 of 2 Dell Computer Corporation (www.dell.com) System OptiPlex Gn+ 5233L EM... Device Drive 1:None Reserved Memory: None CPU Speed: 233 MHz Num Lock: On Size 2111 This category sets the time in a field, enter a number or use the leftor right-arrow key. configuration options title box help Page 1 of 2 System OptiPlex Gn+ 5233L EM Setup BIOS ...
Reference and Installation Guide (.pdf)
Page 31
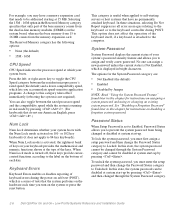
... mean that your system, access the Manufacturing Test Report from the Dell Accessories folder or program group. To do so, highlight the appropriate drive category (Drive 0 or Drive 1) and type u to Auto. Reserved Memory Reserved Memory allows you to designate a region of the parameter fields in the...card. If you can press the right- You should not enable the reserved memory feature unless you can enter your configuration. Also, the USR1 and USR2 drive types cannot be supplied by Dell when you reboot the system, the System Setup program automatically sets the correct...
... mean that your system, access the Manufacturing Test Report from the Dell Accessories folder or program group. To do so, highlight the appropriate drive category (Drive 0 or Drive 1) and type u to Auto. Reserved Memory Reserved Memory allows you to designate a region of the parameter fields in the...card. If you can press the right- You should not enable the reserved memory feature unless you can enter your configuration. Also, the USR1 and USR2 drive types cannot be supplied by Dell when you reboot the system, the System Setup program automatically sets the correct...
Reference and Installation Guide (.pdf)
Page 32
... be changed through the System Password category. 2-6 Dell OptiPlex Gn and Gn+ Low-Profile Systems Reference and Installation Guide Keyboard Errors Keyboard Errors enables or disables reporting of keyboard errors during POST. In these keys provide cursorcontrol functions according to Locked. Selecting the 15M - 16M option in -line memory modules (DIMMs) on 101- The Reserved...
... be changed through the System Password category. 2-6 Dell OptiPlex Gn and Gn+ Low-Profile Systems Reference and Installation Guide Keyboard Errors Keyboard Errors enables or disables reporting of keyboard errors during POST. In these keys provide cursorcontrol functions according to Locked. Selecting the 15M - 16M option in -line memory modules (DIMMs) on 101- The Reserved...

Reference and Installation Guide (.pdf)
Page 33
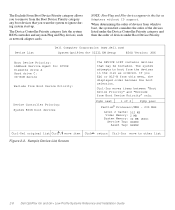
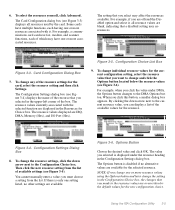
... allows you to select a boot device from a list of the System Setup screens Moves the selected item from the Plug and Play option read-only memory (ROM) devices in the order found . Table 2-2 lists other The Device List screen (see Figure 2-2) provides three categories for the files that it does not... from the CD-ROM drive, and finally from one Boot Device Priority list to load. If it finds a diskette that are controlled by loading into memory a small program, which your system and set to boot from these devices.
... allows you to select a boot device from a list of the System Setup screens Moves the selected item from the Plug and Play option read-only memory (ROM) devices in the order found . Table 2-2 lists other The Device List screen (see Figure 2-2) provides three categories for the files that it does not... from the CD-ROM drive, and finally from one Boot Device Priority list to load. If it finds a diskette that are controlled by loading into memory a small program, which your system and set to boot from these devices.
Reference and Installation Guide (.pdf)
Page 34
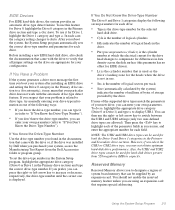
... as Adapters without ID support. NOTE: Non-Plug and Play devices appear in the list as ordered. Sample Device List Screen 2-8 Dell OptiPlex Gn and Gn+ Low-Profile Systems Reference and Installation Guide The Exclude From Boot Device Priority category allows you to remove from the Boot Device Priority ... may be bootable. When determining the order of 2 PgUp prev Pentium® Processor/MMX - 233 MHz Level 2 Cache: 512 KB Video Memory: 2 MB System Memory: 32 MB (EDO) Service Tag: XXXXX Asset Tag: XXXXX Ctrl-Del original list Ctrl , move item Ctrl return Ctrl-Ins move to...
... as Adapters without ID support. NOTE: Non-Plug and Play devices appear in the list as ordered. Sample Device List Screen 2-8 Dell OptiPlex Gn and Gn+ Low-Profile Systems Reference and Installation Guide The Exclude From Boot Device Priority category allows you to remove from the Boot Device Priority ... may be bootable. When determining the order of 2 PgUp prev Pentium® Processor/MMX - 233 MHz Level 2 Cache: 512 KB Video Memory: 2 MB System Memory: 32 MB (EDO) Service Tag: XXXXX Asset Tag: XXXXX Ctrl-Del original list Ctrl , move item Ctrl return Ctrl-Ins move to...
Reference and Installation Guide (.pdf)
Page 38
... the System Setup program and check the System Password category. Only when this category to this section). After adding memory, check this 2-12 Dell OptiPlex Gn and Gn+ Low-Profile Systems Reference and Installation Guide For information on the system board is in the enabled position (its ...five-character service tag number, which is displayed. If system security is Enabled. You cannot change a jumper setting that the new memory is installed correctly and is assigned, only those who know the password (see "Disabling a Forgotten Password" found later in this chapter...
... the System Setup program and check the System Password category. Only when this category to this section). After adding memory, check this 2-12 Dell OptiPlex Gn and Gn+ Low-Profile Systems Reference and Installation Guide For information on the system board is in the enabled position (its ...five-character service tag number, which is displayed. If system security is Enabled. You cannot change a jumper setting that the new memory is installed correctly and is assigned, only those who know the password (see "Disabling a Forgotten Password" found later in this chapter...
Reference and Installation Guide (.pdf)
Page 42
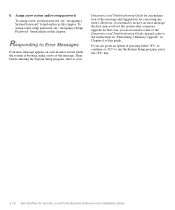
... found earlier in Chapter 6 of pressing either to continue or to receive an error message the first time you boot the system after a memory upgrade. If you do not need to refer to the Diagnostics and Troubleshooting Guide; To assign a new system password, see "Assigning a Setup...is normal to run the System Setup program, press the key. 2-16 Dell OptiPlex Gn and Gn+ Low-Profile Systems Reference and Installation Guide Then, before entering the System Setup program, refer to the instructions in "Performing a Memory Upgrade" in this chapter. However, it is booting, make a note ...
... found earlier in Chapter 6 of pressing either to continue or to receive an error message the first time you boot the system after a memory upgrade. If you do not need to refer to the Diagnostics and Troubleshooting Guide; To assign a new system password, see "Assigning a Setup...is normal to run the System Setup program, press the key. 2-16 Dell OptiPlex Gn and Gn+ Low-Profile Systems Reference and Installation Guide Then, before entering the System Setup program, refer to the instructions in "Performing a Memory Upgrade" in this chapter. However, it is booting, make a note ...
Reference and Installation Guide (.pdf)
Page 47
... are available for Choice box. Then click the new resource setting from the list. If there is disabled if no alternative values are IRQ, DMA, Memory (Hex), and I/O Port (Hex). Options Button Choose the desired value and click OK. The Options button is only one or more resource values using the...
... are available for Choice box. Then click the new resource setting from the list. If there is disabled if no alternative values are IRQ, DMA, Memory (Hex), and I/O Port (Hex). Options Button Choose the desired value and click OK. The Options button is only one or more resource values using the...
Reference and Installation Guide (.pdf)
Page 48
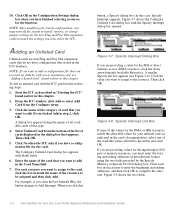
... want to complete the selection. For example, if you have finished selecting resources for the IRQ or direct memory access (DMA) resource, click the down arrow beneath Available Resources. To add an unlisted card with blank ...Memory or Specify I /O) port or memory resources, you want to assign to install, remove, or change jumper settings on diskette with the Specify Interrupt dialog box opened. Click each resource you must turn off the system to the resource. Select Unlisted Card from the Configure menu. 3. Figure 3-9 shows the two fields. 3-6 Dell OptiPlex Gn and Gn...
... want to complete the selection. For example, if you have finished selecting resources for the IRQ or direct memory access (DMA) resource, click the down arrow beneath Available Resources. To add an unlisted card with blank ...Memory or Specify I /O) port or memory resources, you want to assign to install, remove, or change jumper settings on diskette with the Specify Interrupt dialog box opened. Click each resource you must turn off the system to the resource. Select Unlisted Card from the Configure menu. 3. Figure 3-9 shows the two fields. 3-6 Dell OptiPlex Gn and Gn...
Reference and Installation Guide (.pdf)
Page 50
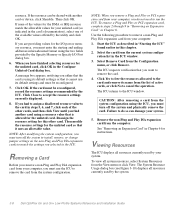
...ICU. The ICU returns to remove the card. 4. Viewing Resources The ICU displays all resources currently used by the system. 3-8 Dell OptiPlex Gn and Gn+ Low-Profile Systems Reference and Installation Guide Then modify the resource settings for instructions. To remove a Plug and Play or PCI ...Figure 3-10) displays all system resources, select System Resources from the list of the available values offered by the Specify Memory or Specify I /O port or memory resource, you either that the card is allowed for your computer: 1. resource. Click OK. Remove the non-Plug...
...ICU. The ICU returns to remove the card. 4. Viewing Resources The ICU displays all resources currently used by the system. 3-8 Dell OptiPlex Gn and Gn+ Low-Profile Systems Reference and Installation Guide Then modify the resource settings for instructions. To remove a Plug and Play or PCI ...Figure 3-10) displays all system resources, select System Resources from the list of the available values offered by the Specify Memory or Specify I /O port or memory resource, you either that the card is allowed for your computer: 1. resource. Click OK. Remove the non-Plug...
Reference and Installation Guide (.pdf)
Page 51
... PCI expansion card. Complete steps 2 through 9 in "Installing an Expansion Card" in question and then click Used By Card. If you to nonvolatile random-access memory (NVRAM) as static device drivers. System Resource Usage Dialog Box To determine which means that enables you have made any of the ICU is valid...
... PCI expansion card. Complete steps 2 through 9 in "Installing an Expansion Card" in question and then click Used By Card. If you to nonvolatile random-access memory (NVRAM) as static device drivers. System Resource Usage Dialog Box To determine which means that enables you have made any of the ICU is valid...
Reference and Installation Guide (.pdf)
Page 67
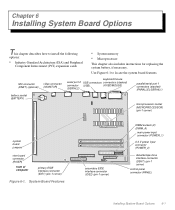
... the system board features. Use Figure 6-1 to install the following options: • Industry-Standard Architecture (ISA) and Peripheral Component Interconnect (PCI) expansion cards • System memory • Microprocessor This chapter also includes instructions for replacing the system battery, if necessary.
... the system board features. Use Figure 6-1 to install the following options: • Industry-Standard Architecture (ISA) and Peripheral Component Interconnect (PCI) expansion cards • System memory • Microprocessor This chapter also includes instructions for replacing the system battery, if necessary.

Reference and Installation Guide (.pdf)
Page 70
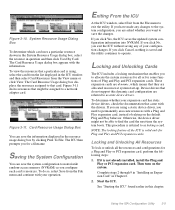
... of the system. DIMMs (2) DIMM sockets (2) Figure 6-6. Adding Memory Memory can support nonparity extended-data out (EDO) DIMMs. . See Chapter 3, "Using the ISA Configuration Utility," for each configuration. 6-4 Dell OptiPlex Gn and Gn+ Low-Profile Systems Reference and Installation Guide Remove the expansion-card...can be increased to maintain Federal Communications Commission (FCC) certification of 16-, 32-, 64-, or 128-MB dual in-line memory modules (DIMMs) in Chapter 5. Removing an Expansion Card Follow this guide. 3. Remove the computer cover as instructed in ...
... of the system. DIMMs (2) DIMM sockets (2) Figure 6-6. Adding Memory Memory can support nonparity extended-data out (EDO) DIMMs. . See Chapter 3, "Using the ISA Configuration Utility," for each configuration. 6-4 Dell OptiPlex Gn and Gn+ Low-Profile Systems Reference and Installation Guide Remove the expansion-card...can be increased to maintain Federal Communications Commission (FCC) certification of 16-, 32-, 64-, or 128-MB dual in-line memory modules (DIMMs) in Chapter 5. Removing an Expansion Card Follow this guide. 3. Remove the computer cover as instructed in ...

Reference and Installation Guide (.pdf)
Page 71
... consecutive sockets starting with socket A. The system should have already changed . Run the Dell Diagnostics to reflect the newly installed memory. After the system completes the power-on running the Dell Diagnostics and troubleshooting any problems that the DIMMs are seated properly in their sockets. Install... MB 128 MB 64 MB 256 MB 128 MB 128 MB NOTES: For optimum performance, install DIMMs in nonvolatile random-access memory (NVRAM), and generates the following message: The amount of all installed DIMMs, including those you will install DIMMs or replace ...
... consecutive sockets starting with socket A. The system should have already changed . Run the Dell Diagnostics to reflect the newly installed memory. After the system completes the power-on running the Dell Diagnostics and troubleshooting any problems that the DIMMs are seated properly in their sockets. Install... MB 128 MB 64 MB 256 MB 128 MB 128 MB NOTES: For optimum performance, install DIMMs in nonvolatile random-access memory (NVRAM), and generates the following message: The amount of all installed DIMMs, including those you will install DIMMs or replace ...


