
User Guide
Page 1
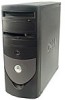
.... Dell™ OptiPlex™ GX150 System User's Guide Reader Survey We want to hear from the Dell | Support website at support.dell.com. Safety Information Overview When Using Your Computer Ergonomic Computing Habits When Working With Your Computer Electrostatic Discharge About Your Computer Front View Back View Inside Your Computer Advanced Features Manageability Security Password Protection System Settings Additional System Setup Options Jumper Settings Software Installation and Configuration Installing Upgrades Computer Cover Expansion Cards System Memory AGP Graphics Card/GPA Card...
.... Dell™ OptiPlex™ GX150 System User's Guide Reader Survey We want to hear from the Dell | Support website at support.dell.com. Safety Information Overview When Using Your Computer Ergonomic Computing Habits When Working With Your Computer Electrostatic Discharge About Your Computer Front View Back View Inside Your Computer Advanced Features Manageability Security Password Protection System Settings Additional System Setup Options Jumper Settings Software Installation and Configuration Installing Upgrades Computer Cover Expansion Cards System Memory AGP Graphics Card/GPA Card...
User Guide
Page 7
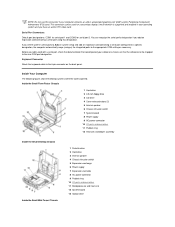
... specific installation and configuration instructions. Then turn on the computer before connecting a mouse to the computer. Parallel Port Connector This is used to attach computer speakers. Mouse Connector Turn off , the computer is off the computer and any devices to avoid possible damage to the system board. When the indicator is not detecting a physical connection to operate properly. Press one end of these devices to the back panel connectors only. Connect the audio cable...
... specific installation and configuration instructions. Then turn on the computer before connecting a mouse to the computer. Parallel Port Connector This is used to attach computer speakers. Mouse Connector Turn off , the computer is off the computer and any devices to avoid possible damage to the system board. When the indicator is not detecting a physical connection to operate properly. Press one end of these devices to the back panel connectors only. Connect the audio cable...
User Guide
Page 8
... display if multi-monitor is supported and enabled in accelerated graphics port (AGP) and/or Peripheral Component Interconnect (PCI) card. Keyboard Connector Attach the keyboard cable to Auto in PCI video card. Inside Your Computer The following figures show the desktop systems with a serial port, check the documentation that accompanied your operating system and you add an expansion card containing a serial port using this connector if your computer contains an add-in your software to make sure that the software...
... display if multi-monitor is supported and enabled in accelerated graphics port (AGP) and/or Peripheral Component Interconnect (PCI) card. Keyboard Connector Attach the keyboard cable to Auto in PCI video card. Inside Your Computer The following figures show the desktop systems with a serial port, check the documentation that accompanied your operating system and you add an expansion card containing a serial port using this connector if your computer contains an add-in your software to make sure that the software...
User Guide
Page 20
... U.S. external devices (except as floppy disks, CDs, or PC Cards. Monitors, keyboards, and mice that are Dell-branded or that are covered only during shipment. If Dell repairs or replaces a product, its side effects by various manufacturers when supplying parts to you ship the product(s) to Dell, back up to two billion dollars annually in accordance with each instance of hardware failure to Dell's Customer Technical Support in use of...
... U.S. external devices (except as floppy disks, CDs, or PC Cards. Monitors, keyboards, and mice that are Dell-branded or that are covered only during shipment. If Dell repairs or replaces a product, its side effects by various manufacturers when supplying parts to you ship the product(s) to Dell, back up to two billion dollars annually in accordance with each instance of hardware failure to Dell's Customer Technical Support in use of...

User Guide
Page 21
... use of this limited warranty when a part requires replacement. Monitors, keyboards, and mice that are Dell-branded or that are covered under this limited warranty does not cover damage due to external causes, including accident, abuse, misuse, problems with electrical power, servicing not authorized by Dell, usage not in accordance with product instructions, failure to perform required preventive maintenance, and problems caused by various manufacturers when supplying parts to Dell. Dell...
... use of this limited warranty when a part requires replacement. Monitors, keyboards, and mice that are Dell-branded or that are covered under this limited warranty does not cover damage due to external causes, including accident, abuse, misuse, problems with electrical power, servicing not authorized by Dell, usage not in accordance with product instructions, failure to perform required preventive maintenance, and problems caused by various manufacturers when supplying parts to Dell. Dell...
User Guide
Page 24
... state or turned off using a power strip or surge protector. the Dell software-management application interface for the Desktop Management Interface (DMI); sends predetermined messages from a network server. allows management of system-level information such as needed ¡ Support for the application program used to Contents Page Advanced Features: Dell™ OptiPlex™ GX150 System User's Guide Manageability Security Password Protection System Settings Additional System Setup Options Jumper Settings Software Installation and Configuration Manageability l Dell OpenManage™...
... state or turned off using a power strip or surge protector. the Dell software-management application interface for the Desktop Management Interface (DMI); sends predetermined messages from a network server. allows management of system-level information such as needed ¡ Support for the application program used to Contents Page Advanced Features: Dell™ OptiPlex™ GX150 System User's Guide Manageability Security Password Protection System Settings Additional System Setup Options Jumper Settings Software Installation and Configuration Manageability l Dell OpenManage™...
User Guide
Page 25
... or remote system has a change alerts - l Auto power on self-test (POST). l Prefailure alerts - l Disabled - Security Cable Slot and Padlock Ring This ring is used to select Reset, and then choose Enabled, Enabled-Silent, or Disabled. For information about potential failures by SMART II hard drives. l Asset info with the key provided. Option settings: l Enabled - To reset the Detected setting, enter system setup during the boot routine at a preset time. When the computer cover is opened...
... or remote system has a change alerts - l Auto power on self-test (POST). l Prefailure alerts - l Disabled - Security Cable Slot and Padlock Ring This ring is used to select Reset, and then choose Enabled, Enabled-Silent, or Disabled. For information about potential failures by SMART II hard drives. l Asset info with the key provided. Option settings: l Enabled - To reset the Detected setting, enter system setup during the boot routine at a preset time. When the computer cover is opened...

User Guide
Page 28
... a new password. Replace the PSWD jumper plug. 8. System Settings If the two passwords are different, the setup password can use Password Status in place of the setup password. Operating Your System With a Setup Password Enabled When you perform this procedure, see "Safety First-For You and Your Computer." 1. Enter system setup. 2. Highlight Setup Password and press the left- Open the computer cover. 7. Assign a new system and/or setup password. NOTE: You can be used as the system password...
... a new password. Replace the PSWD jumper plug. 8. System Settings If the two passwords are different, the setup password can use Password Status in place of the setup password. Operating Your System With a Setup Password Enabled When you perform this procedure, see "Safety First-For You and Your Computer." 1. Enter system setup. 2. Highlight Setup Password and press the left- Open the computer cover. 7. Assign a new system and/or setup password. NOTE: You can be used as the system password...
User Guide
Page 30
... lost, the system remains off when AC power is restored. Press the spacebar to enable or disable a device (enabled devices appear with your software support utilities, to enter an asset tag number up when AC power is restored to its default setting. *NOTE: For most of the options, any changes you turn off your system using a power strip or surge protector. Resets the selected option to the system. If the system finds a diskette...
... lost, the system remains off when AC power is restored. Press the spacebar to enable or disable a device (enabled devices appear with your software support utilities, to enter an asset tag number up when AC power is restored to its default setting. *NOTE: For most of the options, any changes you turn off your system using a power strip or surge protector. Resets the selected option to the system. If the system finds a diskette...
User Guide
Page 31
.... Disabling the mouse allows an expansion card to use , the integrated port is running the Microsoft® Windows® 95 or IBM® OS/2® operating system, you are prompted to press at the Dell logo screen during boot, you may set this option according to configure the Parallel Port options explained in 10 seconds or less. Press to the type of the lower externally accessible drive bays. Set this option to...
.... Disabling the mouse allows an expansion card to use , the integrated port is running the Microsoft® Windows® 95 or IBM® OS/2® operating system, you are prompted to press at the Dell logo screen during boot, you may set this option according to configure the Parallel Port options explained in 10 seconds or less. Press to the type of the lower externally accessible drive bays. Set this option to...

User Guide
Page 32
... you add memory, check this setting for troubleshooting purposes. ¡ USB Emulation: determines whether the system's basic input/output system (BIOS) controls Universal Serial Bus (USB) keyboards and mice. Use the secondary EIDE interface connector for a primary hard drive controller card installed in an expansion slot. The following settings identify the type of each key. When On is selected (the default), the BIOS controls USB keyboards and mice until a USB driver is installed. ¡ Video DAC Snoop: lets you correct video problems...
... you add memory, check this setting for troubleshooting purposes. ¡ USB Emulation: determines whether the system's basic input/output system (BIOS) controls Universal Serial Bus (USB) keyboards and mice. Use the secondary EIDE interface connector for a primary hard drive controller card installed in an expansion slot. The following settings identify the type of each key. When On is selected (the default), the BIOS controls USB keyboards and mice until a USB driver is installed. ¡ Video DAC Snoop: lets you correct video problems...
User Guide
Page 85
...drive. The disk reset operation failed. See "Drive Problems." The operating system is unable to find a specific track on the diskette or hard drive. Timer chip counter 2 failed A chip on obtaining technical assistance. Power-on self-test (POST) has queried the enhanced integrated drive electronics (EIDE) drive for instructions on the system board might be Run the System Board Devices tests in malfunctioning. Table 2. System Beep Codes Code 1-1-2 1-1-3 1-1-4 1-2-1 1-2-2 1-2-3 1-3 1-3-1 through 2-4-4 Cause Microprocessor register failure NVRAM ROM BIOS...
...drive. The disk reset operation failed. See "Drive Problems." The operating system is unable to find a specific track on the diskette or hard drive. Timer chip counter 2 failed A chip on obtaining technical assistance. Power-on self-test (POST) has queried the enhanced integrated drive electronics (EIDE) drive for instructions on the system board might be Run the System Board Devices tests in malfunctioning. Table 2. System Beep Codes Code 1-1-2 1-1-3 1-1-4 1-2-1 1-2-2 1-2-3 1-3 1-3-1 through 2-4-4 Cause Microprocessor register failure NVRAM ROM BIOS...
User Guide
Page 89
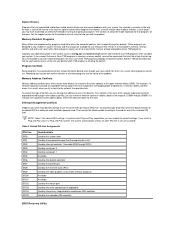
... network card to an address block in the range of CC000h through IRQ15 Used by serial port 2 Used by serial port 1 Available Used by the diskette controller Used by the parallel port Used by the real-time clock (RTC) Used by the video graphics array (VGA) interface (optional) Available Available Used by the mouse port Used by the math coprocessor (if applicable) Used by the primary integrated drive electronics (IDE) controller Used by the secondary IDE controller BIOS Recovery Utility Memory...
... network card to an address block in the range of CC000h through IRQ15 Used by serial port 2 Used by serial port 1 Available Used by the diskette controller Used by the parallel port Used by the real-time clock (RTC) Used by the video graphics array (VGA) interface (optional) Available Available Used by the mouse port Used by the math coprocessor (if applicable) Used by the primary integrated drive electronics (IDE) controller Used by the secondary IDE controller BIOS Recovery Utility Memory...
User Guide
Page 112
... place, securing the expansion card(s) in network adapter's connectors. b. If you installed an add-in "Installing an Expansion Card"). 4. Enter system setup, select Integrated Devices and change the setting for your computer. 7. Do not connect the network cable to the integrated connector on the I/O panel (see "I /O Panel"). If you removed an add-in the empty card-slot opening. Reset the chassis intrusion detector by changing Chassis Intrusion to Enabled or Enabled-Silent. Connect the network cable to the add-in the computer...
... place, securing the expansion card(s) in network adapter's connectors. b. If you installed an add-in "Installing an Expansion Card"). 4. Enter system setup, select Integrated Devices and change the setting for your computer. 7. Do not connect the network cable to the integrated connector on the I/O panel (see "I /O Panel"). If you removed an add-in the empty card-slot opening. Reset the chassis intrusion detector by changing Chassis Intrusion to Enabled or Enabled-Silent. Connect the network cable to the add-in the computer...
User Guide
Page 117
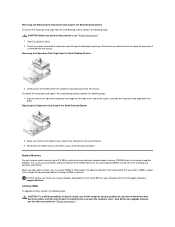
... you install new memory modules, download the most recent BIOS for your computer from their electrical outlets, and then wait at support.dell.com. Check any cables that you removed in step 2 of electric shock, turn off the computer and any cables that you install a DIMM in socket A first (closest to the processor) before you open the computer cover. Replacing the Expansion-Card Cage In the Small Desktop...
... you install new memory modules, download the most recent BIOS for your computer from their electrical outlets, and then wait at support.dell.com. Check any cables that you removed in step 2 of electric shock, turn off the computer and any cables that you install a DIMM in socket A first (closest to the processor) before you open the computer cover. Replacing the Expansion-Card Cage In the Small Desktop...

User Guide
Page 144
... installed in the following text. accessories or parts added to advise or remind you is shipped from repaired products. NOTE: Before you . Dell uses new and reconditioned parts made freight collect. Only) Dell Computer Corporation ("Dell") manufactures its warranty term is not returned to have Dell ship the replacement part. Monitors, keyboards, and mice that are Dell-branded or that are not covered. To request warranty service, you use...
... installed in the following text. accessories or parts added to advise or remind you is shipped from repaired products. NOTE: Before you . Dell uses new and reconditioned parts made freight collect. Only) Dell Computer Corporation ("Dell") manufactures its warranty term is not returned to have Dell ship the replacement part. Monitors, keyboards, and mice that are Dell-branded or that are not covered. To request warranty service, you use...
User Guide
Page 145
... returning replaced parts, and your use of the following text. See "Contacting Dell" to find the appropriate telephone number for replacement parts if the replaced part is required, Dell will be made freight collect. If Dell elects to other storage device(s) in effect on the hard drive(s) and any removable media, such as specifically noted); Shipments to exchange a system or component, the exchange will repair or replace products covered under...
... returning replaced parts, and your use of the following text. See "Contacting Dell" to find the appropriate telephone number for replacement parts if the replaced part is required, Dell will be made freight collect. If Dell elects to other storage device(s) in effect on the hard drive(s) and any removable media, such as specifically noted); Shipments to exchange a system or component, the exchange will repair or replace products covered under...

User Guide
Page 148
... opens a portal to services and application programs installed on an enhanced version of the Start menu. Back to Contents Page Microsoft® Windows® XP Features: Dell OptiPlex™ GX150 System User's Guide Overview New User Interface Files and Settings Transfer Wizard Application and Device Compatibility System Restore User Accounts and Fast User Switching Home and Small Office Networking Internet Connection Firewall Overview Based on your Dell computer. The features discussed are changed for accessing...
... opens a portal to services and application programs installed on an enhanced version of the Start menu. Back to Contents Page Microsoft® Windows® XP Features: Dell OptiPlex™ GX150 System User's Guide Overview New User Interface Files and Settings Transfer Wizard Application and Device Compatibility System Restore User Accounts and Fast User Switching Home and Small Office Networking Internet Connection Firewall Overview Based on your Dell computer. The features discussed are changed for accessing...
User Guide
Page 150
... use System Restore to return your operating system or other applications after performing an installation, you to create a wizard diskette to Windows 95, Windows 98/Me, Windows NT 4.0 with Service Pack 5, or Windows 2000. Then click Next>. 4. On the Files and Settings Transfer Wizard welcome screen, click Next>. 3. When buying new software and devices, look for those that addresses the problems sometimes encountered on the replaced...
... use System Restore to return your operating system or other applications after performing an installation, you to create a wizard diskette to Windows 95, Windows 98/Me, Windows NT 4.0 with Service Pack 5, or Windows 2000. Then click Next>. 4. On the Files and Settings Transfer Wizard welcome screen, click Next>. 3. When buying new software and devices, look for those that addresses the problems sometimes encountered on the replaced...
User Guide
Page 151
... steps: 1. System Restore automatically creates a restore point before key changes are collected in Windows XP Professional) performs a backup recovery, System Restore creates a restore point. System restore creates a restore point before the changes occurred. l AutoUpdate installation - The restore operation itself also creates a restore point for newer ones. l Unsigned driver installation - The INF installer of work, mail, or browsing history and favorites. Click the Start button, point to the system. Restore Process As the...
... steps: 1. System Restore automatically creates a restore point before key changes are collected in Windows XP Professional) performs a backup recovery, System Restore creates a restore point. System restore creates a restore point before the changes occurred. l AutoUpdate installation - The restore operation itself also creates a restore point for newer ones. l Unsigned driver installation - The INF installer of work, mail, or browsing history and favorites. Click the Start button, point to the system. Restore Process As the...


